
Can you paint stained kitchen cabinets? Yes, you absolutely can paint stained kitchen cabinets! Refinishing stained cabinets by painting them is a fantastic way to update your kitchen’s look without the huge expense of replacing them. This guide will walk you through the entire process of kitchen cabinet painting over stain, from preparation to the final coat, making it a manageable DIY project even for beginners. Painting stained wood cabinets can transform your space, and with the right steps, you’ll achieve a durable, beautiful finish.
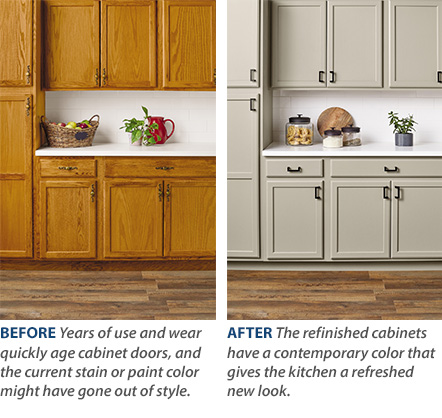
Image Source: images.sherwin-williams.com
Why Paint Stained Kitchen Cabinets?
Stained kitchen cabinets, while often beautiful, can sometimes feel dated or not match your current kitchen style. Painting stained wood cabinets offers a fresh, modern look and is a budget-friendly alternative to replacing them entirely. It’s a popular DIY cabinet refinishing stained project for many homeowners looking to refresh their living spaces. Painting dark stained cabinets, in particular, can brighten up a kitchen and make it feel larger and more airy.
Benefits of Painting Stained Cabinets:
- Cost-Effective: Significantly cheaper than new cabinets.
- Style Update: Completely changes the look and feel of your kitchen.
- Customization: Allows you to choose any color to match your decor.
- Durable Finish: With proper preparation and paint, the finish can last for years.
- Satisfying DIY Project: Achieve a professional look with your own hands.
Comprehending the Cabinet Painting Process: Stained Wood
Painting stained wood cabinets requires careful preparation to ensure the paint adheres properly and creates a lasting, smooth finish. This process involves several key stages, each crucial for the overall success of your kitchen cabinet painting over stain project.
Essential Tools and Materials:
Gathering all your supplies before you begin will make the process much smoother. Here’s a comprehensive list for painting stained kitchen cabinets:
- Screwdriver or Drill: To remove cabinet doors and hardware.
- Painter’s Tape: High-quality tape for clean lines.
- Drop Cloths or Old Sheets: To protect your floors and countertops.
- Sanding Blocks or Electric Sander: For prepping the surface.
- Sanding Sponges: For reaching tight corners.
- Degreaser or TSP (Trisodium Phosphate) Substitute: For thorough cleaning.
- Clean Rags or Sponges: For cleaning and wiping.
- Primer: High-quality stain-blocking primer is essential.
- Paint: Cabinet-grade paint (alkyd enamel, acrylic enamel, or latex enamel).
- Paint Rollers: Foam rollers for smooth surfaces, angled rollers for details.
- Paint Brushes: High-quality angled brushes for cutting in and detailed areas.
- Paint Tray and Liners: For easy paint application.
- Cabinet Surface Cleaner: To remove dust after sanding.
- Wood Filler: For patching any holes or imperfections.
- Putty Knife: To apply wood filler.
- Optional: HVLP Sprayer: For a professional, smooth finish (requires more practice).
- Gloves and Safety Glasses: For protection.
- Dust Masks: Especially when sanding.
Preparing Stained Cabinets for Paint: The Crucial First Steps
The most critical part of painting stained kitchen cabinets is thorough preparation. This step ensures the paint adheres well and doesn’t peel or chip over time. Preparing stained cabinets for paint is where the magic truly begins for successful kitchen cabinet painting over stain.
Step 1: Remove Doors, Drawers, and Hardware
- Systematic Removal: Label each door and drawer with a number or letter to ensure you reassemble them correctly. Use a piece of painter’s tape on the back of each door and write its corresponding number.
- Hardware: Unscrew all hinges, knobs, and pulls. Store them in a labeled bag or container.
Step 2: Clean the Cabinets Thoroughly
- Degreasing: Kitchen cabinets accumulate grease and grime. Use a good degreaser or a TSP substitute with warm water. Wipe down all surfaces, paying close attention to areas around the stove and sink.
- Rinse and Dry: After degreasing, wipe down all surfaces with a clean, damp cloth to remove any residue, and then dry thoroughly with another clean cloth.
Step 3: Repair Imperfections
- Fill Holes: Use wood filler to patch any dings, dents, or old hardware holes. Apply the filler with a putty knife, pressing it in firmly.
- Sand Smooth: Once the wood filler is dry, sand it smooth with a sanding block until it’s flush with the cabinet surface. Wipe away dust with a tack cloth or damp rag.
Step 4: Sand the Surfaces
This is a vital step for creating a surface that paint can grip. Sanding off the old finish or at least scuffing it up is essential for good adhesion.
- Sanding Grit: Start with a medium-grit sandpaper (around 120-150 grit) to scuff up the existing stain and create a dull surface. If there are any old polyurethanes or varnishes, you might need to start with a slightly coarser grit (like 100 grit) but be careful not to gouge the wood. Painting over varnish stained cabinets requires this step to ensure proper adhesion.
- Technique: Sand in the direction of the wood grain. Use sanding sponges for detailed areas and edges.
- Vacuum and Wipe: After sanding, vacuum up all the dust. Then, use a damp cloth or tack cloth to remove any remaining fine dust. This step is crucial before priming.
Applying Primer: The Foundation for Success
Primer is your best friend when painting stained cabinets. It blocks stains from bleeding through your new paint color and provides an excellent surface for the paint to adhere to. This is especially true when painting dark stained cabinets.
Step 5: Apply Stain-Blocking Primer
- Why Stain-Blocking? If you’re painting over a dark stain, a good quality stain-blocking primer is non-negotiable. It prevents the old stain color from “bleeding” through your new paint.
- Application: Apply a thin, even coat of primer using a high-quality brush or a foam roller. For doors and drawer fronts, a roller will give a smoother finish. For the frames, a brush might be better for edges.
- Drying Time: Allow the primer to dry completely according to the manufacturer’s instructions. This is usually a few hours.
- Second Coat (Optional but Recommended): For very dark stains or if you notice any bleed-through after the first coat, apply a second coat of primer.
Step 6: Light Sanding After Priming
- Smooth Surface: Once the primer is completely dry, lightly sand the entire surface with a fine-grit sandpaper (220 grit). This will knock down any dust nibs or minor imperfections, creating a super smooth surface for your paint.
- Clean Again: Wipe down all surfaces with a damp cloth or tack cloth to remove any sanding dust.
Painting Your Kitchen Cabinets: Bringing Your Vision to Life
Now for the exciting part – applying the paint! Choosing the right paint and applying it carefully will give you a beautiful, durable finish. This is the core of your kitchen cabinet painting over stain project.
Step 7: Apply Your First Coat of Paint
- Paint Type: Use a high-quality cabinet paint. Acrylic enamel or alkyd enamel paints are good choices for durability and a smooth finish. For painting stained wood cabinets, a paint specifically designed for cabinets will yield the best results.
- Application Method:
- Brushing/Rolling: Apply thin, even coats. Avoid overloading your brush or roller. Work in sections, maintaining a wet edge to prevent lap marks. For doors and drawer fronts, use a roller for the large flat areas and a brush for the edges.
- Spraying (Optional): If you have an HVLP sprayer, this can provide the smoothest, most professional finish. Practice on scrap wood first.
- Drying Time: Allow each coat to dry completely according to the manufacturer’s instructions. This is crucial for a durable finish.
Step 8: Light Sanding Between Coats
- Smoothness: After the first coat of paint is dry, lightly sand the entire surface with a fine-grit (220-320 grit) sandpaper or sanding sponge. This smooths out any imperfections and ensures good adhesion for the next coat.
- Dust Removal: Always wipe away sanding dust with a tack cloth or damp cloth before applying the next coat.
Step 9: Apply Subsequent Coats of Paint
- Repeat: Apply at least two to three coats of paint, following the same process of applying, drying, and light sanding between coats. The number of coats will depend on the paint color and opacity. Painting dark stained cabinets might require more coats for full coverage.
- Final Coat: For the final coat, you might choose to skip the sanding if the surface is already very smooth, but always ensure the surface is dust-free.
Reassembling and Enjoying Your Newly Painted Cabinets
Once the paint is fully cured, you can reattach the hardware and put your cabinets back together.
Step 10: Reattach Hardware and Hang Doors
- Hardware: Screw the knobs and pulls back into place.
- Doors and Drawers: Carefully reattach the doors and drawer fronts to the cabinet frames using the original hinges. Ensure they hang straight and close properly.
Step 11: Clean Up and Admire!
- Remove Tape: Carefully remove all painter’s tape.
- Final Wipe Down: Give your freshly painted cabinets a final wipe down.
- Enjoy: Step back and admire your beautiful, updated kitchen! You’ve successfully achieved DIY cabinet refinishing stained!
Tips for Painting Stained Kitchen Cabinets
To ensure the best possible outcome for your kitchen cabinet painting over stain project, keep these tips in mind:
- Ventilation is Key: Always work in a well-ventilated area. Open windows and use fans.
- Patience is a Virtue: Rushing the drying times or skipping steps will compromise the final finish.
- Test in an Inconspicuous Area: If you’re unsure about a paint color or primer, test it on the back of a door or inside a cabinet.
- Consider a Sprayer: For the smoothest finish, an HVLP sprayer is ideal, but it requires practice.
- Clean Brushes and Rollers: Thoroughly clean your brushes and rollers immediately after use to keep them in good condition for future projects.
- Paint Curing vs. Drying: Paint is “dry to touch” relatively quickly, but it takes days or even weeks to fully “cure” and reach its maximum hardness. Be gentle with your newly painted cabinets during this time.
Painting Stained Wood Cabinets: Different Finishes
The sheen of your paint can impact the final look and durability of your updated cabinets.
Sheen Options:
- Matte/Flat: Hides imperfections well but is less durable and harder to clean. Not ideal for kitchen cabinets.
- Eggshell/Satin: A good balance of subtle sheen, durability, and ease of cleaning. Very popular for cabinets.
- Semi-Gloss: Offers a noticeable sheen, is very durable, and easy to wipe clean. Excellent choice for kitchens.
- Gloss: The highest sheen, very durable, and easy to clean, but shows imperfections more readily.
For updated stained kitchen cabinets, satin or semi-gloss are usually the best choices for durability and cleanability in a kitchen environment.
Updating Stained Kitchen Cabinets with Color Choices
When updating stained kitchen cabinets, color choice is paramount.
Popular Color Palettes:
- Whites and Creams: Timeless, bright, and make kitchens feel larger. Pair well with almost any countertop and backsplash.
- Grays: Versatile, offering a modern and sophisticated feel. Light grays can brighten, while darker grays add drama.
- Blues and Greens: Can add a pop of personality and depth. Navy blue or sage green are sophisticated choices.
- Black: Bold and dramatic, creating a high-end look. Best for kitchens with ample natural light.
- Two-Tone: Painting upper cabinets white and lower cabinets a darker color (like gray or navy) is a popular trend.
Painting Over Varnish Stained Cabinets: Specific Considerations
When dealing with cabinets that have a varnish or poly finish over the stain, extra care in the preparation phase is needed. Painting over varnish stained cabinets is achievable, but the surface must be scuffed thoroughly.
- Degrease: Essential to remove any oily residue from the varnish.
- Sanding: A more robust sanding might be needed to break the surface tension of the varnish. Start with 100-120 grit sandpaper, moving to 150-180 grit. The goal is to dull the sheen completely.
- Adhesion Primer: Using a high-quality adhesion-promoting primer is highly recommended when painting over varnish stained cabinets. Some primers are specifically formulated for slick surfaces.
Painting Dark Stained Cabinets: Overcoming the Challenge
Painting dark stained cabinets is a common goal for homeowners wanting to brighten their kitchen. The key is a robust stain-blocking primer.
- Primer Choice: Opt for a high-quality oil-based or shellac-based stain-blocking primer. These are generally more effective at preventing bleed-through from dark stains compared to water-based primers.
- Multiple Coats of Primer: Don’t hesitate to apply two coats of primer if the dark stain is particularly stubborn. Allow each coat to dry fully.
- Paint Color: Lighter paint colors will offer the most dramatic transformation when painting dark stained cabinets.
Troubleshooting Common Painting Problems
Even with careful preparation, you might encounter a few issues.
Common Issues and Solutions:
| Problem | Cause | Solution |
|---|---|---|
| Paint not adhering/chipping | Poor surface preparation, no primer, or glossy surface | Re-sand the affected area, clean, prime, and repaint. Ensure thorough scuff sanding. |
| Streaky finish | Too much paint on roller/brush, uneven application | Use thinner coats. Ensure your roller is evenly loaded. Work in sections with a wet edge. |
| Brush marks visible | Using a low-quality brush, too much pressure | Use a high-quality synthetic brush. Apply paint with light, even strokes. |
| Stains bleeding through paint | Inadequate stain-blocking primer or missed spots | Apply another coat of stain-blocking primer, ensuring full coverage. |
| Orange peel texture (sprayer) | Paint too thick, air pressure too high/low | Adjust paint viscosity and air pressure on the sprayer. Practice on scrap material. |
Frequently Asked Questions (FAQ)
Q1: What is the best way to paint stained kitchen cabinets?
The best way to paint stained kitchen cabinets involves meticulous preparation, including thorough cleaning, sanding, using a high-quality stain-blocking primer, and applying multiple thin coats of cabinet-grade paint with proper drying times between coats.
Q2: Can I paint over stained wood cabinets without sanding?
No, it is not recommended to paint over stained wood cabinets without sanding. Sanding creates a scuff surface that allows the primer and paint to adhere properly, preventing peeling and chipping.
Q3: How many coats of paint do I need for stained cabinets?
Typically, you’ll need at least two to three coats of paint for good coverage and durability. Painting dark stained cabinets might require more coats of both primer and paint to achieve the desired opacity.
Q4: What type of paint is best for kitchen cabinets?
Cabinet-grade paints like acrylic enamel, alkyd enamel, or a high-quality latex enamel with a satin or semi-gloss finish are best for kitchen cabinets due to their durability, washability, and smooth finish.
Q5: How long does it take to paint kitchen cabinets?
The entire process, including preparation, priming, painting, and drying/curing, can take anywhere from a few days to a week or more, depending on how many doors and drawers you have, drying conditions, and the number of coats applied.
Q6: Can I paint over cabinets that have been painted before and are stained?
Yes, you can paint over previously painted cabinets that may also be stained. The process is similar, but you must ensure the old paint is sound and adheres well. Sanding is crucial to scuff the old finish, and a stain-blocking primer is still recommended to prevent any underlying stain from bleeding through.
By following these detailed steps and tips, you can successfully transform your stained kitchen cabinets into a beautiful, updated feature of your home. This DIY cabinet refinishing stained project is rewarding and can dramatically change the aesthetic of your kitchen.