
Can you paint over existing paint on kitchen cabinets? Absolutely! Painting over existing paint on kitchen cabinets is a common and effective way to update your kitchen’s look. This guide will walk you through every step, from preparing your cabinets to applying the final coat, ensuring a professional-looking finish. Whether you’re looking to refinish kitchen cabinets for a fresh look or simply repaint existing cabinets, this detailed approach will help you achieve beautiful results.
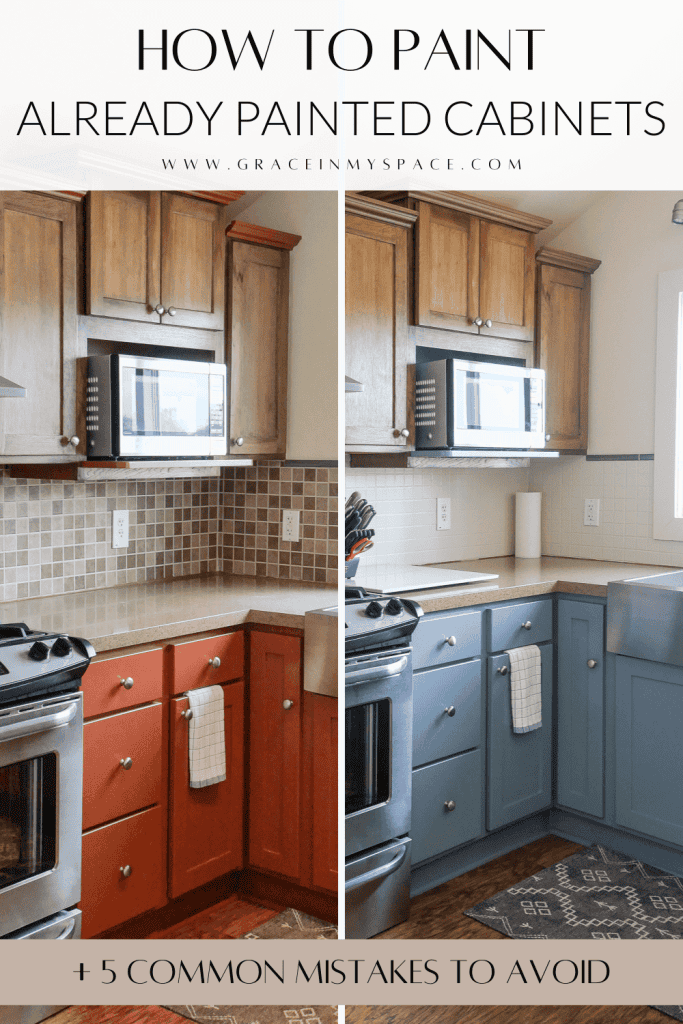
Image Source: graceinmyspace.com
Preparing Your Kitchen Cabinets: The Foundation of Success
Before you even think about picking up a paintbrush, thorough preparation is key to a durable and beautiful finish. This is often the most overlooked step, but it’s crucial for cabinet painting prep. Skipping these steps can lead to peeling, chipping, or a less-than-smooth surface.
Step 1: Declutter and Empty Your Cabinets
This might seem obvious, but it’s the first practical step.
- Remove all items: Take everything out of your cabinets and drawers.
- Organize as you go: Use this opportunity to declutter. Sort items into keep, donate, and discard piles.
- Protect your countertops and floors: Cover your countertops with plastic sheeting or old sheets, and lay down drop cloths on your floors to catch any dust or drips.
Step 2: Remove Cabinet Doors and Drawers
Working with individual components makes the painting process much smoother and allows for a more even finish.
- Label everything: Use painter’s tape and a marker to label each door and drawer front. This is especially important if your cabinets aren’t uniformly sized. Label the back of the door and the corresponding cabinet opening.
- Remove hardware: Unscrew hinges, knobs, and pulls. Store them in a safe place, like a plastic baggie, so you don’t lose any small parts.
Step 3: Clean Your Cabinets Thoroughly
Grease, grime, and food splatters are enemies of good paint adhesion. A deep clean is essential for any DIY cabinet painting project.
- Degrease: Use a strong degreaser or a mixture of warm water and dish soap. For stubborn grease, a solution of TSP (trisodium phosphate) or a TSP substitute can be very effective. Always wear gloves and ensure good ventilation when using strong cleaners.
- Scrub gently: Use a non-abrasive sponge or cloth to clean all surfaces, inside and out. Pay close attention to areas around the stovetop and sink.
- Rinse and dry: Rinse all surfaces thoroughly with clean water to remove any cleaning residue. Allow the cabinets to dry completely. You can speed this up with a clean, lint-free cloth.
Step 4: Sanding for Adhesion
Sanding is vital to create a surface that the new paint can grip onto. This is a critical part of cabinet painting prep. Whether you’re painting laminate cabinets or painting over varnish cabinets, proper sanding is non-negotiable.
- Choose the right sandpaper: For most pre-painted surfaces, start with a medium-grit sandpaper (120-150 grit) to scuff up the existing finish. If the existing paint is glossy or in poor condition, you might start with a slightly coarser grit (100 grit), but be careful not to gouge the wood.
- Sand smooth: Lightly sand all surfaces you intend to paint. The goal isn’t to remove the old paint entirely, but to create a dull, matte finish.
- Clean up dust: After sanding, use a vacuum cleaner with a brush attachment to remove most of the dust. Then, wipe down all surfaces with a tack cloth or a damp (not wet) microfiber cloth to pick up any remaining fine particles.
Step 5: Repair Imperfections
Now is the time to fix any dings, dents, or scratches.
- Wood filler: For deeper imperfections, use a good quality wood filler. Apply it according to the product instructions, allowing it to dry completely.
- Sanding repaired areas: Once the filler is dry, sand it smooth, feathering the edges so it blends seamlessly with the surrounding surface. Use fine-grit sandpaper (220 grit) for this.
- Clean again: Wipe down the repaired areas with a tack cloth to remove dust.
Priming: The Crucial First Layer
Primer is your best friend when painting over existing paint. It ensures better adhesion, blocks stains, and provides a uniform base for your topcoat.
Why Prime?
- Adhesion: Primer creates a strong bond between the old surface and the new paint. This is especially important for painting over varnish cabinets where the new paint might otherwise struggle to stick.
- Coverage: It helps cover any remaining imperfections or dark colors from the previous paint job.
- Durability: A good primer contributes significantly to the longevity of your painted finish.
- Stain Blocking: If there are any water stains, grease marks, or tannins from the wood bleeding through, a stain-blocking primer will seal them in.
Choosing the Right Primer
The best paint for kitchen cabinets often starts with the right primer.
- Oil-based primers: Excellent for blocking stains and providing superior adhesion. They are ideal for surfaces with stubborn grease or water marks. However, they have strong fumes and require mineral spirits for cleanup.
- Water-based (latex) primers: Easier to use, with low VOCs and simple soap-and-water cleanup. Look for high-quality acrylic latex primers specifically designed for cabinets or high-traffic areas.
- Shellac-based primers: Offer exceptional stain blocking and adhesion, even on tricky surfaces like laminate. They dry very quickly but also have strong fumes and require denatured alcohol for cleanup.
Table: Primer Selection Guide
| Primer Type | Best For | Pros | Cons |
|---|---|---|---|
| Oil-Based | Stain blocking, grease, difficult adhesion | Superior adhesion, excellent stain blocking | Strong fumes, mineral spirits cleanup |
| Water-Based | General use, good adhesion, low VOCs | Easy to use, low odor, water cleanup | May not block all stains as effectively |
| Shellac-Based | Tough stains, knot bleeding, quick drying | Excellent stain/odor blocking, fast drying | Strong fumes, denatured alcohol cleanup |
Applying Primer
- Apply thinly and evenly: Use a high-quality synthetic brush for edges and corners, and a foam roller or a fine-nap mohair roller for flat surfaces.
- Two thin coats are better than one thick coat: Allow each coat to dry completely according to the manufacturer’s instructions before applying the next.
- Light Sanding Between Coats: After the primer is dry, lightly sand with 220-grit sandpaper and wipe with a tack cloth. This creates a smoother surface for your paint.
Choosing the Best Paint for Your Kitchen Cabinets
Selecting the right paint is crucial for a durable, washable finish that can withstand the daily wear and tear of a kitchen.
Types of Paint
- Alkyd (Oil-based) Paint: Traditionally known for its durability and smooth finish. It’s very hard and resistant to chipping. However, it has strong odors, requires mineral spirits for cleanup, and can yellow over time, especially in lighter colors.
- Water-based (Latex/Acrylic) Paint: Modern water-based paints, particularly acrylic enamels or hybrid alkyd-acrylic formulas, offer excellent durability and are much easier to use and clean up than oil-based paints. They are also more flexible, reducing the risk of cracking. Look for paints specifically labeled as “enamel” for a harder finish.
Sheen Levels
The sheen of your paint affects both the look and the durability.
- Satin: A popular choice for cabinets. It has a subtle sheen, is easy to clean, and hides minor imperfections well.
- Semi-Gloss: Offers a higher sheen, making it very durable and easy to wipe down. It can highlight imperfections more than satin, so good prep is essential.
- Gloss: The highest sheen, providing a very hard, durable, and washable surface. However, it will reveal every single flaw in your cabinets, so meticulous prep is a must.
The Best Paint for Kitchen Cabinets: Recommendations
For most DIY cabinet painting projects, high-quality acrylic enamel or a hybrid alkyd-acrylic paint in a satin or semi-gloss finish is recommended. These offer a good balance of durability, washability, and ease of application. Brands like Benjamin Moore (Advance), Sherwin-Williams (ProClassic), and Behr (Cabinet & Trim) are popular choices.
Table: Paint Sheen and Durability
| Sheen | Durability | Ease of Cleaning | Imperfection Hiding | Recommended For |
|---|---|---|---|---|
| Flat/Matte | Low | Difficult | Excellent | Walls |
| Eggshell | Medium | Medium | Good | Low-traffic areas |
| Satin | Good | Good | Fair | Cabinets, Trim |
| Semi-Gloss | Very Good | Very Good | Poor | Cabinets, Trim, Doors |
| High-Gloss | Excellent | Excellent | Very Poor | High-traffic areas, trim |
Painting Techniques for a Flawless Finish
Achieving a professional look requires specific cabinet painting techniques.
Brushes and Rollers
- High-Quality Brushes: Invest in good quality synthetic bristle brushes (for latex/acrylic paints) or natural bristle brushes (for oil-based paints). Angled sash brushes are excellent for cutting in edges and details.
- Foam Rollers or Fine-Nap Mohair Rollers: These are ideal for achieving a smooth, even finish on larger, flat surfaces like cabinet doors and drawer fronts. Avoid standard nap rollers, which can leave a textured “orange peel” effect.
Application Methods
There are two primary ways to apply paint: brushing/rolling and spraying.
Brushing and Rolling (DIY Friendly)
- Apply Thin Coats: This is the golden rule of cabinet painting. Multiple thin coats provide a smoother, more durable finish than one or two thick coats.
- Work in Sections: Paint one door or drawer front at a time. For cabinet frames, work on one side or section at a time.
- Brush First, Then Roll:
- Use your brush to apply paint to the edges, corners, and any detailed areas.
- Immediately follow with a foam roller on the flat surfaces, rolling in one direction to create a smooth, uniform finish. Avoid overworking the paint, which can lead to brush strokes or an uneven surface.
- Avoid Overloading: Don’t dip too much paint onto your brush or roller. Too much paint can lead to drips and an uneven finish.
- Maintain a Wet Edge: When working on larger surfaces, try to keep a “wet edge” by overlapping your brush strokes or roller passes slightly. This helps prevent lap marks.
Spraying (Professional Finish, More Advanced)
Spraying provides the smoothest, most factory-like finish, but it requires specialized equipment and practice.
- Equipment: You’ll need a paint sprayer (like an HVLP – High Volume Low Pressure sprayer), a compressor, and appropriate masks and safety gear.
- Preparation is Paramount: When spraying, you’ll need to meticulously mask off everything you don’t want painted. This includes walls, floors, countertops, and the interior of the cabinets.
- Thinning Paint: Most paints need to be thinned to the correct viscosity for spraying. Follow the paint and sprayer manufacturer’s recommendations.
- Practice: Before spraying your actual cabinets, practice on scrap wood or cardboard to get a feel for the sprayer’s output and your technique.
- Technique: Hold the sprayer at a consistent distance from the surface (usually 6-8 inches) and move with a steady, even motion, overlapping your passes by about 50%.
The Best Paint for Kitchen Cabinets: Essential Supplies
Having the right cabinet painting supplies will make the job much easier and improve the final outcome.
Essential Cabinet Painting Supplies Checklist:
- Degreaser/Cleaner: TSP substitute or heavy-duty kitchen degreaser.
- Sandpaper: Assorted grits (120-150 for initial scuff, 220 for between coats).
- Sanding Block or Orbital Sander: For even sanding.
- Tack Cloths: For removing dust after sanding.
- Painter’s Tape: High-quality tape for masking.
- Drop Cloths/Plastic Sheeting: To protect your floors and countertops.
- Screwdriver: For removing hardware.
- Wood Filler and Putty Knife: For repairs.
- Primer: High-quality stain-blocking primer.
- Paint: High-quality acrylic enamel or hybrid paint.
- Paint Brushes: High-quality synthetic brushes.
- Foam Rollers or Fine-Nap Mohair Rollers: With roller frames.
- Paint Trays and Liners: For easy cleanup.
- Paint Stir Sticks: To ensure paint is thoroughly mixed.
- Gloves: For protection.
- Safety Glasses: Especially when sanding or cleaning.
- Face Mask/Respirator: For sanding dust and paint fumes.
- Optional: Paint Sprayer: For a professional finish.
Applying the Topcoat: Bringing It All Together
With proper preparation and priming, applying the topcoat is the final stage of your DIY cabinet painting journey.
Applying Multiple Thin Coats
- Wait for Primer to Dry: Ensure your primer is completely dry as per the manufacturer’s instructions.
- Stir Paint Thoroughly: Always stir your paint well before and during use. Never shake latex paint, as this can create bubbles.
- Apply First Coat: Use your chosen cabinet painting techniques (brushing/rolling or spraying) to apply the first thin, even coat of your topcoat paint.
- Drying Time: Allow each coat to dry thoroughly. Drying times can vary significantly based on humidity, temperature, and the type of paint. Check the paint can for recommended drying times between coats. Rushing this step can lead to peeling or uneven finishes.
- Light Sanding Between Coats (Optional but Recommended): For an ultra-smooth finish, lightly sand with 220-grit or finer sandpaper after the first coat of paint has dried. This knocks down any dust nibs or minor imperfections. Clean thoroughly with a tack cloth afterward.
- Apply Subsequent Coats: Apply at least two to three thin coats of paint, allowing adequate drying time between each. The number of coats needed will depend on the paint color, the primer, and the coverage.
Drying and Curing
- Dry vs. Cure: It’s important to differentiate between drying and curing. Paint is typically dry to the touch within a few hours, meaning you can handle it without smudging. However, paint takes much longer to “cure” – to reach its maximum hardness and durability. This can take anywhere from 7 to 30 days, depending on the paint type.
- Be Gentle: During the curing period, be extra careful with your cabinets. Avoid aggressive cleaning, banging items against them, or placing heavy objects on them.
Reassembling and Enjoying Your Newly Painted Cabinets
Once the paint has fully cured, it’s time to put your kitchen back together.
- Reattach Hardware: Screw your knobs, pulls, and hinges back onto the cabinet doors and drawer fronts.
- Rehang Doors: Carefully rehang the cabinet doors onto the frames.
- Reinsert Drawers: Slide the drawers back into their openings.
- Replace Items: Put all your kitchen items back into your beautifully transformed cabinets.
Frequently Asked Questions (FAQ)
Q1: Can I skip sanding when painting over existing cabinets?
A1: No, you should not skip sanding. Sanding is crucial for creating a surface that the new paint can adhere to properly. Even if the current paint is in good condition, a light scuff sanding is necessary for a lasting finish.
Q2: What’s the best way to paint kitchen cabinets that have a glossy finish?
A2: Cabinets with a glossy finish require thorough cleaning and sanding. You might need a slightly coarser grit sandpaper (around 100-120) to break through the gloss. Using a high-adhesion primer, such as an oil-based or shellac-based primer, is also highly recommended for glossy surfaces.
Q3: How long does it take to paint kitchen cabinets?
A3: The timeline for DIY cabinet painting can vary widely depending on the size of your kitchen, the number of doors and drawers, your chosen painting method (spraying vs. brushing/rolling), and drying times between coats. A typical project can take anywhere from a weekend to a week or more, factoring in drying and curing times.
Q4: What if I’m painting laminate cabinets?
A4: Painting laminate cabinets can be successful with the right preparation. Thoroughly clean the laminate to remove any residue. Lightly scuff sand the surface to create a profile for adhesion. Use a high-quality bonding primer, often a shellac-based primer, as laminate can be a challenging surface for paint to stick to. Follow with your chosen topcoat.
Q5: How do I clean my newly painted cabinets?
A5: For painted cabinets, gentle cleaning is best. Use a soft cloth with mild dish soap and water. Avoid abrasive cleaners or scrubbers, which can damage the paint finish. For stubborn spots, you can use a slightly stronger degreaser, but always test in an inconspicuous area first.
Q6: Can I repaint existing cabinets without removing the doors?
A6: While it’s possible to paint cabinet doors while they are still attached, it’s not recommended for a high-quality finish. Removing the doors allows for more thorough cleaning, sanding, priming, and painting, ensuring you can reach all angles and avoid drips on the cabinet frames.
Q7: What is the best paint finish for kitchen cabinets?
A7: Satin or semi-gloss finishes are generally the most practical and popular for kitchen cabinets. They offer good durability and are easy to clean, which is essential in a kitchen environment. High-gloss can look very sleek but highlights imperfections more.
By following these detailed steps, you can successfully refinish kitchen cabinets and give your kitchen a beautiful, updated look. Happy painting!