
Sure, here’s a comprehensive, SEO-optimized blog post on repainting a kitchen sink, designed for easy readability.
Can I repaint my kitchen sink? Yes, you can repaint your kitchen sink! It’s a fantastic way to give your kitchen a fresh look without the expense and effort of a full replacement. This DIY kitchen sink update can transform a stained, chipped, or outdated sink into a focal point of your kitchen. Whether you have a porcelain, stainless steel, or cast iron sink, this guide will walk you through the process of kitchen sink painting for a beautiful, lasting finish.
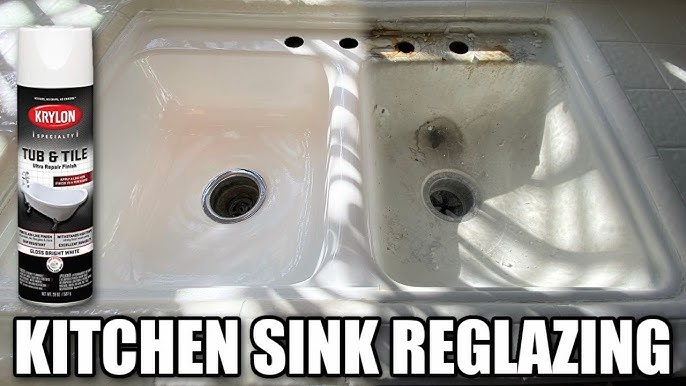
Image Source: i.ytimg.com
Why Repaint Your Kitchen Sink?
Over time, kitchen sinks can show their age. Stains, scratches, chips, and dull finishes can detract from your kitchen’s overall appearance. Repainting your kitchen sink offers several advantages:
- Cost-Effective: It’s significantly cheaper than buying a new sink.
- Quick Update: A fresh coat of paint can dramatically change your kitchen’s look in a weekend.
- Customization: You can choose any color to match your kitchen décor.
- Problem Solver: It effectively covers up minor damage like chips and stains.
- Kitchen Sink Restoration: It brings new life to an old, tired sink.
What Kind of Paint Can I Use?
Choosing the right paint is crucial for a successful kitchen sink painting project. The best paint for your kitchen sink will depend on the material of your sink and the desired finish.
Epoxy Paint for Sinks
Epoxy paint for sinks is a popular choice due to its durability, water resistance, and ability to adhere well to various surfaces. Epoxy coatings are typically two-part systems (a resin and a hardener) that, when mixed, create a hard, protective finish.
- Pros: Highly durable, resistant to water, chemicals, and heat; available in various finishes; excellent for high-traffic areas.
- Cons: Can be more challenging to apply, requiring precise mixing and ventilation; curing time can be longer.
Specialty Sink Paints and Coatings
Beyond epoxy, there are other specialized paints and coatings designed for sinks:
- Porcelain-Enamel Spray Paint: For how to paint a porcelain sink, these spray paints are formulated to mimic the smooth, glossy finish of porcelain. They offer good adhesion and a sleek look.
- Appliance Epoxy Paint: Similar to general epoxy paints, these are designed for appliances but work well on sinks, offering a tough, chip-resistant finish.
- All-Purpose Enamel Paints: While some all-purpose enamels can work, ensure they are formulated for high moisture and regular cleaning. They might not be as durable as dedicated sink paints.
What About Painting a Stainless Steel Sink?
Painting a stainless steel sink requires specific preparation and primers to ensure proper adhesion. Stainless steel can be slick, so a good adhesion promoter or a specific primer for metal is essential.
- Best Approach: Use a metal etching primer or an adhesion promoter specifically designed for stainless steel. Follow up with your chosen topcoat, like an epoxy or appliance enamel.
Materials and Tools You’ll Need
Before you start your DIY kitchen sink update, gather all the necessary supplies:
- Paint: Epoxy paint for sinks, specialty sink paint, or appliance enamel.
- Primer: A good quality primer suitable for your sink’s material.
- Cleaner/Degreaser: A strong household cleaner or a dedicated degreaser.
- Sandpaper: Fine-grit sandpaper (e.g., 220-grit) and possibly medium-grit (e.g., 100-150 grit) depending on the sink’s condition.
- Sanding Block or Orbital Sander: For even sanding.
- Painter’s Tape: High-quality tape for masking off surrounding areas.
- Drop Cloths or Plastic Sheeting: To protect countertops and floors.
- Screwdriver: To remove any fixtures like faucets or drain covers.
- Gloves: Chemical-resistant gloves.
- Safety Glasses or Goggles: To protect your eyes.
- Respirator Mask: Crucial for ventilation and protecting against fumes.
- Paint Brushes: High-quality synthetic brushes for smooth application.
- Foam Rollers: Small rollers for even coverage on larger surfaces.
- Paint Tray: For pouring paint.
- Clean Rags or Microfiber Cloths: For cleaning and wiping.
- Denatured Alcohol or Acetone: For final cleaning and degreasing.
- Caulk Remover (if needed): To remove old caulk.
- New Caulk: For sealing around the sink after painting.
Step-by-Step Guide: Preparing Your Sink for Paint
Proper preparation is the most critical step in repainting kitchen sink. A clean, smooth, and properly primed surface is key to a durable and attractive finish.
Step 1: Remove Fixtures and Drain
Preparing sink for paint begins with disassembly.
- Disconnect Plumbing: Turn off the water supply to the faucet. Unscrew the water supply lines from the faucet.
- Remove Faucet and Drain: Carefully unscrew any mounting nuts or clips holding the faucet in place. Remove the drain assembly. This ensures you get a clean paint job without awkward edges.
- Remove Accessories: Take out any sink strainers, soap dispensers, or other accessories.
Step 2: Clean the Sink Thoroughly
A spotless surface is paramount.
- Initial Cleaning: Use a strong cleaner or degreaser to remove any food debris, grease, soap scum, and mineral deposits. Scrub the entire sink basin, rim, and any surrounding areas that will be painted.
- Rinse and Dry: Rinse the sink thoroughly with clean water and dry it completely with clean rags.
Step 3: Address Existing Damage
Small imperfections can become big problems if not addressed.
- Chip Repair (Porcelain/Enamel): For chips on porcelain or enamel sinks, you can use a porcelain repair kit. Clean out the chipped area, apply the repair filler as directed, let it cure, and then sand it smooth.
- Rust Removal (Metal Sinks): If you have a metal sink with rust spots, use a rust remover or fine-grit sandpaper to remove all traces of rust. Clean the area thoroughly afterward.
- Caulk Removal: If the sink is caulked to the countertop, carefully remove the old caulk using a caulk remover and a utility knife or scraper.
Step 4: Sand the Surface
Sanding creates a surface that paint can adhere to effectively.
- For Stainless Steel: Lightly sand the entire surface with 220-grit sandpaper. You don’t need to remove the stainless steel finish, just create a dull, matte surface. This is crucial for painting a stainless steel sink.
- For Porcelain/Enamel: Lightly sand the entire surface with 220-grit sandpaper to de-gloss the existing finish. If there are significant chips or rough spots, you might start with a slightly coarser grit (like 150) but always finish with 220-grit for smoothness.
- Clean After Sanding: After sanding, wipe down the entire sink with a damp cloth to remove all dust. Then, use a tack cloth to pick up any remaining fine dust particles.
Step 5: Degrease and Final Clean
This is the last chance to ensure a perfectly clean surface.
- Degrease: Wipe down the entire sink with denatured alcohol or acetone on a clean rag. This removes any residual oils, grease, or contaminants. Work in small sections and use a fresh part of the rag frequently.
- Dry: Allow the sink to air dry completely. Do not touch the surface with bare hands after this stage to avoid transferring oils.
Step 6: Masking
Protect areas you don’t want to paint.
- Apply Painter’s Tape: Use high-quality painter’s tape to carefully mask off the countertops, backsplash, faucet base, and any other areas you want to keep paint-free. Ensure the tape is pressed down firmly to create a good seal and prevent paint bleed.
Step-by-Step Guide: Painting Your Kitchen Sink
Now that your sink is prepped and ready, it’s time to paint! This process requires patience and careful application for a professional-looking result.
Step 1: Apply Primer
A good primer is essential for adhesion, especially when painting a stainless steel sink.
- Choose the Right Primer: Use a primer recommended for your sink’s material and compatible with your chosen topcoat. For metal sinks, a metal etching primer or an adhesion primer is ideal. For porcelain or enamel, a high-adhesion primer designed for glossy surfaces works well.
- Application: Apply a thin, even coat of primer using a high-quality synthetic brush or a small foam roller. Avoid applying it too thickly, as this can lead to drips.
- Drying Time: Allow the primer to dry completely according to the manufacturer’s instructions. This usually takes at least an hour, but check the product label.
- Light Sanding (Optional but Recommended): Once the primer is dry, you can lightly scuff it with 220-grit sandpaper and wipe it down with a tack cloth. This further enhances adhesion for the topcoat.
Step 2: Apply the First Coat of Paint
This is where your kitchen sink painting project truly begins to take shape.
- Mix Your Paint: If you’re using a two-part epoxy, mix the resin and hardener thoroughly according to the manufacturer’s instructions. Work in small batches if the pot life is short.
- Application: Apply a thin, even coat of your chosen paint. Use a brush for corners and edges and a small foam roller for the larger surfaces to achieve a smooth finish. Avoid overloading the brush or roller, as this can cause drips and uneven coverage.
- Direction: Paint in one direction as much as possible for a uniform look. Work from the back of the sink towards the front.
- Drying Time: Allow the first coat to dry completely. This is crucial – applying a second coat too soon can cause the paint to lift or wrinkle. Refer to the paint manufacturer’s guidelines for recoat times.
Step 3: Apply Subsequent Coats
Most projects will require at least two to three thin coats for full coverage and durability.
- Second Coat: Apply the second coat, following the same technique as the first. Ensure even coverage.
- Third Coat (if needed): If the coverage isn’t uniform or the original sink color is still showing through, apply a third thin coat.
- Check for Coverage: Inspect the sink after each coat in good light to ensure there are no missed spots or thin areas.
Step 4: Allow for Curing
This is where your sink refinishing kit or paint truly hardens.
- Curing vs. Drying: Paint dries to the touch relatively quickly, but it takes much longer to fully cure and reach its maximum hardness and durability.
- Drying Time: Allow the paint to dry to the touch between coats as per the manufacturer’s instructions.
- Curing Time: The full curing time can range from 24 hours to 7 days, depending on the paint type and environmental conditions. Do not use the sink during the curing period. Avoid placing heavy objects in the sink or exposing it to water.
Step 5: Reassemble Fixtures
Once the paint is fully cured, you can put everything back together.
- Remove Painter’s Tape: Carefully remove the painter’s tape. It’s best to do this while the paint is fully cured but before it has been subjected to any heavy use.
- Reinstall Faucet and Drain: Reattach the faucet assembly and the drain.
- Reconnect Plumbing: Reconnect the water supply lines. Turn on the water slowly and check for any leaks.
- New Caulk: Apply a fresh bead of high-quality kitchen and bath caulk around the edge of the sink where it meets the countertop. Smooth the caulk with a wet finger or caulking tool for a clean finish.
Tips for a Perfect Kitchen Sink Painting Job
- Ventilation is Key: Always work in a well-ventilated area. Open windows and doors, and use fans to circulate air. Wear a respirator mask to protect yourself from fumes.
- Thin Coats are Better: Multiple thin coats are always better than one thick coat. They provide a smoother finish and are less prone to drips and runs.
- Avoid Overworking the Paint: Try to apply the paint smoothly and without over-brushing or over-rolling, which can create an uneven texture.
- Read the Manufacturer’s Instructions: Every paint product is different. Always follow the specific instructions for preparation, application, and drying/curing times provided by the paint manufacturer.
- Test in an Inconspicuous Area: If possible, test your paint and primer combination on a scrap piece of material or an area of the sink that isn’t highly visible to ensure compatibility and desired results.
How To Paint Porcelain Sink Specifics
When how to paint porcelain sink, the process is similar to other materials, but with some key considerations:
- Porcelain’s Smoothness: Porcelain is naturally smooth and glossy. This means thorough cleaning and light sanding are essential to create a surface for the paint to grip.
- Chip Repair: Porcelain can chip. If your sink has chips, address them with a porcelain repair kit before painting for a seamless finish.
- Primer for Porcelain: Use a high-adhesion primer specifically designed for glossy surfaces or porcelain.
- Paint Choice: Porcelain-enamel spray paints are excellent for achieving that classic porcelain look. Epoxy paints also offer superior durability.
Maintaining Your Newly Painted Sink
To keep your painted sink looking its best, follow these maintenance tips:
- Gentle Cleaning: Use mild dish soap and a soft sponge or cloth for regular cleaning. Avoid abrasive cleaners, scouring pads, or steel wool, as they can scratch the painted surface.
- Wipe Up Spills Promptly: Especially acidic foods or liquids like lemon juice or tomato sauce, as prolonged contact could potentially affect the paint.
- Avoid Harsh Chemicals: Do not use bleach, ammonia, or oven cleaners directly on the painted surface.
- Be Mindful of Heavy Objects: Avoid dropping heavy pots or pans into the sink, as this can chip or scratch the paint.
Troubleshooting Common Painting Issues
Even with careful preparation, you might encounter some issues.
Paint Not Sticking / Peeling
- Cause: Poor surface preparation (not clean, not sanded enough, residual oils/grease).
- Solution: If the paint is peeling significantly, you may need to remove it completely and re-prepare the surface, ensuring thorough cleaning and proper priming. If it’s just minor peeling, you might be able to lightly sand the affected area, re-prime, and repaint.
Drips and Runs
- Cause: Applying the paint too thickly, not working quickly enough with the product, or using the wrong applicator.
- Solution: Allow the area to dry completely. You can then carefully sand down the drip with fine-grit sandpaper (220-grit), wipe clean, and apply a thin coat of paint to blend it in.
Uneven Texture or Brush Marks
- Cause: Using a low-quality brush or roller, overworking the paint, or applying it too thickly.
- Solution: For minor issues, you can sometimes lightly sand the dried paint surface with very fine-grit sandpaper (320-grit or higher) and then apply a final thin coat. For more significant texture issues, removal and reapplication might be necessary.
Frequently Asked Questions (FAQ)
Q1: How long does painted kitchen sink last?
The lifespan of a painted kitchen sink depends on the quality of the paint used, how well the surface was prepared, and how the sink is used and maintained. With proper care, a well-painted sink can last anywhere from 3 to 7 years or even longer.
Q2: Can I paint a sink that is already chipped?
Yes, you can paint a chipped sink, but you must repair the chips first. Use a porcelain repair kit or an appropriate filler for metal sinks. Once the repair is cured and sanded smooth, you can proceed with painting.
Q3: Do I need to remove the faucet before painting?
It is highly recommended to remove the faucet and drain assembly. This ensures a cleaner, more professional finish without awkward paint lines around fixtures.
Q4: What is the best paint for a kitchen sink?
Epoxy paint for sinks or specialized appliance epoxy paints are generally considered the best options due to their durability, water resistance, and resistance to chemicals. For a specific look, porcelain-enamel spray paints are also good for porcelain sinks.
Q5: How many coats of paint do I need?
Typically, you will need 2 to 3 thin coats of paint for even coverage and a durable finish. Always allow adequate drying time between coats as specified by the paint manufacturer.
Q6: Can I use regular spray paint on my sink?
While some specialty spray paints designed for appliances or certain materials might work, general-purpose spray paints are usually not durable enough for the demanding environment of a kitchen sink. They may chip, peel, or fade quickly.
Q7: How long do I have to wait to use my sink after painting?
You should wait until the paint has fully cured, which can take anywhere from 24 hours to 7 days, depending on the product. Refer to the paint manufacturer’s instructions for the exact curing time.
Conclusion
Repainting your kitchen sink is an achievable and rewarding DIY project that can significantly enhance your kitchen’s appearance. By following these detailed steps for preparation, application, and curing, you can achieve a beautiful, durable finish. This DIY kitchen sink update is a testament to how a little effort can go a long way in transforming your home. Enjoy your refreshed kitchen sink!