
Can you change your kitchen cabinet color yourself? Yes, you absolutely can change your kitchen cabinet color yourself, and it’s a fantastic way to update your kitchen without a huge expense. This DIY guide will walk you through everything you need to know for a successful kitchen cabinet makeover. We’ll cover the essential steps for painting kitchen cabinets, from prepping cabinets for paint to applying the final coat, making your kitchen cabinet refresh look professional.
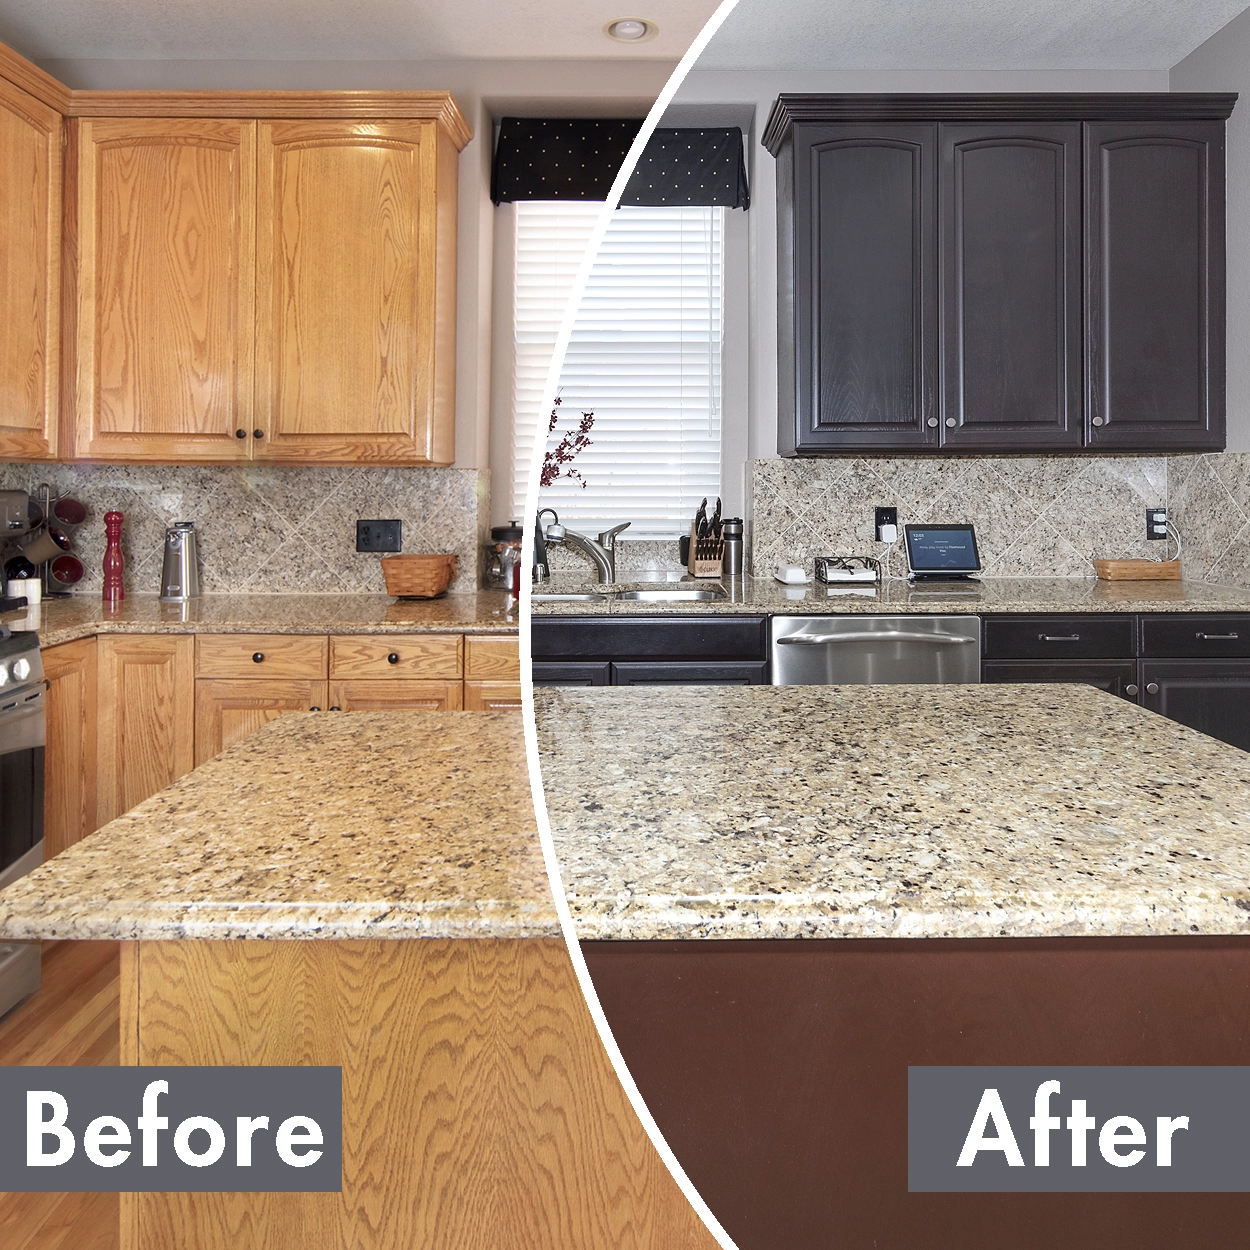
Image Source: www.nhance.com
Why Change Your Cabinet Color?
Outdated or worn cabinet colors can make a kitchen feel drab and uninviting. A fresh coat of paint can completely transform the space, reflecting your style and making your kitchen feel brand new. It’s one of the most impactful DIY cabinet painting projects you can undertake.
Benefits of Painting Cabinets:
- Cost-Effective: Significantly cheaper than replacing cabinets.
- Customization: Achieve any look you desire, from classic white to bold colors.
- Increased Home Value: A modern, updated kitchen is a major selling point.
- Satisfying Project: The results of cabinet refinishing are incredibly rewarding.
Deciphering Your Cabinet Material
Before you start, it’s important to know what your cabinets are made of. This affects the prep work and the type of paint you’ll need.
Common Cabinet Materials:
- Wood (Solid & Veneer): Most common. Can be painted or stained. Requires good prep to avoid grain showing.
- Laminate/Melamine: Often found on budget cabinets. Can be tricky to paint as paint may chip easily. Requires specific primers.
- MDF (Medium-Density Fiberboard): Smooth surface, good for painting. Can absorb a lot of paint.
- Thermally Fused Laminate (TFL): Similar to laminate, but often more durable.
How to Identify Your Material:
Look for seams or manufactured edges for laminate/TFL. Solid wood will have a visible grain pattern that runs consistently. MDF is very smooth and dense. If unsure, test a small, inconspicuous area with a degreaser. If the surface remains intact, it’s likely laminate or TFL.
Planning Your Kitchen Cabinet Makeover
A little planning goes a long way. Consider your desired outcome, cabinet color trends, and the time commitment.
Choosing Your Cabinet Color:
Cabinet color trends are always evolving, but some classics remain timeless.
Popular Cabinet Color Choices:
- Whites & Off-Whites: Brighten the space, create a sense of openness. Versatile and always in style.
- Grays: Offer a modern, sophisticated look. Light grays are airy, while charcoal grays add drama.
- Blues: From soft pastels to deep navy, blues add personality and can evoke a sense of calm.
- Greens: Sage and olive greens bring nature indoors, offering a calming and organic feel.
- Black: Bold and dramatic, black cabinets make a strong statement and pair well with metallic accents.
- Wood Tones: If you have beautiful wood grain, consider a clear or tinted glaze for cabinet refinishing to enhance its natural beauty.
Table: Color Inspiration
| Style | Popular Colors | Mood/Feel |
|---|---|---|
| Modern | White, Gray, Black, Navy Blue | Sleek, Chic |
| Farmhouse | Off-White, Light Gray, Sage Green, Light Blue | Cozy, Rustic |
| Traditional | Cream, Deep Wood Tones, Muted Blues | Elegant, Classic |
| Coastal | White, Light Blue, Seafoam Green | Airy, Relaxed |
| Transitional | Greige, Charcoal Gray, Navy Blue, Wood Tones | Balanced, Chic |
What Kind of Paint for Cabinets?
The best way to paint cabinets involves using the right type of paint for durability and a smooth finish.
- Alkyd Enamel (Oil-Based): Offers a hard, durable finish. Can have strong fumes and requires mineral spirits for cleanup. Takes longer to dry.
- Water-Based Enamel (Latex/Acrylic): Easier to use, less odor, and cleans up with water. Modern water-based enamels are formulated for durability, often with ceramic or silicone additives.
- Luxe Satin or Semi-Gloss: These finishes are ideal for cabinets. They are durable, easy to clean, and hide imperfections better than high-gloss finishes.
Don’t forget a good quality primer! A stain-blocking primer is essential, especially for wood cabinets with knots or tannins that can bleed through paint.
Tools and Supplies Checklist:
Gathering all your supplies beforehand ensures a smooth process.
Essential Tools for Painting Cabinets:
- Screwdriver/Drill: To remove cabinet doors and hardware.
- Putty Knife: For filling small holes or imperfections.
- Sandpaper: Various grits (120-220 grit) for smoothing.
- Sanding Block: For even sanding.
- Orbital Sander (Optional): For faster sanding of flat surfaces.
- Vacuum Cleaner (with brush attachment): To remove dust.
- Tack Cloths: To pick up fine dust particles.
- Degreaser/TSP (Trisodium Phosphate) Substitute: For thorough cleaning.
- Clean Rags: Plenty of them.
- Painter’s Tape: High-quality tape for clean lines.
- Drop Cloths/Plastic Sheeting: To protect floors and countertops.
- Primer: Stain-blocking, bonding primer.
- Paint: High-quality cabinet enamel (satin or semi-gloss).
- Paint Brushes: High-quality synthetic brushes (for water-based paint) or natural bristle brushes (for oil-based paint). Angled brushes are great for detail.
- Foam Rollers: High-density foam rollers for smooth application.
- Paint Tray and Liners: For easy cleanup.
- Cabinet Door Holders/Clamps: To prop doors up for drying.
- Safety Glasses: Always protect your eyes.
- Gloves: To protect your hands.
- Respirator Mask: Especially when sanding or using oil-based products.
Step-by-Step Guide to Painting Kitchen Cabinets
This is where the magic happens! Follow these steps carefully for a professional-looking finish.
Step 1: Prepping Cabinets for Paint – The Most Crucial Step
This step is non-negotiable. Proper preparation is key to a durable and beautiful finish.
Removing Doors and Hardware:
- Label Everything: As you remove doors and drawers, label them with masking tape to remember where they go. Numbering or labeling each door and its corresponding frame section is vital.
- Remove Hardware: Unscrew hinges, knobs, and pulls. Store them in a plastic bag or container, perhaps inside one of the cabinets.
- Lay Out Doors: Spread out the doors and drawers on drop cloths in a well-ventilated area, like a garage or outdoors if weather permits.
Cleaning the Cabinets:
- Degrease Thoroughly: Kitchen cabinets are often covered in grease, grime, and cooking splatters. Use a good degreaser or a TSP substitute with a sponge or rag. Work in sections, rinsing thoroughly with clean water and a fresh rag afterward.
- Rinse and Dry: Ensure all cleaning residue is removed. Wipe down with clean water, then dry completely with a lint-free cloth. Allow cabinets to air dry for at least a few hours, or overnight, to ensure all moisture is gone.
Sanding for Adhesion:
- Light Sanding: This is not about removing old finish but about creating a surface the primer can adhere to. Use 120-grit sandpaper or a sanding sponge.
- Smooth Surfaces: Lightly sand all surfaces you intend to paint – cabinet doors, drawer fronts, and the cabinet frames.
- Pay Attention to Edges and Corners: Ensure all areas are lightly scuffed.
- Clean Dust: After sanding, vacuum all surfaces to remove loose dust. Then, use a tack cloth to meticulously wipe down every surface, ensuring no dust particles remain. This is critical for a smooth finish.
Repairing Imperfections:
- Fill Holes: Use wood filler or putty to fill any dings, dents, or old hardware holes. Let it dry completely according to the product instructions.
- Sand Smooth: Once dry, lightly sand the filled areas until they are flush with the cabinet surface. Wipe away dust with a tack cloth.
Priming:
- Choose the Right Primer: Use a high-quality stain-blocking primer, especially if you’re painting over a dark color or if your cabinets are wood with prominent grain or knots. A bonding primer is excellent for laminate or slick surfaces.
- Apply Primer: Use a good quality brush for edges and corners, and a foam roller for flat surfaces. Apply a thin, even coat. Avoid applying too much, which can lead to drips.
- Second Coat (If Needed): If you’re painting over a very dark color or if you see any imperfections, apply a second coat of primer after the first has dried.
- Light Sanding After Priming: Once the primer is completely dry (check product instructions), lightly sand it with 220-grit sandpaper. This helps create an ultra-smooth surface for your paint. Clean away all dust with a tack cloth.
Step 2: Painting Your Cabinets
This is where your cabinet painting ideas come to life. Patience and technique are key.
Applying the First Coat of Paint:
- Stir, Don’t Shake: Stir your paint thoroughly. Shaking can create air bubbles.
- Brush Strokes: Use a high-quality angled brush for cutting in edges and details. Apply paint in the direction of the wood grain if applicable. Use long, even strokes.
- Rolling: For doors and flat surfaces, use a high-density foam roller. Load the roller evenly, but don’t overload it. Roll in a consistent direction, slightly overlapping each pass.
- Cabinet Frames: Paint the cabinet frames first while the doors are off. Use a brush for corners and edges, and a roller for the larger flat sections.
- Thin Coats are Best: Apply thin, even coats rather than one thick coat. This prevents drips and ensures better adhesion. You’ll likely need two to three coats for full coverage.
- Avoid Overworking: Don’t go back over areas once the paint starts to set. This can create brush marks.
Drying Time Between Coats:
- Read Paint Can: Always follow the manufacturer’s recommended drying times between coats. This can vary significantly based on paint type and humidity. Typically, allow at least 4-6 hours, but sometimes up to 24 hours for optimal hardness before recoating.
- Don’t Rush: Rushing this step can lead to peeling or a poor finish.
Applying Subsequent Coats:
- Light Sanding: After each coat of paint has dried thoroughly, lightly sand with 220-grit or 320-grit sandpaper. This is the secret to a super smooth finish.
- Clean Dust: Again, use a tack cloth to remove all sanding dust before applying the next coat.
- Repeat: Apply your second coat, following the same technique. Repeat the sanding and dusting process for the third coat if necessary.
Step 3: Reassembling and Finishing Touches
The final steps bring your kitchen cabinet makeover to completion.
Reattaching Hardware:
- Install Hardware: Once the final coat of paint is completely dry and cured (this can take several days to a week), reinstall your knobs and pulls. You might consider updating your hardware for an even more modern look.
Rehanging Doors and Drawers:
- Carefully Rehang: Following your labels, reattach the cabinet doors and drawers to their respective frames.
- Adjust Hinges: If doors aren’t hanging straight, adjust the cabinet hinges as needed.
Cleaning Up:
- Remove Tape: Carefully peel off painter’s tape.
- Clean Tools: Clean your brushes and rollers immediately with soap and water (for latex paint) or appropriate solvent (for oil-based paint).
- Dispose Properly: Dispose of used rags, drop cloths, and paint cans responsibly.
Cabinet Refinishing vs. Painting
While painting is a popular method for updating kitchen cabinets, cabinet refinishing can also involve stripping old finishes and re-staining or applying a new varnish.
- Painting: Best for covering up dated or damaged finishes, or when you want a dramatic color change. It’s often more forgiving for beginners.
- Staining/Varnishing: Ideal if you have beautiful wood grain you want to showcase. It requires stripping the old finish, which can be more labor-intensive than painting.
For most DIYers aiming for a color change, painting kitchen cabinets is the more accessible route.
Tips for an Even Better Finish
Want to elevate your DIY project? These tips will help.
Using the Best Spray Paint for Cabinets (Optional)
If you have access to a paint sprayer, it can provide an incredibly smooth, factory-like finish.
Spray Painting Considerations:
- Practice: Practice on scrap material first to get the technique right.
- Ventilation: Essential for safe spraying.
- Masking: Meticulous masking is required to protect surrounding areas.
- Thin Coats: Spraying requires very thin, even coats.
Updating Your Hardware
New hardware can instantly modernize your cabinets.
Hardware Ideas:
- Knobs: Simple and effective for a quick update.
- Pulls: Offer more variety in style and finish.
- Finishes: Brushed nickel, matte black, brass, and chrome are popular choices.
Lighting and Cabinet Accents
Consider how lighting affects your cabinet color. Under-cabinet lighting can highlight a fresh paint job. You could also consider adding decorative molding or beadboard to plain cabinet doors for added texture.
Maintaining Your Newly Painted Cabinets
Proper care will ensure your painted cabinets look great for years.
Daily Cleaning:
- Wipe up spills immediately.
- Use a soft, damp cloth for general cleaning.
- Avoid abrasive cleaners or scrub brushes, which can scratch the paint.
Deep Cleaning:
- For tougher grime, use a mild dish soap mixed with water.
- Wipe with a clean, damp cloth afterward to remove soap residue.
- Dry thoroughly.
Avoiding Damage:
- Be careful when opening and closing doors to avoid knocking them against frames.
- Use coasters for drinks near cabinets.
Frequently Asked Questions (FAQ)
Q: How long does it take to paint kitchen cabinets?
A: This depends on the size of your kitchen, the number of cabinets, and your pace. Most DIYers spend anywhere from a weekend to a full week on the project, including drying times.
Q: Do I need to remove my cabinet doors?
A: Yes, it is highly recommended to remove cabinet doors and drawers for the best and most even finish. Painting them while attached will result in brush marks and missed spots.
Q: Can I paint laminate cabinets?
A: Yes, but it requires careful prep. You’ll need a good quality bonding primer specifically designed for laminate or slick surfaces, followed by a durable topcoat. Lightly sanding is still important.
Q: What’s the best type of paint for kitchen cabinets?
A: High-quality enamel paints (latex or oil-based) in a satin or semi-gloss finish are generally considered the best for durability and washability.
Q: How many coats of paint do I need?
A: Typically, you’ll need two to three coats of paint for good coverage and a smooth finish, after applying primer.
Q: Can I paint my cabinets without sanding?
A: While there are “no-sand” primers, sanding is crucial for proper adhesion and a long-lasting finish, especially for wood cabinets. Skipping sanding will likely lead to chipping and peeling paint down the line. It’s the best way to paint cabinets for durability.
Q: My cabinets look okay, but I want a refresh. What are my options?
A: A kitchen cabinet refresh can be as simple as cleaning them thoroughly, tightening hardware, or perhaps applying a new coat of polish. If you want a color change, painting is the most impactful kitchen cabinet makeover you can do.
Changing your kitchen cabinet color is a rewarding DIY project that can dramatically improve the look and feel of your kitchen. With careful preparation and the right techniques, you can achieve a beautiful, updated look that you’ll love for years to come. Happy painting!