
Can you restore kitchen cabinets yourself? Yes, with the right tools, patience, and a good plan, anyone can restore kitchen cabinets. This guide will walk you through the entire process, from a simple clean-up to a full cabinet refinishing. Revitalizing your kitchen cabinets can dramatically change the look and feel of your kitchen, often without the hefty cost of replacement. Whether your cabinets are scratched, faded, or just outdated, this DIY guide is your roadmap to transforming them.
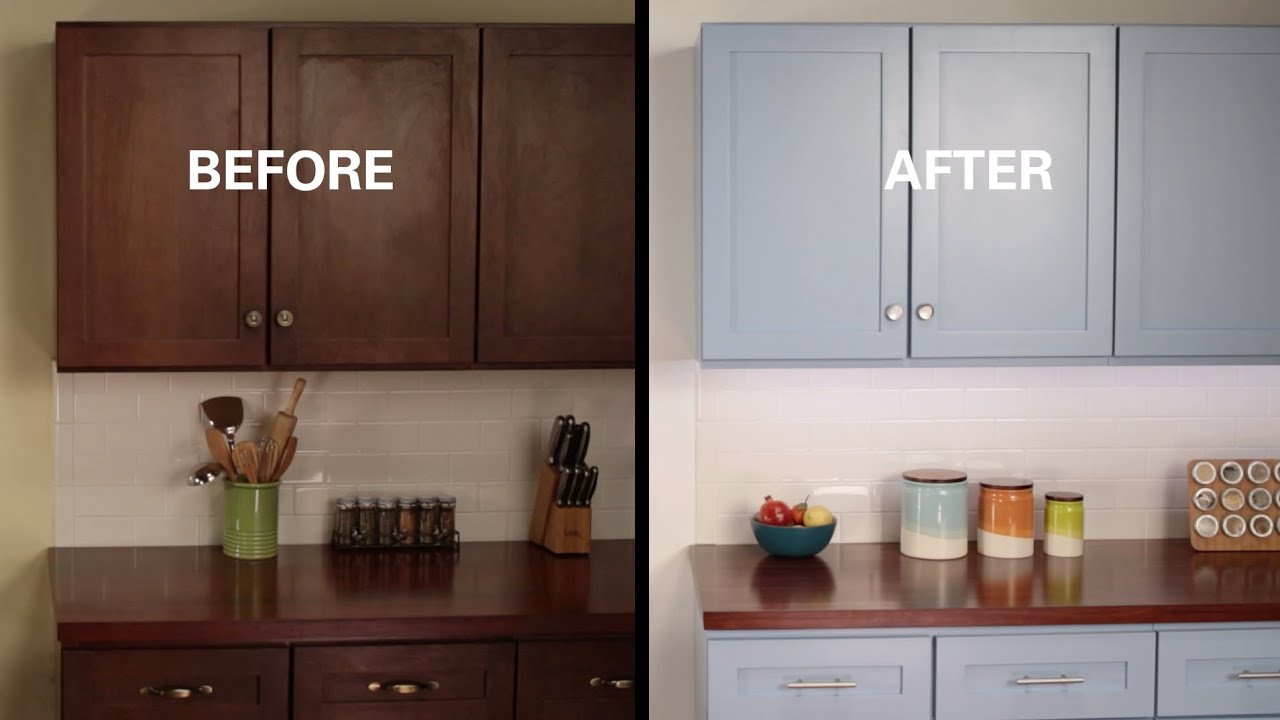
Image Source: i.ytimg.com
Why Restore Your Kitchen Cabinets?
Restoring your kitchen cabinets offers a fantastic way to update your kitchen’s appearance and functionality. It’s a cost-effective alternative to a complete kitchen remodel, allowing you to achieve a fresh, new look without breaking the bank. Beyond aesthetics, proper restoration can also extend the life of your cabinets, protecting them from further damage and wear.
Benefits of DIY Cabinet Restoration:
- Cost Savings: Significantly cheaper than hiring professionals or buying new cabinets.
- Customization: You control the color, finish, and style.
- Sense of Accomplishment: The satisfaction of a job well done.
- Extended Cabinet Lifespan: Protects wood and prevents future damage.
- Increased Home Value: An updated kitchen is a major selling point.
Deciding on the Right Restoration Method
There are several ways to restore kitchen cabinets, each suited for different conditions and desired outcomes. Your cabinets’ current state and the look you want to achieve will determine the best approach.
1. Cleaning and Deep Conditioning
For cabinets that are generally in good shape but simply dull or a bit grimy, a thorough cleaning might be all they need. This is the simplest and least time-consuming method.
When to choose this:
- Cabinets have surface dirt, grease, or residue.
- The original finish is intact and not significantly damaged.
- You want a quick, low-effort refresh.
What you’ll need:
- Mild dish soap
- Warm water
- Soft cloths (microfiber is ideal)
- Wood conditioner (optional, for extra shine and protection)
Steps:
- Remove Hardware: Unscrew knobs and pulls.
- Prepare Cleaning Solution: Mix a few drops of mild dish soap with warm water.
- Clean Surfaces: Dip a soft cloth into the solution, wring it out well, and wipe down each cabinet surface. Work in small sections.
- Rinse: Use a separate cloth dampened with plain water to wipe away any soap residue.
- Dry Thoroughly: Use a dry cloth to immediately dry all surfaces. This prevents water spots.
- Apply Conditioner (Optional): If using a wood conditioner, apply it according to product instructions. This helps nourish the wood and restore its natural sheen.
2. Repairing Minor Damage
Scratches, dents, and chips can make cabinets look worn. Fortunately, these are often easy to fix.
What you’ll need:
- Wood filler or putty
- Putty knife
- Fine-grit sandpaper (120-220 grit)
- Wood stain or furniture polish matching cabinet color
Steps for Minor Scratches:
- Clean the Area: Ensure the scratch is free of dirt and debris.
- Rub with a Walnut: For very light surface scratches, sometimes rubbing a walnut (the nut, not the wood type) over the scratch can help blend it in due to its natural oils.
- Use a Scratch Repair Pen: Available in various wood tones, these pens are excellent for camouflaging light scratches.
- Wood Stain Pen/Marker: Similar to scratch repair pens, but specifically for staining.
Steps for Dents and Gouges:
- Clean the Area: Make sure the damaged spot is clean.
- Apply Wood Filler: Use a putty knife to apply wood filler to the dent or gouge, pressing it in firmly. Overfill slightly, as it will shrink when drying.
- Let it Dry: Allow the wood filler to dry completely according to the product’s instructions.
- Sand Smooth: Once dry, lightly sand the filled area with fine-grit sandpaper until it’s flush with the surrounding surface.
- Touch Up: Apply wood stain or furniture polish that matches your cabinets to the repaired area. You might need to experiment with stain colors on a scrap piece of wood first to get a perfect match.
3. Refinishing Kitchen Cabinets (Staining)
Refinishing kitchen cabinets involves stripping the old finish and applying a new stain. This is a more involved process but yields beautiful, durable results, especially for beautiful wood grain. This is a great option for wood cabinet restoration.
When to choose this:
- The existing finish is damaged, peeling, or heavily worn.
- You want to change the color of your wood cabinets.
- You want to highlight the natural beauty of the wood grain.
What you’ll need:
- Screwdriver (to remove doors and drawers)
- Chemical stripper (follow safety instructions carefully)
- Scrapers (various sizes)
- Steel wool (medium and fine grit)
- Mineral spirits or denatured alcohol
- Tack cloth
- Sanding block
- Sandpaper (80, 120, 220 grit)
- Wood conditioner (optional, but recommended for even staining)
- Wood stain (your chosen color)
- Polyurethane or other protective topcoat (satin, semi-gloss, or gloss)
- Good quality brushes or foam applicators
- Gloves, safety glasses, and a respirator mask
- Drop cloths
Steps for Refinishing:
- Remove Doors and Drawers: Carefully label each door and drawer to ensure they go back in the correct place. Remove hinges and hardware.
- Strip the Old Finish:
- Lay drop cloths to protect your work area.
- Apply the chemical stripper according to the manufacturer’s instructions. Work in a well-ventilated area.
- Allow the stripper to work for the recommended time.
- Use scrapers and steel wool to gently remove the softened finish.
- Wipe down the cabinets with mineral spirits or denatured alcohol to remove any remaining stripper residue.
- Sand the Cabinets:
- Start with 80-grit sandpaper to remove any stubborn finish and smooth out imperfections.
- Progress to 120-grit, then 220-grit sandpaper for a smooth surface.
- For cabinet doors and drawer fronts, sanding is crucial for a smooth finish.
- Always sand in the direction of the wood grain.
- Wipe away all dust with a tack cloth after each sanding grit.
- Apply Wood Conditioner (Optional but Recommended):
- If you’re staining a softer wood like pine, applying a pre-stain wood conditioner will help the stain penetrate more evenly, preventing blotchiness.
- Apply according to product instructions and let it penetrate for the recommended time.
- Apply Stain:
- Stir the stain thoroughly. Do not shake, as this can create bubbles.
- Apply the stain evenly in the direction of the wood grain using a brush or foam applicator.
- Let the stain penetrate for the time recommended by the manufacturer (usually 5-15 minutes). Longer penetration means a darker color.
- Wipe off the excess stain with a clean cloth, again working in the direction of the grain.
- Allow the stain to dry completely. You may want to apply a second coat for a deeper color.
- Apply Topcoat (Protective Finish):
- Once the stain is completely dry, apply a protective topcoat like polyurethane.
- Apply thin, even coats using a good quality brush or foam applicator. Avoid over-brushing.
- Allow each coat to dry completely according to the manufacturer’s instructions.
- Lightly sand between coats with 220-grit or 320-grit sandpaper and wipe with a tack cloth for a super-smooth finish.
- Typically, 2-3 coats of topcoat are recommended for durability.
4. Painting Kitchen Cabinets
Painting kitchen cabinets is a popular and effective way to achieve a dramatic transformation. It allows for a wide range of color options and can cover up less attractive wood grain. This is a great way to update the look of your kitchen.
When to choose this:
- The wood grain is not desirable.
- You want a bold color change.
- The cabinets are laminate or composite rather than solid wood.
What you’ll need:
- Screwdriver
- Degreaser or TSP substitute
- Sanding sponges or sandpaper (100, 150, 220 grit)
- Wood filler (if needed)
- Primer (high-quality, stain-blocking)
- Paint (cabinet-grade enamel or latex paint specifically designed for cabinets)
- High-density foam rollers or good quality brushes
- Paint tray
- Tack cloths
- Gloves, safety glasses, and a respirator mask
Steps for Painting:
- Remove Doors and Drawers: Label everything carefully. Remove hinges and hardware.
- Clean Thoroughly: This is a critical step. Use a degreaser or TSP substitute to remove all grease, dirt, and grime from the cabinet surfaces. Rinse with clean water and let them dry completely.
- Repair and Prep:
- Fill any holes or imperfections with wood filler. Let dry and sand smooth.
- Lightly sand all cabinet surfaces with 100-150 grit sandpaper to create a surface for the primer to adhere to. Sand in the direction of the grain where possible.
- Wipe down all surfaces with a tack cloth to remove dust.
- Prime the Cabinets:
- Apply a high-quality, stain-blocking primer. This seals the wood and prevents tannins from bleeding through the paint.
- Use a brush for corners and edges and a foam roller for the flat surfaces. Apply thin, even coats.
- Let the primer dry completely according to the manufacturer’s instructions.
- Lightly sand the primed surfaces with 220-grit sandpaper and wipe with a tack cloth.
- Paint the Cabinets:
- Apply your chosen paint in thin, even coats. Use a high-density foam roller for smooth surfaces and a quality brush for details.
- Avoid over-brushing or over-rolling, which can lead to an uneven finish.
- Allow each coat to dry completely before applying the next. This is key to achieving a smooth, professional look.
- Apply 2-3 coats of paint for full coverage and durability.
- Lightly sand with 220-grit sandpaper between coats and wipe with a tack cloth for a smoother finish.
- Reassemble:
- Once the final coat of paint is completely dry (allow at least 24-48 hours for full curing, though it might feel dry to the touch sooner), reattach the doors, drawers, and hardware.
Choosing a Cabinet Refinishing Kit
For those who want a streamlined approach, a cabinet refinishing kit can be a great option. These kits typically include most of the necessary supplies, such as stripper, deglosser, stain, and topcoat, often tailored for a specific type of cabinet or finish. Using a cabinet refinishing kit can simplify the process, especially for beginners.
What to look for in a kit:
- Comprehensive Supplies: Does it include everything you need, or will you have to buy additional items?
- Quality of Products: Research reviews for the specific brands included in the kit.
- Type of Finish: Is it for staining or painting? Does it suit your cabinet material?
- Ease of Use: Some kits are specifically designed for DIYers with minimal experience.
Preparing Your Kitchen for the Project
Before you dive into restoring your cabinets, proper preparation is essential for a successful outcome and a less chaotic kitchen.
Clearing the Kitchen
- Remove Everything: Empty cabinets, drawers, countertops, and appliances that might be in the way.
- Designate a Workspace: If possible, set up a dedicated area for working on cabinet doors and drawers. A garage, basement, or even a spare room can work. Ensure it’s well-ventilated.
Protecting Your Space
- Cover Floors and Appliances: Use drop cloths or plastic sheeting to protect your floors, countertops, and any appliances you can’t move.
- Tape Off Areas: Use painter’s tape to mask off any areas you don’t want to be affected, such as walls, backsplashes, or appliance fronts.
Cabinet Refinishing Kit vs. Buying Supplies Separately
The choice between a cabinet refinishing kit and purchasing individual supplies depends on your budget, experience level, and preference.
| Feature | Cabinet Refinishing Kit | Buying Supplies Separately |
|---|---|---|
| Convenience | High; all necessary products are included. | Requires careful selection and purchasing of individual items. |
| Cost | Can be cost-effective, but sometimes you pay for bundled convenience. | Potentially more budget-friendly if you select wisely; can also be more expensive if you buy premium products. |
| Flexibility | Limited; you get the products provided in the kit. | High; you can choose specific brands, colors, and finishes. |
| Learning Curve | Generally lower, as products are often formulated to work together. | Higher; requires more research into product compatibility and application. |
| Customization | Limited to the options within the kit. | Unlimited; full control over all aspects of the project. |
Recommendation: For beginners, a cabinet refinishing kit can be a good starting point. Experienced DIYers or those with specific aesthetic goals might prefer to select their own supplies.
Refinishing Cabinet Doors: Special Considerations
Cabinet doors are the most visible part of your kitchen cabinets, so getting them right is crucial. Refinishing cabinet doors requires attention to detail.
Working Surfaces
- Flat Surface: Always work on a flat, stable surface. Use sawhorses or a workbench.
- Ventilation: Ensure good airflow, especially when using strippers or strong finishes.
Achieving a Smooth Finish
- Prepping is Key: Thoroughly clean, sand, and remove all dust from the doors before applying any finish.
- Thin Coats: Apply thin, even coats of stain or paint. Multiple thin coats are always better than one thick coat.
- Drying Time: Respect the drying times between coats. This is vital for a smooth, durable finish.
Wood Cabinet Restoration: Specific Tips
When dealing with solid wood cabinets, you’re working with natural materials that have unique characteristics.
Identifying Wood Type
Knowing your wood type can help you choose the right products and techniques. For example, oak may require a wood filler to smooth out its prominent grain before painting, while maple is a smoother wood that takes stain beautifully.
Addressing Wood Issues
- Warping: Minor warping can sometimes be corrected with moisture and weight, but severe warping may require replacing the door or drawer front.
- Water Damage: If you find water damage, allow the wood to dry completely. If the damage is severe, you might need to replace that section or the entire component.
Kitchen Cabinet Repair: Beyond Cosmetics
Sometimes, cabinets need more than just a cosmetic facelift. Structural repairs might be necessary.
Drawer Slides
- Wobbly Drawers: Check the drawer slides for damage or misalignment. Clean them, lubricate them if necessary, or consider replacing them if they are bent or broken.
Hinges
- Sagging Doors: If cabinet doors are sagging, the hinges might be loose, bent, or worn out. Tighten screws, replace bent hinges, or opt for new, high-quality hinges.
Structural Integrity
- Loose Joints: For cabinets with loose joints, wood glue and clamps can often reinforce them.
Cabinet Painting Tips for a Professional Look
Achieving a professional finish when painting cabinets requires patience and attention to detail.
Choosing the Right Paint
- Cabinet-Specific Paint: Use paints formulated for cabinets, typically oil-based enamels or high-quality latex enamels. They offer better durability and a smoother finish.
- Sheen: Satin or semi-gloss finishes are often preferred for cabinets as they are easier to clean and more resistant to moisture than matte finishes.
Application Techniques
- Rollers vs. Brushes: Use high-density foam rollers for large, flat surfaces for a smooth, brush-stroke-free finish. Use a quality angled brush for cutting in edges and details.
- Back-Brushing: After rolling, lightly brush over the wet paint to smooth out any roller marks.
- Thin Coats: Apply thin, even coats. This prevents drips and runs and builds a durable finish.
Restore Kitchen Cabinet Finish: Bringing Back the Sheen
Restoring the original finish or applying a new one is about protecting the wood and enhancing its appearance.
Maintaining the Finish
- Regular Cleaning: Wipe down cabinets regularly with a damp cloth and mild soap.
- Avoid Harsh Chemicals: Never use abrasive cleaners or harsh chemicals, as they can damage the finish.
Touch-Up and Maintenance
Over time, even the best finishes can show wear. Having leftover paint or stain on hand for touch-ups is a good idea. For minor scuffs, a furniture polish or wax can often help restore the sheen.
Frequently Asked Questions (FAQ)
Q1: How long does it take to restore kitchen cabinets?
A1: The time required varies greatly depending on the method and the size of your kitchen. A simple cleaning might take a few hours, while a full refinishing or painting job can take several days to over a week, factoring in drying times.
Q2: What is the best paint for kitchen cabinets?
A2: High-quality latex enamel paints or oil-based enamels specifically designed for cabinets offer the best durability and finish. Look for paints that are washable and resistant to grease and moisture.
Q3: Can I paint over stained cabinets?
A3: Yes, you can paint over stained cabinets. The key is proper preparation: cleaning, sanding to create a good surface for adhesion, priming with a stain-blocking primer, and then applying your paint in thin coats.
Q4: Do I need to remove my cabinet doors to paint them?
A4: It is highly recommended to remove cabinet doors and drawer fronts. This allows for a much smoother and more even finish, as you can paint all sides and edges without drips or missed spots that can occur when they are attached.
Q5: What grit sandpaper should I use for cabinet refinishing?
A5: For stripping, you might start with 80-grit. For smoothing between coats of primer or paint, 220-grit is common. For a very smooth final finish on stained wood, you might even go up to 320-grit. Always start with a coarser grit if needed and progress to finer grits.
Q6: How do I get a smooth finish when painting cabinets?
A6: Achieve a smooth finish by thorough cleaning and sanding, using a high-quality primer, applying thin, even coats of paint with a foam roller and quality brush, and lightly sanding between coats.
By following these steps and tips, you can successfully restore your kitchen cabinets, breathing new life into your kitchen and enjoying a beautiful, updated space.