
Can you attach a kitchen island to the floor? Yes, you absolutely can and often should attach your kitchen island to the floor for stability and safety. What is the best way to attach a kitchen island to the floor? The best way involves securely fastening its base to the subfloor or flooring material using appropriate hardware and techniques to ensure it won’t shift or tip.
A kitchen island is a fantastic addition to any kitchen, offering extra prep space, storage, and a place to gather. However, for safety and long-term stability, especially in households with children or high traffic, kitchen island anchoring is crucial. A wobbly or unsecured island is not only an eyesore but a potential hazard. This guide will walk you through the process of securing island to floor, covering different methods and considerations for a sturdy and safe installation.
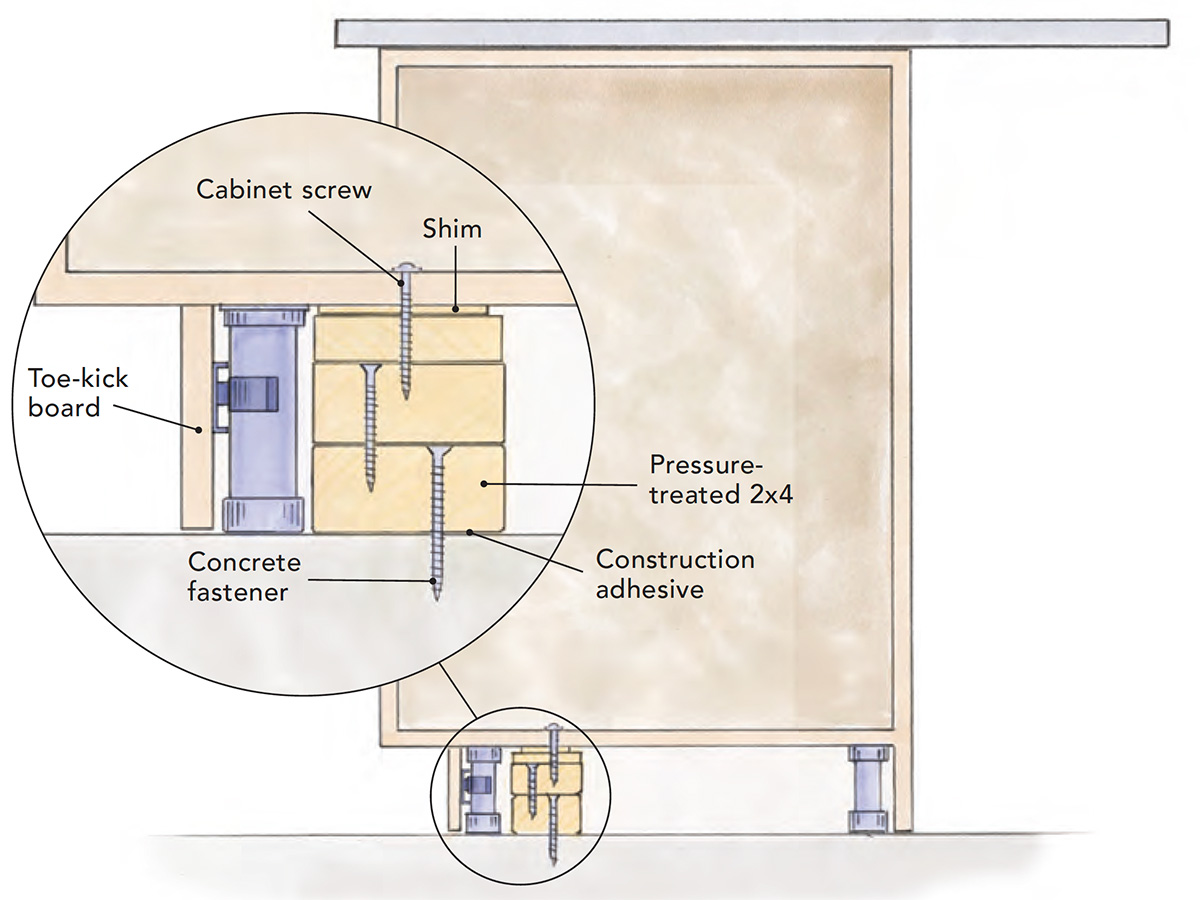
Image Source: images.finehomebuilding.com
Why Secure Your Kitchen Island to the Floor?
Before diving into the “how,” let’s explore the “why.” Kitchen island anchoring serves several vital purposes:
- Safety: This is paramount. An unsecured island can tip over, especially if someone leans heavily on it or a child tries to climb it. This is particularly true for islands with overhangs or those that are taller than they are wide.
- Stability: A secure island provides a stable work surface. No more wobbling cutting boards or items sliding off when you’re chopping vegetables.
- Durability: Properly fastened islands are less likely to suffer damage from shifting or movement over time.
- Aesthetics: A firmly planted island looks and feels more professional and finished.
- Compliance (Sometimes): In some commercial or high-traffic environments, building codes might even mandate kitchen island floor mounting.
Types of Kitchen Islands and Their Mounting Needs
Not all kitchen islands are created equal, and their construction will influence the best method for floor fastening kitchen island.
Freestanding Islands
These are the most common type. They are often built like large cabinets or tables and typically have a finished base that sits directly on the floor. Attaching island cabinets in this scenario usually involves securing the island’s cabinet base to the floor.
Islands with Legs or Pedestals
Some islands are designed with legs or a central pedestal for support. In these cases, kitchen island leg attachment becomes the focus. The legs might have pre-drilled plates or require specialized brackets to connect them to the floor.
Rolling Islands
While convenient, rolling islands are designed to be mobile. They generally do not need to be permanently secured to the floor. However, some people prefer to lock the wheels and add extra stability with chocks or even temporary anchors if they are concerned about movement during heavy use.
Essential Tools and Materials for Securing Your Island
To ensure a successful and secure installation, you’ll need the right tools and materials.
Tools
- Drill/Driver: For pre-drilling holes and driving screws.
- Drill Bits: Various sizes, including pilot hole bits and masonry bits if you have a concrete floor.
- Screwdriver Set: For manual adjustments.
- Level: To ensure the island is perfectly horizontal.
- Tape Measure: For accurate placement and measurements.
- Pencil: For marking.
- Stud Finder: Crucial for locating floor joists if you have a wooden subfloor.
- Chisel or Pry Bar: Might be needed to slightly lift flooring if necessary.
- Safety Glasses: Always protect your eyes.
- Work Gloves: For grip and protection.
- Optional: Oscillating Multi-Tool or Reciprocating Saw: If you need to cut access holes in flooring.
Materials
- Heavy-Duty Wood Screws: Lag screws or construction screws are ideal for securing wood to wood. Choose screws long enough to penetrate the subfloor effectively.
- Washers: To distribute the pressure of the screws and prevent them from pulling through the island’s base.
- Angle Brackets (L-Brackets): Versatile for connecting the island’s base to the floor.
- Island Base Plates: These are specialized metal plates designed to attach to the underside of the island and then to the floor. They often provide a cleaner look than visible brackets.
- Wood Shims: To level the island if your floor is uneven.
- Caulk or Wood Filler: For sealing any gaps or covering screw holes.
- Subfloor Anchors (if necessary): For concrete floors, you’ll need appropriate concrete anchors (e.g., wedge anchors, sleeve anchors).
Methods for Kitchen Island Floor Mounting
There are several effective ways to achieve kitchen island floor mounting. The best method will depend on your island’s construction and your floor type.
Method 1: Securing Through the Island’s Base Cabinet
This is the most common and often the most robust method for freestanding islands.
Steps:
- Position the Island: Place the kitchen island in its final location. Ensure it’s centered and spaced correctly from cabinets and walls.
- Level the Island: Use a level on all sides. If it’s not level, place shims under the low spots until it is perfectly stable and level.
- Mark the Shim Locations: Once leveled, mark the positions of the shims. You might need to temporarily lift the island to secure the shims with adhesive or screws if they are in critical spots.
- Locate Floor Joists (for Wood Floors): Use a stud finder to locate the floor joists directly beneath the island’s base. Mark their positions carefully. If you can’t align your attachment points with joists, you’ll need to use appropriate subfloor anchors.
- Pre-Drill Pilot Holes:
- Through the Island Base: From the inside of the island’s base cabinets, drill pilot holes through the bottom panel of the cabinet, just large enough for your screws. Aim to drill through the center of any internal support beams within the island’s base for added strength.
- Into the Floor: If attaching to a wood subfloor, drill pilot holes into the joists at your marked locations. The pilot hole should be slightly smaller than the diameter of your screws to ensure a strong grip. If attaching to a concrete floor, you’ll need to mark the hole locations and use a hammer drill with a masonry bit to create holes for concrete anchors.
- Choose Your Fasteners:
- Wood Subfloor: Use 3-inch to 4-inch heavy-duty wood screws with washers. The screws should be long enough to go through the island’s base, the subfloor, and at least 1.5 inches into the floor joist.
- Concrete Floor: Use appropriate concrete anchors (e.g., wedge anchors) with washers. Follow the anchor manufacturer’s instructions for drilling and installation.
- Attach the Island:
- For Wood Floors: Drive the screws through the pilot holes in the island’s base and into the floor joists. Tighten them securely, but avoid overtightening, which could strip the wood.
- For Concrete Floors: Insert the concrete anchors into the pre-drilled holes and set them according to the manufacturer’s instructions. Then, secure the island to the anchors using the appropriate hardware.
- Reinforce (Optional but Recommended): For maximum stability, consider adding angle brackets (L-brackets) on the inside corners of the island’s base, attaching them to both the island’s base and the floor. This is a great way of reinforcing kitchen island base.
- Hide Fasteners: Once secured, you can fill any visible screw holes on the inside of the island with wood filler or caulk for a clean finish.
Method 2: Using Island Base Plates
Island base plates offer a more concealed way to anchor your island, especially if you can’t easily access the inside of the base cabinets or want a cleaner look.
Steps:
- Position and Level: As with Method 1, position and level the island, using shims as needed.
- Mark Locations: While the island is in place and leveled, mark the positions where the base plates will be attached to the floor. You’ll need to determine where on the island’s base the plates will be most effective for support.
- Attach Base Plates to the Floor:
- For Wood Floors: Pre-drill pilot holes into the floor joists at your marked locations. Then, secure the island base plates to the floor using appropriate wood screws and washers. Ensure the plates are flush with the floor.
- For Concrete Floors: Mark the hole locations for the concrete anchors through the base plates. Drill into the concrete and install the anchors. Then, secure the base plates to the anchors.
- Attach Island to Base Plates: Carefully lower the island onto the secured base plates. From the inside of the island’s base, drive screws upwards through the island’s bottom panel and into the pre-drilled holes in the base plates. You might need to cut small access holes in the island’s base to do this.
- Final Checks: Ensure the island is still level and all connections are tight.
Method 3: Attaching to the Island Base Plate (Underside Mount)
This is a variation of using base plates but focuses on attaching the plates to the underside of the island first.
Steps:
- Prepare the Island: If possible, carefully flip the island upside down or tilt it to access the underside of its base.
- Position Base Plates: Place the island base plates on the underside of the island’s base, aligning them with sturdy internal supports or cabinet members. Mark the screw hole locations.
- Attach Base Plates to Island: Pre-drill pilot holes through the island’s base and into the base plates. Secure the plates to the island using short wood screws.
- Position Island and Mark Floor: Carefully move the island into its final position. Use a level to ensure it’s perfectly plumb and level. Mark the locations of the base plates onto the floor.
- Secure Plates to Floor:
- For Wood Floors: Carefully lift one end of the island (or use temporary supports) just enough to access the base plate. Drill pilot holes through the base plates and into the floor joists. Secure the base plates to the floor with appropriate screws and washers. Repeat for all base plates.
- For Concrete Floors: Mark the anchor locations through the base plates onto the concrete. Lift the island as needed, drill into the concrete, install anchors, and then secure the base plates to the anchors.
- Final Tightening: Once all base plates are secured to the floor, ensure all screws connecting the island to the plates are tightened.
Method 4: Securing Islands with Legs or Pedestals
For islands that don’t have a solid cabinet base, securing the legs or pedestal is key.
Steps:
- Position the Island: Place the island in its final location.
- Level: Use shims under the legs or pedestal to ensure the entire island is level.
- Mark Leg/Pedestal Base: Mark the exact position of each leg or the base of the pedestal on the floor.
- Detach Legs/Pedestal (If Possible): If the legs or pedestal can be detached from the island top, it makes securing them to the floor much easier.
- Attach Legs/Pedestal to Floor:
- For Legs with Mounting Plates: If the legs have pre-drilled mounting plates, mark the hole locations on the floor. For wood floors, locate joists and pre-drill pilot holes. Secure the plates to the floor with appropriate screws and washers. For concrete, use anchors.
- For Pedestals: The pedestal base might have a wider footprint that needs to be secured. You might use a combination of screws through the pedestal base into joists or anchors for concrete. For very heavy pedestals, you might even embed a steel plate in the floor before installing the final flooring, to which the pedestal can then be permanently bolted.
- Reattach Legs/Pedestal to Island: If you detached them, reattach the legs or pedestal to the island top securely.
- Final Check: Ensure the island is stable and all connections are tight.
Considerations for Different Floor Types
The type of flooring you have will significantly impact the floor fastening kitchen island process.
Wooden Subfloor with Finished Flooring (Hardwood, Laminate, Vinyl)
This is the most common scenario in many homes.
- Challenge: You need to penetrate the finished flooring without damaging it and securely anchor into the subfloor and ideally into floor joists.
- Technique:
- Locate Joists: A stud finder is essential. Mark the joist locations carefully.
- Protect Flooring: When drilling through finished flooring, use a sharp drill bit designed for the material (e.g., a brad-point bit for wood). Drill slowly and steadily.
- Access: You might need to drill through the finished flooring directly, or if you can access the underside of the island’s base, you might be able to drill upwards into the underside of the floorboards.
- Screw Length: Ensure your screws are long enough to go through the finished floor, subfloor, and at least 1.5 inches into the joist.
Tile or Stone Flooring
These are hard, brittle surfaces that require extra care.
- Challenge: Drilling through tile or stone can cause cracking or chipping. You also need to reach the subfloor beneath.
- Technique:
- Locate Grout Lines/Seams: If possible, try to align your attachment points over grout lines or seams where drilling is easier.
- Use Masonry Drill Bits: Always use a masonry or carbide-tipped drill bit specifically designed for tile and stone.
- Drill Slowly and Cool the Bit: Start drilling at a slow speed and apply steady pressure. Periodically lift the drill to clear debris and cool the bit, perhaps with a little water or a damp sponge.
- Protect the Surface: Place painter’s tape around the drill site to help prevent chipping.
- Subfloor Access: Once through the tile, you’ll need to continue into the subfloor and joists, or use appropriate anchors if the subfloor itself is concrete.
Concrete Flooring
This provides a very solid base but requires different fasteners.
- Challenge: You cannot screw directly into concrete.
- Technique:
- Use Concrete Anchors: You will need specialized concrete anchors such as wedge anchors, sleeve anchors, or Tapcons (self-tapping concrete screws).
- Drilling into Concrete: Use a hammer drill and a masonry bit of the correct size specified by the anchor manufacturer.
- Anchor Placement: Mark the hole locations carefully and ensure they are spaced appropriately for the island’s stability.
Frequently Asked Questions (FAQ)
Q: Do I need to secure a heavy kitchen island to the floor?
A: Even heavy islands can shift with significant force, especially if leaned on heavily or if there are children in the home. Securing a heavy island is highly recommended for safety and long-term stability.
Q: What if I have radiant floor heating?
A: This is a critical consideration. If you have radiant floor heating, you must be extremely careful not to damage the heating elements.
* Locate the Heating Coils: If possible, get the installation plans for your radiant heating system to identify the exact location of the heating wires or tubes.
* Drill with Extreme Caution: You may need to drill very shallow pilot holes or use mounting methods that don’t require penetrating deeply into the subfloor if the heating elements are close to the surface.
* Consider Alternative Mounting: For islands with legs, it might be safer to attach the legs to a thicker, separate base plate that is then secured to the floor, minimizing the risk of damaging the heating system.
* Consult Professionals: If you are unsure, consult with the installer of your radiant heating system or a qualified contractor.
Q: Can I attach my kitchen island to a vinyl or linoleum floor?
A: Yes, but you must ensure you are anchoring through the vinyl or linoleum into the subfloor and ideally the joists. Do not rely on the vinyl or linoleum itself for support. You will likely need to drill through it.
Q: What is the best type of screw for securing an island to a wood floor?
A: Heavy-duty wood screws, also known as construction screws or lag screws, are best. Ensure they are long enough to penetrate the subfloor and firmly grip the floor joists. A 3-inch to 4-inch length is usually appropriate.
Q: How many screws do I need to secure my island?
A: The number of screws depends on the size and weight of your island, as well as the method of attachment. For a standard freestanding island, aim for at least four secure anchor points, ideally two on each long side, driven into floor joists. For islands with legs, secure each leg individually.
Q: What if I can’t find floor joists?
A: If you cannot locate floor joists under your island, you will need to use subfloor anchors specifically designed for your subfloor type (e.g., concrete anchors for concrete, or toggle bolts/molly bolts if you only have a thick subfloor and no joists accessible, though this is less ideal for heavy loads).
Q: Do I need to anchor a small, lightweight island?
A: Even small islands benefit from anchoring. They can still pose a tipping hazard, especially if a child attempts to climb them or if you lean heavily on one side while preparing food.
Conclusion
Kitchen island anchoring is a crucial step for any homeowner looking to maximize the safety, stability, and longevity of their kitchen island. Whether you’re attaching island cabinets, securing legs, or using specialized island base plates, taking the time to properly secure your island to the floor will pay dividends in peace of mind and a more functional, beautiful kitchen. Always prioritize safety, use the correct tools and hardware, and don’t hesitate to seek professional help if you’re unsure about any step of the DIY kitchen island floor attachment process. By following these guidelines, you can ensure your kitchen island remains a stable and integral part of your home for years to come.