
Image Source: contentgrid.homedepot-static.com
DIY: How To Install a Single Handle Kitchen Faucet
Can I install a single handle kitchen faucet myself? Yes, you absolutely can install a single handle kitchen faucet yourself! With basic tools and a little patience, most homeowners can tackle this project. This guide will walk you through the entire process, from removing your old faucet to enjoying your brand-new one.
Installing a new kitchen faucet can dramatically update your kitchen’s look and functionality. A single handle faucet is popular for its ease of use and modern aesthetic. It controls both water flow and temperature with a single lever, making it a convenient choice.
Tools and Materials You’ll Need
Before you start, gather all the necessary tools and materials. Having everything ready will make the installation process much smoother.
- New Single Handle Kitchen Faucet: Ensure it’s compatible with your sink.
- Adjustable Wrench: For tightening and loosening various nuts.
- Basin Wrench: This specialized tool is a lifesaver for reaching nuts in tight spaces under the sink.
- Plumber’s Tape (Teflon Tape): To create watertight seals on threaded connections.
- Bucket: To catch any residual water from the old lines.
- Old Towels or Rags: For cleaning up spills.
- Safety Glasses: To protect your eyes from debris.
- Flashlight or Headlamp: To see clearly under the sink.
- Wire Brush or Steel Wool: For cleaning threads on supply lines.
- Putty Knife or Scraper: To remove old putty or sealant.
- Silicone Sealant or Plumber’s Putty: To seal the base of the new faucet.
Step 1: Shutting Off the Water Supply
This is the most crucial first step. You don’t want water spraying everywhere!
- Locate Shut-Off Valves: Under your kitchen sink, you’ll find two shut-off valves connected to the hot and cold water supply lines. They usually have red (hot) and blue (cold) handles or indicators.
- Turn Off the Valves: Turn both handles clockwise until they are completely closed.
- Test the Water: Turn on your old faucet in the “on” position to drain any remaining water in the lines and to confirm the water is indeed shut off. No water should come out.
Step 2: Removing the Old Faucet
Now it’s time to remove old faucet components. This can sometimes be the trickiest part due to corrosion and tight spaces.
- Clear Under the Sink: Remove everything from the cabinet below your sink to give yourself ample working space.
- Disconnect Water Lines:
- Place your bucket directly beneath the connections.
- Using your adjustable wrench, carefully loosen the nuts that connect the hot and cold water supply lines to the shut-off valves. These are typically compression fittings.
- Once loose, unscrew them by hand. Be prepared for a small amount of residual water to drip out.
- Next, disconnect the supply lines from the old faucet itself. This is where the basin wrench often becomes essential.
- Unscrew Faucet Mounting Hardware:
- Look for the nuts or mounting clips holding the faucet to the underside of your sink or countertop.
- Use your basin wrench or adjustable wrench to loosen and remove these nuts. It might require some maneuvering to get the wrench into position.
- If your old faucet had a separate spray nozzle, disconnect its hose as well.
- Lift Out the Old Faucet: Once all connections and mounting hardware are removed, the old faucet should lift out from the top of the sink. You might need to gently rock it back and forth if it’s stuck due to old putty or sealant.
- Clean the Sink Surface: Use a putty knife or scraper to carefully remove any old plumber’s putty or sealant from the sink surface where the old faucet was mounted. Clean the area thoroughly with a rag.
Step 3: Preparing for the New Faucet Installation
With the old faucet out, you’re ready to prepare for the new one.
- Inspect the Sink Holes: Make sure the holes in your sink or countertop are clean and free of debris.
- Install Faucet Base Plate (If Included): Many single-handle faucets come with an optional base plate, also known as an escutcheon. This plate covers extra holes if your sink has more than the faucet requires.
- If you are using the base plate, follow the manufacturer’s instructions. It might have a rubber gasket or require a bead of silicone sealant around its edge to create a watertight seal.
- Position the base plate over the sink holes.
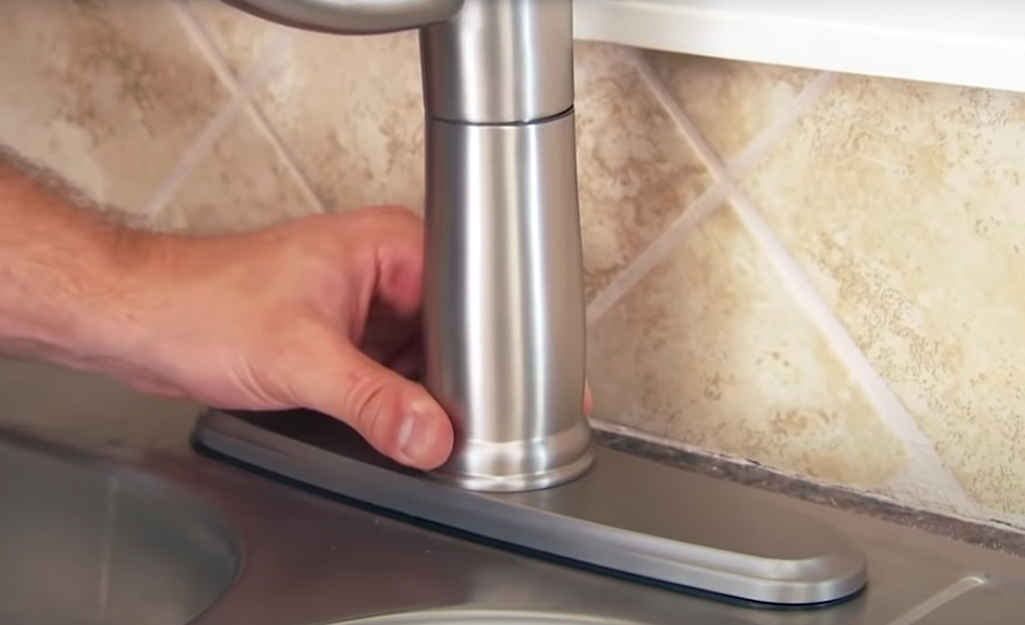
Step 4: Mounting the Faucet
This is where your new faucet starts to take shape in your kitchen.
-
Mount Faucet Body:
- Feed the faucet’s supply lines and mounting shank(s) through the appropriate hole(s) in the sink or countertop. If you’re using a base plate, feed them through that first.
- Position the faucet so it is centered and facing the correct direction.
-
Secure the Faucet:
- From underneath the sink, slide any included rubber or plastic washers onto the faucet shank(s).
- Then, thread on the metal washers and the mounting nuts.
- Tighten Faucet Nuts: Hand-tighten the nuts first. Then, use your basin wrench or adjustable wrench to snug them up. Be careful not to overtighten, as this could crack your sink or damage the faucet. Ensure the faucet is straight and stable before fully tightening. A good rule of thumb is to tighten until snug, then give it another quarter-turn.
Step 5: Connecting the Water Lines
Now you’ll connect water lines to your new faucet and the shut-off valves.
-
Prepare Supply Lines:
- Your new faucet likely came with integrated supply lines, or you may have purchased separate flexible braided stainless steel supply lines.
- If using separate lines, ensure they are the correct length and have the appropriate fittings for both your faucet and the shut-off valves.
- If the ends of the supply lines or shut-off valves have old tape or debris, use a wire brush or steel wool to clean the threads.
- Wrap plumber’s tape (Teflon tape) clockwise around the threads of the shut-off valves (if not using new ones with built-in seals) and the threaded inlet of the faucet if they are not self-sealing. Use about 3-4 wraps.
-
Connect Supply Lines to Faucet:
- If your faucet has separate supply lines that screw into the faucet body, thread them on by hand, ensuring they are not cross-threaded. Tighten them with a wrench as per the manufacturer’s instructions.
-
Connect Supply Lines to Shut-Off Valves:
- Connect water lines from the faucet (or your separate supply lines) to the corresponding hot (red) and cold (blue) shut-off valves.
- Thread the nuts onto the valve stems by hand.
- Use your adjustable wrench to tighten the nuts. Again, avoid overtightening. A snug fit is usually sufficient.
Step 6: Connecting the Sprayer Hose (If Applicable)
If your new faucet includes a side sprayer or a pull-down/pull-out sprayer, you’ll need to connect its hose.
- Locate Sprayer Connection: Under the sink, find the connection point for the sprayer hose. This is usually a quick-connect fitting or a threaded nut.
- Connect Hose:
- For quick-connect fittings, simply push the hose into place until it clicks.
- For threaded connections, screw the hose onto the designated fitting and tighten gently with a wrench if needed.
- Attach Counterweight (Pull-Down/Pull-Out Sprayers): If you have a pull-down or pull-out sprayer, you’ll need to attach the provided counterweight to the hose. This weight helps the sprayer retract smoothly. Position it according to the faucet’s instructions.
Step 7: Sealing the Faucet Base
A good seal prevents water from seeping under the faucet and damaging your countertop or cabinet.
- Seal Faucet Base: Most manufacturers recommend using either plumber’s putty or silicone sealant.
- Plumber’s Putty: Roll a rope of plumber’s putty (about the thickness of a pencil) and place it around the underside of the faucet base or the base plate.
- Silicone Sealant: Apply a thin, continuous bead of 100% silicone sealant around the underside of the faucet base or base plate.
- Make sure the sealant or putty creates a complete circle to effectively block water.
Step 8: Final Checks and Testing
Before you celebrate, perform these final checks.
- Check Tightness: Double-check that all connections are snug – both the faucet mounting nuts and the supply line connections.
- Remove Aerator: Unscrew the aerator from the tip of the faucet spout. This is important because it allows any debris that might have entered the lines during installation to flush out freely.
- Turn On Water: Slowly turn the hot and cold shut-off valves back on by turning their handles counter-clockwise.
- Test for Leaks:
- Carefully inspect all connections under the sink: where the supply lines connect to the shut-off valves, and where they connect to the faucet. Look for any drips or signs of moisture.
- Check around the base of the faucet on top of the sink for any seepage.
- If you see any leaks, gently tighten the offending connection a small amount. If a leak persists, you may need to re-apply plumber’s tape or check the washer/gasket.
- Flush the Lines:
- With the aerator still removed, turn on the faucet to a medium flow.
- Let the water run for a minute or two to flush out any air and debris from the lines and the new faucet.
- Turn off the faucet.
- Reinstall Aerator: Screw the aerator back onto the faucet spout.
- Test Faucet Operation: Turn the faucet on again. Test both hot and cold water flow. Check that the handle moves smoothly and controls temperature and flow as expected. Test any sprayer function.
Table: Common Faucet Installation Issues and Solutions
| Issue | Cause | Solution |
|---|---|---|
| Faucet leaks at base | Inadequate or improperly applied sealant | Remove faucet, clean surface, apply new silicone sealant or plumber’s putty, reinstall and tighten. |
| Leaking supply line connection | Loose fitting or damaged thread/washer | Tighten the connection slightly. If still leaking, disconnect, check washer, reapply plumber’s tape, reconnect. |
| Faucet wobbles | Loose mounting nuts | Tighten the mounting nuts from underneath the sink. |
| Low water pressure | Debris in lines or clogged aerator | Remove aerator and flush lines. Clean or replace aerator if necessary. |
| Hot and cold reversed | Supply lines connected to wrong valves | Turn off water, swap the hot and cold supply line connections at the shut-off valves. |
| Sprayer hose not retracting | Counterweight positioned incorrectly or missing | Adjust or attach the counterweight according to the manufacturer’s instructions. |
Frequently Asked Questions (FAQ)
Q1: How long does it typically take to install a kitchen faucet?
A1: For a DIYer with basic tools and experience, installing a single-handle kitchen faucet usually takes between 1 to 3 hours. If it’s your first time, it might take a bit longer as you familiarize yourself with the process.
Q2: What is the difference between plumber’s putty and silicone sealant?
A2: Plumber’s putty is a malleable, clay-like substance that creates a watertight seal. It’s best for sealing surfaces that are porous, like granite or marble, as it won’t stain. Silicone sealant is a waterproof adhesive that cures to a flexible rubber-like state. It’s ideal for sealing gaps and is commonly used on stainless steel or porcelain sinks. Always check your faucet manufacturer’s recommendation.
Q3: My old faucet is very corroded. How can I remove it?
A3: If nuts and fittings are heavily corroded, you might need to use a penetrating oil (like WD-40) to loosen them. Let it sit for a while before attempting to loosen with a wrench. In extreme cases, you may need to use a small hacksaw to cut through stubborn nuts or mounting hardware, but be very careful not to damage your sink.
Q4: Can I replace my kitchen faucet if I don’t have shut-off valves under the sink?
A4: While it’s highly recommended to have shut-off valves for ease of maintenance, if yours are missing or don’t work, you’ll need to turn off water to the entire house at the main water shut-off valve. This is usually located where the water pipe enters your home (e.g., basement, utility closet, or outside).
Q5: Do I need to replace kitchen faucet supply lines every time?
A5: It’s a good practice to replace old or worn supply lines when you replace kitchen faucet. Flexible braided stainless steel supply lines are relatively inexpensive and are less prone to bursting than older rubber or plastic types. If your new faucet comes with integrated lines, you won’t need separate ones unless the integrated ones are too short.
Q6: What is a basin wrench and why is it important?
A6: A basin wrench is a long-handled tool with a swiveling jaw at one end. It’s specifically designed to reach and turn nuts in the confined spaces behind sinks or bathtubs, where a standard wrench cannot fit. It’s invaluable for tasks like loosening and tightening faucet mounting nuts.
By following these steps carefully, you can successfully install a single handle kitchen faucet and enjoy your refreshed kitchen. Remember to work methodically, and don’t hesitate to consult your faucet’s specific installation manual for any unique instructions.