
Can you change the color of kitchen cabinets? Yes, you absolutely can! Whether you’re looking for a fresh look, want to match new decor, or simply dislike the current shade, changing your kitchen cabinet color is a fantastic way to transform your space without a complete renovation. This guide will walk you through everything you need to know for a successful DIY cabinet makeover, from picking the perfect shade to the final touches.
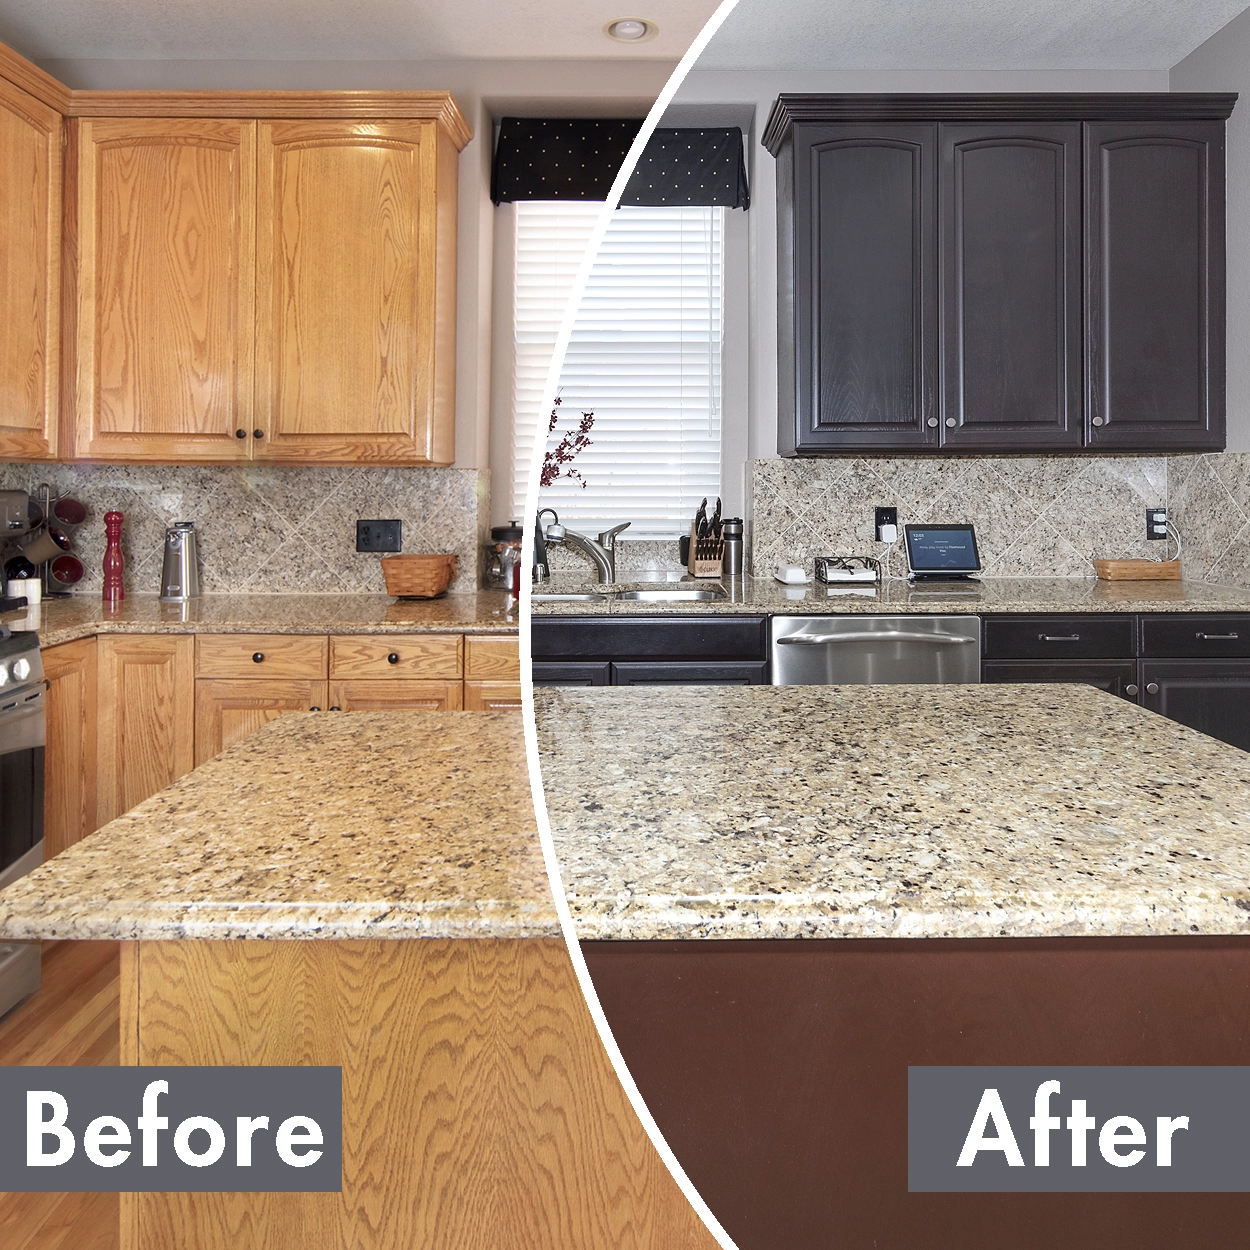
Image Source: www.nhance.com
Why Change Your Kitchen Cabinet Color?
Kitchen cabinets are a dominant feature in any kitchen. Their color can dramatically affect the overall mood and style of the room. If your cabinets are outdated, damaged, or just not your style anymore, updating their color can be a game-changer. It’s a cost-effective way to achieve a high-impact transformation. This process, often referred to as kitchen cabinet painting or cabinet refinishing, breathes new life into your kitchen.
Here are some common reasons people decide to change their cabinet color:
- Outdated Style: Trends change, and what was once stylish might now feel tired.
- New Decor: When you redecorate your kitchen, existing cabinet colors might clash with your new scheme.
- Damage or Wear: Scuffs, scratches, or fading can make cabinets look old and worn. A fresh coat of paint or stain can hide these imperfections.
- Personal Preference: You might simply be tired of the current color and crave something new.
- Increased Home Value: A modern, updated kitchen with fresh cabinet colors can boost your home’s appeal and resale value.
Deciding on Your New Cabinet Color
Choosing the right cabinet color ideas is crucial for a successful DIY cabinet makeover. Consider your kitchen’s existing elements, the amount of natural light, and the overall style you’re aiming for.
Factors to Consider When Choosing a Color:
- Kitchen Size: Lighter colors can make a small kitchen feel more spacious, while darker colors can make a large kitchen feel cozier.
- Natural Light: Rooms with abundant natural light can handle a wider range of colors. Rooms with less light might benefit from lighter, brighter shades to maximize the available light.
- Existing Elements: Think about your countertops, backsplash, flooring, and wall color. Your new cabinet color should complement these features.
- Overall Style:
- Modern: White, gray, black, or deep blues often work well.
- Farmhouse: Off-whites, creams, soft grays, or muted blues and greens are popular.
- Traditional: Wood stains, deep greens, navy blues, or classic whites can create a timeless look.
- Mid-Century Modern: Walnut or teak wood tones, or even pops of color like teal or mustard yellow, can capture this style.
- Durability: Consider how well a color hides wear and tear. White can show grime easily, while darker colors might show dust or fingerprints.
Popular Cabinet Color Ideas:
| Color Family | Popular Shades | Mood/Style It Creates | Considerations |
|---|---|---|---|
| Whites | Pure White, Cream, Off-White | Bright, airy, clean, classic, versatile | Can show dirt easily. Requires good prep for a smooth finish. |
| Grays | Light Gray, Charcoal, Greige | Modern, sophisticated, neutral, adaptable | Works well with many accent colors. |
| Blues | Navy, Teal, Powder Blue | Calm, serene, coastal, sophisticated, bold | Deep blues can make a kitchen feel dramatic and rich. |
| Greens | Sage, Emerald, Mint | Earthy, natural, calming, fresh | Sage is very popular for a natural look. |
| Blacks | Matte Black, Deep Charcoal | Dramatic, modern, luxurious, bold | Can make a kitchen feel smaller if not balanced with light. |
| Wood Tones | Walnut, Oak, Maple | Warm, natural, traditional, rustic, timeless | Cabinet staining highlights the wood grain. |
Preparing Your Cabinets for a Color Change
Proper preparation is the most critical step in achieving a professional-looking finish for your kitchen cabinet painting. Skipping steps here will likely lead to a less durable and less attractive result.
Step 1: Remove Cabinet Doors and Drawers
- Label Everything: Use masking tape and a marker to label each door and drawer front with its corresponding location. This is vital for reassembly.
- Remove Hardware: Take off all kitchen cabinet hardware, including hinges, knobs, and pulls. Store them safely in a bag or container.
- Organize: Keep doors and drawers organized by their location. You can place them on a drop cloth or large sheets of paper.
Step 2: Clean the Cabinets Thoroughly
Grease, grime, and dust are the enemies of good adhesion.
- Degrease: Use a good degreaser or a mixture of warm water and dish soap. You can also use a specialized TSP (trisodium phosphate) substitute cleaner.
- Wipe Down: Clean all surfaces of the cabinets, doors, and drawer fronts.
- Rinse: Wipe down all surfaces with clean water to remove any residue from the cleaner.
- Dry: Allow all surfaces to dry completely.
Step 3: Sanding for Adhesion
Sanding creates a slightly rough surface that primer and paint can adhere to better.
- Sanding Grit: Use medium-grit sandpaper (120-150 grit) for initial sanding. If your cabinets have a very glossy finish, you might need to start with a slightly coarser grit (100-120 grit) but finish with 150.
- Sanding Technique: Sand all surfaces that will be painted or stained. Focus on creating a dull, matte finish, not on removing the original finish entirely.
- Power vs. Hand Sanding: A palm sander can speed up the process for doors and drawer fronts. For cabinet frames, hand sanding or sanding blocks are often more practical.
- Dust Removal: After sanding, use a vacuum cleaner with a brush attachment to remove as much dust as possible. Then, wipe down all surfaces with a tack cloth or a damp (not wet) microfiber cloth to pick up the remaining fine dust particles.
Step 4: Repair Imperfections
Fill any holes, dents, or cracks before painting.
- Wood Filler: Use wood filler to repair dents and gouges. Apply it according to the product instructions.
- Sanding Repairs: Once the filler is dry, sand it smooth to be flush with the surrounding surface.
- Dust Removal Again: Clean off the dust from the repairs using a vacuum and tack cloth.
Step 5: Prime the Cabinets
Primer is essential for good adhesion and an even finish. It also helps block any stains from bleeding through the new paint.
- Choose the Right Primer: Use a high-quality bonding primer, especially if you’re painting over a laminate or slick surface. For wood cabinets, an oil-based primer is often recommended for its stain-blocking properties.
- Application: Apply a thin, even coat of primer. Avoid drips.
- Drying Time: Allow the primer to dry completely according to the manufacturer’s instructions.
- Light Sanding: Once dry, lightly sand the primed surfaces with fine-grit sandpaper (220 grit). This will create a super smooth surface for your paint.
- Dust Removal: Clean off the dust with a vacuum and tack cloth.
The Painting Process: Achieving a Smooth Finish
Kitchen cabinet painting requires patience and attention to detail for the best results.
Choosing Your Paint
- Type: For cabinets, a high-quality enamel paint is recommended. These paints are durable, washable, and resistant to chipping and scratching. Look for paints specifically designed for cabinets or furniture. Alkyd or latex enamels are common choices.
- Sheen:
- Satin or Semi-Gloss: These sheens are popular for cabinets because they are durable, easy to clean, and offer a slight sheen that hides minor imperfections better than high gloss.
- Matte or Flat: These can look beautiful but are generally less durable and harder to clean on cabinet surfaces.
Application Techniques
There are three main ways to apply paint to your cabinets:
-
Brushing and Rolling (DIY Friendly):
- Tools: High-quality synthetic brushes (for cutting in edges and details) and small foam rollers (for smooth, even coverage on flat surfaces).
- Technique:
- Apply paint in thin, even coats.
- For doors and drawer fronts, roll in one direction to avoid roller marks.
- For cabinet frames, use a brush for corners and edges, then a roller for larger flat areas.
- Avoid over-brushing or over-rolling, which can create an uneven texture.
- Pros: Most accessible for DIYers.
- Cons: Can be time-consuming and may leave subtle brush or roller marks if not done carefully.
-
Spraying (Professional Finish):
- Tools: A paint sprayer (airless or HVLP – High Volume Low Pressure).
- Technique: Requires practice. Apply thin, even coats, maintaining a consistent distance from the surface. Overlap your spray passes.
- Pros: Provides the smoothest, most professional finish. Fast application.
- Cons: Requires specialized equipment, good ventilation, and practice. Significant prep is needed to mask off surrounding areas.
-
Cabinet Spray Paint Kits:
- These kits often include a special primer and paint formulated for spray application in a rattle can or a small sprayer.
- Pros: Convenient for small projects and offers a smoother finish than brushing/rolling.
- Cons: Can be expensive for large projects, and the finish may not be as durable as professional spray equipment.
The Painting Steps
- First Coat: Apply your first thin, even coat of paint. Work methodically.
- Drying Time: Allow each coat to dry completely according to the manufacturer’s instructions. This is crucial for adhesion and preventing smudging.
- Light Sanding Between Coats: After the first coat is dry, lightly sand all surfaces with fine-grit sandpaper (220-320 grit). This removes any dust nibs or imperfections and helps the next coat adhere better.
- Dust Removal: Clean off the dust with a tack cloth after each sanding.
- Subsequent Coats: Apply additional thin coats (usually 2-3 total) until you achieve full coverage and the desired finish. Always sand and clean between coats.
Cabinet Refinishing and Staining Options
If you have natural wood cabinets and prefer a wood grain look, cabinet refinishing or cabinet staining is a great alternative to painting. This process can reveal the beautiful natural beauty of the wood.
Cabinet Staining:
This involves removing the existing finish and applying a new stain.
Steps for Cabinet Staining:
- Preparation: Follow the same preparation steps as painting: remove doors, clean, and sand. For staining, you’ll need to sand down to the bare wood.
- Stripping (if necessary): If the original finish is very dark or damaged, you might need to use a chemical stripper to remove it before sanding.
- Sanding to Bare Wood: Use progressively finer grits of sandpaper (starting with 80-100 grit and moving up to 180-220 grit) until all old finish is removed and the wood is smooth.
- Pre-Stain Conditioner (Recommended for Pine and other Softwoods): Apply a pre-stain conditioner to ensure an even stain absorption.
- Apply Stain: Apply the stain evenly with a brush or rag, following the grain of the wood. Wipe off excess stain after the recommended time for the desired color depth.
- Apply Topcoat (Polyurethane/Varnish): Once the stain is dry, apply several thin coats of a durable topcoat like polyurethane or a water-based varnish for protection. Lightly sand between coats with very fine-grit sandpaper (320-400 grit).
Cabinet Renewal (Minor Touch-ups):
If your cabinets are in good condition but just need a refresh, you might consider a cabinet renewal process. This could involve:
- Cleaning and Polishing: A thorough cleaning followed by a furniture polish or wax can restore shine and mask minor scuffs.
- Touch-up Paint/Stain Markers: For small scratches or chips, specialized touch-up products can be used to blend the damage.
- Applying a Glaze: A glaze can be applied over existing paint or stain to add depth, an antique look, or highlight details. This is a cabinet finishing technique that can dramatically alter the appearance without a full repaint.
Reassembling and Final Touches
Once your cabinet doors, drawer fronts, and frames are painted or refinished and completely dry, it’s time to put everything back together.
Reattaching Hardware
- New Hardware: This is the perfect opportunity to update your kitchen cabinet hardware. New knobs and pulls can further enhance the updated look.
- Installation: Reinstall the hinges onto the doors and then reattach the doors to the cabinet frames. Install new knobs or pulls.
Adjusting Doors
- Hinge Adjustments: Cabinet hinges usually have adjustment screws that allow you to fine-tune the alignment of the doors so they hang straight and close properly. Consult your hinge manufacturer’s guide if needed.
Final Touches
- Clean Up: Clean your newly finished cabinets with a soft, damp cloth.
- Enjoy: Admire your refreshed kitchen!
What You Need to Know About Kitchen Cabinet Styles
Your kitchen cabinet styles play a role in how you approach a color change.
- Shaker Style: Characterized by a recessed center panel and clean lines. This versatile style looks good with almost any color.
- Slab/Flat Panel: Modern and minimalist. These are easy to paint or stain evenly.
- Raised Panel: Have a more traditional, ornate look. The raised detail might require careful brushing or spraying to get even coverage.
- Insetting Doors: These doors sit flush within the cabinet frame. They require very precise work to paint smoothly.
Common Mistakes to Avoid
- Skipping Prep Work: This is the most common mistake. Inadequate cleaning, sanding, or priming leads to poor adhesion and a short-lived finish.
- Using the Wrong Paint: Not using durable enamel paint designed for cabinets can lead to chipping and scratching.
- Applying Paint Too Thickly: Thick coats can drip, run, and result in a less smooth finish. Thin, even coats are key.
- Not Allowing Proper Drying Time: Rushing the process and putting doors back too soon can cause damage.
- Not Sanding Between Coats: This prevents the paint from adhering properly and results in a less smooth finish.
- Using Old Brushes or Rollers: Invest in good quality tools for a better finish.
- Not Labeling Doors and Drawers: This can lead to a frustrating reassembly process.
Frequently Asked Questions (FAQ)
Q1: How long does it take to paint kitchen cabinets?
A1: The time varies greatly depending on the size of your kitchen, the number of doors and drawers, and your chosen method (brushing/rolling vs. spraying). A typical DIY project can take anywhere from a weekend to a week or more, factoring in drying times between coats and steps.
Q2: Can I paint over stained cabinets?
A2: Yes, you can paint over stained cabinets, but proper preparation is crucial. You’ll need to clean, sand, prime, and then paint with a durable enamel.
Q3: Can I paint laminate cabinets?
A3: Yes, you can paint laminate cabinets, but they require specific preparation. You must use a bonding primer designed for slick surfaces, and thorough sanding is essential for adhesion.
Q4: What is the best paint finish for kitchen cabinets?
A4: Satin or semi-gloss finishes are generally recommended for kitchen cabinets due to their durability, washability, and resistance to moisture.
Q5: Do I need to remove my cabinet doors to paint them?
A5: It is highly recommended to remove cabinet doors, drawer fronts, and hardware. This allows for a much smoother, more professional finish by enabling you to paint all sides and edges thoroughly without drips or unevenness on the cabinet frames.
Q6: How many coats of paint do I need?
A6: Typically, 2-3 thin coats of paint are sufficient. However, this can vary depending on the color you’re using and the coverage of the paint. Always apply thin, even coats and sand lightly between them.
Q7: How do I clean my newly painted cabinets?
A7: Clean with a soft, damp cloth and mild dish soap if needed. Avoid abrasive cleaners or scrub brushes, as they can damage the paint finish.
By following these detailed steps, you can confidently transform your kitchen cabinets, giving your kitchen a beautiful and updated look. Whether you choose kitchen cabinet painting or cabinet staining, the effort will be well worth the stunning results. Enjoy your DIY cabinet makeover!