
Can you adjust kitchen cabinet hinges yourself? Yes, you absolutely can! Adjusting kitchen cabinet hinges is a common DIY task that can significantly improve the look and function of your kitchen doors. It’s the secret to fixing sagging cabinet doors and ensuring your cabinets close smoothly and look perfectly aligned. This guide will walk you through the process of cabinet hinge adjustment, helping you tackle common issues like door sag adjustment and kitchen cabinet door alignment.
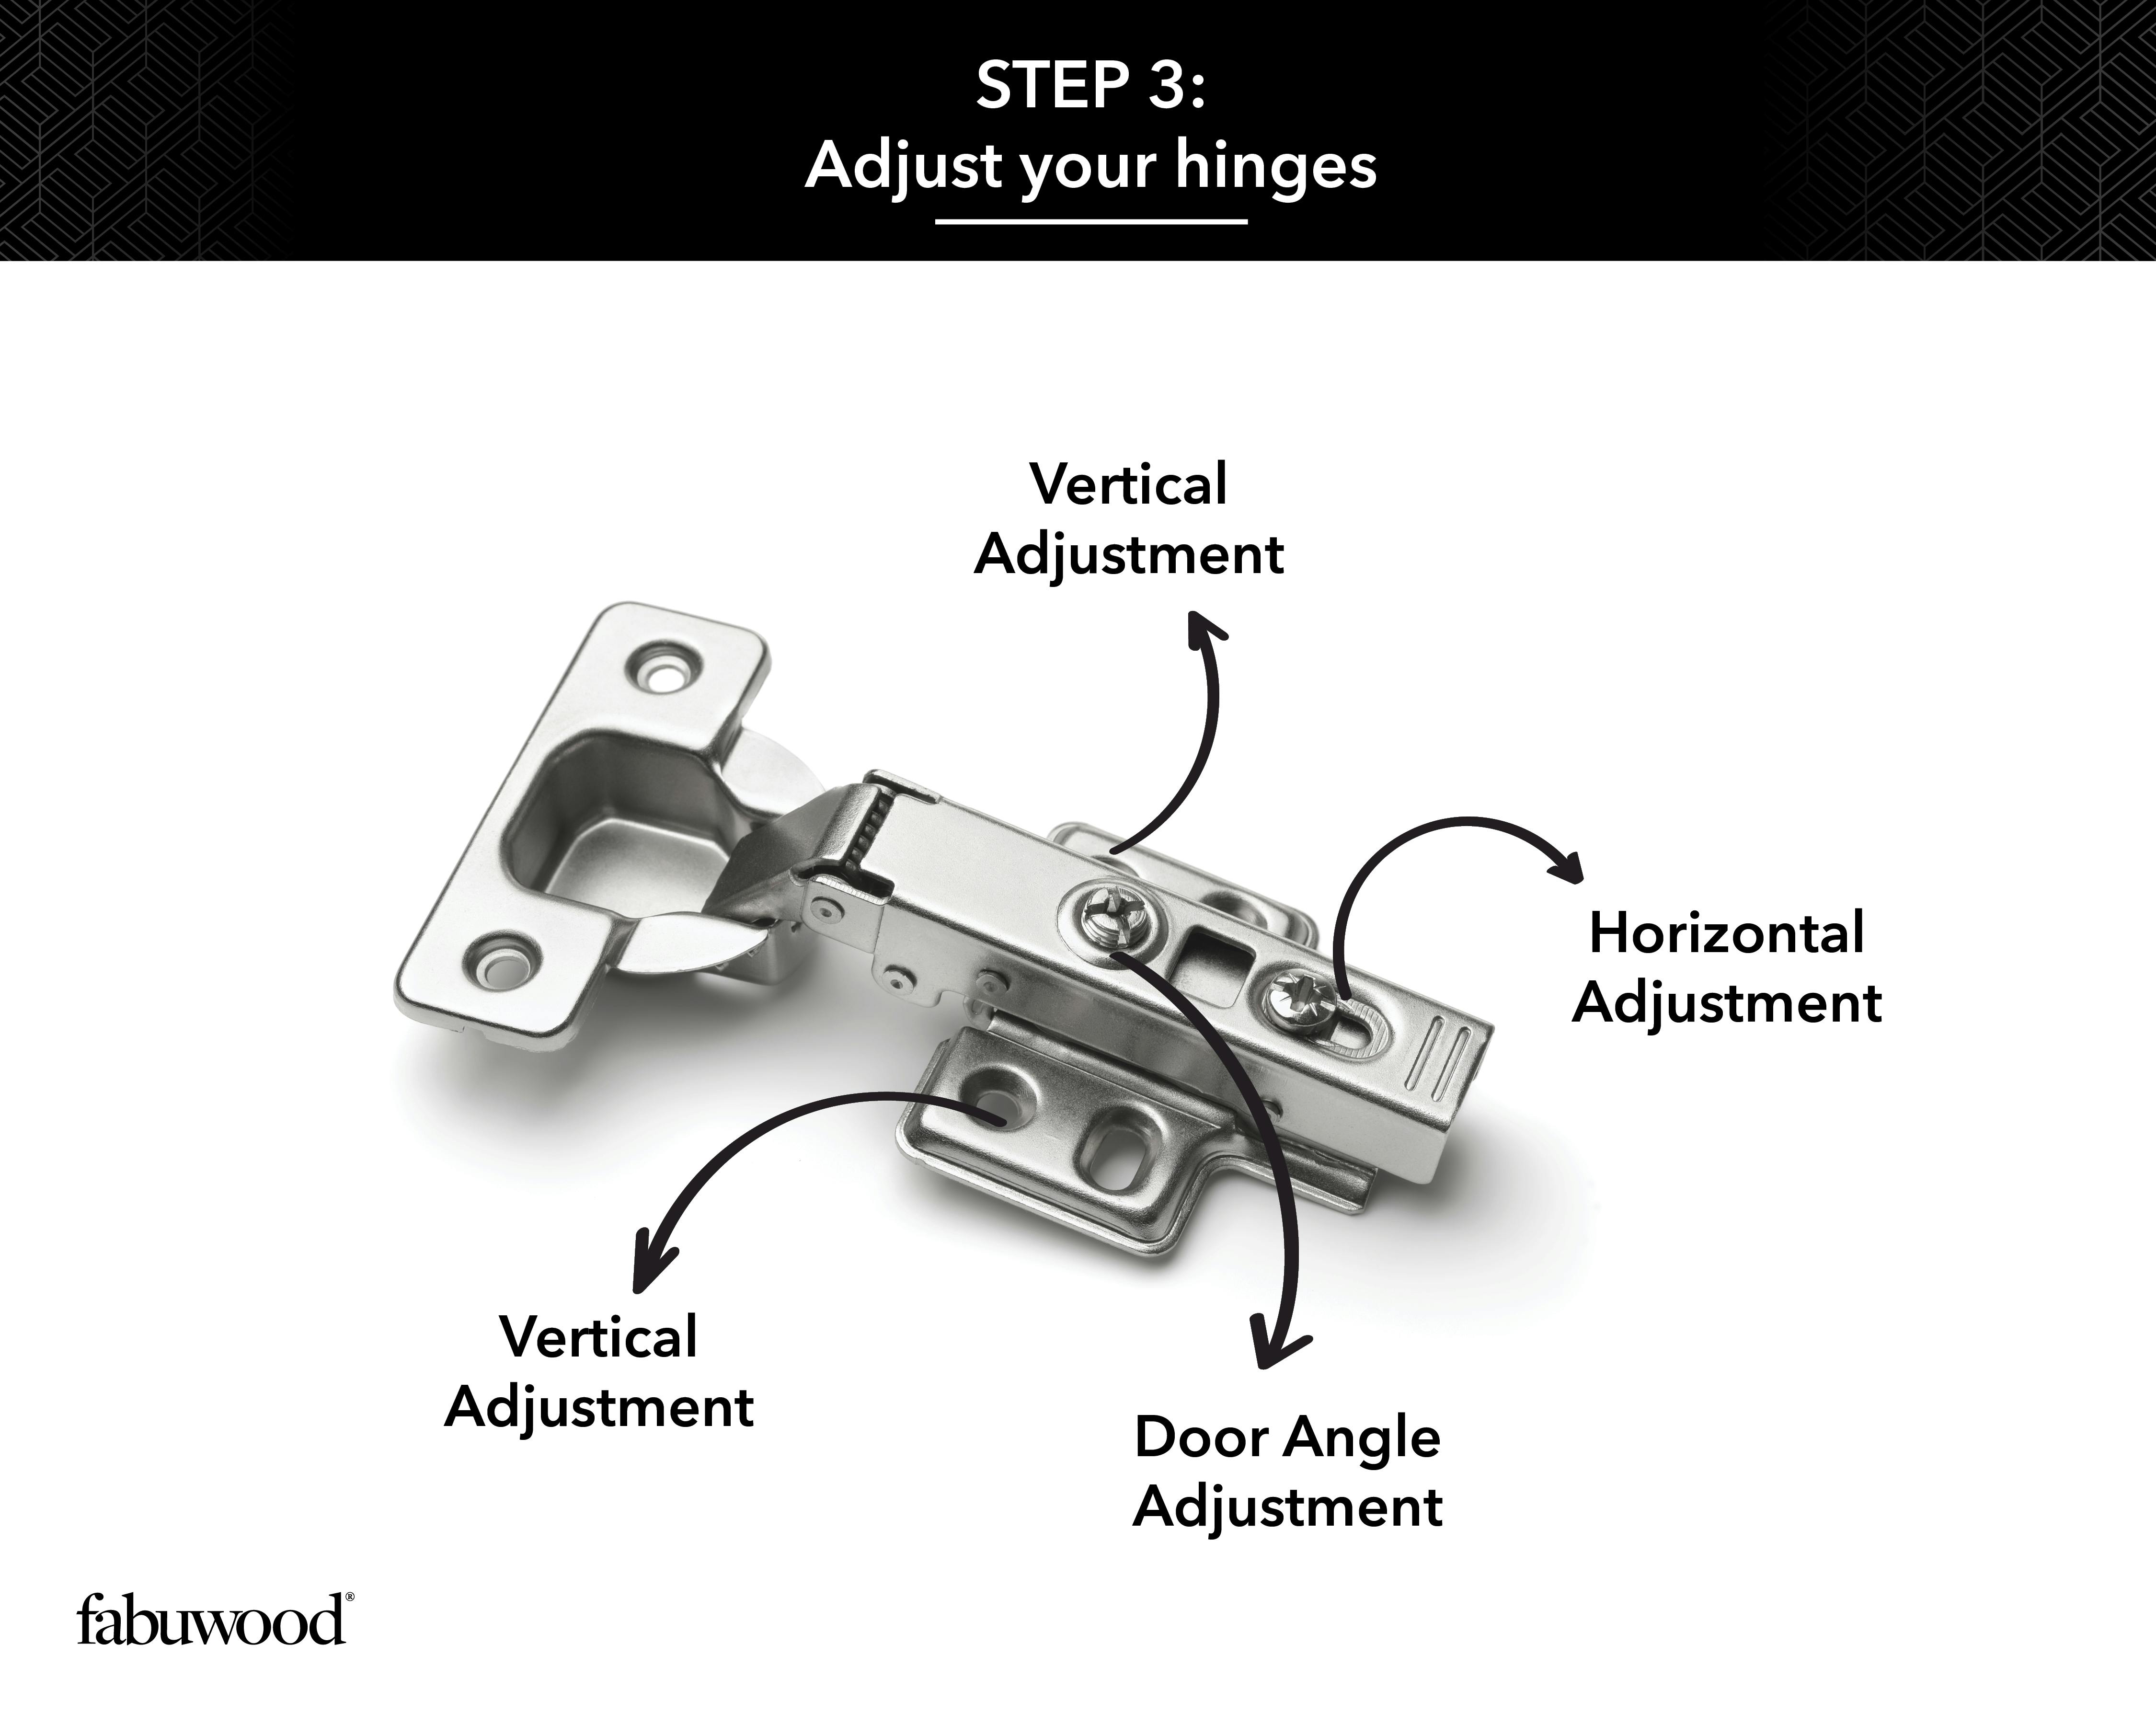
Image Source: images.ctfassets.net
Why Your Cabinet Doors Need Adjusting
Over time, kitchen cabinet doors can sag, become misaligned, or fail to close properly. This isn’t usually a sign of a major problem with your cabinets themselves, but rather an indication that the hinges might need a little tweak. Several factors can contribute to this:
- Wear and Tear: Hinges are mechanical parts and, like any moving component, they can wear down with constant use.
- Humidity Changes: Wood expands and contracts with changes in humidity. This can subtly shift the weight of the door, putting stress on the hinges.
- Installation Errors: Sometimes, hinges aren’t perfectly installed initially, leading to issues down the line.
- Heavy Doors: Larger or heavier cabinet doors are more prone to sagging due to the extra weight on the hinges.
- Loose Screws: Over time, the screws that attach the hinges to the cabinet and the door can loosen.
Addressing these issues through cabinet hinge adjustment can revive the appearance of your kitchen and make your cabinets much more user-friendly. It’s a great way to save money by avoiding professional repairs for what is often a simple fix.
Identifying the Problem: What to Look For
Before you start adjusting, it’s important to pinpoint exactly what’s wrong with your cabinet doors. This will help you determine the right adjustments to make. Common issues include:
- Door Sagging: The bottom of the door hangs lower than it should, creating an uneven gap between doors or between the door and the cabinet frame. This is a classic sign that needs door sag adjustment.
- Uneven Gaps: The space between cabinet doors is inconsistent, or the gap between the door and the cabinet frame is wider on one side than the other. This points to a need for kitchen cabinet door alignment.
- Doors Rubbing: The door might be sticking or rubbing against the cabinet frame or an adjacent door.
- Doors Not Closing Flush: The door doesn’t sit flush with the cabinet frame when closed, sticking out slightly.
- Cabinet Door Off-Track: In some cases, a door might feel like it’s not opening or closing smoothly, almost as if it’s off-track, though this is less common with standard hinges and more often associated with sliding mechanisms.
A quick inspection of your cabinet doors will reveal these common problems. Look at them from different angles and open and close them to see exactly where the misalignment occurs.
Types of Cabinet Hinges You Might Encounter
The method for adjusting hinges depends largely on the type of hinge your kitchen cabinets use. Most modern kitchens feature one of two main types:
Overlay Cabinet Hinges
These are the most common type of hinge found in kitchens. Overlay hinges allow the cabinet door to “overlay” the cabinet frame when closed. This means the door covers a portion of the face frame.
There are generally two sub-types of overlay hinges:
- Partial Overlay: The doors cover most, but not all, of the cabinet frame.
- Full Overlay: The doors cover almost the entire cabinet frame, leaving minimal gaps between doors.
European Cabinet Hinges (also known as Euro Hinges or Concealed Hinges)
These are incredibly popular for their sleek, modern look. European cabinet hinges are typically concealed within the cabinet door, making them invisible from the outside. They offer a very clean aesthetic.
These hinges are known for their adjustability and often have multiple adjustment screws allowing for precise control over the door’s position. Many European cabinet hinges also feature a self-closing mechanism, which is a convenient feature that pulls the door shut from a certain angle.
Essential Tools for Cabinet Hinge Adjustment
Before you dive into the adjustment process, gather these basic tools:
- Screwdriver Set: You’ll need Phillips head and possibly flathead screwdrivers. Many hinge screws are Phillips head.
- Measuring Tape: To check the gaps and ensure even alignment.
- Level: To verify if the doors are hanging straight.
- Pencil: To mark positions if needed.
- Soft Cloth or Rag: To protect the cabinet finish from scratches.
- Optional: Small Awl or Toothpick and Wood Glue: If a hinge screw hole has become stripped.
How to Adjust Hinges on Kitchen Cabinets: A Step-by-Step Guide
The core of fixing sagging and misaligned doors lies in understanding how to use the adjustment screws on your hinges. Most cabinet hinges, regardless of type, have screws that control the door’s position in three directions: up/down, left/right, and in/out.
Step 1: Identify the Adjustment Screws
This is where knowing your hinge type comes in handy.
-
For Overlay Hinges (Face Frame Cabinets):
- In/Out Adjustment: Usually, the screw closest to the cabinet frame controls how far the door sits from the frame. Turning this screw in or out will move the door closer or further away from the frame.
- Left/Right Adjustment: This is often achieved by loosening the screws that mount the hinge cup to the door or the hinge arm to the frame, allowing you to slide the door left or right. Sometimes, there’s a dedicated left/right adjustment screw.
- Up/Down Adjustment: This is the most common adjustment for sagging doors. It’s usually controlled by the longer screw that goes into the mounting plate on the cabinet frame. You’ll often need to loosen this screw slightly, adjust the door up or down, and then re-tighten.
-
For European Cabinet Hinges (Concealed Hinges):
These hinges are designed for precise adjustments and typically have three main screws:- Screw 1 (Depth/In-Out): This screw controls how far the door sits from the cabinet frame. Turning it in pushes the door away, and turning it out pulls the door closer.
- Screw 2 (Side-to-Side/Left-Right): This screw allows you to move the door horizontally, closing or widening the gap between doors.
- Screw 3 (Height/Up-Down): This screw is for vertical adjustments, allowing you to raise or lower the door to fix sagging or uneven gaps. On some hinges, this adjustment is made by loosening the mounting screws and sliding the hinge on the mounting plate.
Tip: Take a moment to examine your hinges. Often, you can visually identify which screw controls which movement. If you’re unsure, a quick search online for your specific hinge model can often provide diagrams or instructional videos.
Step 2: Address Door Sag Adjustment (Up/Down)
This is usually the most common adjustment needed for sagging doors.
- Locate the Up/Down Adjustment Screw: For overlay hinges, this is typically the screw that attaches the hinge to the mounting plate on the cabinet frame. For European hinges, it’s the dedicated height adjustment screw.
- Loosen the Screw (Slightly): Using the appropriate screwdriver, turn the screw counter-clockwise a half or full turn. You don’t need to remove it, just loosen it enough so the hinge can move.
- Adjust the Door: Gently lift the sagging side of the door to the desired position. If you’re adjusting European hinges, you might slide the hinge up or down on its plate.
- Re-tighten the Screw: Once the door is in the correct position, carefully tighten the adjustment screw clockwise.
- Test the Door: Open and close the door several times to ensure the sag is corrected and the door hangs straight.
- Repeat if Necessary: If the sag isn’t fully corrected, repeat the process, making small adjustments each time until the door is level.
Step 3: Correcting Left/Right Alignment
If your doors have uneven gaps on the sides or are rubbing against each other, you’ll need to adjust them left or right.
- Locate the Left/Right Adjustment Screw: For many overlay hinges, this involves loosening the screws that attach the hinge to the door or frame. For European hinges, there’s a dedicated side-to-side adjustment screw.
- Make the Adjustment:
- Overlay Hinges: Loosen the screws holding the hinge to the cabinet frame or door. Gently slide the door left or right to achieve the desired gap. Then, re-tighten the screws.
- European Hinges: Turn the side-to-side adjustment screw. Turning it one way will move the door one way, and turning it the other way will move it in the opposite direction.
- Check the Gap: Use your measuring tape to ensure the gap between the doors or the door and the frame is even on both sides.
- Test and Repeat: Open and close the door to ensure smooth operation and consistent alignment. Make further small adjustments as needed.
Step 4: Fine-Tuning the In/Out Position (Depth Adjustment)
This adjustment controls how far the door sits into the cabinet frame. It’s useful if a door is sticking out too far or not closing flush against the frame.
- Locate the In/Out Adjustment Screw: This is often the screw closest to the cabinet frame on overlay hinges, or a dedicated depth adjustment screw on European hinges.
- Adjust the Screw:
- Overlay Hinges: Turning this screw in will push the door further out from the frame; turning it out will pull it closer.
- European Hinges: Turn the depth adjustment screw.
- Check the Fit: Observe how the door sits against the frame. You want it to be flush or to the desired overlay.
- Test and Refine: Open and close the door to make sure it operates smoothly and the depth looks correct.
Step 5: Fixing Stripped Screw Holes
If you find that a hinge screw just keeps turning and doesn’t tighten, the screw hole in the cabinet or door may be stripped. This is a common cabinet hardware troubleshooting issue.
Here’s how to fix it:
- Remove the Hinge: Unscrew the hinge completely from the stripped hole.
- Fill the Hole:
- Method 1 (Toothpick/Wood Glue): Insert several wooden toothpicks into the stripped hole along with a small amount of wood glue. Break off the excess toothpicks flush with the surface. Let the glue dry completely (usually a few hours). The toothpicks fill the hole, giving the screw new material to grip.
- Method 2 (Golf Tee): A wooden golf tee can also be inserted into the hole with glue, then cut off flush.
- Method 3 (Screwdriver Handle): For larger stripped holes, sometimes a wooden dowel or even the handle of an old screwdriver can be cut to fit and glued in place.
- Re-drill (Optional): Some people prefer to drill a slightly larger pilot hole into the filled and dried area to ensure the screw goes in straight.
- Re-attach the Hinge: Screw the hinge back into the repaired hole. The screw should now have something firm to grip.
Step 6: Addressing Self-Closing Hinges
If you have self-closing hinges that aren’t closing all the way, or are closing too slowly or too forcefully, they often have an adjustment mechanism for the spring tension.
- Locate the Spring Adjustment: Look for a screw or a small dial on the hinge body itself. This controls the tension of the spring.
- Adjust Tension: Turn the screw or dial slowly.
- Too Slow/Not Closing: Increase the spring tension (usually by turning clockwise).
- Too Fast/Slamming: Decrease the spring tension (usually by turning counter-clockwise).
- Test: Close the door gently and observe its self-closing action.
- Fine-tune: Repeat the adjustment until the self-closing action is smooth and effective.
Important Note: Be careful not to overtighten the spring adjustment, as you could damage the hinge.
Table: Common Cabinet Hinge Problems and Adjustments
| Problem | Adjustment Needed | How to Adjust |
|---|---|---|
| Door Sagging (Up/Down) | Vertical adjustment | Loosen the main mounting screw (often for the hinge arm to the frame), lift the door, re-tighten. For Euro hinges, use the height adjustment screw. |
| Uneven Side Gaps (Left/Right) | Horizontal adjustment | Loosen hinge mounting screws and slide the door, or use the dedicated side-to-side screw on Euro hinges. |
| Door Rubbing Frame (In/Out) | Depth adjustment | Turn the screw that controls door depth (closest to frame on overlay, or dedicated screw on Euro hinges). |
| Door Not Closing Flush | Depth or Hinge Arm Position | Adjust depth. If that doesn’t work, you might need to slightly loosen hinge arm screws and adjust the door’s angle. |
| Door Sticking/Binding | Multiple adjustments (depth, side, height) | Systematically adjust each screw to relieve pressure points. |
| Stripped Screw Holes | Repair the hole | Fill with toothpicks/glue, let dry, then re-screw. |
| Self-Closing Hinges Not Working Properly | Spring tension adjustment | Adjust the spring tension screw/dial on the hinge body. |
Tips for a Smooth Adjustment Process
- Work on One Hinge at a Time: Especially for doors with two hinges, adjust one hinge completely before moving to the other. This makes it easier to isolate the problem and track your adjustments.
- Small Adjustments are Key: Turn the screws only a quarter or half turn at a time. You can always make more adjustments, but over-adjusting can lead to new problems.
- Keep Screws Organized: If you need to remove a hinge completely, place the screws in a small container or tape them to the back of the cabinet door so you don’t lose them.
- Clean Your Hinges: A quick wipe-down of the hinges with a damp cloth can remove dust and debris that might be hindering smooth operation.
- Lubricate Hinges: If your hinges are stiff or squeaky, a small spray of white lithium grease or a silicone-based lubricant can help. Apply sparingly and wipe away any excess.
- Check the Cabinet Structure: While hinge adjustments fix most issues, ensure the cabinet itself is plumb and level. If the cabinet box is warped or damaged, hinge adjustments may only offer a temporary fix.
- Take Pictures: Before you start, take a picture of your doors as they are. This can be helpful if you get confused or want to return to the original position.
When to Call a Professional
While most cabinet hinge adjustments are manageable for the average DIYer, there are times when it’s best to call in the experts:
- Damaged Hinges: If a hinge is visibly bent, cracked, or rusted, it might need to be replaced entirely.
- Complex Cabinetry: For custom cabinets, antique cabinets, or very high-end cabinetry, you might want a professional to handle adjustments to avoid damaging valuable finishes or components.
- Persistent Problems: If you’ve made multiple attempts at adjustments and the doors still aren’t right, a professional cabinet maker or handyman can diagnose the issue.
- Heavy Doors or Specialty Hinges: Some very large doors or specialty hinges might require specific tools or techniques.
- Cabinet Box Issues: If the cabinet box itself is the problem (e.g., leaning, warped), hinge adjustments won’t fix the root cause.
Frequently Asked Questions (FAQ)
How often should I adjust my cabinet hinges?
You don’t need to adjust your cabinet hinges on a regular schedule. Only make adjustments when you notice issues like sagging, misalignment, or doors that don’t close properly.
Can I use WD-40 on my cabinet hinges?
While WD-40 can help with squeaks in the short term, it’s not the best lubricant for hinges. It can attract dust and dirt over time. It’s better to use a dedicated lubricant like white lithium grease or a silicone spray.
What if my cabinet doors are made of particleboard and the screws won’t tighten?
Particleboard is less durable than solid wood. If the screw holes are stripped in particleboard, you’ll need to use the toothpick and wood glue method, or consider using slightly larger screws if the original ones are too small for the hole.
My cabinet doors are crooked, but the hinges seem tight. What else could it be?
If the hinges are tight and the door is still crooked, the issue might be with the cabinet box itself. Ensure the cabinet frame is level and plumb. If the cabinet box is out of square, hinge adjustments will only do so much.
How do I remove cabinet doors for better access to hinges?
Most cabinet doors are attached by unscrewing the hinge from the cabinet frame or door. For European hinges, you’ll typically find a release clip or lever on the hinge arm that attaches to the mounting plate. Consult your hinge manufacturer’s documentation if you’re unsure.
Can I upgrade my old hinges to Euro hinges?
Yes, in many cases, you can retrofit older cabinets with European cabinet hinges. This often requires drilling new holes for the hinge cups in the doors and installing new mounting plates on the cabinet frames. It’s a more involved project but can dramatically update the look and functionality of your cabinets.
Fixing sagging or misaligned kitchen cabinet doors is a rewarding DIY project that can significantly improve the look and feel of your kitchen. By taking the time to identify the problem, gather the right tools, and make small, careful adjustments, you can restore your cabinet doors to their proper function and appearance. Happy adjusting!