
Image Source: www.familyhandyman.com
How To Fix A Kitchen Faucet With Sprayer: Step-By-Step
Can you fix a leaky kitchen faucet sprayer yourself? Yes, you can often fix a leaky kitchen faucet sprayer by replacing a worn-out part, like a washer, O-ring, or the entire sprayer head or hose. This comprehensive guide will walk you through the common issues and their solutions for your kitchen faucet sprayer.
A malfunctioning kitchen faucet sprayer can be a real nuisance. Whether it’s a persistent drip, a weak spray, or a complete failure to operate, knowing how to tackle these problems can save you time and money on plumber calls. This article will cover common kitchen faucet sprayer troubleshooting steps, how to fix a pull-out sprayer, how to replace a kitchen faucet sprayer hose, and even how to install a new kitchen faucet sprayer if yours is beyond repair.
Why Your Kitchen Faucet Sprayer Might Be Acting Up
Several culprits can cause your kitchen faucet sprayer to misbehave. Identifying the source of the problem is the first step in effective kitchen faucet sprayer repair.
Common Sprayer Problems
- Leaky Sprayer Nozzle: Water dripping from the nozzle when the faucet is off.
- Weak Water Flow: The spray pattern is weak or inconsistent.
- Sprayer Won’t Retract: For pull-out models, the sprayer head doesn’t smoothly return to its housing.
- Sprayer Hose Leak: Water leaks from the hose itself or at the connection points.
- Sprayer Won’t Turn On: No water comes out of the sprayer at all.
- Water Leaks Around the Base: Water seeping out from where the sprayer hose connects to the faucet body.
The Heart of the Matter: The Diverter
For faucets with integrated sprayers, a crucial component is the diverter. This small valve, usually located inside the faucet body, is responsible for directing water either to the main spout or to the sprayer. A faulty kitchen faucet diverter repair might be the solution if your sprayer isn’t working correctly or if water is coming out of both the spout and the sprayer simultaneously.
Preparing for Your Kitchen Faucet Sprayer Repair
Before you dive into fixing your kitchen faucet sprayer, proper preparation is key. This ensures a smooth and efficient repair process.
Gathering Your Tools and Supplies
Having the right tools on hand will make the job much easier. Here’s a typical list:
- Adjustable wrench
- Phillips head screwdriver
- Flathead screwdriver
- Plumber’s tape (Teflon tape)
- Bucket or towels to catch water
- Old toothbrush or small brush
- Penetrating oil (like WD-40) if parts are stuck
- Replacement parts (e.g., O-rings, washers, new sprayer head, new hose, new diverter) – ensure these are compatible with your faucet model!
Safety First: Turning Off the Water Supply
This is the most critical step. You absolutely must turn off the water supply before attempting any repairs.
- Locate Shut-Off Valves: Look under the sink for two handles – one for hot water and one for cold water. These are typically connected to the water lines that feed your faucet.
- Turn Off the Valves: Turn both handles clockwise until they are firmly closed.
- Test: Turn on the faucet to ensure the water supply has been completely shut off. Some residual water might drain out.
Step-by-Step Guide to Fixing Your Kitchen Faucet Sprayer
Now, let’s get to the actual repair. The specific steps might vary slightly depending on your faucet model, but these general instructions cover most common scenarios for kitchen faucet sprayer repair.
Fixing a Leaky Kitchen Faucet Sprayer Nozzle
A leaky sprayer nozzle is often due to worn-out seals within the nozzle itself.
Step 1: Detach the Sprayer Head
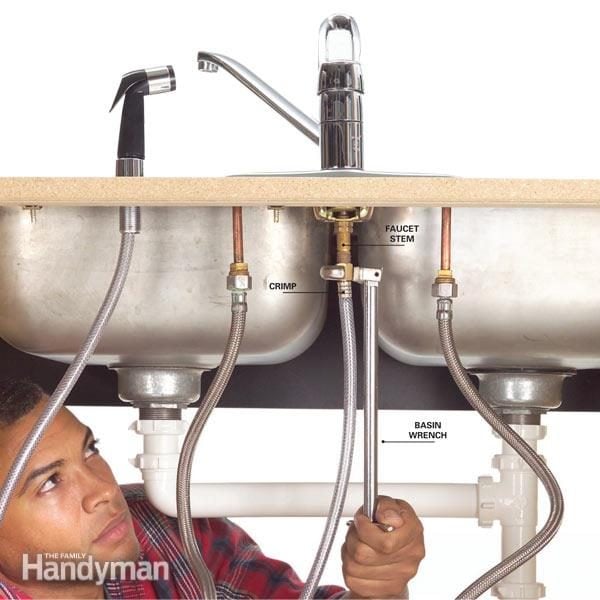
- Locate the Connection: The sprayer hose usually connects to the faucet body under the sink. For pull-out sprayers, the hose often screws directly into the faucet body or a special connector.
- Loosen and Remove: Use an adjustable wrench to loosen the nut connecting the sprayer hose to the faucet. If it’s a pull-out sprayer, you might need to disconnect the hose from the faucet body under the sink first. Have a bucket ready for any residual water.
Step 2: Disassemble the Sprayer Nozzle
- Look for a Set Screw or Clip: Many sprayer heads have a small set screw or a clip that holds the nozzle housing together. You might need a small screwdriver or an Allen wrench to remove it.
- Carefully Pry Apart: Once any fasteners are removed, gently try to twist or pry apart the nozzle housing. There might be a retaining ring or a threaded cap.
Step 3: Inspect and Replace Worn Parts
- Identify the Cause: Look for any worn-out rubber washers or O-rings inside the nozzle. These are the most common culprits for leaks.
- Replace: Carefully remove the old O-rings or washers. Take them to a hardware store to find exact matches, as a perfect fit is crucial.
- Clean: While you have it apart, clean any mineral buildup from the internal parts of the nozzle using a small brush and vinegar.
Step 4: Reassemble and Test
- Put it Back Together: Reassemble the sprayer nozzle, ensuring the new O-rings or washers are in place correctly.
- Reconnect: Reconnect the sprayer hose to the faucet body.
- Turn on Water: Slowly turn the water supply valves back on.
- Check for Leaks: Test the sprayer to see if the leak has stopped.
Fixing a Weak Water Flow from the Sprayer
A weak spray can be caused by a clogged nozzle or a restriction in the hose or diverter.
Step 1: Clean the Sprayer Nozzle
- Soaking: Unscrew the sprayer head (as described above) and soak it in a solution of equal parts white vinegar and water. This helps dissolve mineral deposits. You can also use a small brush to gently clean the spray holes.
- Reassemble and Test: Reattach the sprayer head and test the water flow.
Step 2: Check the Diverter (If Applicable)
If cleaning the nozzle doesn’t help, the diverter might be the issue, especially if you have a pull-out sprayer or a dual-handle faucet with a side sprayer.
- Locate the Diverter: The diverter is usually located within the faucet body, often where the sprayer hose connects.
- Remove the Sprayer Hose: Disconnect the sprayer hose from the faucet body under the sink.
- Access the Diverter: Depending on your faucet, you might need to remove the spout to access the diverter. Some diverters are simply pulled out, while others are screwed in. Consult your faucet’s manual if you have it.
- Inspect and Clean: Look for any debris or mineral buildup that might be obstructing the diverter. You can try cleaning it with a brush and vinegar.
- Replace if Necessary: If the diverter appears damaged or worn, it may need to be replaced. This is a common part for kitchen faucet sprayer repair.
Step 3: Inspect the Sprayer Hose
- Flexibility: Ensure the hose is not kinked or bent, which can restrict water flow.
- Internal Clogs: In rare cases, the hose itself can become clogged internally. If you suspect this, you might need to replace kitchen faucet sprayer hose.
How to Fix a Pull-Out Sprayer Not Working Correctly
Pull-out sprayers have a few extra components that can cause issues.
Troubleshooting the Retraction Mechanism
- Check the Hose Weight: Most pull-out sprayers have a counterweight attached to the hose under the sink. Ensure this weight is securely attached and not interfering with the hose’s movement.
- Inspect the Hose Path: Make sure the hose is not snagged on anything under the sink. Clear any obstructions.
- Lubricate (If Necessary): If the hose is stiff, you might try applying a bit of silicone lubricant to the hose itself or the connections.
- Sprayer Hose Connection: Ensure the connection of the sprayer hose to the faucet body is tight and not leaking, as this can affect the retraction pressure.
Addressing Sprayer Head Issues
If the sprayer head itself isn’t working (e.g., weak flow, inconsistent spray), follow the steps for fixing a leaky sprayer nozzle, focusing on cleaning or replacing the nozzle components. If the entire sprayer head is damaged, you might need to install new kitchen faucet sprayer.
Replacing a Kitchen Faucet Sprayer Hose
A damaged or leaky sprayer hose needs to be replaced.
Step 1: Turn Off Water and Disconnect Old Hose
- Shut off Water: As always, turn off the water supply under the sink.
- Disconnect from Faucet: Unscrew the sprayer hose from the faucet body under the sink. There will likely be a nut securing it.
- Disconnect from Sprayer Head: Unscrew the sprayer head from the other end of the hose.
Step 2: Install the New Sprayer Hose
- Apply Plumber’s Tape: Wrap a few layers of plumber’s tape around the threads of the new hose’s connections to ensure a watertight seal.
- Connect to Sprayer Head: Screw the sprayer head onto one end of the new hose. Tighten it by hand first, then give it a slight turn with a wrench if needed, but be careful not to overtighten.
- Connect to Faucet Body: Connect the other end of the new hose to the faucet body under the sink. Tighten the connection securely with an adjustable wrench.
- Reattach Hose Weight: If your faucet has a hose weight, reattach it to the new hose in the same position as the old one.
Step 3: Test the New Hose
- Turn on Water: Slowly turn the water supply back on.
- Check for Leaks: Run water through the faucet and sprayer, checking all connections for any leaks.
- Test Functionality: Ensure the sprayer retracts smoothly and the water flow is strong.
Kitchen Faucet Diverter Repair: When Water Won’t Direct Properly
If water is flowing from both the spout and the sprayer, or if only one or the other works, the diverter is a likely culprit.
Step 1: Locate and Remove the Diverter
- Disconnect Sprayer Hose: Turn off the water and disconnect the sprayer hose from the faucet body under the sink.
- Access the Diverter: You may need to remove the spout to access the diverter. This usually involves loosening a set screw or unscrewing a cap at the base of the spout.
- Extract the Diverter: Once the spout is off, the diverter can often be pulled straight out. Some diverters are threaded and will need to be unscrewed.
Step 2: Inspect and Clean the Diverter
- Examine for Damage: Look for cracks, wear, or mineral buildup on the diverter.
- Clean: Clean the diverter thoroughly with a small brush and vinegar to remove any deposits.
Step 3: Replace the Diverter (If Necessary)
- Get a Replacement: If the diverter is damaged or cleaning doesn’t help, you’ll need to replace it. Take the old diverter to a hardware store to find an exact match.
- Install New Diverter: Insert or screw the new diverter into place.
Step 4: Reassemble and Test
- Reattach Spout: If you removed the spout, reassemble it.
- Reconnect Sprayer Hose: Reconnect the sprayer hose to the faucet body, ensuring a secure fit.
- Turn on Water: Turn on the water supply and test the faucet and sprayer to ensure proper operation.
Kitchen Faucet Sprayer Nozzle Replacement
If your sprayer nozzle is beyond repair – cracked, clogged permanently, or leaking significantly even after replacing O-rings – it’s time for a replacement.
Step 1: Remove the Old Sprayer Nozzle
- Disconnect Hose: Turn off the water supply and disconnect the sprayer hose from the faucet body under the sink.
- Unscrew Sprayer Head: Unscrew the sprayer head from the end of the hose.
Step 2: Install the New Sprayer Nozzle
- Apply Plumber’s Tape: Wrap plumber’s tape around the threads of the new sprayer nozzle.
- Screw on New Nozzle: Screw the new sprayer nozzle onto the end of the hose. Hand-tighten first, then use a wrench to snug it up, being careful not to overtighten.
Step 3: Reconnect Hose and Test
- Reconnect Hose: Reconnect the hose to the faucet body if you had to disconnect it there.
- Turn on Water: Turn on the water supply.
- Check Operation: Test the new nozzle to ensure it sprays correctly and doesn’t leak.
Installing a New Kitchen Faucet Sprayer
If your entire sprayer assembly is faulty or you’re upgrading, installing a new one is straightforward.
Step 1: Remove the Old Sprayer Assembly
- Turn off Water: Shut off the water supply under the sink.
- Disconnect Hose: Disconnect the sprayer hose from the faucet body.
- Remove Sprayer Head: Unscrew the sprayer head from the hose.
Step 2: Prepare for New Installation
- Clean the Area: Clean the faucet base and any mounting points for the sprayer hose under the sink.
Step 3: Install the New Sprayer Assembly
- Attach Sprayer Head to Hose: Screw the new sprayer head onto the new hose.
- Connect Hose to Faucet: Connect the other end of the new hose to the faucet body, using plumber’s tape on the threads.
- Secure Hose (if applicable): Some faucets have a bracket or clip to secure the hose.
- Attach Hose Weight: If your new sprayer comes with a weight, attach it to the hose according to the manufacturer’s instructions.
Step 4: Final Checks and Testing
- Turn on Water: Turn on the water supply slowly.
- Inspect for Leaks: Check all connections for leaks.
- Test Functionality: Operate the faucet and the new sprayer to ensure everything works correctly.
Maintenance Tips for Your Kitchen Faucet Sprayer
Regular maintenance can prevent many common issues and extend the life of your faucet sprayer.
- Regular Cleaning: Periodically soak the sprayer head in vinegar to prevent mineral buildup.
- Check for Leaks: Regularly inspect all connections for any signs of drips or leaks.
- Gentle Use: Avoid yanking or forcing the pull-out sprayer, as this can damage the hose or retraction mechanism.
- Tighten Connections: If you notice a slight drip at a connection, try gently tightening the fitting with a wrench.
When to Call a Professional Plumber
While many kitchen faucet sprayer repairs are DIY-friendly, there are times when it’s best to call in a professional:
- Unsure of the Cause: If you can’t pinpoint the source of the problem.
- Corroded or Stuck Parts: If parts are heavily corroded and won’t budge without risking damage.
- Complex Faucet Designs: Some modern or high-end faucets have more intricate mechanisms that can be tricky to repair.
- Persistent Leaks: If you’ve tried several fixes and the leak persists, there might be a more significant issue with the faucet body itself.
- Lack of Confidence: If you’re not comfortable with the repair process, it’s always safer to hire a professional.
Frequently Asked Questions (FAQ)
Q1: How do I know if I need to replace the whole sprayer or just a part?
A: If you can identify a specific worn-out component like an O-ring or washer and find a replacement, try that first. If the entire nozzle is cracked or the hose is visibly damaged, replacement is usually the best option.
Q2: Can I use any brand of replacement parts for my faucet sprayer?
A: It’s highly recommended to use parts specifically designed for your faucet brand and model. Using generic parts can lead to improper fit and recurring issues.
Q3: My pull-out sprayer hose is tangled. What should I do?
A: Turn off the water, then carefully untangle the hose. Check for any obstructions under the sink that might be causing it to snag. Ensure the counterweight is correctly positioned.
Q4: Is it normal for a little water to come out of the spout when the sprayer is on?
A: It’s not ideal. A small amount might be residual, but if a significant stream of water comes from the spout when the sprayer is activated, it usually indicates a problem with the diverter.
Q5: How often should I replace my kitchen faucet sprayer hose?
A: There’s no set schedule, but replace it if you notice any cracks, stiffness, or persistent leaks from the hose itself.
By following these detailed steps, you can confidently tackle most kitchen faucet sprayer repair tasks, keeping your sink area functional and leak-free.