
Image Source: www.thehandymansdaughter.com
How to Update Laminate Kitchen Cabinets: Stunning DIY Makeovers
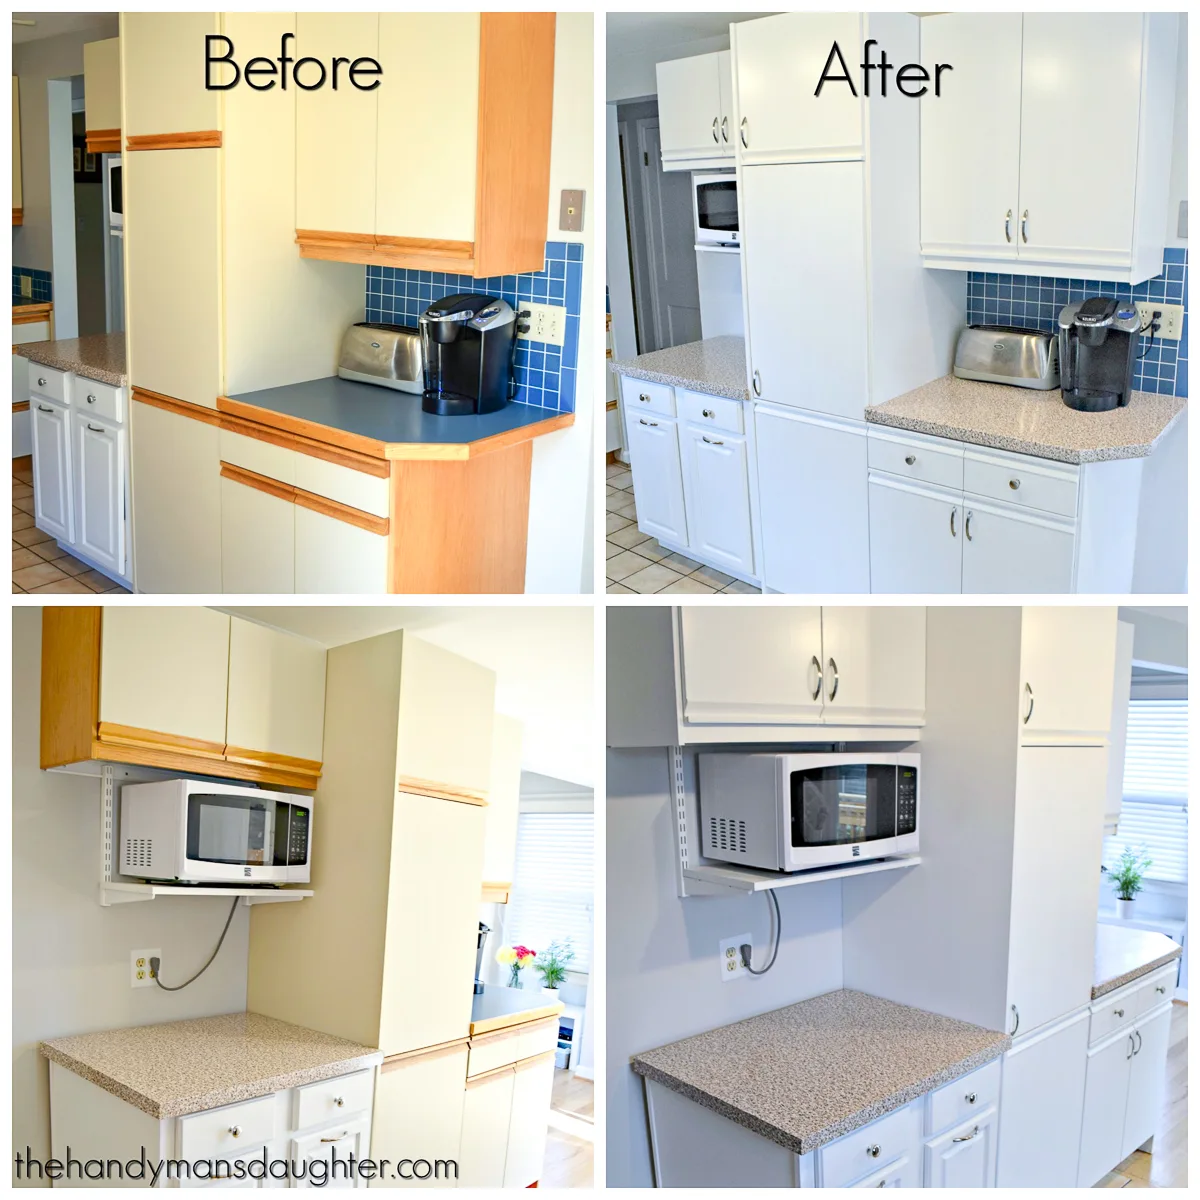
Can you update laminate kitchen cabinets? Absolutely! Laminate kitchen cabinets can be beautifully updated with a bit of elbow grease and the right techniques. You don’t need to replace them to achieve a stunning, modern look. This guide will walk you through everything you need to know for a successful laminate cabinet makeover.
Laminate cabinets, often found in older kitchens, can sometimes feel dated. However, they are surprisingly durable and budget-friendly to refresh. With the right approach, you can transform those worn-out surfaces into a focal point of your kitchen. Let’s dive into how to tackle a DIY laminate cabinet update and achieve professional-looking results.
Why Update Laminate Cabinets?
Laminate cabinets are popular for their affordability and ease of maintenance. However, over time, the laminate layer can peel, fade, or simply become outdated in style. Instead of a costly replacement, a laminate cabinet restoration or laminate cabinet resurfacing can dramatically improve your kitchen’s appearance. This is a fantastic way to modernize your kitchen on a budget, giving it a fresh, new feel without a complete renovation.
Is Refinishing Laminate Cabinets Difficult?
Refinishing laminate cabinets is achievable for most DIY enthusiasts. While it requires patience and attention to detail, the process is straightforward. The key is proper preparation and using the correct products. The most common method is painting, and with the right steps, you can achieve a smooth, durable finish.
Preparing Your Laminate Cabinets for a Makeover
Proper preparation is the most crucial step in any cabinet update, especially when dealing with laminate. Skipping or rushing this stage can lead to paint peeling or an uneven finish.
Cleaning Laminate Cabinets Before Painting
Before you even think about primer or paint, thorough cleaning is essential. Any grease, dirt, or residue will prevent the paint from adhering properly.
- Step 1: Remove Hardware: Take off all door handles, hinges, and drawer pulls. Store them in a safe place, perhaps in labeled bags to make reassembly easier.
- Step 2: Initial Wipe Down: Use a damp cloth with a mild dish soap to wipe down all cabinet surfaces. This removes most surface grime.
- Step 3: Degreasing: For stubborn grease, especially around the stovetop, a good degreaser is necessary. TSP (trisodium phosphate) is a powerful option, but wear gloves and ensure good ventilation. Alternatively, a solution of hot water and a grease-cutting dish soap or a specialized cabinet degreaser works well.
- Step 4: Rinse and Dry: After using any cleaning solution, wipe down all surfaces with a clean, damp cloth to remove residue. Then, dry everything completely with a clean, lint-free towel.
Sanding Laminate Cabinets
Sanding laminate is essential to create a surface that paint can grip. You’re not trying to remove the laminate, but rather to scuff it up.
- Sanding Grit: Use a fine-grit sandpaper, typically 150-220 grit. You can use a sanding block or an orbital sander for larger areas.
- The Process: Lightly sand all surfaces that you intend to paint. The goal is to dull the sheen of the laminate, not to remove it. You should see a fine dust being created.
- Clean Again: After sanding, wipe down all surfaces with a tack cloth or a damp microfiber cloth to remove all dust particles. Dust is the enemy of a smooth paint finish!
Repairing Minor Damage
Before painting, inspect your cabinets for any minor damage like chipped laminate or small dents.
- For Scratches or Gouges: Use a good quality wood filler or a laminate repair kit. Apply the filler, let it dry completely, and then sand it smooth until it’s flush with the cabinet surface.
- For Peeling Laminate: If the laminate is lifting slightly at the edges, you can try to glue it down with a strong adhesive like contact cement or wood glue. Clamp it in place until dry. If it’s badly peeled, you may need to carefully trim away any loose pieces and then fill any gaps.
Priming Laminate Cabinets: The Crucial First Step
Priming is non-negotiable when you want to paint laminate kitchen cabinets. Primer acts as a bonding agent, ensuring the paint adheres well to the slick laminate surface and preventing peeling. It also helps to cover any underlying colors or stains and provides a uniform base for your chosen paint color.
How to Prime Laminate Cabinets
- Choose the Right Primer: The best primer for laminate cabinets is an oil-based or shellac-based primer. These primers are specifically designed to adhere to slick surfaces like laminate, metal, and plastic. Look for primers labeled “adhesion promoter” or “bonding primer.”
- Application: Apply a thin, even coat of primer. You can use a high-quality synthetic brush for edges and corners, and a foam roller or a fine-nap roller for the larger flat surfaces. Avoid applying the primer too thickly, as this can lead to drips and an uneven finish.
- Drying Time: Allow the primer to dry completely according to the manufacturer’s instructions. This is usually at least a few hours, but overnight is often best for optimal adhesion.
- Light Sanding (Optional but Recommended): Once the primer is dry, you can very lightly sand it with 220-grit sandpaper or a sanding sponge. This creates a super-smooth surface for the paint and knocks down any imperfections. Wipe down with a tack cloth again to remove dust.
Painting Laminate Kitchen Cabinets: Bringing Your Vision to Life
Now for the fun part – painting! Choosing the best paint for laminate cabinets and applying it correctly will make all the difference.
Selecting the Best Paint for Laminate Cabinets
- Type of Paint: For laminate cabinets, you generally want a durable enamel paint.
- Alkyd (Oil-Based) Paint: Offers superior durability and a hard, smooth finish that’s resistant to wear and tear. However, it requires mineral spirits for cleanup and has stronger fumes.
- Water-Based Alkyd (Acrylic Enamel): A good compromise. These paints offer excellent durability and a hard finish similar to oil-based paints, but with the easier cleanup of water-based products. They also have lower VOCs (volatile organic compounds).
- Latex Paint (with caution): While some high-quality acrylic latex paints can work, they generally don’t offer the same level of durability on slick surfaces as enamels unless specifically formulated for cabinets and used with an excellent primer.
- Sheen: A satin or semi-gloss finish is usually recommended for kitchen cabinets. These sheens are more durable, easier to clean, and resist moisture better than matte finishes.
Application Techniques for a Smooth Finish
- Thin Coats are Key: Just like with primer, apply paint in thin, even coats. It’s better to apply three thin coats than two thick ones. This ensures better adhesion and a smoother finish.
- Tools: Use high-quality synthetic brushes for detailed areas and edges. For the main cabinet doors and drawer fronts, a high-density foam roller or a short-nap mohair roller will give you the smoothest finish.
- Brush Strokes: When brushing, use long, even strokes in the direction of the wood grain if applicable, or the longest dimension of the surface. Avoid over-brushing.
- Rolling: Roll with light pressure, overlapping each stroke slightly. Avoid pressing too hard, which can create an uneven texture.
- Drying Between Coats: Allow each coat of paint to dry completely according to the manufacturer’s instructions before applying the next. This is crucial for durability. Rushing this step can lead to peeling or improper curing.
How Many Coats of Paint?
Typically, you’ll need at least two coats of paint, and sometimes three, to achieve full coverage and a rich, even color. Always ensure the previous coat is dry before applying the next.
Curing Time
It’s important to distinguish between drying time and curing time. Paint may feel dry to the touch within a few hours, but it can take up to 30 days for the paint to fully cure and reach its maximum hardness and durability. During the curing period, be gentle with your cabinets, avoiding harsh scrubbing or banging.
Advanced Laminate Cabinet Makeover Techniques
While painting is the most popular method, other techniques can also refresh your laminate cabinets.
Laminate Cabinet Resurfacing
Laminate cabinet resurfacing involves applying a new layer or coating over the existing laminate.
- Contact Cement and New Laminate: For cabinets with peeling laminate, you can carefully remove the old laminate (if possible) and apply new laminate sheets using contact cement. This is a more involved process that requires precision cutting and application.
- Specialty Laminate Coatings: There are specialized coatings available that can be applied directly over laminate for a durable finish. These often act like a very tough paint but are specifically designed for this purpose.
Refinishing Laminate Cabinets with Other Materials
- Veneer: You can apply a thin wood veneer over laminate. This gives you the look of real wood and requires careful application with adhesive. Once the veneer is applied, it can be stained or painted.
- Contact Paper/Vinyl Wraps: For a quick and temporary update, decorative contact paper or vinyl wraps can be applied. These come in a vast array of colors and patterns, mimicking wood grain, marble, or solid colors. While not as durable as paint, they are an excellent budget-friendly and temporary solution, especially for renters.
Modernizing Your Laminate Cabinets: Beyond the Paint
Once your cabinets are painted or resurfaced, consider these steps to complete your modernizing laminate cabinets project.
New Hardware
Upgrading your cabinet hardware is one of the easiest and most impactful ways to change the look of your kitchen.
- Style: Choose hardware that complements your new cabinet color and the overall kitchen style (e.g., sleek modern pulls, classic knobs).
- Placement: If you’re keeping the same hole placement, measure carefully. If you’re drilling new holes, use a template to ensure they are straight and evenly spaced.
New Doors or Drawer Fronts
If your cabinet boxes are in good condition but the doors and drawer fronts are beyond repair or you want a completely different look, consider replacing just these components. You can order custom-sized doors and drawer fronts that fit your existing cabinet boxes. This is a significant upgrade but can be more affordable than a full cabinet replacement.
Updating the Backsplash and Countertops
A laminate cabinet makeover often goes hand-in-hand with other kitchen updates. A new backsplash or countertop can completely transform the space and complement your refreshed cabinets beautifully.
Tools and Materials Checklist for Your Laminate Cabinet Makeover
Here’s a handy list to get you started:
- Cleaning Supplies:
- Mild dish soap
- Degreaser (TSP or a dedicated cabinet degreaser)
- Sponges and cloths
- Gloves
- Sanding Supplies:
- Fine-grit sandpaper (150-220 grit)
- Sanding block or orbital sander
- Tack cloths
- Repair Supplies (if needed):
- Wood filler or laminate repair kit
- Putty knife
- Adhesive (for peeling laminate)
- Priming Supplies:
- Adhesion-promoting primer (oil-based or shellac-based)
- High-quality synthetic brushes
- Foam rollers or fine-nap rollers
- Paint tray
- Painting Supplies:
- Cabinet enamel paint (alkyd or water-based alkyd)
- High-quality synthetic brushes
- Foam rollers or fine-nap rollers
- Paint tray
- Painter’s tape
- Hardware:
- New cabinet knobs and pulls
- Screwdriver or drill
- Drill bits (if drilling new holes)
- Optional:
- Wood veneer or decorative laminate sheets
- Contact cement
- Veneer scraper or smoother
Troubleshooting Common Issues
| Problem | Cause | Solution |
|---|---|---|
| Paint peeling or chipping | Inadequate preparation, wrong primer/paint | Ensure thorough cleaning and sanding. Use an adhesion-promoting primer. Apply thin coats and allow proper drying. |
| Uneven paint finish/streaks | Applying paint too thickly, poor roller/brush | Apply thin, even coats. Use high-quality applicators. Avoid over-brushing. |
| Bubbles in the paint | Applying paint too quickly, humidity | Allow proper drying time between coats. Avoid painting in humid conditions. |
| Paint not adhering to edges | Insufficient primer on edges | Ensure edges are properly sanded and well-primed. |
| Laminate peeling after paint | Adhesive failure, improper prep | Ensure the laminate is securely adhered before painting. Use appropriate adhesives if necessary. |
Frequently Asked Questions (FAQ)
Q1: Do I really need to prime laminate cabinets?
A1: Yes, absolutely. Laminate is a non-porous, slick surface, and primer is essential for paint adhesion. Without primer, paint is very likely to peel or chip.
Q2: What is the best paint for laminate kitchen cabinets?
A2: The best paints are durable enamels. Look for oil-based alkyd paints or water-based alkyd paints that offer excellent adhesion and a hard, scrubbable finish. Satin or semi-gloss sheens are recommended.
Q3: Can I paint over old laminate with peeling edges?
A3: It’s best to address peeling edges before painting. Try to re-adhere the laminate with a strong adhesive or trim any loose pieces. If the peeling is extensive, you might consider a laminate resurfacing technique or replacing the doors.
Q4: How long does it take for painted laminate cabinets to cure?
A4: While the paint may feel dry to the touch in a few hours, it can take up to 30 days for the paint to fully cure and reach its maximum hardness. Be gentle with the cabinets during this period.
Q5: Can I use a chalk paint or milk paint on laminate cabinets?
A5: Chalk paint and milk paint can be used on laminate, but they require a robust primer for adhesion and a durable topcoat (like polycrylic) for protection, especially in a high-traffic area like a kitchen. They are not typically considered the most durable option for kitchen cabinets.
Embracing Your Transformed Kitchen
Updating laminate kitchen cabinets is a rewarding DIY project that can dramatically improve the look and feel of your kitchen. By following these detailed steps, focusing on preparation, using the right products, and applying them with care, you can achieve a beautiful and durable finish. Whether you opt for a simple paint job or explore other laminate cabinet resurfacing options, the result will be a more modern, stylish kitchen that you can be proud of. Happy renovating!