
Image Source: solutions.moen.com
Simple Steps: How To Clean Moen Kitchen Faucet Spray Head
Can you clean a Moen kitchen faucet spray head? Yes, you absolutely can and should clean your Moen kitchen faucet spray head regularly to ensure optimal performance and water flow.
A clogged or dirty spray head can lead to frustrating issues like a weak spray, uneven water distribution, or even no spray at all. Fortunately, Moen faucet spray head cleaning is a straightforward process that can restore your faucet’s functionality and appearance. This guide will walk you through simple, effective steps to clean Moen faucet sprayer heads, tackling everything from mineral buildup to general grime. Whether you’re looking to unclog Moen spray head issues or perform routine Moen spray wand maintenance, these instructions will help.
Why Clean Your Moen Faucet Spray Head?
Over time, mineral deposits from hard water, soap scum, and other debris can accumulate in the tiny holes of your Moen kitchen faucet’s spray head. This buildup restricts water flow, reduces pressure, and can cause the spray pattern to become uneven or weak. Regular cleaning not only resolves these performance issues but also prevents more significant problems down the line.
Key benefits of cleaning your Moen faucet spray head include:
- Restoring full water pressure: Eliminate blockages for a strong, consistent spray.
- Improving spray pattern: Ensure even water distribution for efficient washing.
- Preventing leaks and drips: A clean spray head is less likely to develop issues.
- Extending faucet lifespan: Regular maintenance keeps your faucet in good working order.
- Enhancing kitchen aesthetics: A clean faucet looks better and is more hygienic.
Common Issues and How Cleaning Helps
Before diving into the cleaning process, let’s look at some common problems you might be experiencing and how a clean spray head can help:
- Weak or sputtering spray: This is usually a direct result of clogged nozzle holes. Cleaning will clear these obstructions.
- Uneven spray pattern: Mineral deposits can block individual holes, leading to a patchy spray.
- Difficulty switching between spray and stream: A dirty diverter mechanism within the spray head can cause this.
- Dripping after turning off the water: While sometimes a washer issue, a clogged spray head can exacerbate dripping.
- Accumulation of white, chalky residue: This is classic mineral buildup, commonly seen around the nozzle holes.
Tools and Materials You’ll Need
Gathering the right tools and materials before you start will make the process smoother and more efficient.
Essential Items:
- Soft cloth or microfiber towel: For wiping and drying.
- White vinegar: A natural and effective cleaner for mineral deposits.
- Small bowl or cup: To soak the spray head.
- Old toothbrush or small cleaning brush: To scrub away stubborn grime.
- Pliers (optional, with cloth protection): To help loosen a stubborn spray head.
- Small paperclip or needle (optional): For carefully poking out individual nozzle holes.
- Plumber’s tape (optional): If you need to reseal threads.
Step-by-Step Guide: Moen Faucet Spray Head Cleaning
This section provides a detailed, easy-to-follow guide to effectively clean Moen faucet sprayer heads.
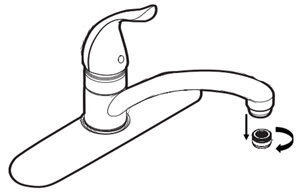
Step 1: Identify and Detach the Spray Head
The first step in Moen faucet spray head cleaning is to safely remove the spray head from the faucet hose.
- Locate the spray head: This is the part of the faucet you pull out to activate the spray function.
- Gently twist and pull: Most Moen spray heads detach by unscrewing them counter-clockwise from the hose. Some might have a quick-connect fitting, which usually involves pressing a button or tab to release.
- Protect the finish: If the spray head is tight, wrap a cloth around it before using pliers to avoid scratching the finish.
Table: Common Moen Spray Head Attachment Types
| Attachment Type | How to Detach | Notes |
|---|---|---|
| Screw-on Threads | Twist counter-clockwise to unscrew. | Most common. Ensure you have a good grip. |
| Quick-Connect | Look for a button or tab on the connection point. Press and pull. | Often found on newer models. Allows for tool-free removal. |
| Bayonet Mount | Twist the head a quarter turn to unlock, then pull away. | Less common, but check for a distinctive locking mechanism. |
Step 2: Prepare the Cleaning Solution
A simple yet powerful cleaning solution is all you need to tackle mineral buildup.
- White Vinegar Immersion: Pour enough white vinegar into a small bowl or cup to fully submerge the spray head. Ensure the nozzle holes are completely covered.
Step 3: Soak the Spray Head
This is where the magic happens to remove mineral buildup Moen faucet spray heads.
- Submerge and Wait: Place the detached spray head into the bowl of white vinegar.
- Soaking Time: Let it soak for at least 30 minutes to an hour. For heavily clogged spray heads, you might need to soak it for several hours or even overnight. Vinegar’s acidity breaks down mineral deposits effectively.
Step 4: Scrub and Clear Nozzle Holes
After soaking, it’s time for some gentle scrubbing to ensure every nozzle hole is clear.
- Remove from Vinegar: Take the spray head out of the vinegar.
- Gentle Scrubbing: Use an old toothbrush or a small cleaning brush to scrub away any loosened debris and mineral deposits from the exterior of the spray head and around the nozzle holes.
- Clean Nozzle Holes Moen Faucet: For any stubborn blockages still present in the individual Moen nozzle holes, carefully use a toothpick, paperclip, or needle. Gently poke into each hole to dislodge any remaining buildup. Be careful not to damage the delicate rubber or plastic components.
- Rinse Thoroughly: Rinse the spray head under warm running water.
Step 5: Address Aerator Cleaning (If Applicable)
Some Moen spray heads have an integrated aerator that can also become clogged. If you suspect your issue is related to the aerator, this step is crucial for Moen faucet aerator cleaning.
- Locate the Aerator: The aerator is usually found at the very tip of the spray head. Sometimes it can be unscrewed separately from the main spray head body.
- Disassemble (if possible): If the aerator can be removed, carefully take it apart. You might find a small screen and a rubber washer inside.
- Soak and Clean: Soak these parts in white vinegar along with the spray head.
- Scrub and Rinse: Use a toothbrush to clean any visible debris from the aerator components and rinse them thoroughly.
Step 6: Reassemble and Test
Once clean, it’s time to put everything back together and check if your efforts paid off.
- Reattach the Spray Head: Screw the spray head back onto the faucet hose, tightening it gently. If it had a quick-connect fitting, simply push it back into place until it clicks.
- Turn on the Water: Slowly turn on the faucet water supply.
- Check for Leaks: Ensure there are no leaks at the connection point. If there are, you may need to tighten it slightly or consider using plumber’s tape on the threads before reattaching.
- Test the Spray: Activate the spray function. You should notice a stronger, more consistent spray. If you still have issues, repeat the cleaning process or consider if there are other potential problems.
Maintaining Your Moen Handheld Sprayer
Regular Moen handheld sprayer cleaning is key to preventing future issues and keeping your faucet performing at its best.
Routine Cleaning Practices
- Wipe Down Regularly: After each use, wipe down the spray head and wand with a soft cloth to remove water spots and prevent soap scum buildup.
- Vinegar Wipe: Periodically (e.g., once a month), wipe down the spray head exterior and around the nozzles with a cloth dampened with white vinegar.
- Occasional Deep Clean: Perform the full soaking and cleaning process described above every 3-6 months, depending on your water hardness.
Troubleshooting Specific Issues
- Fix Weak Spray Moen Faucet: If you fix weak spray Moen faucet issues after cleaning, but it returns quickly, consider that you may have very hard water. More frequent cleaning might be necessary, or you may need to investigate a whole-house water softener.
- Unclog Moen Spray Head Stubbornly: If the vinegar soak doesn’t fully unclog Moen spray head, you might have a more severe mineral buildup. Prolonged soaking or very gentle use of a fine-grit sandpaper on external metal parts (if applicable and done with extreme care) might be considered, but proceed with caution to avoid damaging the finish.
Advanced Moen Spray Wand Maintenance
For those who want to go the extra mile with their Moen spray wand maintenance, here are a few additional considerations:
- Check the Hose: Ensure the hose itself is not kinked or damaged, as this can also affect water flow.
- Inspect the Diverter: The diverter valve within the faucet body can also get clogged. While cleaning this is more involved, sometimes the vibrations from cleaning the spray head can help loosen minor debris.
- Consider a Water Softener: If you consistently battle hard water deposits, a water softener can significantly reduce the frequency and severity of cleaning required for all your plumbing fixtures.
Cleaning Different Types of Moen Faucet Spray Heads
Moen offers a variety of faucet designs, and while the general cleaning principles remain the same, there might be slight variations.
Integrated Spray Heads vs. Pull-Down/Pull-Out Sprayers
- Integrated Spray Heads: These are fixed to the faucet spout. Cleaning involves soaking the entire faucet head if possible, or more commonly, holding a soaking-dampened cloth or bag of vinegar around the spray head for the recommended soaking time.
- Pull-Down/Pull-Out Sprayers: These are the most common types for which the step-by-step guide above is most applicable. The entire spray head unit detaches for easier soaking.
Specialty Finishes
If your Moen faucet has a special finish (like brushed nickel, oil-rubbed bronze, or polished nickel), be mindful of harsh chemicals.
- Avoid Abrasives: Never use abrasive cleaners, steel wool, or rough scrubbing pads, as these can scratch or dull the finish.
- Test in an Inconspicuous Area: If you’re unsure about vinegar’s effect on a specific finish, test it on a hidden part of the faucet or a spare part if available. However, vinegar is generally safe for most faucet finishes when used as directed.
When to Call a Professional
While most spray head cleaning can be done DIY, there are times when professional help might be needed.
- Persistent Clogging: If you’ve tried all the steps and the spray remains weak or uneven, there might be a deeper issue within the faucet body or hose.
- Damaged Components: If you notice cracks, leaks, or broken parts during cleaning, it might be time to replace the spray head or call a plumber.
- Lack of Confidence: If you’re not comfortable performing the cleaning or disassembling parts, a plumber can handle it for you.
Frequently Asked Questions (FAQ)
Here are some common questions related to cleaning Moen faucet spray heads:
- Q: How often should I clean my Moen faucet spray head?
A: For optimal performance, it’s recommended to perform a deep clean every 3-6 months. You can also do quick wipes with vinegar solution more frequently. - Q: Can I use a stronger cleaner than vinegar?
A: While stronger cleaners exist, white vinegar is highly effective for mineral buildup and is safe for most faucet finishes. Avoid harsh chemicals or abrasive cleaners, as they can damage your faucet’s finish. - Q: What if the spray head won’t unscrew?
A: If it’s stuck, try wrapping a cloth around the base to protect the finish and use pliers to gently twist. Soaking the connection point with vinegar might also help loosen any mineral deposits binding it. - Q: My spray head has rubber nozzles. How do I clean those?
A: The rubber nozzles are designed to flex, making them easier to clear of mineral buildup. The vinegar soak and a gentle scrub with a toothbrush are usually sufficient. For stubborn blockages, you can carefully poke the rubber nozzles with a toothpick or needle. - Q: I’m having trouble switching between spray and stream. Is cleaning the spray head the solution?
A: Yes, a dirty spray head or its internal components can affect the diverter function. Cleaning the spray head thoroughly, especially the internal parts if accessible, can often resolve this issue. If not, the diverter valve within the faucet body might need attention.
By following these simple steps and maintaining a regular cleaning schedule, you can ensure your Moen kitchen faucet spray head functions perfectly, delivering a strong and consistent spray for years to come. Enjoy your clean and efficient kitchen!