
Can you build kitchen base cabinets yourself? Yes, absolutely! Building your own DIY kitchen cabinets is a rewarding project that can save you a lot of money and allow for truly custom kitchen cabinets. This guide will walk you through the entire process of building base cabinets, from planning to the final touches. We’ll cover essential cabinet joinery, cabinet assembly, and the basics of building cabinet boxes for your woodworking for kitchens journey.
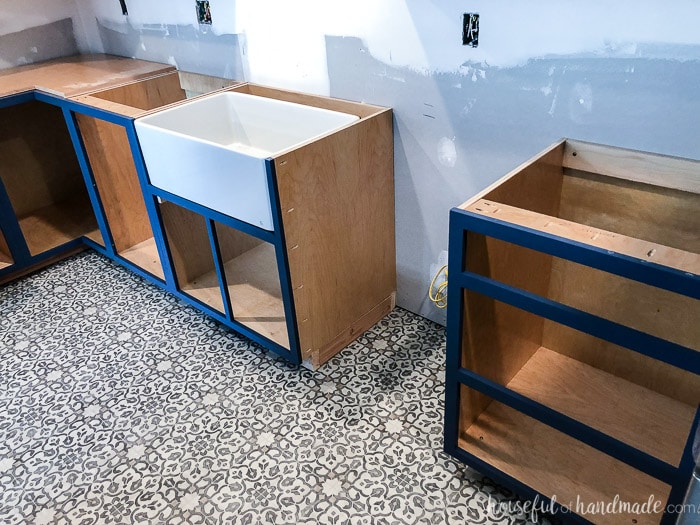
Image Source: housefulofhandmade.com
1. Planning Your Kitchen Cabinet Project
Before you even pick up a saw, good planning is key. This is where you’ll develop your kitchen cabinet plans.
1.1 Measuring Your Kitchen Space
- Measure everything: Measure the length and depth of each wall where cabinets will go.
- Note window and door locations: Mark their positions and heights.
- Account for appliances: Measure the space needed for your refrigerator, dishwasher, stove, and oven. Leave appropriate clearances.
- Check for outlets and plumbing: Identify the location of electrical outlets and water hookups.
- Consider ceiling height: This will affect the maximum height of your cabinets.
1.2 Designing Your Base Cabinets
- Standard sizes: Base cabinets are typically 24 inches deep and 34.5 inches high (before countertop). The width varies based on your needs.
- Cabinet types:
- Standard Base Cabinet: A basic box, often 18-36 inches wide.
- Sink Base Cabinet: Wider than standard cabinets to accommodate a sink, usually 30-36 inches wide.
- Corner Base Cabinet: Designed to fit into a corner, often using a diagonal or L-shape.
- Drawer vs. Door fronts: Decide if you want drawers, doors, or a combination. Drawers are great for pots and pans.
- Sketch your layout: Draw a birds-eye view of your kitchen, marking where each cabinet will go.
1.3 Creating Detailed Cabinet Plans
Your kitchen cabinet plans should be detailed. For each cabinet, you’ll need:
- Overall Dimensions: Width, height, and depth.
- Material List: Type of wood, plywood, screws, glue, etc.
- Cut List: Precise dimensions for each piece of wood.
- Joinery Method: How the pieces will be connected.
Example Base Cabinet Cut List (Standard 30″ Wide Cabinet):
| Part | Material | Dimensions (in inches) | Quantity |
|---|---|---|---|
| Front/Back | 3/4″ Plywood | 23 1/4″ x 34 1/2″ | 2 |
| Sides | 3/4″ Plywood | 22 1/2″ x 34 1/2″ | 2 |
| Bottom | 1/2″ Plywood | 23 1/4″ x 22 1/2″ | 1 |
| Back Support | 1×4 Lumber | 23 1/4″ x 3″ | 1 |
| Toe Kick Front | 1×4 Lumber | 30″ x 3 3/4″ | 1 |
| Toe Kick Side | 1×4 Lumber | 23 1/4″ x 3 3/4″ | 2 |
Note: These dimensions are for building the box itself. Drawer box dimensions and face frame dimensions will be separate.
2. Gathering Your Materials and Tools
Having everything ready before you start cabinet construction makes the process smoother.
2.1 Essential Materials
- Plywood: For cabinet boxes. Baltic birch plywood is a popular choice for its strength and stability. 3/4-inch thickness for sides, front, and back. 1/2-inch or 1/4-inch for the bottom, depending on your design.
- Lumber: For face frames and toe kicks. Hardwoods like oak, maple, or poplar are common. 1×4 and 1×3 lumber are frequently used.
- Screws: Wood screws, typically 1 1/4-inch and 2-inch.
- Wood Glue: A strong adhesive for joints.
- Drawer Slides: For smooth drawer operation.
- Hinges: For cabinet doors.
- Sandpaper: Various grits for smoothing.
- Finishing Supplies: Stain, paint, sealer, or varnish.
2.2 Necessary Tools
- Measuring Tape: Accurate measurements are crucial.
- Pencil: For marking cuts.
- Safety Glasses: Always protect your eyes.
- Hearing Protection: Essential when using power tools.
- Table Saw or Circular Saw with Guide: For precise cuts of plywood and lumber.
- Miter Saw or Crosscut Sled: For accurate crosscuts on lumber.
- Drill/Driver: For pre-drilling holes and driving screws.
- Pocket Hole Jig: A highly recommended tool for strong and hidden joinery.
- Orbital Sander: For efficient sanding.
- Clamps: Various types (bar clamps, pipe clamps) to hold pieces together while gluing.
- Wood Chisel: For minor adjustments or cleaning up joinery.
- Router (Optional but Recommended): For creating dados, rabbets, or decorative edges.
3. Building the Cabinet Box
This is the core of building cabinet boxes. We’ll focus on a common and strong method using pocket holes.
3.1 Cutting Your Plywood Pieces
- Accuracy is key: Use your cut list and carefully measure and mark each piece.
- Use a good saw: A table saw with a fine-tooth plywood blade is ideal for clean, straight cuts. If using a circular saw, a good guide will ensure accuracy.
- Cut all box pieces first: This ensures consistency before moving to face frames.
3.2 Preparing for Joinery
- Pocket Holes: For robust and beginner-friendly joinery, pocket holes are excellent. Use a pocket hole jig to drill angled holes on the edges of the pieces that will attach to others.
- Sides to Bottom: Drill pocket holes along the bottom edge of the side panels.
- Front/Back to Sides: Drill pocket holes along the side edges of the front and back panels.
- Front/Back to Bottom: Drill pocket holes along the bottom edges of the front and back panels.
3.3 Assembling the Cabinet Box (Cabinet Assembly)
This is the main step in cabinet assembly.
- Attach Sides to Bottom: Apply wood glue to the bottom edges of the side panels. Align them with the bottom panel and drive pocket hole screws. Ensure the sides are square to the bottom.
- Attach Front and Back: Apply glue to the edges of the front and back panels where they meet the sides and bottom. Position them and drive pocket hole screws. Make sure the box is square. A carpenter’s square is your best friend here.
- Reinforce Corners: For added strength, you can add small blocks of wood in the corners, secured with glue and screws.
3.4 Adding the Back Panel
- Material: Typically 1/4-inch plywood.
- Purpose: The back panel adds significant rigidity and squareness to the cabinet box.
- Attachment: Apply glue along the back edges of the cabinet box. Lay the back panel in place and secure it with small brad nails or staples. Ensure the cabinet box remains square as you attach the back. You can check this by measuring the diagonals of the back – they should be equal.
3.5 Installing the Bottom Panel (Alternative Method)
If you prefer not to use pocket holes for the bottom, you can create dado grooves.
- Dado Grooves: Using a router with a dado blade or a router with a straight bit and a guide, cut shallow grooves (dados) into the inside faces of the front, back, and side panels. These grooves should be the thickness of your bottom plywood.
- Assembly: Apply glue to the edges of the bottom panel and slide it into the dados. Then, assemble the sides and front/back around the bottom, securing with pocket holes or other joinery.
4. Creating the Face Frame
The face frame is the decorative front of your cabinet, and it’s crucial for a professional look and for mounting drawer slides and hinges. This is where woodworking for kitchens really shines.
4.1 Cutting Face Frame Components
- Materials: Use your chosen hardwood (e.g., 1×3 or 1×4 lumber).
- Components:
- Stiles: The vertical pieces on the sides of the face frame.
- Rails: The horizontal pieces at the top and bottom.
- Center Stiles/Rails: Used for separating doors or drawers.
- Measurements: Face frame pieces are typically cut to the outer dimensions of the cabinet box, but with allowances for the overlay of doors and drawers. For a standard cabinet box that is 23 1/4 inches wide and 34 1/2 inches high, you might aim for a face frame that is 29 3/4 inches wide (to allow for 3/4 inch overlay on each side) and 35 inches high.
4.2 Joinery for Face Frames
- Pocket Holes: The easiest and most common method for DIY face frames. Drill pocket holes on the back of the rails where they will join the stiles.
- Dowels or Biscuits: For a more hidden joinery, dowels or biscuits can be used. This requires more precision.
- Miter Joints: For a cleaner look at the corners, you can miter the ends of the rails and stiles. This requires accurate angle cuts.
4.3 Assembling the Face Frame
- Layout: Lay out your stiles and rails on a flat surface.
- Glue and Clamp: Apply wood glue to the joining edges. Use your pocket hole jig or other chosen joinery to connect the pieces.
- Clamp and Square: Clamp the frame together and check for squareness.
- Drive Screws: Secure the joints with pocket hole screws.
- Clean Up: Wipe away any excess glue.
5. Attaching the Face Frame to the Cabinet Box
Once your face frame is built and your cabinet box is assembled, it’s time to bring them together.
5.1 Alignment
- Flush or Overlay: Decide if you want the face frame to be flush with the back of the cabinet box or sit slightly forward (overlay). For most base cabinets, the face frame is attached so it’s flush with the sides of the box and extends slightly below the bottom of the box (for the toe kick).
- Marking: You can mark guidelines on the cabinet box to ensure consistent alignment.
5.2 Attaching
- Apply Glue: Apply wood glue to the front edges of the cabinet box.
- Position: Carefully position the face frame onto the glued edges.
- Clamp: Clamp the face frame securely to the cabinet box.
- Secure: Drive screws through the face frame into the cabinet box. It’s often easiest to pre-drill through the face frame and then drive screws into the front and sides of the cabinet box. You can also drive screws from the inside of the cabinet box through the front panel into the back of the face frame.
6. Building and Installing Drawer Boxes
Drawers are a key part of building base cabinets and offer great functionality.
6.1 Drawer Box Construction
- Materials: Typically 1/2-inch or 3/4-inch plywood, or solid wood for higher-end drawers.
- Joinery:
- Dovetails: The strongest and most traditional method. Requires precision and specialized tools.
- Box Joints (Finger Joints): Strong and aesthetically pleasing, achievable with a table saw jig.
- Dado and Rabbet: A strong and accessible method. Cut dadoes in the drawer sides to receive the front and back panels, and a rabbet on the front and back panels to receive the drawer bottom.
- Pocket Holes: A quick and easy option, though less traditional for drawer box joinery.
- Drawer Bottom: Usually 1/4-inch plywood, designed to slide into grooves cut in the drawer sides and front/back.
Example Drawer Box Cut List (for a 24″ wide cabinet, with a 20″ wide drawer):
| Part | Material | Dimensions (in inches) | Quantity |
|---|---|---|---|
| Front/Back | 1/2″ Plywood | 19″ x 5″ | 2 |
| Sides | 1/2″ Plywood | 20″ x 5″ | 2 |
| Bottom | 1/4″ Plywood | 19″ x 19 1/2″ | 1 |
Note: These dimensions are examples. Actual drawer size depends on slide type and desired fit.
6.2 Installing Drawer Slides
- Types: There are many types, including undermount, side-mount, and epoxy-coated.
- Placement: Follow the manufacturer’s instructions precisely. Drawer slides are usually mounted to the inside of the cabinet box and to the sides of the drawer box.
- Leveling: Ensure the slides are perfectly level for smooth operation. Use shims if necessary.
6.3 Installing Drawer Boxes
- Insert: Slide the assembled drawer boxes onto the installed drawer slides.
- Test: Open and close the drawers to ensure they operate smoothly.
7. Adding Doors and Hardware
The final touches that make your DIY kitchen cabinets look professional.
7.1 Preparing Doors
- Material: Can be made from solid wood panels and rails, or from plywood with an applied veneer or edge banding.
- Construction: Doors are often built with a frame and panel design or as a solid slab.
- Sizing: Doors are typically sized to overlay the face frame by about 1/2 inch on all sides.
7.2 Attaching Hinges
- Types: European (concealed) hinges or traditional butt hinges.
- Placement: Mark the hinge locations on the doors and the cabinet face frame according to the hinge manufacturer’s specifications.
- Installation: Mount the hinges to the doors first, then attach the doors to the cabinet.
7.3 Adjusting Hinges
- Fine-tuning: Most hinges have adjustment screws that allow you to fine-tune the door alignment for a perfect reveal.
7.4 Installing Drawer Fronts
- Attaching: Drawer fronts are usually attached to the drawer boxes from the inside using screws. Position the drawer front carefully for the desired overlay before securing.
8. Finishing Touches
This stage transforms your bare cabinets into beautiful features.
8.1 Sanding
- Smooth Surfaces: Sand all surfaces, starting with a coarser grit (like 120) and moving to finer grits (180, 220).
- Edge Smoothing: Pay attention to edges and corners.
8.2 Applying Finish
- Stain: If you’re staining, apply evenly with a brush or cloth, wiping off excess.
- Paint: Apply a primer, then multiple thin coats of paint.
- Sealer/Topcoat: Apply a clear coat (polyurethane, varnish, lacquer) for durability and protection. Follow the manufacturer’s instructions for drying times between coats.
9. Cabinet Installation in Your Kitchen
The final step is kitchen cabinetry installation.
9.1 Marking Cabinet Locations
- Level Lines: Use a level to draw a level line on your wall where the top of your base cabinets will sit (typically 34.5 inches from the finished floor, or the height of your toe kick plus the cabinet box height).
- Plumb Lines: Mark plumb lines for the sides of cabinets, especially in corners.
9.2 Securing Cabinets
- Wall Studs: Locate wall studs using a stud finder. This is crucial for secure mounting.
- Attaching to Wall:
- Position Cabinet: Place the first cabinet in its position.
- Level and Plumb: Ensure it’s level and plumb.
- Drill Pilot Holes: Drill pilot holes through the back of the cabinet box (often through the solid back support piece you installed earlier) into the wall studs.
- Drive Screws: Use sturdy wood screws (e.g., 2 1/2-inch or 3-inch) to secure the cabinet to the wall.
- Joining Cabinets:
- Position Next Cabinet: Place the adjacent cabinet and ensure it’s level and plumb, and butted up tightly against the first cabinet.
- Clamp Together: Clamp the two cabinets together to ensure a tight seam.
- Drill and Screw: Drill pilot holes from the inside of one cabinet into the face frame or side of the other. Drive screws to join them. You can also drill through the cabinet sides from the inside.
9.3 Installing Toe Kick
- Material: Typically made from 1×4 lumber.
- Attachment: Secure the toe kick pieces to the front and sides of the cabinet base, usually with glue and brad nails.
9.4 Installing Countertops
- Professional Installation: Countertops are often best left to professionals to ensure a perfect fit and finish.
- DIY Attachment: If installing yourself, follow the countertop manufacturer’s guidelines for securing it to the cabinet boxes.
Frequently Asked Questions (FAQ)
What type of wood is best for DIY kitchen cabinets?
Baltic birch plywood is excellent for cabinet boxes due to its strength, stability, and smooth surface. For face frames and doors, hardwoods like maple, oak, or poplar are popular choices.
Can I build kitchen cabinets without a table saw?
While a table saw makes precise cuts much easier, you can build cabinets with a good circular saw and a straight edge guide. However, accuracy will be more challenging.
How do I ensure my cabinets are square?
Use a carpenter’s square when assembling each piece. For cabinet boxes, measure the diagonals of the back – they should be equal if the box is square.
What is the easiest joinery method for beginners?
Pocket holes are generally considered the easiest and most forgiving joinery method for beginners when building cabinet boxes and face frames.
How deep should my base cabinets be?
Standard base cabinet depth is 24 inches. This includes the cabinet box and the face frame overlay.
How high should my base cabinets be?
The standard height for base cabinets is 34.5 inches before the countertop is installed. This allows for a standard countertop height of 36 inches.
Building your own kitchen cabinetry installation is a significant undertaking, but with careful planning, the right tools, and a step-by-step approach, you can achieve beautiful and functional custom kitchen cabinets. This detailed guide provides the foundation for your woodworking for kitchens project, empowering you to create the kitchen of your dreams.