
When looking for a new kitchen sink, you might wonder, “What are the most important measurements for a kitchen sink?” The most crucial measurements involve the sink’s overall kitchen sink dimensions, the sink cutout size required in your countertop, and the cabinet base size for sink compatibility. This guide will walk you through accurately measuring for your new kitchen sink, ensuring a perfect fit and a smooth installation.
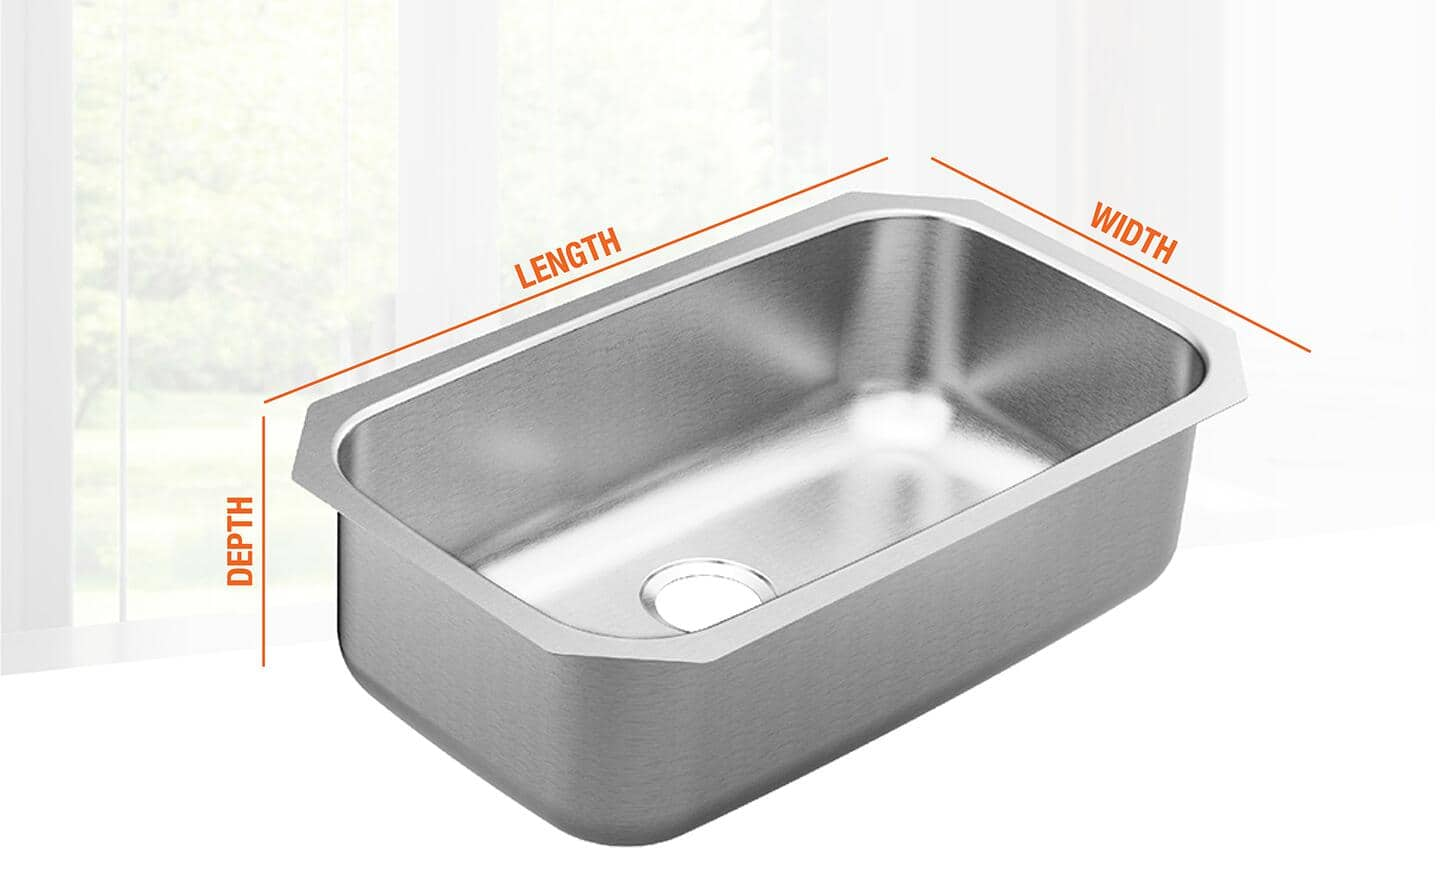
Image Source: dam.thdstatic.com
Why Accurate Sink Measurements Matter
Choosing a new kitchen sink can be exciting, but getting the measurements wrong can lead to significant headaches. An incorrectly sized sink might not fit your countertop opening, may require costly countertop modifications, or could look out of proportion with your cabinets. Fathoming the necessary measurements ensures you select a sink that is both aesthetically pleasing and functionally sound for your kitchen space.
Kitchen Sink Dimensions: Beyond the Basics
The overall kitchen sink dimensions are your starting point. This refers to the sink’s length, width, and depth. While manufacturers provide these details, you’ll need to measure your existing space and cabinet to ensure compatibility.
- Length and Width: These are the primary external measurements of the sink basin(s).
- Sink Depth Measurement: This refers to how deep the sink basin is. Deeper sinks are great for washing large pots and pans, but ensure they don’t interfere with plumbing or the cabinet base.
Sink Cutout Size: The Countertop’s Opening
The sink cutout size is the exact opening in your countertop where the sink will sit. This is one of the most critical measurements.
- For Top-Mount (Drop-In) Sinks: The cutout size is typically slightly larger than the sink’s outer rim to allow it to drop into place. Always check the manufacturer’s specifications for the precise cutout dimensions.
- For Undermount Sinks: The cutout size is usually the exact size of the sink’s basin, as the sink edge will be mounted beneath the countertop. Precision is paramount here.
Undermount Sink Measurement: Precision is Key
Measuring for an undermount sink requires extra care. Since the sink is installed from below, the cutout in the countertop must be perfectly matched to the sink’s dimensions.
- Measure the Sink’s Outer Edge: Record the total length and width of the sink, including any mounting clips or flanges.
- Determine the Countertop Cutout: You’ll typically need to subtract a small amount from the sink’s overall dimensions to create the countertop opening. Consult the sink manufacturer’s sink template or specifications. They will provide the exact cutout measurements needed for their specific model.
- Consider the Countertop Edge: Ensure there’s enough countertop material around the cutout to support the sink and any necessary sealing.
Farmhouse Sink Installation: Unique Considerations
Farmhouse sink installation often involves different measurements and techniques due to their design. These sinks, also known as apron-front sinks, have a distinctive exposed front panel.
- Cabinet Width: Farmhouse sinks typically require a specific cabinet base size for sink to accommodate their depth and the apron front. You’ll often need a dedicated sink base cabinet, usually wider than standard cabinets.
- Countertop Cutout: The cutout for a farmhouse sink is generally at the front of the countertop, with the front panel of the sink extending outwards. The cutout will typically match the interior dimensions of the sink basin.
- Support: Ensure your cabinet base and countertop are robust enough to support the weight of a farmhouse sink, which can be quite heavy, especially when filled with water.
Double Bowl Sink Size: Balancing Functionality
When measuring for a double bowl sink size, you need to consider both the overall dimensions and how the two basins are divided.
- Overall Dimensions: These follow the same principles as single sinks – length, width, and depth.
- Bowl Dimensions: Note the size and shape of each individual bowl. Will one be larger for washing dishes, and the other smaller for rinsing or food preparation?
- Divider Width: The space between the two bowls can impact usability.
Single Bowl Sink Dimensions: Simplicity and Space
For single bowl sink dimensions, the focus is on maximizing usable space within the basin.
- Basin Size: Measure the length and width of the primary basin.
- Depth: As mentioned, consider how deep you want the bowl to be.
Countertop Sink Allowance: The Space Around the Sink
The countertop sink allowance refers to the amount of countertop material that surrounds the sink opening. This is crucial for structural integrity and aesthetics.
- For Top-Mount Sinks: This allowance is where the sink’s rim will rest. A typical allowance might be 1/2 inch to 1 inch.
- For Undermount Sinks: The allowance is the width of the countertop edge visible around the sink. This can vary depending on your countertop material and desired look.
- General Guideline: Ensure there’s enough allowance for stability and to avoid potential cracking, especially with heavier materials like granite or quartz.
Step-by-Step Measurement Guide
Let’s break down the process of measuring for your new kitchen sink.
Step 1: Identify Your Sink Type
Before you start measuring, determine which type of sink you’re installing:
- Top-Mount (Drop-In): Rests on top of the countertop, with the rim visible.
- Undermount: Mounted underneath the countertop, creating a seamless look.
- Farmhouse (Apron-Front): Features an exposed front panel.
- Flush-Mount/Integrated: Sinks that are seamlessly integrated into the countertop material.
The measurement approach varies slightly for each.
Step 2: Measure Your Existing Sink (If Applicable)
If you’re replacing an existing sink, this is your starting point.
Measuring a Top-Mount Sink:
- Outer Rim Measurements:
- Use a tape measure to find the total length (side to side) and width (front to back) of the sink’s outer rim.
- Measure from the furthest point on one side to the furthest point on the other.
- Repeat for the front-to-back dimension.
- Cutout Measurements:
- Carefully measure the opening in your countertop.
- Measure the length and width of the hole from edge to edge. This is your current cutout size.
- Important: For a top-mount sink, the new sink’s outer dimensions should be slightly larger than the existing cutout to ensure the rim can cover the hole.
- Depth Measurement:
- Measure from the top edge of the sink rim down to the bottom of the sink basin.
Measuring an Undermount Sink:
- Sink Basin Measurements:
- You’ll need to access the sink from underneath the countertop.
- Measure the length and width of the actual sink bowl itself.
- Measure the depth of the sink bowl.
- Countertop Cutout:
- Measure the precise opening in your countertop. This measurement should ideally match the sink’s outer dimensions (excluding any mounting clips).
- If you don’t have the sink accessible, you may need to estimate based on the rim visible above the countertop.
Measuring a Farmhouse Sink:
- Overall Exterior Dimensions:
- Measure the total length (side to side), width (front to back of the apron panel), and height/depth of the entire sink unit.
- Cabinet Base Measurements:
- Measure the interior width of your cabinet base where the sink will be installed. Farmhouse sinks often require a wider cabinet base.
- Countertop Cutout:
- This will typically be at the front edge of the countertop. Measure the length and depth of the opening that will accommodate the sink’s bowl and apron front.
Step 3: Measure Your Cabinet Base
This is crucial for ensuring your new sink fits within your existing cabinetry.
For Standard Top-Mount and Undermount Sinks:
- Cabinet Width:
- Measure the interior width of the cabinet that will house the sink. This is often referred to as the “sink base cabinet.”
- Most standard sinks require a 30-inch or 36-inch sink base cabinet.
- Cabinet Depth:
- Measure the depth of the cabinet from the back wall to the front edge.
- Cabinet Height:
- Measure the internal height of the cabinet. This is important for sink depth measurement compatibility, especially if you have a garbage disposal or need to accommodate plumbing.
For Farmhouse Sinks:
- Cabinet Base Size for Sink:
- Farmhouse sinks often require a specialized sink base cabinet. You’ll need to measure the interior width of this cabinet.
- The cabinet front will need to be removed or modified to accommodate the apron front of the sink.
- Measure the distance from the wall to the edge of the cabinet front where the sink will sit.
Step 4: Check Countertop Clearance and Edge Considerations
You need sufficient countertop material around the sink opening.
For Top-Mount Sinks:
- Ensure the countertop sink allowance (the distance from the cutout edge to the countertop edge) is sufficient for the rim of your new sink to rest securely. A minimum of 1/2 inch to 1 inch is generally recommended.
For Undermount Sinks:
- The countertop sink allowance here refers to the exposed countertop edge. Measure the distance from the edge of the sink bowl to the edge of the countertop. This determines how much of your countertop material will be visible.
- Consider the thickness of your countertop material. Thicker countertops provide more support for undermount sinks.
For Farmhouse Sinks:
- The countertop will likely be cut flush with the front of the sink’s apron. Measure the depth of the countertop to ensure a clean edge where the sink meets the counter.
Step 5: Consult Manufacturer Specifications and Templates
This is a vital step that cannot be overstated.
- Sink Specifications: Every sink manufacturer provides detailed specifications, including overall dimensions, bowl dimensions, cutout dimensions, and recommended cabinet base size for sink. Always refer to these.
- Sink Template: Many manufacturers provide a paper or cardboard sink template with their sinks. This template is invaluable for marking your countertop accurately for the cutout. If you can’t get a physical template, download one from the manufacturer’s website.
Working with Different Sink Configurations
Let’s look at specific considerations for common sink types.
Double Bowl Sinks: Practicality and Space
When choosing a double bowl sink size, think about how you’ll use each bowl.
- Sizing: Measure the overall length and width. Then, measure each individual bowl’s length, width, and depth.
- Dividing Wall: The thickness of the dividing wall between the bowls can slightly affect the usable space within each basin.
- Drain Placement: Note the location of the drains in each bowl, as this impacts plumbing.
Single Bowl Sinks: Maximizing Capacity
Single bowl sink dimensions offer a clean, open space for washing large items.
- Size: Focus on the overall length, width, and depth of the basin.
- Depth: A deeper sink (9 inches or more) is excellent for large pots and pans. However, ensure it doesn’t conflict with your cabinet’s internal structure or plumbing.
Preparing for Installation
Once you have your measurements and chosen your sink, here’s what you need to consider before installation.
Material Matters: Countertop Allowance
The material of your countertop can influence the countertop sink allowance.
- Laminate: Often requires a larger cutout allowance as it’s less robust than stone.
- Granite/Quartz: Can accommodate tighter tolerances but still needs adequate support.
- Butcher Block: May require specific sealing and allowance for expansion.
Cabinet Base Size for Sink Compatibility
Always double-check that your cabinet base size for sink can accommodate the physical dimensions of your chosen sink, including any overflow or drain assemblies that might extend below the basin.
Using the Sink Template
- Placement: Place the sink template on your countertop where the sink will be located.
- Marking: Trace the template onto the countertop. For undermount sinks, you’ll trace the cutout area. For top-mount sinks, you’ll trace the area that needs to be removed, ensuring the rim will cover it.
- Verification: Double-check your markings against the sink’s specifications and your measurements.
Common Measurement Pitfalls to Avoid
- Not Measuring the Cabinet: Relying solely on the old sink’s dimensions can be misleading. Always measure the cabinet opening.
- Ignoring Undermount Requirements: These sinks need precise cutout measurements. A slight error can be costly.
- Forgetting Farmhouse Sink Needs: These often require specialized cabinets and modifications.
- Not Checking for Obstructions: Ensure there are no pipes, hinges, or other obstructions in the cabinet that will interfere with the sink’s installation or your plumbing.
- Assuming Standard Sizes: While there are common sizes, variations exist. Always verify dimensions.
Frequently Asked Questions (FAQ)
Q1: How much bigger should my countertop cutout be than my sink?
This depends on the sink type. For top-mount sinks, the cutout is typically 1/4 inch to 1/2 inch smaller than the sink’s overall length and width to allow the rim to cover the opening. For undermount sinks, the cutout usually matches the sink’s basin dimensions precisely. Always refer to the manufacturer’s sink template or specifications.
Q2: Can I install a larger sink than my current one?
You can often install a larger sink, but you must ensure your cabinet base size for sink is adequate and that the new sink’s outer dimensions (or cutout dimensions for undermount) fit within your existing countertop opening or can be safely modified. For farmhouse sink installation, you might need a new or modified cabinet.
Q3: What is the standard depth for a kitchen sink?
The standard sink depth measurement ranges from 6 to 10 inches. Deeper sinks (9-10 inches) are popular for accommodating large pots and pans, but ensure they don’t interfere with your plumbing or cabinet structure.
Q4: How do I measure for an undermount sink if I don’t have the sink?
If you’re buying a sink for a new countertop or replacing an old one without the sink present, you’ll need to rely on the sink manufacturer’s specifications. They will provide the exact sink cutout size required for their specific undermount models. You’ll then need to communicate these precise dimensions to your countertop fabricator.
Q5: What is the countertop sink allowance for a farmhouse sink?
For a farmhouse sink installation, the countertop is typically cut flush with the front of the sink’s apron. The measurement here is more about the depth of the countertop edge that meets the sink and ensuring a clean, finished look. You’ll need to consider the sink’s dimensions and how its apron front sits against the cabinet face.
By following these detailed steps, you can confidently measure for your new kitchen sink, ensuring a perfect fit and a beautiful, functional addition to your kitchen.