
Can you caulk a kitchen backsplash? Yes, you absolutely can and should caulk your kitchen backsplash! It’s a crucial step in both its installation and maintenance, creating a watertight barrier and a clean, finished look. This guide will walk you through how to caulk kitchen backsplash like a pro, ensuring a perfect seal that protects your walls and adds to your kitchen’s appeal. We’ll cover everything from choosing the best caulk for kitchen backsplash to mastering the application.
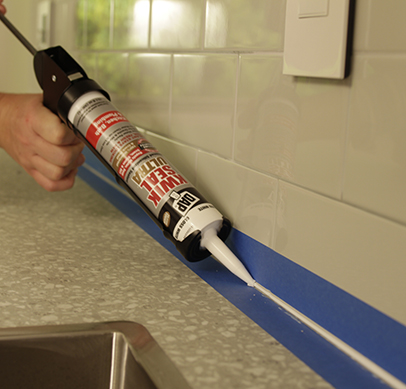
Image Source: www.dap.com
Why Caulk Your Kitchen Backsplash?
Sealing kitchen backsplash edges is more than just an aesthetic choice; it’s a functional necessity. Backsplashes, especially those made of tile, often meet countertops, walls, and cabinetry at various angles. These seams are prime spots for moisture, grease, and food splatters to accumulate. Without proper sealing, this can lead to:
- Water Damage: Moisture can seep into the wall behind the backsplash, causing mold, mildew, and structural damage over time.
- Stains and Grime: Unsealed grout and gaps can absorb spills, leading to stubborn stains that are difficult to clean.
- Pest Infestations: Small gaps can become entry points for insects and other pests.
- A Less Finished Look: Gaps and uneven edges detract from the overall appearance of your kitchen.
Applying backsplash caulk effectively bridges these gaps, creating a smooth, protective layer.
Grout vs. Caulk: What’s the Difference for Your Backsplash?
It’s important to distinguish between grout and caulk, as they serve different purposes in a DIY backsplash caulking project.
- Grout: This is a cement-like material used to fill the wider spaces between tiles. It’s rigid and strong, designed to bond tiles together. However, grout can be porous and prone to cracking, especially in areas with movement or moisture.
- Caulk: This is a flexible sealant, typically made of silicone, latex, or acrylic. It’s designed to fill smaller gaps, joints, and corners. Its flexibility allows it to expand and contract with temperature changes, preventing cracking and maintaining a seal.
When caulking a tile backsplash, you’re typically filling the transition areas where the tile meets the countertop, walls, or cabinets, and sometimes along vertical grout lines if they are particularly wide or prone to cracking.
When to Use Grout vs. Caulk on a Backsplash
| Feature | Grout | Caulk |
|---|---|---|
| Purpose | Fills spaces between tiles | Seals joints, corners, and transitions |
| Flexibility | Rigid, prone to cracking | Flexible, expands and contracts |
| Composition | Cement-based | Silicone, latex, acrylic |
| Application | Wider gaps between tiles | Narrow gaps, seams, corners, transitions |
| Durability | Good for structural bonding | Excellent for sealing against moisture and air |
| Maintenance | Can stain and crack, requires sealing | Easy to clean, resists mold and mildew (if rated) |
Choosing the Best Caulk for Your Kitchen Backsplash
Selecting the right caulk is crucial for a long-lasting and attractive finish. Not all caulks are created equal, especially for a high-traffic, high-moisture area like a kitchen backsplash.
Key Features to Look For:
- Kitchen & Bath Formula: These caulks are specifically designed to resist moisture, mildew, and mold. This is essential for waterproof kitchen backsplash caulk.
- Paintable (Optional): If you plan to paint your backsplash or the surrounding walls, ensure your caulk is paintable.
- Color: Most caulks come in white or clear, but you can also find colors that match your grout or décor.
- Adhesion: Look for a caulk that adheres well to tile, stone, laminate, and other common backsplash materials.
- Flexibility: A flexible caulk will better withstand minor house settling and temperature fluctuations without cracking.
Types of Caulk:
-
100% Silicone Caulk:
- Pros: Extremely durable, waterproof, and resistant to mold and mildew. Excellent flexibility.
- Cons: Can be difficult to work with, has a strong odor during application, and is generally not paintable.
- Best For: Areas with high moisture exposure, like the joint between the backsplash and the countertop where splashes are common.
-
Siliconized Acrylic Latex Caulk:
- Pros: Easier to apply and clean up than 100% silicone. Most are paintable. Good flexibility and adhesion.
- Cons: Less flexible and durable than 100% silicone. May not be as resistant to heavy moisture over the long term.
- Best For: General use on backsplash seams where moisture isn’t a constant, direct threat, and paintability is desired.
-
Acrylic Latex Caulk with Silicone:
- Pros: Offers a good balance of ease of use, paintability, and improved flexibility and water resistance compared to basic latex caulk.
- Cons: Still not as robust as 100% silicone for extreme moisture.
- Best For: A good all-around choice for most kitchen backsplash applications.
For most DIY backsplash caulking projects, a high-quality siliconized acrylic latex caulk labeled for kitchens and baths is an excellent choice. If the seam between your countertop and backsplash is particularly prone to getting wet, consider using 100% silicone there for maximum protection.
Preparing for Your Backsplash Caulking Project
Proper preparation is key to a professional-looking finish and a lasting seal. Don’t skip these steps!
Gather Your Supplies:
- Caulk Gun: A good quality caulk gun makes application much easier. Look for one with a smooth trigger and a release lever.
- Caulk: Your chosen kitchen backsplash sealant.
- Utility Knife or Caulk Removal Tool: To remove old caulk.
- Scraper or Putty Knife: For removing stubborn residue.
- Rubbing Alcohol or Mineral Spirits: For cleaning the area.
- Rags or Paper Towels: For wiping and cleaning.
- Painter’s Tape (Blue or Green): For creating clean lines.
- Caulk Finishing Tool or Finger: For smoothing the bead.
- Gloves: To protect your hands.
- Safety Glasses: To protect your eyes.
Step-by-Step Preparation:
1. Remove Old Caulk:
- If you’re replacing old caulk, use a utility knife or a dedicated caulk removal tool to carefully cut along the edges of the old caulk bead.
- Gently pull the old caulk away. For stubborn bits, use a scraper or putty knife. Be careful not to scratch your countertop or backsplash tiles.
- Wipe away any remaining residue with a damp cloth.
2. Clean the Area Thoroughly:
- This is a critical step for ensuring good adhesion. The surfaces where you will be applying caulk must be clean, dry, and free of dust, grease, and debris.
- Wipe down the seams with rubbing alcohol or mineral spirits. This will remove any remaining grease or residue that might prevent the new caulk from sticking.
- Allow the area to dry completely.
3. Apply Painter’s Tape:
- For the cleanest possible results, apply painter’s tape along the edges of the seam you’ll be caulking.
- The tape should be placed parallel to the seam, creating a clean border on both sides. This acts as a guide and helps you achieve a straight, uniform bead of caulk.
- Leave a gap between the tape strips that is slightly wider than the bead of caulk you intend to apply.
How to Apply Backsplash Caulk for a Perfect Seal
Now for the main event – applying the caulk! Take your time and follow these steps for a professional finish.
Step 1: Prepare the Caulk Tube
- Using a utility knife, cut the tip of the caulk tube at a 45-degree angle. Start with a small opening; you can always cut more if needed. A smaller opening gives you more control, especially when applying backsplash caulk for the first time.
- Puncture the inner seal of the caulk tube with the tool on the caulk gun or a long nail.
Step 2: Load the Caulk Gun
- Pull back the plunger rod on the caulk gun.
- Insert the caulk tube, with the cut tip facing forward.
- Push the plunger rod firmly against the back of the caulk tube.
Step 3: Test the Flow
- Before applying to your backsplash, test the caulk flow on a piece of scrap cardboard or paper.
- Squeeze the trigger gently to dispense a small amount of caulk. Adjust your pressure to find a consistent flow. Release the trigger and then press the release lever to stop the flow.
Step 4: Apply the Caulk Bead
- Hold the caulk gun at a 45-degree angle to the seam.
- Apply steady, consistent pressure to the trigger as you move the gun along the seam.
- Aim for a continuous bead that fills the gap completely without excessive overflow. Try to match the width of the bead to the gap you are filling, and the width of the tape you applied.
- Work in manageable sections, about 2-3 feet at a time, especially if you are new to DIY backsplash caulking. This prevents the caulk from drying out before you can smooth it.
Step 5: Smooth the Caulk Bead
- This is where you turn a good application into a great one. Immediately after applying a section of caulk, you need to smooth it.
- Using a Caulk Finishing Tool: These tools come with various profiles to create different bead shapes. Run the tool along the bead at a consistent angle and pressure.
- Using Your Finger: Dip your finger in water (for latex-based caulk) or a soapy water solution (for silicone caulk, though some prefer dry for silicone). Gently run your finger along the caulk bead to push it into the gap and create a smooth, concave surface. Wipe excess caulk off your finger onto a damp rag frequently.
- Important: Avoid over-smoothing, which can pull the caulk out of the seam.
Step 6: Remove the Painter’s Tape
- Once you’ve smoothed the caulk bead, carefully and slowly pull off the painter’s tape.
- Pull the tape away at a 45-degree angle, away from the fresh caulk bead.
- Do this while the caulk is still wet to ensure clean lines and prevent the caulk from pulling away with the tape.
Step 7: Clean Up
- Wipe away any excess caulk that may have squeezed out from under the tape or during smoothing with a damp rag.
- For latex-based caulk, soap and water are usually sufficient. For silicone caulk, you may need mineral spirits for stubborn residue, but be careful as this can also affect nearby finishes.
Step 8: Allow to Cure
- Check the caulk manufacturer’s instructions for drying and curing times. Most latex-based caulks are dry to the touch within an hour and fully cure in 24 hours. Silicone caulks may take longer to fully cure.
- Avoid getting the caulk wet or disturbing it until it has fully cured. This is crucial for a waterproof kitchen backsplash caulk seal.
Mastering Backsplash Caulking Techniques
Achieving a perfect seam involves more than just applying caulk. Here are some tips for tackling common areas and achieving that professional look.
How to Caulk Tile Seams at the Countertop:
This is arguably the most important seam to caulk effectively.
- Angle is Key: Hold the caulk gun at a 45-degree angle, pushing the caulk into the seam between the tile and the countertop.
- Consistent Pressure: Apply steady pressure to the caulk gun.
- Smooth with Purpose: When smoothing, aim to create a slight concave shape that channels water away from the seam. Use a specialized caulk finishing tool or a wet finger.
- Clean Edges: Painter’s tape is your best friend here for maintaining razor-sharp lines.
Sealing Kitchen Backsplash Edges Against Walls and Cabinets:
- Vertical Seams: For seams where the backsplash meets a wall or cabinet side, apply caulk vertically. Maintain the 45-degree angle.
- Corners: In inside corners (where two walls meet, and the backsplash extends to that corner), apply caulk generously and smooth it with a rounded caulk finishing tool or a finger to create a cove.
Tips for Applying Caulk Like a Pro:
- Practice Makes Perfect: If you’re nervous, practice on scrap material first.
- Work in Sections: Don’t try to caulk the entire kitchen at once. Work in 2-3 foot sections to maintain control.
- Keep a Wet Rag Handy: Have a damp rag or paper towel readily available to wipe away excess caulk from your tools or fingers.
- Don’t Overwork It: Smooth the caulk bead just once. Going over it multiple times can make it look messy.
- Consider a Caulk Remover Tool: These specialized tools are excellent for removing old caulk cleanly without damaging surfaces.
Common Questions About Caulking Your Kitchen Backsplash
How often should I re-caulk my kitchen backsplash?
This depends on the type of caulk used and the amount of wear and tear. Generally, a high-quality caulk should last 3-5 years. You’ll know it’s time to re-caulk when you see signs of cracking, peeling, mold growth, or gaps forming.
Can I caulk over old caulk?
It’s best not to. Old caulk may be degraded, peeling, or not adhering properly. Applying new caulk over old caulk will result in a poor bond and an unprofessional look. Always remove old caulk completely before applying new caulk.
What if my caulk bead isn’t perfect?
Don’t panic! If the caulk is still wet, you can carefully remove it with a damp rag or caulk removal tool and reapply. If you’ve already smoothed it and aren’t happy, you may need to let it dry and then carefully shave off the excess with a sharp utility knife before reapplying.
How do I ensure the caulk matches my grout?
Many manufacturers offer caulk in colors that are designed to match popular grout shades. If you can’t find an exact match, choose a neutral color like white, almond, or clear that complements your tiles and countertops.
What is the best caulk for a granite backsplash?
For a granite backsplash, you’ll want a caulk that adheres well to stone and is resistant to moisture. A 100% silicone caulk or a high-quality siliconized acrylic latex caulk formulated for kitchens and baths will work well. Ensure the color complements your granite.
Do I need to caulk every grout line?
No. Grout is designed to fill the spaces between tiles. Caulk is for sealing seams and transitions. You only need to caulk where the tile meets another surface (like a countertop, wall, or cabinet) or in any areas where grout might be prone to cracking or moisture ingress.
Conclusion: Achieving a Perfect Seal
How to caulk kitchen backsplash is a skill that can dramatically improve the longevity and appearance of your kitchen. By choosing the best caulk for kitchen backsplash, preparing the surfaces diligently, and applying and smoothing the caulk with care, you can achieve a waterproof kitchen backsplash caulk seal that looks professional and protects your home. This DIY backsplash caulking task is achievable for any homeowner looking to enhance their kitchen’s durability and aesthetics. Remember, the details matter, and a perfectly caulked seam is a testament to a job well done.