
Can you paint kitchen countertops for a fresh look? Yes, you absolutely can! Painting kitchen countertops is a fantastic DIY project that can dramatically update your kitchen’s appearance without the hefty cost of replacement. Whether you’re looking to refresh old laminate, give a new lease of life to worn-out solid surfaces, or even experiment with a bold new look for your DIY kitchen countertops, this guide will walk you through the process to achieve professional results at home. We’ll cover everything from choosing the right paint to essential preparation and application techniques, making countertop resurfacing an achievable goal for any homeowner.
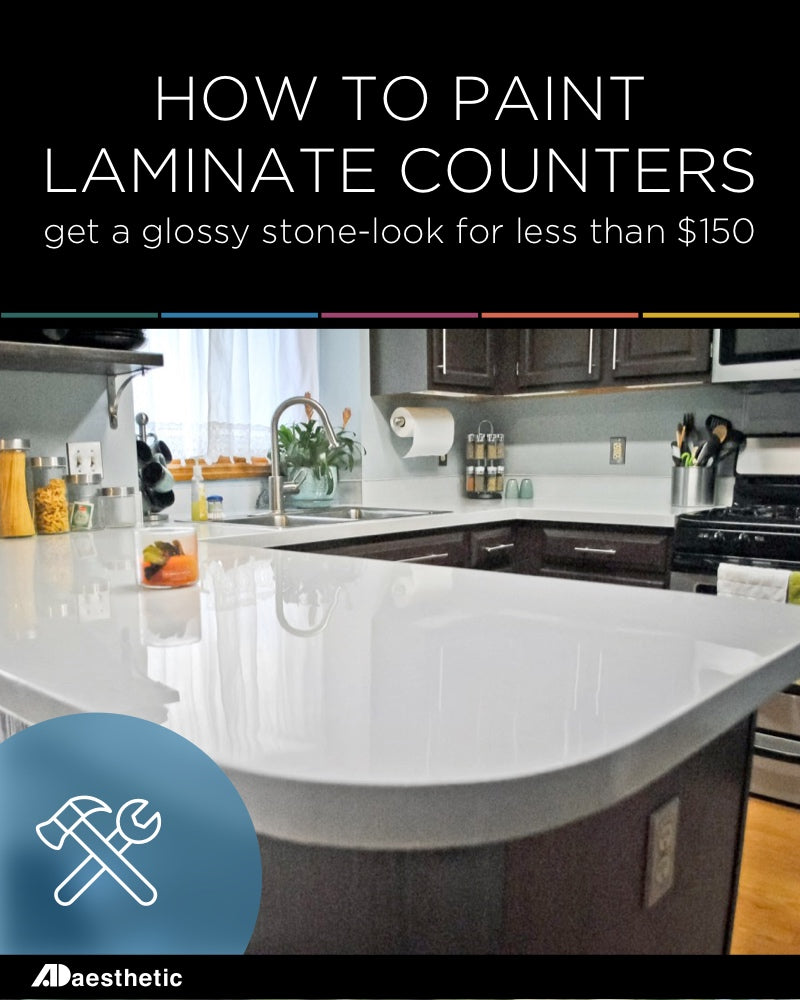
Image Source: adaesthetic.com
Why Paint Your Kitchen Countertops?
The kitchen is the heart of many homes, and its countertops play a central role in both its function and its aesthetic. Over time, even the most durable surfaces can show signs of wear and tear – chips, stains, and fading can make your kitchen look tired and dated. Replacing countertops can be incredibly expensive and disruptive. Painting offers a budget-friendly and surprisingly effective alternative for countertop refinishing.
Benefits of Painting Countertops:
- Cost-Effective: Significantly cheaper than replacement.
- Versatile Aesthetics: Choose from countless colors and finishes.
- Quick Transformation: A weekend project can completely change your kitchen’s look.
- DIY Friendly: Accessible for most skill levels.
- Covers Imperfections: Hides minor damage and discoloration.
Choosing the Right Kitchen Countertop Paint
Selecting the best paint for your kitchen counters is crucial for durability and a beautiful finish. Not all paints are created equal, especially when it comes to the high-traffic, moisture-prone environment of a kitchen. You’re looking for a paint that offers excellent adhesion, is resistant to stains and moisture, and can withstand daily use.
Types of Countertop Paints:
There are several types of products specifically designed for painting countertops.
- Acrylic Latex Paints: While common for walls, standard acrylic latex paints are generally not durable enough for countertops without a specialized additive or topcoat. Look for high-quality interior acrylics with a satin or semi-gloss finish, as these are more washable.
- Enamel Paints: Enamel paints, particularly oil-based or water-based alkyd enamels, offer better durability and a harder finish than standard latex. They provide good resistance to moisture and stains.
- Epoxy Countertop Paint: This is often considered the gold standard for painted countertops. Epoxy paints are typically two-part systems (a resin and a hardener) that create an incredibly durable, seamless, and non-porous surface. They are highly resistant to stains, heat, and scratches, making them ideal for kitchens. Epoxy countertop paint can mimic the look of granite, marble, or quartz, offering a high-end finish.
- Specialty Countertop Kits: Many brands offer all-in-one kits specifically formulated for countertops. These kits often include primers, base coats, decorative flecks or marbling agents, and clear sealants. They are designed for ease of use and guaranteed compatibility between components.
Factors to Consider When Choosing:
- Material of Your Existing Countertops: How to paint laminate countertops requires a different approach than painting solid quartz or granite. Most paints will work on laminate, but proper prep is key.
- Desired Finish: Do you want a matte, satin, semi-gloss, or high-gloss look?
- Durability Requirements: How much wear and tear do your countertops typically endure?
- Budget: Epoxy paints and specialty kits tend to be more expensive but offer superior durability.
- Ease of Application: Some products are more beginner-friendly than others.
Top Picks for Best Paint for Kitchen Counters:
| Product Type | Pros | Cons | Best For |
|---|---|---|---|
| Epoxy Kits | Extremely durable, stain/heat resistant, seamless finish. | Can be pricier, may require more meticulous application. | High-traffic kitchens, those seeking ultimate durability. |
| Acrylic Enamels | Good durability, wide color selection, easier cleanup (water-based). | May require a robust topcoat for maximum protection. | Budget-conscious DIYers, moderate use kitchens. |
| Specialty Kits | All-in-one solution, often include decorative elements. | Less flexibility in color/finish choices, can be brand-specific. | Beginners, those wanting a specific decorative effect. |
| Mineral Paints | Eco-friendly, natural look, good adhesion. | Limited color palette, may require frequent sealing. | Naturalistic aesthetics, low-VOC preference. |
When in doubt, always read product reviews and manufacturer recommendations for the specific type of countertop material you have.
Step-by-Step Guide to Painting Kitchen Countertops
Achieving a professional finish on your kitchen counters involves careful preparation and precise application. Skipping steps can lead to peeling, chipping, or an uneven appearance. This guide focuses on preparing and painting your existing countertops to give them a beautiful new look.
Essential Tools and Materials:
Before you begin painting kitchen counters, gather all your supplies:
- Cleaner/Degreaser: Trisodium phosphate (TSP) or a strong kitchen degreaser.
- Sanding Sponges/Sandpaper: Fine-grit (150-220 grit) for smoothing and adhesion.
- Painter’s Tape: High-quality tape for masking.
- Drop Cloths/Plastic Sheeting: To protect surrounding areas.
- Rags/Microfiber Cloths: For cleaning and wiping.
- Primer: High-adhesion primer suitable for your countertop material.
- Paint: Your chosen kitchen countertop paint (epoxy, enamel, or specialty kit).
- Paint Rollers: High-density foam rollers for a smooth finish.
- Paint Brushes: Angled brushes for edges and details.
- Paint Trays: For rolling and brushing.
- Gloves: For protection.
- Safety Glasses: To protect your eyes.
- Optional: Sealer/Topcoat (especially for non-epoxy paints), decorative elements (like metallic powders or granite flecks).
Step 1: Thorough Cleaning and Degreasing
This is arguably the most critical step for countertop resurfacing. Any grease, grime, or residue left behind will prevent the paint from adhering properly.
- Clear the Countertops: Remove everything from your countertops.
- Initial Wipe-Down: Use a general kitchen cleaner to remove loose debris.
- Degrease: Mix a solution of TSP (follow manufacturer instructions) or a heavy-duty degreaser with warm water. Scrub the entire countertop surface thoroughly. Pay close attention to areas around the sink and stovetop, which tend to accumulate the most grease.
- Rinse: Rinse the countertops thoroughly with clean water and a damp cloth, changing the water frequently.
- Dry: Allow the countertops to air dry completely or wipe them dry with clean cloths. Ensure no moisture remains, especially in crevices.
Step 2: Surface Preparation and Light Sanding
Proper surface prep ensures the primer and paint will adhere strongly.
- Masking: Carefully apply painter’s tape along the edges of your countertops, including where they meet the backsplash, cabinets, and walls. Ensure a tight seal to prevent paint seepage. Cover any adjacent surfaces like cabinets or backsplashes with plastic sheeting or drop cloths.
- Sanding: Lightly scuff the entire surface of the countertops with a fine-grit (150-220 grit) sandpaper or sanding sponge. This creates a “tooth” for the primer to grip onto. You don’t need to remove any material, just dull the existing finish.
- Clean Again: After sanding, wipe down the countertops with a damp cloth to remove all dust. Follow up with a tack cloth for a final dust-free surface. For laminate, ensure you’re not sanding through the laminate layer.
Step 3: Applying the Primer
The primer acts as a bonding agent between your countertop and the paint. Using a high-quality, adhesion-promoting primer is essential for a long-lasting finish.
- Choose the Right Primer: Select a primer specifically designed for slick surfaces or one recommended by your chosen paint manufacturer. Look for primers that offer excellent adhesion to laminate, laminate countertops, or whatever your base material is.
- Application: Pour a small amount of primer into a paint tray. Use a high-density foam roller for broad areas and an angled brush for edges. Apply a thin, even coat of primer. Avoid applying it too thickly, as this can lead to drips and an uneven finish.
- Drying Time: Allow the primer to dry completely according to the manufacturer’s instructions. This is crucial for proper adhesion. Most primers require at least 2-4 hours, but check the label.
- Light Sanding (Optional but Recommended): Once the primer is dry, lightly sand the surface again with very fine-grit sandpaper (220-320 grit). Wipe away dust with a tack cloth. This step helps create an ultra-smooth surface for the paint.
Step 4: Applying the Base Coat of Paint
This is where your DIY kitchen countertops start to take on their new color.
- Stir the Paint: Thoroughly stir your chosen kitchen countertop paint. If using an epoxy, mix the two components precisely as instructed.
- First Coat: Apply the first thin, even coat of paint using your foam roller and brush. Work in small sections, rolling in one direction for consistency. Avoid overworking the paint, which can cause brush marks or roller texture.
- Edge Work: Use your angled brush to carefully paint along the taped edges and any intricate areas.
- Drying: Let the first coat dry completely. Again, follow the manufacturer’s recommended drying times. This is usually several hours.
- Second Coat (and Subsequent Coats): Apply a second coat, following the same procedure. Depending on the paint color and opacity, you may need a third coat for full coverage. Always allow adequate drying time between coats.
Step 5: Adding Decorative Elements (Optional)
If you’re aiming for a granite or marble look, this is the stage to add those effects.
- Granite Flecks: Many kits include small chips or flecks. You can lightly toss these onto the wet paint of your final coat or follow the kit’s specific instructions.
- Marbling: For a marble effect, you can use a sponge or brush to lightly dab and swirl different colors onto the base coat while it’s still wet or semi-dry, then gently blend. This technique requires practice.
Step 6: Applying the Topcoat/Sealer
This step is vital for protecting your painted finish and ensuring its longevity, especially if you didn’t use an epoxy countertop paint. Sealing painted countertops creates a durable barrier against spills and wear.
- Choose Your Topcoat: Opt for a water-based polyurethane or a clear acrylic sealant specifically designed for high-traffic surfaces. Some specialty countertop kits include their own sealants. For maximum durability, consider a clear epoxy topcoat.
- Application: Apply the topcoat in thin, even coats using a clean foam roller or a high-quality brush. Avoid applying it too thickly.
- Drying and Curing: Allow each coat of sealant to dry completely between applications. Most sealants require multiple coats (usually 2-3) for optimal protection. Importantly, pay attention to the “curing” time. While the surface might feel dry to the touch much sooner, it can take several days (sometimes up to 7 days) for the sealant to fully harden and reach maximum durability. Avoid heavy use, placing hot items, or cleaning the countertops during the curing period.
Specific Considerations for Different Countertop Materials
The process of painting kitchen counters can vary slightly depending on what your existing countertops are made of.
How to Paint Laminate Countertops
Laminate is a popular material, but its non-porous surface can be challenging for paint adhesion.
- Key Focus: The primary concern is ensuring the paint adheres well to the plastic laminate surface. Thorough cleaning, degreasing, and light sanding are paramount. Using a high-adhesion bonding primer is non-negotiable.
- Paint Choice: Specialty laminate countertop paint kits or epoxy paints are highly recommended for laminate. They are formulated to adhere to this type of surface.
- Edge Sealing: Pay extra attention to the edges of laminate countertops, as moisture can seep into the particleboard core if the seal is compromised. Ensure your primer and topcoats adequately seal these areas.
Painting Other Countertop Materials (Solid Surface, Tile, etc.)
- Solid Surface (e.g., Corian): These are generally easier to paint than laminate as they are less slick. Light sanding for adhesion and a good quality primer are still necessary.
- Tile Countertops: Grout lines can be tricky. Ensure you fill any damaged grout before painting. You might need to apply more paint to adequately cover the grout, or consider using a specialized grout sealer before applying the countertop paint.
- Butcher Block/Wood: Wood requires a different approach. You’ll typically need wood filler for any imperfections, followed by wood primer and then your chosen paint. A durable, water-resistant topcoat is essential.
Tips for Achieving Professional Results
- Work in Good Lighting: Adequate light helps you see imperfections and ensure even coverage.
- Ventilation: Ensure your workspace is well-ventilated, especially when using solvent-based paints or epoxies. Open windows and use fans.
- Patience is Key: Don’t rush the drying or curing times between coats. This is where many DIY projects go wrong.
- Test a Small Area: If possible, test your paint and application method in an inconspicuous area (like the back edge of the countertop or a hidden corner) to ensure you achieve the desired look and adhesion.
- Clean Up Immediately: Wipe up any spills or drips immediately with a damp cloth. Dried paint is much harder to remove.
- Consider Painting Kitchen Cabinets: While you’re transforming your countertops, consider if your kitchen cabinets need a refresh too. Painting kitchen cabinets can complement your new countertops for a cohesive and updated look. Ensure you use the right paint and techniques for cabinets.
Maintenance of Painted Countertops
To keep your newly painted kitchen counters looking great:
- Gentle Cleaning: Use mild dish soap and water or a non-abrasive cleaner. Avoid harsh chemicals, abrasive sponges, or scouring pads, as these can damage the paint or sealant.
- Wipe Spills Promptly: Clean up spills, especially acidic ones like lemon juice or vinegar, as soon as possible.
- Use Trivets and Cutting Boards: Always use trivets under hot pots and pans and cutting boards for chopping to protect the surface.
- Avoid Dragging: Do not drag heavy appliances or dishes across the countertops. Lift them instead.
- Touch-Ups: For minor chips or scratches, you may be able to perform small touch-ups. Keep a small amount of your paint and sealant for this purpose.
Frequently Asked Questions (FAQ)
Q1: How long do painted kitchen countertops last?
A1: With proper preparation, application, and maintenance, painted countertops, especially those finished with epoxy or a durable sealant, can last anywhere from 3 to 10 years or even longer. Durability depends heavily on the quality of materials used and how well they are cared for.
Q2: Can I paint over existing granite or quartz countertops?
A2: Yes, you can paint over granite and quartz, but the process requires very thorough cleaning and preparation. Light sanding is crucial to create a surface that paint can adhere to. Using a high-quality bonding primer specifically designed for slick surfaces is essential. Epoxy countertop paint systems are often recommended for these materials.
Q3: Is painting kitchen countertops a good idea?
A3: Painting kitchen countertops can be an excellent idea if you’re looking for a budget-friendly way to update your kitchen’s look, or if you’re dealing with countertops that are beyond simple cleaning or repair. It’s a rewarding DIY project that can significantly improve your kitchen’s aesthetic. However, it requires patience and attention to detail for the best results.
Q4: What is the difference between countertop refinishing and painting?
A4: Countertop refinishing is a broader term that can include various methods to restore or change the look of countertops. Painting is one specific method of refinishing, where you apply a colored coating. Other refinishing methods might include applying a veneer, a natural stone overlay, or using a process like concrete overlay.
Q5: Do I need a special sealant for painted countertops?
A5: Yes, especially if you are not using an epoxy countertop paint system. A high-quality, durable sealant or topcoat is crucial for protecting your painted finish from moisture, stains, heat, and scratches. This layer significantly extends the life and appearance of your DIY kitchen countertops.
Q6: Can I use regular wall paint on my kitchen counters?
A6: It is not recommended to use regular wall paint. Wall paints are not formulated to withstand the daily wear, moisture, and potential heat exposure that kitchen countertops face. They will likely chip, scratch, or stain very easily, leading to a poor and short-lived result. Always use paints specifically designed for countertops or high-traffic surfaces.
Q7: How do I achieve a seamless finish?
A7: To achieve a seamless finish, use high-density foam rollers and apply paint in thin, even coats. Avoid overworking the paint. Pay close attention to your application technique, ensuring no roller marks or brush strokes are left behind. Proper prep, including light sanding between coats if recommended, also contributes to a smoother finish.
Q8: How long does it take to paint kitchen countertops?
A8: The actual painting process might take a weekend, but the entire project, including preparation and drying/curing times, can span anywhere from 3 to 7 days. Rushing the drying or curing periods can compromise the durability of your painted kitchen counters.
By following these detailed steps and tips, you can confidently tackle the project of painting your kitchen countertops, transforming your kitchen with beautiful, professional-looking results achievable right in your own home.