
Sure, here’s a detailed blog post about how to stage a kitchen for sale.
What is kitchen staging? Kitchen staging is the process of preparing your kitchen for showings to potential buyers, making it look its best to increase its appeal and potential selling price. Can I stage my kitchen myself? Yes, you absolutely can! DIY kitchen staging is a fantastic way to save money and personalize the presentation of your home.
The kitchen is often considered the heart of the home. It’s where families gather, meals are prepared, and memories are made. When you’re selling a home, the kitchen is one of the most crucial rooms that buyers focus on. A well-staged kitchen can significantly impact a buyer’s perception of your entire house, potentially leading to a faster sale and a higher offer. This guide will walk you through the essential steps of home selling kitchen prep to maximize kitchen appeal for buyers.
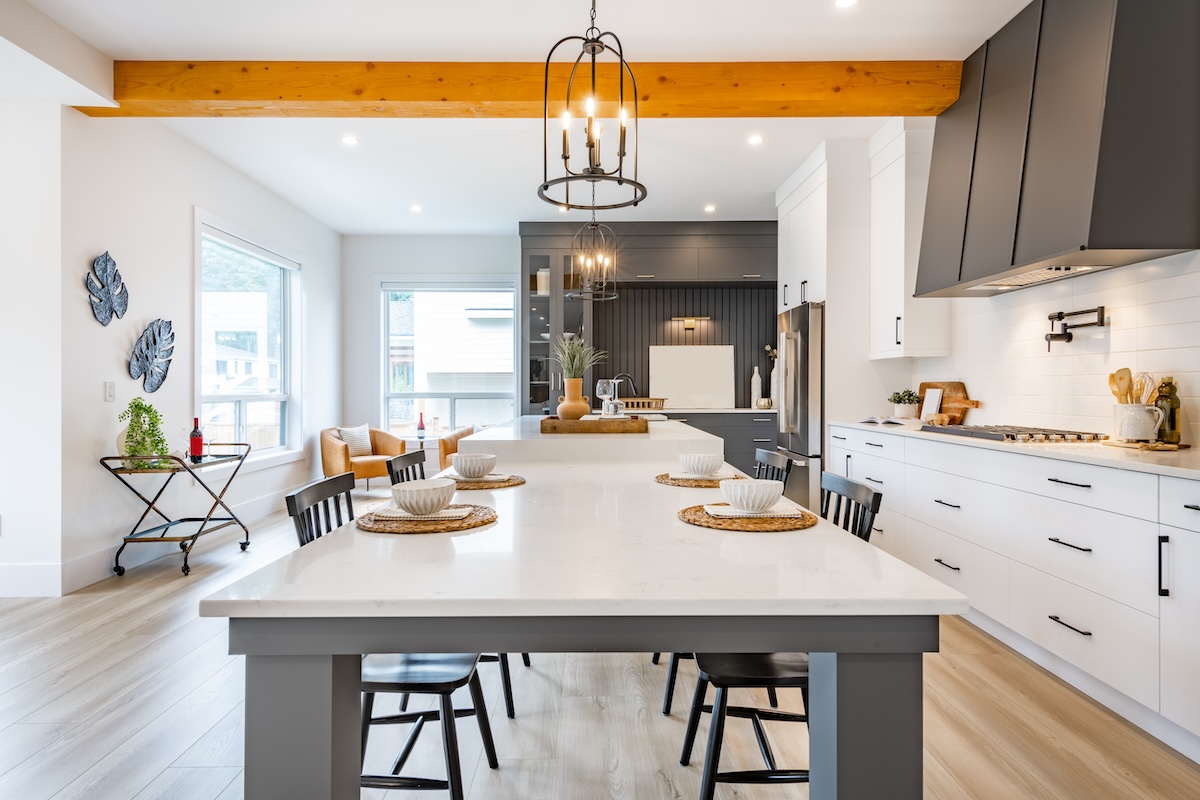
Image Source: nicolemickle.com
The Power of First Impressions: Why Kitchen Staging Matters
Buyers often form an opinion about a home within seconds of entering. The kitchen, along with bathrooms and curb appeal, is a high-priority area. If your kitchen looks dated, cluttered, or poorly maintained, it can create a negative first impression that’s hard to overcome. Conversely, a bright, clean, and inviting kitchen signals a well-cared-for home.
Selling a home kitchen effectively means showcasing its potential. Buyers want to envision themselves cooking, entertaining, and living in the space. Staging helps them do just that by creating a warm, functional, and aspirational atmosphere.
Key Benefits of Kitchen Staging:
- Increased Perceived Value: A staged kitchen often makes a home feel more luxurious and well-maintained, leading buyers to believe it’s worth more.
- Faster Sale: Homes with attractive kitchens tend to sell more quickly than those that don’t.
- Higher Offers: Buyers are often willing to pay more for a home that requires less immediate work or renovation.
- Buyer Visualization: Staging helps buyers imagine themselves living in the space, making an emotional connection.
- Highlighting Features: Staging can draw attention to your kitchen’s best features, such as granite countertops, updated appliances, or ample storage.
Step-by-Step Guide to Kitchen Staging: Your Comprehensive Checklist
To prepare kitchen for showing, a systematic approach is best. Follow this detailed kitchen staging checklist to ensure you don’t miss any crucial details.
1. Deep Cleaning: The Foundation of Kitchen Staging
Before you even think about decor, a spotless kitchen is non-negotiable. This is the most critical step in kitchen decluttering for sale.
H5: Surfaces and Appliances
- Countertops: Clean thoroughly. Remove all items except for a few carefully selected staging props.
- Cabinets: Wipe down the exterior of all cabinets, inside and out if possible. Pay attention to handles and knobs.
- Backsplash: Scrub grout and tiles until they gleam.
- Sink: Polish the sink and faucet until they shine. Ensure no water spots are visible.
- Stovetop/Range: Clean meticulously, including burners, grates, and the oven door.
- Oven Interior: Clean the oven interior, including the self-cleaning cycle if needed.
- Microwave: Wipe down the interior and exterior.
- Refrigerator: Clean the exterior, including handles. Pull it out and clean the floor behind and underneath it. Clean the interior if it will be left open during showings.
- Dishwasher: Clean the exterior and the control panel. Run a cleaning cycle if it has an odor.
- Small Appliances: Wipe down all small appliances.
H5: Floors and Fixtures
- Floors: Mop and scrub all floor surfaces, paying special attention to corners and edges.
- Windows: Clean windows inside and out for maximum natural light.
- Light Fixtures: Dust and wipe down all light fixtures and ceiling fans.
- Baseboards and Walls: Wipe down baseboards and any smudges on walls.
2. Decluttering: Creating Space and Calm
Clutter is the enemy of staged spaces. Buyers need to see the actual size of your kitchen and its storage capacity.
H5: Countertops
- Remove Everything: Ideally, your countertops should be nearly bare. Store appliances like toasters, blenders, and coffee makers in cabinets.
- Essential Items Only: If you must leave items out, choose only a few attractive, functional pieces. Think a nice fruit bowl, a decorative canister, or a small plant.
- Organize What’s Left: Keep any remaining items neat and tidy.
H5: Cabinets and Drawers
- Clear Out Excess: Remove anything that isn’t regularly used or that looks old and unappealing. Donate or discard items you no longer need.
- Organize Interiors: Buyers may peek inside. Ensure cabinets and drawers are organized and not overflowing. Use drawer dividers or small baskets if necessary.
- Showcase Storage: If you have attractive shelving or pantry space, make sure it’s neat and organized to highlight your storage.
H5: Pantry
- Neaten and Organize: Tidy up your pantry. Remove excess packaging and arrange items neatly. Use clear containers if possible.
- Remove Personal Items: Pack away anything that screams “your” personal life.
H5: Other Areas
- Junk Drawer: Empty and organize it, or better yet, remove items you don’t need.
- Refrigerator Magnets/Notes: Remove all magnets, photos, drawings, and notes from the refrigerator.
- Under the Sink: Clear out all cleaning supplies and store them neatly.
3. Depersonalizing: Helping Buyers Envision Their Own Lives
While the kitchen is a personal space for you, it needs to feel universally appealing to potential buyers.
H5: Remove Personal Touches
- Family Photos: Take down all family photos, children’s artwork, and personal memorabilia.
- Unique Decor: Store overly personal or niche decorative items that might not appeal to a broad audience.
- Religious or Political Items: Remove anything that could be polarizing.
4. Declor: Enhancing the Atmosphere
This is where kitchen staging ideas really come into play to maximize kitchen appeal for buyers.
H5: Color Palette
- Neutral Tones: Ensure your kitchen has a neutral and welcoming color palette. If you have bold accent colors, consider toning them down with neutral linens or decor.
- Fresh Paint: If your walls are a dated or strong color, a fresh coat of neutral paint (white, off-white, light gray, or beige) can make a world of difference.
H5: Lighting
- Maximize Natural Light: Keep windows clean and free of obstructions. Use light, sheer curtains if you need privacy, but avoid heavy drapery.
- Artificial Light: Ensure all light fixtures are working. Turn on all lights before showings, including under-cabinet lighting and pendant lights. Consider updating outdated fixtures if your budget allows.
H5: Refresh and Repair
- Hardware: Update cabinet hardware if it’s dated or worn. New knobs and pulls can be an inexpensive way to modernize the kitchen.
- Faucets and Fixtures: Ensure faucets and handles are clean and polished. Consider replacing a worn-out faucet if it’s an easy DIY project.
- Grout: Re-grout or re-caulk any areas around the sink, backsplash, or countertops that look stained or mildewed.
- Paint Touch-ups: Touch up any scuffed or chipped paint on walls, ceilings, or trim.
- Appliance Polish: Polish stainless steel appliances to a shine. For non-stainless steel appliances, ensure they are as clean and bright as possible.
H5: Decorative Touches
- Greenery: Add a touch of life with a small potted plant (like a herb or a small flowering plant) on the counter or a vase of fresh flowers.
- Fruit Bowl: A bowl of fresh, colorful fruit (apples, oranges, lemons) adds vibrancy and a sense of abundance.
- Cookbooks: A few attractive, well-placed cookbooks can suggest a love for cooking.
- Tea Towels: Use fresh, clean, neutral-colored tea towels. Fold them neatly or hang them neatly.
- Decorative Bowl or Tray: A simple decorative bowl or tray can corral a few essentials like a salt and pepper shaker or a small vase.
- Art: A small piece of tasteful kitchen-themed art can add personality.
5. Highlight Functionality and Space
Buyers want to see how the kitchen works. Showcasing its usability is a key kitchen staging secret.
H5: Workspace Appeal
- Clear Work Areas: Ensure countertops where food preparation would happen are as clear as possible.
- Functional Appliances: If you have specific features like a warming drawer or a built-in cutting board, make sure they are visible and clean.
H5: Dining Nook/Island
- Set the Scene: If you have a breakfast nook or an island with seating, set it for one or two people. Use placemats, simple cutlery, and a small vase.
- Comfortable Seating: Ensure chairs are neatly tucked in.
6. Kitchen Staging Secrets for Extra Impact
These are some advanced kitchen staging tips to make your kitchen truly shine.
H5: The Scent Factor
- Pleasant Aroma: A subtle, pleasant scent can be very appealing. Bake cookies, simmer cinnamon sticks, or use a lightly scented candle. Avoid overpowering or artificial air fresheners.
- Eliminate Odors: Address any underlying odors from drains, garbage disposals, or pets.
H5: Showcase Smart Storage
- Organized Drawers: If you have pull-out drawers, ensure they are organized and easy to slide.
- Open Shelving: If you have attractive open shelving, display a few matching, attractive dishes or glassware.
H5: The “Move-In Ready” Feel
- Newer Items: If you have a new dish towel, a fresh sponge, or a new cutting board, use them to give a sense of freshness.
- Emptying Trash Cans: Ensure trash and recycling bins are completely empty and clean before showings.
DIY Kitchen Staging: Making It Happen on a Budget
Most of these kitchen staging ideas can be implemented with items you already own or through inexpensive purchases.
- Decluttering: This costs nothing but time and effort.
- Cleaning: Invest in good cleaning supplies if you don’t have them.
- Paint: A quart of neutral paint for touch-ups is very affordable.
- Hardware: New cabinet knobs can be found for a few dollars each.
- Decor: Borrow items from other rooms, or visit thrift stores for affordable decorative pieces like bowls or small plants.
- Flowers/Fruit: A small bouquet or a few pieces of fruit are inexpensive ways to add color and life.
What to Avoid When Staging Your Kitchen
- Over-decorating: Too many items can make the kitchen look cluttered again.
- Personal Clutter: Remember, the goal is to depersonalize.
- Strong Scents: Overpowering air fresheners can be a turn-off.
- Dirty or Damaged Items: Cracked mugs, stained dish towels, or chipped bowls should be removed.
- Leaving Appliances on: Unless it’s part of the ambiance (like a gently simmering pot for scent), keep appliances off.
- Expired Food: Check your pantry and refrigerator for anything that’s past its prime.
Kitchen Staging Checklist Summary
Here’s a quick recap to help you manage the process:
| Task | Status | Notes |
|---|---|---|
| Deep Cleaning | [ ] Done | Surfaces, appliances, floors, fixtures, windows |
| Decluttering | [ ] Done | Countertops, cabinets, pantry, drawers |
| Depersonalizing | [ ] Done | Photos, personal items, notes |
| Color & Paint | [ ] Done | Neutral palette, touch-ups |
| Lighting | [ ] Done | Natural light, all bulbs working, turn on |
| Hardware & Fixtures | [ ] Done | Clean, polish, or update |
| Repairs & Touch-ups | [ ] Done | Grout, caulk, paint scratches |
| Decorative Touches | [ ] Done | Plants, fruit bowl, cookbooks, towels |
| Functionality Showcase | [ ] Done | Clear workspaces, set dining nook |
| Scent Check | [ ] Done | Pleasant, subtle aroma |
| Final Walk-through | [ ] Done | Ensure everything is perfect |
Frequently Asked Questions About Kitchen Staging
Q: How much does kitchen staging cost?
A: DIY kitchen staging can cost very little, primarily for cleaning supplies or a few decorative items like flowers or a plant. Professional staging services can range from a few hundred to several thousand dollars, depending on the size of the kitchen and the extent of the work.
Q: Should I remove everything from my countertops?
A: Yes, it’s highly recommended. Buyers need to see the true expanse of your countertops and imagine their own items there. Leaving only a few, carefully selected decorative items is the key.
Q: What if my kitchen is very small?
A: For small kitchens, decluttering is even more critical. Maximize vertical space with organized shelves. Keep decor to an absolute minimum, focusing on cleanliness and bright lighting. A well-lit, organized small kitchen can still be very appealing.
Q: How do I stage an outdated kitchen?
A: Focus on cleanliness, decluttering, and minor cosmetic updates. A fresh coat of paint on walls and cabinets (if appropriate), updated hardware, and new lighting can make a significant difference. Strategic staging with appealing decor can distract from less desirable features and highlight the kitchen’s potential.
Q: Should I leave out dishes or cooking utensils?
A: Generally, no. You want to create a sense of an immaculate, ready-to-use space. Dishes piled in the sink or drying rack can suggest ongoing mess. If you must leave something out for staging, make it a single, attractive item like a stylish cutting board or a set of attractive measuring cups neatly arranged.
By following these detailed kitchen staging tips, you can transform your kitchen into a space that truly shines, helping you sell your home faster and for more money. Remember, the goal is to help potential buyers envision themselves enjoying this central hub of your home.