
Drawing a kitchen plan is a crucial step for any home renovation or new build. A well-drawn kitchen plan helps visualize your space, communicate ideas clearly, and avoid costly mistakes. Can you draw a kitchen plan yourself? Yes, you absolutely can! What is a kitchen plan? It’s a visual blueprint that shows the layout, cabinets, appliances, and other key elements of your kitchen. Who should draw a kitchen plan? Anyone undertaking a kitchen project, from a full renovation to a simple cabinet update.
Embarking on a kitchen renovation or design project can feel overwhelming, but a solid plan is your best friend. It’s your roadmap, guiding you from the initial idea to the final, functional, and beautiful kitchen. This guide will walk you through the process, equipping you with the knowledge and tools to create an effective kitchen plan. We’ll cover everything from taking accurate measurements to selecting the best kitchen layout ideas and placing your appliances.
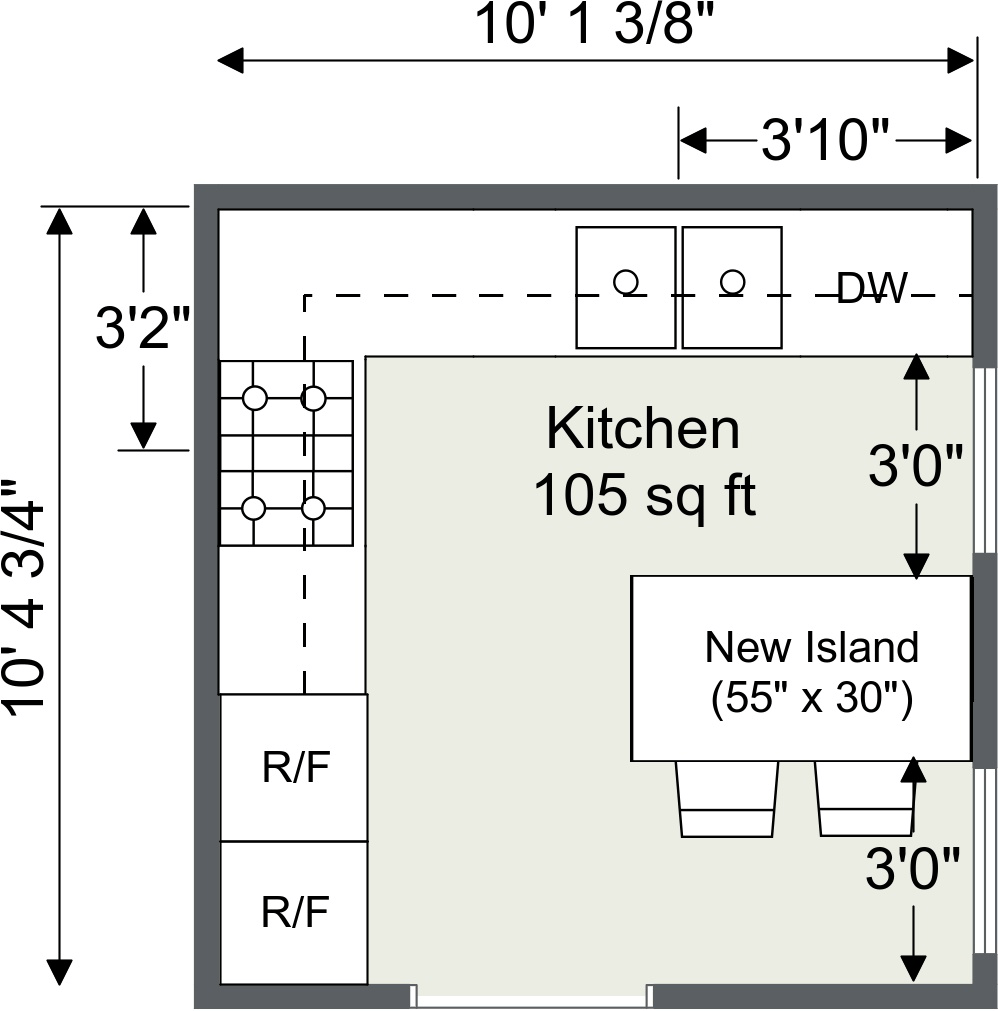
Image Source: wpmedia.roomsketcher.com
Why You Need a Kitchen Plan
Before diving into the “how,” let’s solidify the “why.” A detailed kitchen plan is more than just a drawing; it’s a critical communication tool and a safeguard against potential problems.
- Clear Vision: It transforms abstract ideas into a concrete visual representation. You can see how your space will look and function before any demolition or construction begins.
- Efficient Workflow: A good plan ensures a logical flow for cooking, cleaning, and storage. This means efficient movement between the sink, stove, and refrigerator – the classic kitchen work triangle.
- Accurate Budgeting: Knowing precisely what you need – cabinets, appliances, countertops – allows for more accurate quotes from suppliers and contractors, helping you stay within budget.
- Communication with Professionals: Whether you’re working with a contractor, designer, or cabinet maker, your plan serves as a clear set of instructions, minimizing misunderstandings and rework.
- Permitting and Regulations: For larger projects, a professional plan might be required for building permits. Even for smaller projects, it helps ensure you meet safety and building codes.
- Appliance and Fixture Selection: Your plan dictates the size and type of appliances and fixtures you can accommodate, guiding your purchasing decisions.
Getting Started: Measuring Your Space
Accurate measurements are the bedrock of any good plan. Even a slight miscalculation can lead to major issues down the line. This is where measuring kitchen dimensions becomes paramount.
Tools You’ll Need
- Tape Measure: A sturdy, long tape measure (at least 25 feet) is essential.
- Pencil and Paper: For jotting down measurements as you go.
- Graph Paper: Helps in drawing to scale.
- Level: To check if walls are straight and floors are even.
- Helper (Optional but Recommended): Especially for measuring long walls or awkward spaces.
What to Measure
- Wall Lengths: Measure each wall from corner to corner. Note any windows, doors, or permanent fixtures (like radiators) on each wall. Measure the height of each wall from floor to ceiling.
- Window and Door Openings:
- Measure the width and height of each window and door opening.
- Measure the distance from the floor to the bottom of the window sill.
- Measure the distance from the ceiling to the top of the window and door frames.
- Note the direction doors open and their swing radius.
- Obstructions and Fixtures:
- Plumbing: Mark the exact location of the sink drain, water supply lines, and gas lines.
- Electrical Outlets and Switches: Mark their positions. Note any outlets that need to be considered for appliance placement.
- Vents and HVAC: Mark the location of any air vents, heating elements, or exhaust fans.
- Structural Elements: Note any columns, bulkheads, or soffits that cannot be moved.
- Room Dimensions: Measure the overall length and width of the kitchen. If it’s an L-shaped or U-shaped room, measure each segment accurately.
Tips for Accurate Measuring
- Measure Twice, Draw Once: This old adage is especially true for renovations.
- Measure to the Walls: Unless there’s a specific reason, measure to the actual wall surfaces.
- Account for Doors and Windows: Don’t just measure the opening; measure the space needed for a door to swing open fully.
- Draw a Rough Sketch: As you measure, sketch the room’s shape and mark all your measurements clearly. This rough sketch will be your starting point for the scaled drawing.
Creating Your Scaled Drawing
Once you have all your measurements, it’s time to translate them into a scaled drawing. This is where floor plan creator tools and techniques come into play.
Scale Basics
A scale drawing represents real-world objects at a reduced size while maintaining their proportions. Common scales for floor plans are:
- 1/4 inch = 1 foot: This is a very common and practical scale for most rooms.
- 1/2 inch = 1 foot: This provides a larger, more detailed drawing, useful for complex layouts.
Drawing Methods
-
Graph Paper and Pencil:
- Choose your scale.
- On your graph paper, draw the outer perimeter of your kitchen based on your measurements. Each square on the graph paper will represent a specific unit of measurement (e.g., if your scale is 1/4 inch = 1 foot, and your graph paper has 1/4 inch squares, each square represents one foot).
- Carefully draw in all walls, windows, doors, and permanent fixtures.
- Use different symbols or colors to denote different elements (e.g., blue for water, red for heat, yellow for electrical).
-
Room Planning Software (Digital Approach):
- Many user-friendly room planning software programs are available, both free and paid.
- These tools allow you to draw walls, add windows and doors, and then populate the room with cabinets, appliances, and furniture.
- They often have pre-made templates and libraries of items, making the process faster and more intuitive.
- Popular options include SketchUp, Sweet Home 3D, HomeByMe, and IKEA Kitchen Planner.
- These interior design tools can often generate 3D views, giving you a much clearer picture of the final result.
What to Include in Your Scaled Drawing
- Room Dimensions: Overall length and width.
- Wall Lines: Showing the thickness of walls.
- Windows and Doors: Accurately placed with their swing direction.
- Cabinets: Outline base cabinets, wall cabinets, and pantry units.
- Appliances: Mark the space for your refrigerator, range/cooktop, dishwasher, oven, microwave, etc.
- Sink and Faucet: Show their placement and size.
- Work Areas: Designate landing zones next to the refrigerator, oven, and sink.
- Traffic Flow: Indicate main pathways through the kitchen.
Exploring Kitchen Layout Ideas
The layout of your kitchen significantly impacts its functionality and flow. Considering different kitchen layout ideas early on is essential. The most common kitchen layouts are:
1. The Galley Kitchen
- Description: Two parallel walls with cabinets and appliances on each.
- Pros: Efficient for small spaces, great for serious cooks as everything is within easy reach.
- Cons: Can feel cramped, limited counter space if not designed carefully, can be a bottleneck if used by more than one person.
- Ideal For: Smaller homes, apartments, or as a secondary prep area.
2. The L-Shaped Kitchen
- Description: Cabinets and appliances are arranged along two adjoining walls.
- Pros: Creates an open feel, good for corner spaces, offers ample counter and cabinet space, allows for a dining nook.
- Cons: The corner can be challenging for cabinet access, the work triangle can be extended.
- Ideal For: Mid-sized kitchens, open-plan living spaces.
3. The U-Shaped Kitchen
- Description: Cabinets and appliances are along three walls, forming a “U” shape.
- Pros: Maximizes storage and counter space, creates a very efficient work triangle, keeps traffic out of the main work area.
- Cons: Can feel enclosed if too small, can be challenging to navigate in larger U-shapes.
- Ideal For: Medium to large kitchens, those who cook a lot and need extensive prep space.
4. The Island Kitchen
- Description: Combines a standard layout (L-shape, U-shape, or even a straight line) with a freestanding island.
- Pros: Adds significant counter and storage space, can serve as a prep area, dining space, or a central gathering point, improves workflow.
- Cons: Requires a larger kitchen footprint to accommodate the island and adequate circulation space.
- Ideal For: Larger kitchens, open-plan homes, families who want a central hub.
5. The Peninsula Kitchen
- Description: Similar to an island, but attached to a wall or cabinet at one end, forming a “peninsula.”
- Pros: Provides extra counter and cabinet space, can act as a divider in open-plan spaces, often more space-efficient than a full island.
- Cons: Can obstruct traffic flow if not placed carefully.
- Ideal For: Mid-sized to large kitchens, open-plan layouts where a full island isn’t feasible.
When choosing a layout, consider your cooking habits, the size of your kitchen, and how many people will be using it. Space optimization tips are key here to make the most of every square inch.
Appliance Placement Guide
Where you place your appliances is critical for both function and safety. Use your scaled drawing to map out the best positions. This is where your appliance placement guide comes into play.
The Work Triangle (Sink, Refrigerator, Stove/Cooktop)
- Goal: Minimize steps between these three main work areas. The sum of the three sides of the triangle should ideally be between 13 and 26 feet.
- Refrigerator:
- Place it at one end of the triangle for easy access from outside the kitchen.
- Ensure there’s adequate “landing space” next to it for unloading groceries.
- Allow clearance for the door to open fully (check manufacturer specs).
- Sink:
- Typically placed under a window.
- Should be near the dishwasher for easy loading.
- Requires plumbing access.
- Ensure enough counter space on either side for prep and drying.
- Stove/Cooktop and Oven:
- Often placed in the center of the triangle.
- Requires ventilation (hood fan).
- Allow landing space on at least one side for placing hot dishes.
- Consider wall ovens placed at a comfortable height for easier access.
Other Appliances
- Dishwasher:
- Place adjacent to the sink.
- Ensure clearance for opening the door and for a person to stand in front of it while it’s open.
- Microwave:
- Can be placed on the counter, in a cabinet, or above the range (as a microwave hood combo).
- Consider convenient height for use.
- Oven:
- Wall ovens are often placed in a cabinet at waist height, near the cooktop or as part of a larger appliance bank.
- Allow clearance for door opening and ventilation.
- Range Hood:
- Crucial for ventilation. Ensure it’s the correct size for your cooktop and properly vented.
Clearance and Landing Space
- Countertop Space: Aim for at least 15 inches of landing space on the side of the refrigerator and oven, and 18-24 inches on the side of the cooktop.
- Door Swings: Account for appliance doors opening fully without hitting cabinets or walls.
- Traffic Flow: Ensure appliances don’t block main walkways.
Cabinet Design and Layout
Cabinets are the workhorses of your kitchen, providing storage and defining the style. Cabinet design software can be incredibly helpful here.
Types of Cabinets
- Base Cabinets: Sit on the floor and support countertops. Come in various widths and depths, with options for drawers, shelves, or pull-out shelves.
- Wall Cabinets: Mount to the wall above the counter. Available in different heights, widths, and depths.
- Tall Cabinets: Include pantries, oven cabinets, and refrigerator enclosures.
Cabinet Configuration
- Standard Depth: Base cabinets are typically 24 inches deep; wall cabinets are 12-13 inches deep.
- Toe Kick: The recessed area at the bottom of base cabinets, allowing you to stand closer to the counter. Usually 4 inches high and 3 inches deep.
- Countertop Overhang: Typically 1.5 inches.
Planning Your Cabinet Layout
- Start with the Appliances: Place your refrigerator, range, and sink first.
- Fill in the Gaps: Work around your appliances with base cabinets. Consider corner cabinets, which often use specialized solutions like lazy Susans or pull-out shelves to maximize accessibility.
- Wall Cabinets: Plan your wall cabinet layout above the base cabinets, ensuring adequate clearance over the countertop (usually 18 inches).
- Pantry and Tall Storage: Integrate pantry cabinets or tall units where needed for maximum food and appliance storage.
- Drawers vs. Shelves: Prioritize drawers in base cabinets for easier access to items.
- Consider Workflow: Place frequently used items in easily accessible cabinets. Pots and pans near the stove, dishes near the dishwasher or dining area.
Using Cabinet Design Software
Cabinet design software can help you visualize different cabinet configurations, experiment with door styles, and even get estimates. Many cabinet manufacturers offer their own planning tools.
Incorporating Other Design Elements
Your kitchen plan is more than just cabinets and appliances.
Countertops
- Measure Carefully: Account for overhangs.
- Consider Seams: For long runs, you might need seams. Plan their placement where they are least conspicuous.
- Material Choice: Different materials have different installation requirements.
Backsplash
- Height: Standard backsplash height is typically 4 inches, but you can extend it to the underside of wall cabinets or even to the ceiling.
- Material and Pattern: Your plan can sketch out the design and placement of tiles or other materials.
Lighting
- Task Lighting: Under-cabinet lights, pendant lights over an island, and ceiling lights over work areas.
- Ambient Lighting: General overhead lighting.
- Accent Lighting: In-cabinet lighting or toe-kick lighting.
- Mark the location of light fixtures and switches on your plan.
Flooring
- Consider Traffic: Choose durable materials.
- Layout: If you’re using patterned tiles or different flooring in adjacent areas, mark this on your plan.
Refining Your Plan with DIY Kitchen Design Tools
You don’t need to be a professional designer to create a great kitchen plan. Many interior design tools and DIY kitchen design resources are available.
- Inspiration Boards: Create mood boards (physical or digital) with images of kitchens you like to solidify your style.
- Online Visualizers: Many appliance and cabinet manufacturers have online tools that allow you to “place” their products in a virtual kitchen.
- 3D Modeling: Once you have a basic plan, using 3D room planning software can help you truly visualize the space and identify potential issues you might not see in a 2D drawing. This is a powerful method for home renovation planning.
Putting It All Together: The Final Kitchen Plan
Your final kitchen plan should be a clear, detailed document that includes:
- Scaled Floor Plan: Showing all walls, doors, windows, appliances, cabinets, sink, and major fixtures.
- Elevations: Drawings of each wall showing cabinet heights, appliance placements, and backsplash details.
- Appliance Specifications: List of all appliances with their dimensions and model numbers.
- Cabinet Specifications: Details on cabinet types, sizes, and finishes.
- Electrical and Plumbing Layout: Showing the location of outlets, switches, lighting, and plumbing points.
- Material Specifications: Details on countertop, backsplash, flooring, and paint colors.
Frequently Asked Questions (FAQ)
Q1: What is the best scale for drawing a kitchen plan?
A1: The most common and practical scale for drawing a kitchen plan is 1/4 inch = 1 foot. This scale allows for sufficient detail while keeping the drawing at a manageable size.
Q2: Can I use my existing house plans to draw a kitchen plan?
A2: Yes, if you have accurate architectural plans of your home, you can use them as a base for your kitchen plan. You’ll then add the specific details related to cabinets, appliances, and other kitchen features.
Q3: How do I deal with awkward corners in my kitchen layout?
A3: Awkward corners can be challenging but also offer opportunities for creative storage. Solutions include using specialized corner cabinets like “lazy Susans,” pull-out corner shelving units, or even creating a unique appliance nook. Planning this carefully in your drawing is key.
Q4: Do I need professional software to draw a kitchen plan?
A4: Not necessarily. You can start with graph paper and a pencil. However, for more detailed visualizations and to experiment with different kitchen layout ideas, using free or paid room planning software or cabinet design software can be very beneficial.
Q5: What are the most important “landing spaces” in a kitchen?
A5: The most critical landing spaces are next to the refrigerator (for unloading groceries), next to the sink (for placing dishes to wash or dry), and next to the oven/cooktop (for setting down hot items). Aim for at least 15-18 inches of clear counter space in these areas.
Q6: How do I ensure good traffic flow in my kitchen?
A6: Good traffic flow is achieved by avoiding placing appliances or furniture in main pathways. Ensure there are clear routes between key work areas (sink, stove, refrigerator) and between the kitchen and adjacent rooms. Aim for at least 36 inches of clearance for walkways, and 48 inches for main traffic paths or areas where two people might work. This is a crucial aspect of space optimization tips.
Drawing a kitchen plan is an empowering part of the home renovation planning process. By carefully measuring, choosing the right layout, and thoughtfully placing your appliances and cabinets, you create a functional, beautiful, and efficient space that you’ll enjoy for years to come.