
Can you paint kitchen floor tiles? Yes, you absolutely can paint kitchen floor tiles! It’s a fantastic way to refresh your kitchen without the high cost and mess of replacing them. This guide will walk you through everything you need to know for a successful kitchen tile painting project, turning your old floors into a beautiful focal point with this easy kitchen flooring update.
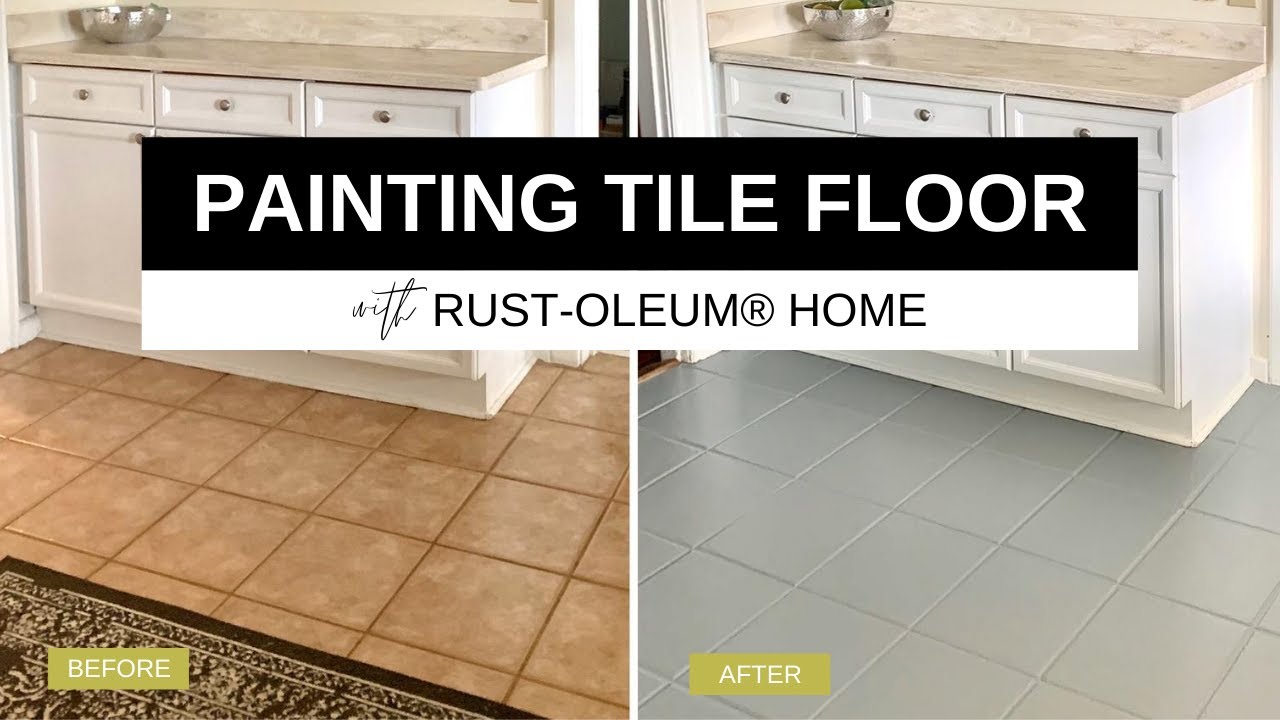
Image Source: i.ytimg.com
Refresh Your Kitchen with a DIY Kitchen Floor
Your kitchen is the heart of your home, and its flooring plays a huge role in its overall look and feel. If your current tile floor is looking a bit tired, chipped, or just not your style anymore, you might be considering a complete overhaul. However, a full tile replacement can be expensive, time-consuming, and incredibly disruptive. That’s where the magic of painting ceramic tiles comes in!
Painting ceramic tiles is a budget-friendly and surprisingly effective way to give your kitchen a whole new vibe. It’s a project that many homeowners can tackle themselves, making it a true DIY kitchen floor endeavor. This method falls under tile floor renovation or a complete kitchen floor makeover, offering a dramatic transformation without the demolition.
Why Paint Your Kitchen Floor Tiles?
- Cost-Effective: Compared to ripping out and replacing tiles, painting is a fraction of the price.
- Time-Saving: You can often complete a painted tile floor in a weekend, unlike the days or weeks a full replacement might take.
- Versatile Style: You can achieve a wide range of looks, from a solid color to a faux-tile pattern, or even mimic the look of concrete or wood.
- Less Mess: No dust, debris, or heavy lifting involved, making it a much cleaner renovation option.
- Empowering DIY: It’s a rewarding project that can significantly boost your home’s appeal.
Deciphering the Painting Process: What You Need to Know
Before you grab a brush, it’s crucial to understand that not all paints are created equal when it comes to flooring. You’ll need specialized products designed to withstand foot traffic, moisture, and potential spills. The key to a durable and beautiful finish lies in proper preparation and using the best paint for floor tiles.
The Best Paint for Floor Tiles: Choosing Wisely
When you’re thinking about kitchen tile painting, the type of paint is paramount. You can’t just grab any old wall paint. You need products specifically formulated for floors, offering adhesion, durability, and resistance to wear and tear.
Here are the top contenders for the best paint for floor tiles:
- Epoxy Floor Coatings: These are incredibly durable, often used in garages and commercial spaces. They offer excellent resistance to chemicals, water, and abrasion. They usually come in two parts that you mix before applying.
- Pros: Extremely tough, long-lasting, wide color selection.
- Cons: Can be more expensive, requires good ventilation during application, can be slippery if not textured.
- Urethane Floor Paints: These are also very tough and provide a hard, durable finish. They are more flexible than epoxies and can be a good choice for high-traffic areas.
- Pros: Very durable, good flexibility, often available in a wider range of finishes (satin, semi-gloss).
- Cons: Can be a bit pricier than acrylics, may require specific primers.
- Acrylic Latex Floor Paint: These are a more budget-friendly option and easier to work with. They offer good adhesion and are suitable for moderate foot traffic. Look for paints specifically labeled as “floor paint” or “porch and floor paint.”
- Pros: Affordable, easy to apply and clean up, low VOCs, good color variety.
- Cons: Less durable than epoxy or urethane, may require a good sealant for extra protection.
Important Note: Some people opt for chalk paint or mineral paint followed by a tough topcoat. While this can work, ensure the topcoat is specifically designed for floors and can handle heavy traffic. For a truly long-lasting, professional-looking finish, epoxy or urethane are generally recommended.
Crucial Prep Work: How to Prep Tiles for Paint
This is the most important step. Skipping or rushing the preparation will lead to peeling, chipping, and a finish that doesn’t last. Properly preparing your tiles ensures the paint has a surface it can adhere to effectively. This is the core of how to prep tiles for paint.
1. Clearing the Area
- Remove all furniture, rugs, appliances, and anything else from the kitchen floor.
- Take down any wall hangings that might get in the way or be splashed.
2. Thorough Cleaning
- Sweep and Vacuum: Get rid of all loose dirt, dust, and debris.
- Degrease: Kitchen floors can have a greasy film. Use a strong degreaser (like TSP – Trisodium Phosphate, or a dedicated heavy-duty kitchen cleaner) mixed with hot water. Scrub the tiles thoroughly, paying attention to grout lines. Rinse exceptionally well with clean water. Any residual grease will prevent paint adhesion.
- Wash Again: After degreasing, wash the floor with a standard tile cleaner or soap and water to remove any degreaser residue. Rinse thoroughly.
- Let it Dry Completely: This can take 24-48 hours, depending on humidity and ventilation. Ensure the floor is bone dry before moving to the next step.
3. Repairing Imperfections
- Fill Gaps and Cracks: Use a good quality tile or grout filler for any chips, cracks, or deep grout lines. Allow this to dry completely according to the product instructions.
- Sand Smooth: Once any fillers are dry, lightly sand down any rough spots or uneven areas. Use fine-grit sandpaper (around 120-220 grit).
4. Etching or Scuff Sanding
This step is vital for creating a surface that the primer and paint can grip.
- For Non-Porous Tiles (like glazed ceramic or porcelain): You need to create a “tooth” for the paint to adhere to.
- Method 1: Chemical Etching: Some products (like special concrete etchers or specific tile etching solutions) can be used. Follow product instructions carefully and ensure excellent ventilation and safety gear.
- Method 2: Scuff Sanding: Use an orbital sander with fine-grit sandpaper (120-220 grit) or simply use sandpaper by hand or with a sanding block. The goal is to lightly dull the glossy surface of the tiles, not to remove glaze. You want to create a slightly rough, matte finish.
- For Porous Tiles (like unglazed terra cotta): These might not need aggressive etching but still benefit from a light scuff sand to remove any surface contaminants and ensure a uniform surface.
5. Vacuum and Wipe Down Again
- After sanding or etching, vacuum the floor meticulously to remove all dust.
- Wipe down the entire floor with a tack cloth or a lint-free cloth lightly dampened with denatured alcohol or mineral spirits. This removes any remaining dust particles.
Applying the Tile Primer: The Foundation of Success
A good primer is non-negotiable for a successful painted tile floor. The tile primer acts as a bridge between the tile surface and your paint, ensuring superior adhesion and preventing potential issues like peeling or the underlying tile color showing through.
-
Choosing the Right Primer:
- Adhesion Primer: Look for a primer specifically designed for hard-to-stick-to surfaces, often labeled as “multi-surface,” “bonding,” or “high-adhesion” primer.
- Water-Based vs. Solvent-Based: For kitchen floors, a water-based acrylic enamel primer is often a good choice due to its low odor and easy cleanup. However, some ultra-durable floor paints might recommend a specific solvent-based primer. Always check the paint manufacturer’s recommendations.
- Epoxy Primer: If you’re using an epoxy topcoat, using a compatible epoxy primer is often recommended for the best adhesion.
-
Application Tips:
- Mix Thoroughly: Stir the primer well before and during use.
- Use a High-Quality Roller: A short-nap roller (like a foam roller or a microfiber roller) is usually best for smooth, even application.
- Work in Sections: Apply the primer in manageable sections.
- Even Coats: Aim for thin, even coats. Avoid applying too thickly, as this can lead to drips and an uneven finish.
- Follow Drying Times: Allow the primer to dry completely according to the manufacturer’s instructions. This is crucial for proper adhesion. You might need two coats of primer, especially if you’re painting over dark tiles with a light color.
Painting the Tiles: Bringing Your Vision to Life
Now for the fun part – applying the color! Whether you’re going for a solid color, a geometric pattern, or something more intricate, the technique remains similar.
-
Tools You’ll Need:
- High-quality paint rollers (short-nap, foam, or microfiber)
- Good quality paintbrushes (for cutting in edges and corners)
- Paint tray
- Painter’s tape (for creating patterns or protecting edges)
- Drop cloths
-
Applying the First Coat:
- Stir the Paint: Thoroughly stir your chosen floor paint.
- Cut in Edges: Use a paintbrush to apply paint along the edges of the room and around any fixtures.
- Roll the Main Area: Use your roller to apply thin, even coats of paint to the tiles. Work in a consistent direction for a uniform look. Avoid pressing too hard, as this can cause roller marks.
- Overlap Strokes: Overlap your roller strokes slightly to avoid visible lines.
- Ventilation: Ensure good ventilation in the kitchen while painting.
-
Multiple Coats:
- Most projects will require at least two coats of paint, sometimes three, depending on the paint color and coverage.
- Allow Drying Time Between Coats: This is critical. Check the paint can for recommended drying times between coats. Rushing this step will compromise the finish. Usually, it’s 4-6 hours, but some paints require longer.
- Light Sanding Between Coats (Optional but Recommended): For an ultra-smooth finish, you can very lightly scuff sand the dried paint with 220-grit sandpaper after each coat. This knocks down any imperfections and helps subsequent coats adhere better. Vacuum and wipe down again after sanding.
-
Creating Patterns (Optional):
- Stencils: Use stencils to create repeating patterns. Ensure the stencil is securely taped down and that you don’t overload your brush or roller to prevent bleed-through.
- Geometric Designs: Use painter’s tape to section off areas and create bold geometric designs. Apply the paint, let it dry slightly, and then carefully remove the tape while the paint is still slightly wet to avoid peeling.
Sealing the Deal: The Importance of a Tile Sealant
Once your paint is completely dry (this can take 24-72 hours, check the paint can), it’s time for the final, crucial step: sealing. A tile sealant (or topcoat) is what provides that extra layer of protection against spills, stains, and everyday wear and tear. It will significantly extend the life of your painted floor.
-
Choosing the Right Sealant:
- Polyurethane Topcoats: These are very popular and offer good durability and a nice sheen. Look for a water-based polyurethane designed for floors or high-traffic areas.
- Epoxy Sealants: If you used an epoxy paint, a compatible epoxy clear coat is the best option for maximum durability.
- Water-Based Sealers: These are easier to apply and clean up, with lower VOCs.
- Sheen Options: Sealants come in matte, satin, semi-gloss, and high-gloss finishes. Choose one that suits your desired aesthetic. A satin or semi-gloss is often a good choice for kitchens as they are easier to clean.
-
Application Tips:
- Clean the Surface: Ensure the painted surface is clean, dry, and free of dust.
- Apply Thin, Even Coats: Just like with paint, apply thin, even coats of sealant using a high-quality roller or applicator brush.
- Avoid Pooling: Be careful not to let the sealant pool in grout lines or low spots.
- Multiple Coats: Most projects will require at least two coats of sealant for adequate protection.
- Drying and Curing Times: Pay close attention to the manufacturer’s instructions regarding drying and curing times. Paint might feel dry to the touch, but it needs to fully cure before heavy use. Curing can take several days to a week or even longer for some products.
Maintaining Your Painted Tile Floor
Proper maintenance will keep your painted floor looking great for years to come.
- Cleaning: Use a mild, pH-neutral cleaner. Avoid harsh chemicals, abrasive scrubbers, or excessive water. A damp mop is usually sufficient.
- Protection: Use furniture pads on the legs of chairs and tables to prevent scratching. Use doormats at exterior entrances to trap dirt and grit.
- Quick Spill Cleanup: Wipe up spills immediately to prevent staining.
A Step-by-Step Summary for Your Kitchen Tile Painting Project
Here’s a concise checklist to guide you through your DIY kitchen floor transformation:
Phase 1: Preparation is Key
- Clear the Space: Remove all items from the kitchen floor.
- Deep Clean: Degrease, scrub, and rinse thoroughly. Let it dry completely.
- Repair: Fill cracks and chips, then sand smooth.
- Etch/Scuff: Lightly sand or etch the tiles to create adhesion.
- Final Clean: Vacuum and wipe down with a tack cloth or alcohol.
Phase 2: Priming for Perfection
- Apply Tile Primer: Apply 1-2 thin, even coats using a quality roller.
- Dry Thoroughly: Allow the primer to dry completely between coats and before painting.
Phase 3: Painting with Precision
- Apply First Paint Coat: Cut in edges with a brush, then roll the main area with thin, even coats.
- Allow Drying: Let the first coat dry as per manufacturer instructions.
- Apply Subsequent Coats: Apply 1-2 more coats, allowing drying time between each. Lightly sand between coats for a smoother finish.
- Cure: Allow the paint to cure fully before sealing (refer to product instructions).
Phase 4: Sealing for Longevity
- Apply Tile Sealant: Apply 2-3 thin, even coats of your chosen floor sealant.
- Cure Fully: Allow the sealant to cure for the recommended time before using the kitchen.
Frequently Asked Questions About Painting Kitchen Floor Tiles
Q1: How long does painted tile flooring last?
A1: With proper preparation, the right products, and good maintenance, painted tile floors can last anywhere from 2 to 5 years, sometimes even longer, before needing a touch-up or recoat. The durability depends heavily on the quality of the paint and sealant used, as well as the amount of foot traffic and wear the floor experiences.
Q2: Can I paint over grout lines?
A2: Yes, you can paint over grout lines. Many people choose to paint the grout the same color as the tiles for a seamless look, or they might use a contrasting color to highlight the tile pattern. Ensure the grout is clean and dry before priming and painting. Some specialized grout paints are also available.
Q3: What if I don’t want to use a specific tile primer?
A3: While a dedicated tile primer is highly recommended for optimal adhesion and durability, some heavy-duty floor paints might claim to adhere directly to well-cleaned and prepped surfaces. However, skipping the primer significantly increases the risk of the paint peeling or not adhering properly over time, especially in a high-moisture, high-traffic area like a kitchen. It’s a gamble that rarely pays off in the long run.
Q4: Is it safe to paint my kitchen floor?
A4: Yes, it is safe to paint your kitchen floor, provided you use paints and sealants that are specifically designed for flooring and are low-VOC or water-based when possible. Ensure you have good ventilation during the application process and allow the paint and sealant to cure fully before using the kitchen, as this is when the off-gassing is most significant.
Q5: What’s the difference between painting tiles and using tile stickers or vinyl planks?
A5: Tile stickers and vinyl planks are coverings that go over your existing tiles. Painting, on the other hand, is a direct coating applied to the tile surface itself. Painting offers a more integrated, often more durable (if done correctly) finish, and allows for custom color and design possibilities that stickers might not. Vinyl planks offer a completely new surface look and feel.
Q6: Can I paint vinyl or linoleum tiles?
A6: You can paint vinyl or linoleum tiles, but the preparation and paint choice are critical. These surfaces can be very slick. Thorough cleaning and a specialized primer designed for vinyl or laminate are usually necessary. Standard ceramic tile paints might not adhere well. Always test in an inconspicuous area first.
By following these detailed steps, you can achieve a beautiful, durable, and budget-friendly kitchen floor makeover that will refresh your space and make you proud of your DIY kitchen floor skills. Enjoy your newly painted tiles!