
Can you stain kitchen cabinets without sanding? Yes, you absolutely can! Staining kitchen cabinets without sanding is a fantastic way to refresh your kitchen’s look without the dust, mess, and extensive labor associated with traditional sanding. This method, often utilizing products like gel stain cabinets, offers a cabinet refinishing no sanding solution that’s perfect for a DIY cabinet update or an easy cabinet makeover. Let’s dive into how you can achieve a beautiful, updated look for your kitchen cabinets with minimal prep.
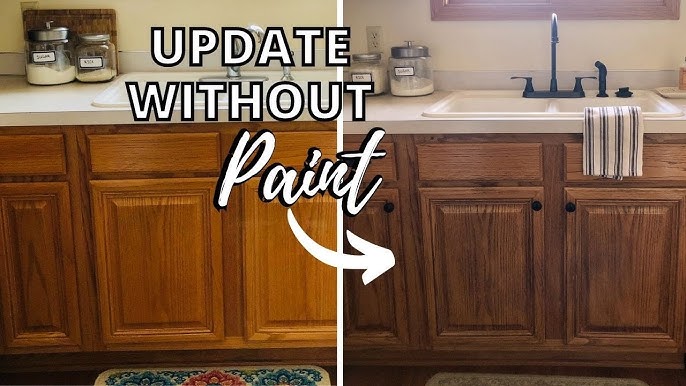
Image Source: i.ytimg.com
Why Go Sans Sanding?
Traditional wood refinishing often involves a thorough sanding process. This is typically done to remove old finishes, smooth imperfections, and create a surface that stain can adhere to. However, sanding cabinets can be:
- Time-consuming: It takes a lot of effort and hours.
- Messy: Sanding creates a lot of dust, which can get everywhere.
- Physically demanding: It requires significant physical effort.
- Potentially damaging: If you’re not careful, you can sand too much and damage the wood.
Opting for a no-sanding approach means you can skip these drawbacks while still achieving a professional-looking finish. This is particularly appealing for those looking for a quicker, less intensive way of updating kitchen cabinets.
The Magic of Gel Stain: Your No-Sanding Secret Weapon
The star player in the no-sand cabinet stain game is gel stain cabinets. Unlike traditional liquid stains that penetrate the wood, gel stain sits on the surface. This unique characteristic is what makes it so forgiving and ideal for a cabinet refinishing no sanding project.
What is Gel Stain?
Gel stain is a thicker, more viscous stain that has a jelly-like consistency. It’s formulated to adhere well to various surfaces, including previously finished wood, laminate, and even painted surfaces, with minimal preparation. It offers great coverage and control, making it easier to achieve an even color.
Benefits of Using Gel Stain:
- No Stripping or Heavy Sanding Required: This is the primary advantage. Gel stain adheres well without needing to remove the existing finish entirely.
- Excellent Coverage: It provides a rich, opaque color that can transform the look of your cabinets in a single coat, although two coats are often recommended for deeper color.
- Controlled Application: Its thick consistency prevents drips and runs, giving you more control over the application process.
- Versatility: It can be used on a variety of cabinet materials, including wood, veneer, and laminate.
- Durable Finish: When properly sealed, gel stain creates a long-lasting and beautiful finish.
Beyond Gel Stain: Other No-Sand Options
While gel stain is a top choice for cabinet refinishing no sanding, there are other paint-based options that can achieve a similar no-prep result.
Cabinet Painting No Prep (with caveats):
When people talk about cabinet painting no prep, they usually mean minimizing sanding. While you can certainly paint cabinets without extensive sanding, some form of cleaning and light deglossing is still crucial for paint adhesion. However, with the right primers and paints, you can significantly reduce the sanding involved.
Chalk Paint Cabinets:
Chalk paint cabinets are another popular option for an easy cabinet makeover. Chalk paint adheres exceptionally well to most surfaces with minimal prep. It creates a matte, velvety finish that can be distressed for a vintage look or sealed for a smoother, more modern appearance.
Milk Paint:
Similar to chalk paint, milk paint also offers good adhesion with minimal prep. It’s known for its ability to create a chippy, antique look, but it can also be sealed for a smoother finish.
Preparing Your Cabinets: The Crucial First Steps (Even Without Sanding)
Even though we’re skipping the heavy sanding, proper cabinet surface prep alternatives are vital for a successful and durable finish. Think of this as a deep clean and degrease.
What You’ll Need:
- Screwdriver: To remove cabinet doors and hardware.
- Cleaning Solution: A good degreaser (like TSP substitute, diluted dish soap, or a specialized cabinet cleaner).
- Lint-free Cloths: For cleaning and wiping.
- Deglosser/Liquid Sandpaper (Optional but Recommended): For a very light deglossing to ensure ultimate adhesion.
- Painter’s Tape: To protect surrounding areas.
- Drop Cloths: To protect your floors.
- Gloves and Eye Protection: For safety.
Step-by-Step Cabinet Surface Prep Alternatives:
- Empty and Remove: Take everything out of your cabinets. Remove all cabinet doors, drawers, and hardware (handles, hinges). It’s best to label each door and drawer so you can put them back in the right place.
- Thorough Cleaning: This is the most critical step in the cabinet refinishing no sanding process. Mix your chosen cleaning solution. Use a damp cloth to wipe down every surface of the cabinets, doors, and drawer fronts. Pay close attention to areas around knobs and pulls where grease and grime tend to accumulate. Rinse with a clean, damp cloth to remove any cleaning residue.
- Degrease and De-Gunk: For stubborn grease, you might need a stronger degreaser. Ensure the cleaner is safe for your cabinet material. Wipe down all surfaces thoroughly.
- Wipe Down with a Tack Cloth: After cleaning and drying, use a tack cloth to pick up any lingering dust or debris. This ensures a perfectly clean surface for your stain or paint.
- Optional: Light Deglossing: While not sanding, using a liquid deglosser or “liquid sandpaper” can provide a slightly more porous surface for your product to adhere to, especially if your cabinets have a very glossy finish. Apply it with a cloth according to the product’s instructions, then wipe clean with a dry cloth. This is a quick way to improve adhesion without the dust of sanding.
Applying Gel Stain: Your Guide to a Flawless Finish
Now for the fun part – applying the no-sand cabinet stain! Gel stain is forgiving, but a few techniques will ensure a beautiful result.
What You’ll Need:
- Gel Stain: Choose your desired color.
- Pre-Stain Wood Conditioner (Optional but Recommended for raw wood or repairs): If you have any bare wood spots or want to ensure even absorption on certain wood types.
- High-Quality Synthetic Brushes: For stain application.
- Foam Brushes or High-Quality Lint-Free Rags/Applicators: For wiping off excess stain.
- Pre-Catalyzed Lacquer, Polyurethane, or Cabinet-Specific Topcoat: For sealing and protection.
- Fine-Grit Sandpaper (e.g., 220-grit): For light sanding between topcoats if needed.
Application Steps:
- Test in an Inconspicuous Area: Always test your stain on the back of a cabinet door or an inside surface to ensure you like the color and how it applies.
- Apply the First Coat:
- Work in small sections.
- Dip your brush or rag into the gel stain, or pour a small amount onto your applicator.
- Apply a thin, even coat of gel stain to the cabinet surface, brushing or wiping in the direction of the wood grain.
- Don’t over-apply; a thin coat is key for control.
- Wipe Off Excess (The Key to Gel Stain):
- Immediately after applying, use a clean, lint-free rag or foam brush to gently wipe off the excess stain. Wipe in the direction of the wood grain.
- The amount of stain you wipe off determines the depth of the color. Wipe lightly for a more transparent, wood-grain-showing finish. Wipe more firmly for a deeper, more opaque color. This is where you control the look!
- Allow to Dry: Let the first coat dry completely. Drying times can vary depending on humidity and temperature, but typically range from 4 to 24 hours.
- Apply Additional Coats (if desired): For a deeper, richer color, apply a second (or even third) coat following the same steps. Remember to wipe off the excess each time.
- Apply Topcoat: Once you’re happy with the color, it’s time to protect your work. Apply 2-3 thin coats of your chosen topcoat (polyurethane, lacquer, etc.).
- Allow each coat of topcoat to dry completely according to the manufacturer’s instructions.
- Lightly sand with fine-grit sandpaper (220-grit) between topcoats for a smoother finish. Wipe away dust with a tack cloth before applying the next coat.
Painting Cabinets Without Sanding: A Similar Approach
If you prefer paint over stain, the prep steps remain similar.
What You’ll Need:
- Cabinet-Specific Primer: High-adhesion, stain-blocking primers are best.
- Cabinet Paint: Latex, enamel, or chalk paint.
- High-Quality Brushes and Rollers: For paint application.
- Painter’s Tape.
- Drop Cloths.
Application Steps:
- Prep: Follow the same cleaning and degreasing steps as for staining. A deglosser is highly recommended here.
- Prime: Apply 1-2 coats of a high-quality cabinet primer. This is essential for paint adhesion and coverage, especially over existing finishes. Allow adequate drying time between coats.
- Paint: Apply 2-3 thin coats of your chosen cabinet paint.
- Use a brush for corners and edges, and a small foam roller for flat surfaces to achieve a smooth finish.
- Allow each coat to dry completely before applying the next.
- Light sanding with very fine-grit sandpaper (320-grit or higher) between coats can improve smoothness. Always wipe with a tack cloth after sanding.
Refinishing Wood Cabinets: Considering Your Wood Type
When refinishing wood cabinets, the type of wood can influence how the stain takes.
- Hardwoods (Oak, Maple, Cherry): These are generally less porous and might absorb stain more evenly. Gel stain works very well on these.
- Softwoods (Pine, Fir): These can be more porous and may absorb stain unevenly, leading to blotchiness. Gel stain is often a better choice than liquid stain for softwoods as it sits on the surface. If using liquid stain, a pre-stain conditioner is almost always necessary.
Updating Kitchen Cabinets: Bringing it All Together
Here’s a quick reference table for your DIY cabinet update:
| Step | Gel Stain Method | Paint Method |
|---|---|---|
| Prep | Clean, degrease, tack cloth. Optional deglosser. | Clean, degrease, tack cloth. Optional deglosser. |
| Primer | Not typically needed for gel stain. | Crucial. Apply 1-2 coats. |
| Color Application | Gel stain (1-3 coats), wipe off excess. | Cabinet paint (2-3 thin coats). |
| Drying Between Coats | 4-24 hours (check product). | Varies by product (check manufacturer). |
| Sanding Between Coats | Light sanding between topcoats only (optional). | Light sanding between paint coats (optional, finer grit). |
| Topcoat/Sealer | 2-3 coats of durable topcoat. | Not usually needed if using durable cabinet paint. |
| Hardware Reinstallation | After topcoat is fully cured. | After paint is fully cured. |
Considerations for Your Easy Cabinet Makeover
- Ventilation: Always work in a well-ventilated area, especially when using stains, paints, and topcoats.
- Patience: While this method is faster than traditional sanding, allowing adequate drying time between coats is essential for a durable finish.
- Quality Products: Invest in good quality stains, paints, brushes, and topcoats. This will make application easier and the final result much better.
- Hardware: Don’t forget to update your hardware! New knobs and pulls can drastically change the look of your cabinets. Consider filling old holes and drilling new ones if you’re changing hardware styles.
- Cabinet Doors vs. Frames: You can remove doors and drawers to work on them flat on sawhorses. This makes application much easier and ensures a more even finish. Remember to work on the cabinet frames in place.
Frequently Asked Questions (FAQ)
Q: Will gel stain work on laminate cabinets?
A: Yes, gel stain is an excellent choice for updating kitchen cabinets that are made of laminate. The key is proper cleaning and degreasing, and potentially a light deglossing with liquid sandpaper.
Q: How long does gel stain take to dry?
A: Drying times for gel stain can vary, but generally, it takes between 4 to 24 hours for each coat to dry to the touch. Full curing can take several days to a week. Always check the manufacturer’s instructions.
Q: Can I stain cabinets without removing them?
A: While it’s much easier and yields a better result to remove doors and drawers, you can stain cabinet frames while they are in place. However, you’ll need to be very careful with masking and application to avoid drips and unevenness.
Q: Is gel stain more durable than regular stain?
A: Gel stain itself isn’t necessarily more durable than liquid stain, but its ability to provide a thicker, more opaque finish and its compatibility with durable topcoats make the overall finished product very long-lasting. The topcoat is what provides the primary durability.
Q: How many coats of gel stain do I need?
A: Typically, one to three coats are needed, depending on the desired color depth and the original color of your cabinets. Always allow each coat to dry completely before applying the next.
Q: Can I use a polycrylic topcoat over gel stain?
A: Yes, polycrylic is a good water-based topcoat option over gel stain. Ensure the gel stain is fully dry and follow the polycrylic manufacturer’s application instructions.
By following these steps and choosing the right products, you can achieve a stunning DIY cabinet update and an easy cabinet makeover that transforms your kitchen without the hassle of traditional sanding. Enjoy your refreshed cabinets!