
Can you secure a kitchen island to the floor? Yes, absolutely! Securing a kitchen island to the floor is a crucial step for safety, stability, and preventing potential hazards. This guide will walk you through the essential methods for kitchen island anchoring, ensuring your island remains firmly in place. Whether you have a securing freestanding island project or need to know about attaching kitchen island to floor, this information will help you achieve excellent kitchen island stability. We’ll cover everything from choosing the right fasteners to different floor attachment methods for robust island securement and paramount kitchen island safety.
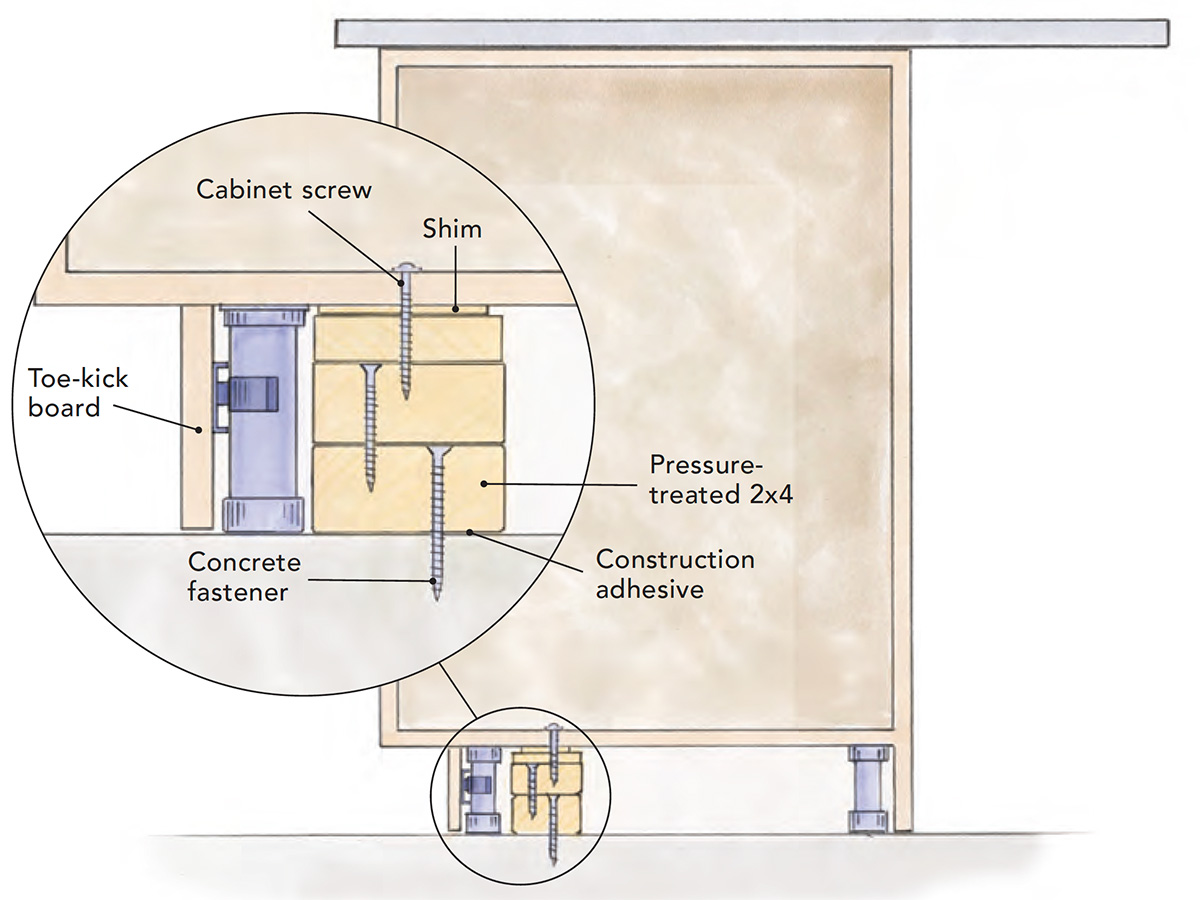
Image Source: images.finehomebuilding.com
Why Securing Your Kitchen Island Matters
A wobbly or unsecured kitchen island isn’t just an annoyance; it can be a significant safety risk. Imagine a heavy pot slipping, a child leaning too hard, or even a minor earthquake – an unsecured island could topple or shift unexpectedly. Proper kitchen island anchoring prevents these scenarios, offering peace of mind and a more functional kitchen.
Enhancing Kitchen Island Stability
Kitchen island stability is the primary benefit of securing your island. A firmly attached island feels more substantial and reliable. This stability is vital for everyday kitchen tasks, from chopping vegetables to preparing large meals. It reduces the chances of the island moving during use, which can lead to dropped items or even injuries.
Preventing Kitchen Island Movement
The goal of securing freestanding island is to eliminate unwanted movement. This prevents the island from sliding across the floor, especially on smooth surfaces like tile or laminate. Preventing kitchen island movement is key to maintaining the overall layout and safety of your kitchen.
Kitchen Island Safety Considerations
Kitchen island safety is paramount, especially in households with children or pets. An unsecured island can tip over, causing severe injury. Ensuring your island is properly fastened is a fundamental safety measure that every homeowner should take.
Structural Integrity and Longevity
Proper fastening also contributes to the structural integrity and longevity of your kitchen island. By reducing stress on the joints and connections, you help prevent wear and tear, ensuring your island remains a beautiful and functional part of your kitchen for years to come.
Different Floor Attachment Methods
There are several effective floor attachment methods for securing your kitchen island. The best method for you will depend on the type of flooring you have, the material of your island’s base, and your DIY comfort level.
Method 1: Using L-Brackets
L-brackets are a common and effective way to attach kitchen islands. They are strong, relatively easy to use, and suitable for most flooring types.
What You’ll Need for L-Bracket Installation:
- L-brackets: Choose heavy-duty steel brackets. The size will depend on the weight of your island and the fasteners you’ll use.
- Screws:
- For attaching the bracket to the island’s base: Use wood screws that are long enough to get a good grip on the island’s frame but not so long that they pierce through the countertop.
- For attaching the bracket to the floor: This is where your flooring type dictates the screw choice.
- Drill/Driver: For pre-drilling holes and driving screws.
- Drill Bits: Appropriate sizes for pre-drilling pilot holes for both wood and floor screws.
- Measuring Tape: For precise placement.
- Pencil: For marking.
- Safety Glasses: Always protect your eyes!
- Stud Finder (Optional but Recommended): If attaching to a wooden subfloor, a stud finder can help locate joists for maximum strength.
Step-by-Step Guide to Using L-Brackets:
- Position the Island: Carefully move your kitchen island to its final desired location. Ensure it’s level and square to its surroundings.
- Identify Attachment Points: Look for sturdy, solid areas on the island’s base cabinet frame. Avoid attaching to thin panels or decorative elements.
- Mark Bracket Placement:
- Place an L-bracket against the inside corner of the island’s base, with one leg against the side and the other against the bottom (or against the floor).
- Mark the screw holes on both the island’s frame and the floor.
- Pre-drill Pilot Holes:
- For the Island: Drill pilot holes into the island’s frame where you marked. These holes should be slightly smaller than the screw diameter to prevent splitting the wood.
- For the Floor: This is the crucial part.
- Wood Floors (Hardwood, Plywood Subfloor): If you’re screwing directly into a wooden subfloor, drill pilot holes that are slightly smaller than your floor screws. If possible, aim for floor joists using a stud finder for added strength.
- Concrete Floors: You’ll need to use concrete screws (like Tapcons) and a masonry drill bit. Drill holes to the depth recommended by the screw manufacturer and insert the screws.
- Tile Floors: This is trickier. You’ll need to drill through the tile and into the substrate (often concrete or a wooden subfloor). Use a tile-specific drill bit (diamond-tipped or carbide-tipped) for the tile, then switch to a bit appropriate for the material underneath. Be very careful to avoid cracking the tile.
- Vinyl/Linoleum Floors: You’ll likely be screwing into the subfloor beneath. The vinyl/linoleum itself doesn’t offer structural support.
- Attach Brackets to the Island: Using wood screws, securely fasten the L-brackets to the island’s frame.
- Attach Brackets to the Floor: Align the brackets with the pre-drilled holes in the floor and drive the appropriate screws to secure them. Ensure the screws are snug but do not overtighten, which could damage the flooring or subfloor.
- Check for Stability: Once all brackets are secured, gently push and pull on the island to test its stability. It should feel solid and immobile.
Method 2: Using Specialized Island Attachment Kits
Several manufacturers offer kitchen island anchoring kits specifically designed for this purpose. These kits often include specialized fasteners and brackets that can be easier to install and provide a very secure hold.
Common Components of Island Attachment Kits:
- Heavy-duty metal plates or brackets: Designed to connect the island base to the floor.
- Specific screws or anchors: Tailored for different flooring types (wood, concrete, etc.).
- Clear instructions: Often more detailed than generic hardware.
Advantages of Using an Attachment Kit:
- Simplicity: Kits are often designed for straightforward installation.
- Optimized Strength: Components are engineered to work together for maximum securement.
- Flooring Compatibility: Many kits offer options for various floor types.
Installation Process (Generally):
- Follow Kit Instructions: Always prioritize the manufacturer’s specific instructions.
- Position Island: Place the island in its final location.
- Mark and Drill: Mark attachment points and pre-drill holes as directed by the kit, using the appropriate drill bits for your flooring.
- Fasten Plates/Brackets: Secure the provided plates or brackets to the island base and then to the floor.
Method 3: Attaching Through the Island Base to the Subfloor
This method involves screwing directly through the island’s base cabinet and into the subfloor, often using longer wood screws. This is a very robust method, especially if you can hit floor joists.
When to Consider This Method:
- You have a sturdy island base with a solid bottom panel or frame.
- You are confident in locating floor joists.
- Your flooring allows for drilling through it (e.g., hardwood, laminate, or if you’re comfortable drilling through tile).
What You’ll Need:
- Long Wood Screws: Choose screws that are long enough to penetrate the island’s base, your flooring, and at least 1-1.5 inches into the subfloor or joist. Common lengths might be 2.5 to 4 inches, depending on your materials.
- Drill/Driver: With appropriate drill bits.
- Measuring Tape and Pencil: For marking.
- Safety Glasses: Essential protection.
- Stud Finder: Crucial for locating joists.
Step-by-Step for This Method:
- Position and Level: Place and level the island.
- Locate Joists: Use a stud finder to mark the location of floor joists directly beneath where the island will sit. Aim to have at least one attachment point into a joist if possible.
- Mark Screw Locations:
- From the inside of the island’s base, mark where you want to drive the screws. Try to distribute them evenly around the base for maximum stability.
- Ensure your marks are on solid structural components of the island base.
- Pre-drill Pilot Holes:
- Through the Island Base: Drill pilot holes through the island’s base at your marked locations.
- Through the Floor: Drill pilot holes through your flooring and into the subfloor/joists. The pilot hole size should be slightly smaller than the screw diameter. If you’re drilling through tile, use a tile bit first.
- Drive the Screws: Drive the long wood screws through the island’s base and into the pre-drilled holes in the floor. Ensure they are driven in straight and snug.
- Test Stability: Check for any wobble.
Method 4: Securing to a Concrete Slab
If your kitchen has a concrete slab foundation, the process involves different hardware.
What You’ll Need:
- Concrete Anchors (e.g., Tapcon screws): These are specialized screws designed to grip into concrete.
- Masonry Drill Bit: The size will be specified by the anchor manufacturer.
- Drill/Driver: A hammer drill is highly recommended for concrete.
- L-brackets or Mounting Plates: Similar to Method 1, but designed to work with concrete anchors.
- Measuring Tape and Pencil:
- Safety Glasses:
Step-by-Step for Concrete:
- Position Island: Place the island in its final position.
- Mark Attachment Points: Use L-brackets or mounting plates, marking screw locations on the concrete floor through the bracket.
- Drill into Concrete:
- Using the masonry bit and hammer drill, drill holes at your marked locations to the depth specified by the anchor manufacturer.
- Clean out the dust from the holes.
- Attach Brackets:
- Place the L-brackets or mounting plates back over the holes.
- Drive the concrete anchors through the brackets and into the pre-drilled holes. Tighten them securely.
- Attach to Island: If using separate brackets, fasten them to the island’s base with appropriate wood screws.
- Test Stability: Ensure the island is firmly secured.
Factors to Consider for Effective Island Securement
Choosing the right floor attachment methods and fasteners is crucial for successful island securement. Several factors will influence your decision.
Flooring Type: The Most Critical Factor
Your existing kitchen flooring plays a significant role in how you can secure your island.
| Flooring Type | Best Fastener/Method | Important Considerations |
|---|---|---|
| Hardwood | Long wood screws into subfloor/joists; L-brackets | Pre-drill to avoid splitting; locate joists if possible for maximum strength. |
| Laminate | Screws into subfloor; L-brackets | Laminate itself is not structural. You must go through it to the subfloor. |
| Tile | Masonry screws (Tapcons) into concrete/mortar bed; L-brackets | Use a diamond/carbide bit for tile; switch to appropriate bit for substrate. Drill slowly and carefully to avoid cracking. |
| Vinyl/Resilient | Screws into subfloor; L-brackets | Vinyl is a soft layer; attachment must be to the subfloor beneath. |
| Concrete Slab | Concrete anchors (Tapcons); L-brackets/mounting plates | Use a hammer drill and masonry bits. Clean holes before inserting anchors. |
| Carpet | Requires removing carpet to access subfloor. | Unsightly if the island is moved later. Best to secure directly to subfloor. |
Island Construction and Weight
The material and construction of your island will also influence the attachment method.
- Heavy, Solid Wood Islands: These require robust fastening. Attaching directly into floor joists provides the best support.
- Islands with Metal Bases: Ensure your fasteners are compatible with the metal and the floor.
- Islands with Casters: If your island has casters for mobility, permanent kitchen island anchoring is usually not desired. However, you can still use specialized locking casters and chocks to prevent kitchen island movement. If you want to permanently secure a wheeled island, you’ll need to immobilize the wheels and then use brackets that attach to the island’s frame and the floor.
Subfloor Condition
The condition of your subfloor is just as important as the visible flooring.
- Solid Subfloor: Plywood or OSB subfloors provide excellent holding power for screws.
- Damaged Subfloor: If your subfloor is rotten, warped, or damaged, you may need to repair it before attempting to secure the island.
- Concrete Slab: Generally provides a very stable base.
Tools and Materials Checklist for Attaching Your Island
Before you begin, gather all the necessary tools and materials to ensure a smooth process.
Essential Tools:
- Drill/Driver (cordless is often best)
- Drill Bit Set (including wood bits, masonry bits, and potentially tile bits)
- Measuring Tape
- Pencil or Marker
- Level
- Safety Glasses
- Gloves
- Stud Finder (especially for wood floors)
- Screwdriver Set (if any screws require it)
- Hammer (for tapping in anchors or anchors)
- Vacuum Cleaner (for dust cleanup)
Key Materials:
- L-Brackets or Mounting Plates: Heavy-duty steel is recommended.
- Screws:
- Wood Screws (various lengths)
- Concrete Screws (Tapcons)
- Washers (optional, to help distribute pressure)
- Kitchen Island Anchoring Kit (Optional): If you prefer a complete solution.
- Wood Filler or Caulk (Optional): For filling screw holes if you ever need to remove the island.
Common Pitfalls to Avoid When Fastening Your Island
Even with the best intentions, mistakes can happen. Being aware of common issues can help you achieve a secure installation.
Not Pre-drilling Properly
Skipping or inadequately pre-drilling is a recipe for disaster. It can lead to:
- Splitting wood: Especially in hardwood floors or the island’s base.
- Stripped screw holes: If the pilot hole is too large.
- Difficulty driving screws: Particularly into dense materials.
Ignoring Floor Joists
If you have a wooden subfloor, attaching directly into joists provides significantly more strength than screwing into the subfloor alone. A stud finder is your best friend here.
Using the Wrong Fasteners
Using drywall screws or short wood screws for kitchen island anchoring is a common mistake. They are not designed for the shear and tensile forces an island can experience. Always use screws specifically rated for the load and material.
Attaching to Weak Points on the Island
Only attach your brackets or screws to the structural frame or solid panels of the island’s base. Avoid attaching to:
- Thin back panels
- Decorative trim
- Drawer fronts
- Areas that feel flimsy
Not Checking for Level and Square
An island that isn’t level can look off-kilter and may not sit flush with surrounding cabinetry. While attaching kitchen island to floor, periodically check that it remains level and square to the room.
Over-tightening Screws
While you want a secure fit, over-tightening can strip screw heads, damage the flooring, or crack the substrate. Drive screws until they are snug and the island is firmly held.
Frequently Asked Questions (FAQ)
Q1: Do I really need to secure my kitchen island?
Yes, for safety and stability, it’s highly recommended to secure your kitchen island, especially if it’s a significant size or weight, or if you have children or pets. Kitchen island safety is paramount.
Q2: Can I attach my island to laminate flooring?
Yes, but you must attach through the laminate to the subfloor beneath. The laminate itself offers no structural support. Use appropriate screws for the subfloor material.
Q3: What if my island has wheels?
If your island has wheels, permanent kitchen island anchoring might not be ideal. Consider using heavy-duty locking casters and wheel chocks to prevent movement. If you need to secure it permanently, you might need to immobilize the wheels and attach brackets to the island’s frame and the floor.
Q4: How many attachment points do I need?
For most standard-sized islands, 4-6 attachment points around the base are sufficient. Ensure they are strategically placed on sturdy parts of the island’s frame and, if possible, into floor joists.
Q5: Will securing my island damage my floor?
There is a risk of minor damage, such as screw holes, especially if you need to remove the island later. Using appropriate pilot holes and fasteners, and being careful during installation, minimizes this risk. For tile, careful drilling is essential to prevent cracks.
Q6: Can I secure an island to a raised subfloor or joists?
Absolutely, this is the ideal scenario for wooden floors. Locating and screwing into floor joists provides the strongest possible hold for kitchen island stability.
By carefully following these guidelines and choosing the right floor attachment methods, you can confidently secure your kitchen island, enhancing both its kitchen island stability and the overall kitchen island safety of your home. Proper fastening kitchen island ensures it remains a safe and functional centerpiece for years to come.