
Can you divide a living room and kitchen? Yes, you absolutely can, and it’s a common and effective way to enhance both the functionality and aesthetic of your home. Whether you have an open concept kitchen living room that feels too vast or you simply crave more defined areas, there are numerous ways to achieve this separation. This guide will explore practical tips for dividing these often-connected spaces, focusing on creating zones and achieving visual separation without sacrificing the flow of your home.
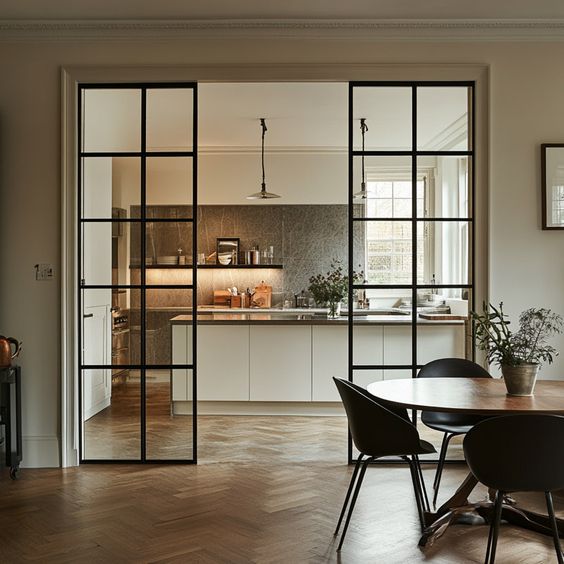
Image Source: andorwillow.com
Why Separate Your Living Room and Kitchen?
In many modern homes, the open-concept layout is celebrated for its spaciousness and ability to foster connection. However, this design isn’t without its challenges. Dividing a living room and kitchen can offer several key benefits:
- Defining Functional Zones: It clearly demarcates where cooking ends and relaxing begins, making each space feel more purposeful.
- Reducing Visual Clutter: A physical or visual barrier can hide kitchen messes from the living area, creating a more tidy appearance.
- Minimizing Noise and Odors: Separating the spaces can help contain cooking smells and the sounds of kitchen activity, allowing for a more peaceful living environment.
- Creating Intimacy: Defined areas can feel cozier and more intimate than one large, undifferentiated space.
- Enhancing Decor Opportunities: Different zones allow for distinct design styles and furniture arrangements, adding personality to your home.
Effective Strategies for Separating Spaces
The beauty of dividing your living room and kitchen lies in the variety of approaches available. From subtle visual cues to more substantial architectural elements, you can find a solution that perfectly suits your needs and style.
1. Furniture Arrangement Living Room Kitchen: The Foundation of Separation
Often, the most straightforward and cost-effective way to divide spaces is through thoughtful furniture arrangement. By strategically placing your furniture, you can create invisible walls that guide the eye and delineate different zones.
Strategic Sofa Placement
- The Back of the Sofa as a Divider: Position your sofa with its back facing the kitchen area. This creates a clear visual boundary and offers a natural anchor for your living room. You can place a console table or a slim bookshelf behind the sofa to enhance the separation and provide display space.
- Creating a Conversational Pit: Arrange sofas and chairs to face each other, forming a distinct living area that naturally turns away from the kitchen.
Dining Table as a Transition Piece
- The Dining Room Zone: A dining table and chairs can act as a natural buffer between the kitchen and the living room. Position it in the space between the two, serving as a transition zone.
- Island or Peninsula Extension: If you have a kitchen island or peninsula, it inherently acts as a divider. Extend it further with seating to create a more robust barrier and a casual dining or social space.
Utilizing Area Rugs
- Defining Living Area: A large area rug can visually anchor your living room furniture, making it a distinct zone within the larger open concept kitchen living room.
- Creating a “Room within a Room”: Layering rugs can further emphasize different areas, for example, a smaller rug under a coffee table within the larger living room rug.
2. Room Divider Ideas: Creative Solutions for Separation
When furniture alone isn’t enough, or you desire a more intentional separation, consider dedicated room dividers. These can range from practical screens to more decorative and architectural elements.
Screens and Dividers: Versatile Room Divider Ideas
- Folding Screens: These are classic and highly adaptable. Available in various materials like wood, fabric, rattan, and even metal, folding screens can be easily moved, opened, or closed to adjust the level of separation. They offer a flexible way of using screens to divide rooms.
- Freestanding Dividers: These are often more substantial than folding screens and can be made of wood panels, metal frames with glass or fabric inserts, or even modular systems.
- Curtains as Dividers: Heavy fabric curtains can offer a soft, elegant, and budget-friendly way to divide spaces. They can be drawn back when more openness is desired, providing excellent versatility. Choose fabrics that complement your decor.
Open Shelving and Bookcases: Functional Separation
- Floating Shelves for Separation: Install open shelving units or bookcases that can be accessed from both sides. These provide visual separation without completely blocking light or views. They are excellent for displaying decor, plants, or books, adding personality while serving a practical purpose.
- Two-Sided Bookshelves: A tall, freestanding bookcase can act as a significant visual barrier, especially if positioned perpendicular to a wall.
Plants as Natural Dividers
- Living Walls and Tall Plants: A row of tall potted plants or a strategically placed planter with greenery can create a soft, organic division between zones. This is a beautiful and refreshing way to achieve visual separation.
3. Architectural Elements: Semi-Permanent Divisions
For those seeking more permanent or substantial divisions, architectural elements can be incorporated. These are often more involved but offer a significant impact on the space.
Half Walls and Built-Ins
- Low Walls or Half Walls: A low wall, perhaps extending halfway up the wall, can define the living area without making the space feel closed off. It still allows for light and a sense of connection.
- Built-in Cabinets or Shelving: Incorporating custom built-in cabinets or shelving units can create a seamless and integrated separation that also provides valuable storage.
Room Dividers with Built-in Features
- Fireplaces as Dividers: A double-sided fireplace can serve as a stunning focal point and a natural divider between a living room and a dining or kitchen area.
- Cabinetry Islands: Beyond just a functional kitchen island, a larger, more elaborate cabinetry unit can extend into the living space, offering storage, display, and a clear delineation.
4. Visual Separation Techniques: Subtle but Effective
Sometimes, the most impactful divisions are those that are not entirely physical but rely on visual cues to create distinct zones.
Flooring Transitions
- Changing Materials: Use different flooring materials in each zone. For instance, hardwood or laminate in the living area and tile or vinyl in the kitchen. This creates a clear visual and tactile distinction.
- Area Rugs as Defined Boundaries: As mentioned earlier, area rugs are excellent for visually separating zones.
Lighting Strategies
- Task Lighting for Kitchen: Use brighter, task-oriented lighting in the kitchen area (e.g., pendant lights over an island or under-cabinet lighting).
- Ambient Lighting for Living Room: Opt for softer, more ambient lighting in the living room (e.g., floor lamps, table lamps, dimmer switches) to create a cozy atmosphere.
- Statement Fixtures: A striking pendant light over a dining table can also serve as a visual anchor for that specific zone.
Color and Texture
- Paint or Wallpaper: Use different paint colors or wallpaper on accent walls in each zone. This can subtly differentiate the areas without being overtly dividing.
- Textural Differences: Introduce different textures in furnishings and decor for each zone. For example, a plush rug and soft throws in the living room versus more durable and easily cleanable materials in the kitchen.
5. Considering Specific Architectural Features
Certain existing architectural elements can be leveraged or enhanced to create divisions.
Bay Window as Divider
- Creating a Nook: If your living room has a bay window, the area around it can be styled to feel like a separate zone. Place comfortable seating or a small table and chairs within the bay window area to create a cozy reading nook or a breakfast spot, effectively separating it from the main living space.
Sliding Doors or Pocket Doors
- Creating Flexibility: While more of a physical barrier, sliding doors or pocket doors can offer the best of both worlds. They can completely separate the spaces when needed for privacy or noise reduction, but can be opened to create a flowing, open concept kitchen living room when desired.
Table of Divider Options
Here’s a quick comparison of various room divider ideas:
| Divider Type | Pros | Cons | Best For |
|---|---|---|---|
| Furniture Arrangement | Cost-effective, flexible, easy to implement | May not provide full visual separation, can be less definitive | Creating subtle zones, renters, those who like frequent redecoration |
| Folding Screens | Portable, adjustable, adds decorative element | Can be less stable, may not offer complete visual block | Temporary separation, adding a bohemian or eclectic feel |
| Open Shelving | Functional (storage/display), allows light, visually light | Less privacy, doesn’t block sound or smells completely | Displaying items, separating zones without feeling closed off |
| Curtains | Soft, elegant, affordable, adjustable (can be drawn back) | May not block noise or smells effectively, can look less substantial | Soft division, adding color and texture, creating a sense of enclosure |
| Half Walls | Defines space clearly, allows light and airflow, can add features | Less flexible, requires some construction | More permanent separation, defining distinct functional areas |
| Bay Window Area | Utilizes existing architecture, creates cozy niche | Limited to spaces with bay windows, can be a fixed zone | Creating a secondary living or dining nook |
DIY Room Divider Projects
For the hands-on homeowner, creating a DIY room divider can be a rewarding and cost-effective endeavor.
Building a Simple Screen
- Materials: Wood (plywood, lumber, lath), hinges, fabric or paint.
- Process: Cut wood to desired panel sizes. Connect panels with hinges. Cover with fabric or paint for a finished look. You can even add decorative elements like lattice work or stencils.
Creating Floating Shelves for Separation
- Materials: Sturdy lumber, shelf brackets, screws, wall anchors.
- Process: Plan your layout and spacing. Attach brackets securely to wall studs. Install shelves onto brackets, ensuring they are level. You can opt for a staggered or linear arrangement.
Repurposing Furniture
- Old Ladders: A vintage ladder can be leaned against a wall and draped with fabric or used to hang plants and decorative items, creating a rustic room divider.
- Headboards: A decorative headboard can be mounted and used as a partial divider.
Key Considerations When Dividing Spaces
Before you embark on your division project, keep these important factors in mind:
Light and Airflow
- Preserving Natural Light: Avoid creating solid barriers that block windows and natural light. Opt for solutions that allow light to pass through, such as open shelving, screens, or glass panels.
- Maintaining Air Circulation: Ensure your division doesn’t impede the natural airflow in your home, which is crucial for comfort and ventilation.
Functionality and Purpose
- Consider Your Lifestyle: How do you use your living room and kitchen? Do you entertain frequently? Do you need a clear separation for cooking or working? Your daily habits should guide your choices.
- Accessibility: Make sure your chosen divider doesn’t obstruct essential pathways or access to key areas.
Aesthetics and Style
- Cohesion: While you’re defining zones, ensure the overall aesthetic remains cohesive. The divider should complement, not clash with, your existing decor.
- Material and Finish: Choose materials and finishes that align with your home’s style, whether it’s modern, minimalist, rustic, or traditional.
Budget
- Cost-Effectiveness: Solutions like furniture arrangement and curtains are budget-friendly. Architectural changes or custom-built dividers will naturally be more expensive.
- Long-Term Value: Consider how your chosen divider will impact your home’s functionality and appeal in the long run.
Ease of Installation and Flexibility
- DIY vs. Professional: If you’re not experienced with renovations, consider simpler, less intrusive options.
- Future Needs: Think about whether your needs might change in the future. A flexible solution like screens or modular shelving offers greater adaptability.
Frequently Asked Questions (FAQ)
Q: What is the best way to divide a small open concept kitchen living room?
A: For small spaces, focus on visual separation rather than solid barriers. Furniture arrangement, such as placing a sofa with its back to the kitchen, or using a slim console table behind it, is highly effective. Open shelving units also work well, allowing light and air to pass through while still defining the zones. Area rugs are also excellent for visually anchoring the living area.
Q: Can I use plants to divide my living room and kitchen?
A: Absolutely! A row of tall potted plants or a strategically placed large plant can create a beautiful, natural, and permeable divider. It adds a touch of nature and freshness to your space while offering a soft delineation between areas.
Q: What if I want to separate my kitchen from my living room but still want to see into it?
A: Open shelving, half-walls, or decorative screens with cutouts are excellent options for this. They provide a sense of division without completely blocking the view, maintaining a connection between the spaces while still offering some separation.
Q: How can I divide a room without making it feel smaller?
A: The key is to use dividers that allow light and visibility. Consider open-back shelving, glass panels, slatted screens, or even sheer curtains. Furniture arrangement that creates distinct zones without full barriers also helps maintain the perception of space.
Q: What are some budget-friendly room divider ideas?
A: Furniture arrangement is the most budget-friendly. Other affordable options include using large curtains hung from ceiling tracks, DIY screens made from inexpensive materials like lattice or fabric panels, or repurposing existing items like room dividers from thrift stores.
By thoughtfully implementing these strategies, you can successfully divide your living room and kitchen, transforming your open-concept space into a more functional, organized, and aesthetically pleasing home.