
Can you replace fluorescent kitchen lights with LEDs? Yes, you absolutely can, and it’s a fantastic way to improve your kitchen’s look and feel. Updating your old fluorescent kitchen lighting is a smart move for many homeowners. Those dated fixtures often cast a dull, greenish light that doesn’t do your culinary space any favors. Fortunately, there are several straightforward ways to bring your kitchen lighting into the modern age, making it brighter, more energy-efficient, and more appealing. This guide will walk you through the best methods for a successful kitchen lighting retrofit, from simple fluorescent tube replacement to a complete kitchen light fixture upgrade.
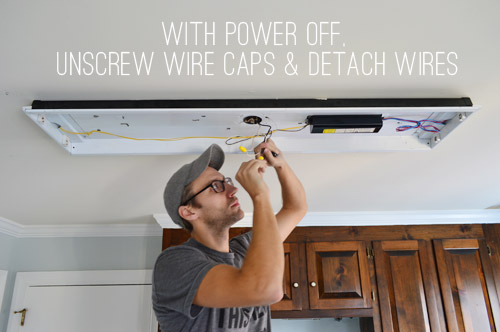
Image Source: images.younghouselove.com
Why Update Your Fluorescent Kitchen Lighting?
Fluorescent lights have been a staple in kitchens for decades, primarily due to their affordability and decent brightness. However, they come with several drawbacks that make an upgrade highly desirable:
- Light Quality: Old fluorescent bulbs often produce a harsh, sometimes greenish light that can make food look unappetizing and the overall kitchen atmosphere feel sterile. Modern lighting options offer better color rendering, making everything look more vibrant and natural.
- Energy Efficiency: While fluorescent lights are more energy-efficient than incandescent bulbs, they are significantly less so than modern LED alternatives. Upgrading to LEDs can lead to substantial savings on your electricity bills.
- Lifespan: Fluorescent tubes have a decent lifespan, but LEDs last considerably longer, meaning fewer replacements and less hassle.
- Environmental Impact: LEDs are more environmentally friendly. They don’t contain mercury, unlike fluorescent bulbs, and their lower energy consumption reduces your carbon footprint.
- Aesthetics: Let’s face it, many older fluorescent fixtures are not exactly stylish. Updating your lighting can dramatically improve the look of your kitchen.
Your Options for a Brighter Kitchen
When it comes to updating your fluorescent kitchen lighting, you have a few excellent paths to consider. Each offers different levels of effort, cost, and impact on your kitchen’s ambiance.
Option 1: The Simple Fluorescent Tube Replacement
This is the easiest and often the most budget-friendly way to make a noticeable difference. If your existing fluorescent fixture is in good condition but the bulbs are the issue, you can simply swap them out.
Understanding Fluorescent Bulb Types
Before you buy new bulbs, you need to know what you’re replacing. Fluorescent tubes come in various types, and it’s crucial to match the new bulbs to your existing fixture’s requirements.
- T8 Bulbs: These are the most common type in modern fluorescent fixtures. They are 8/8ths of an inch in diameter (one inch). T8s are generally more energy-efficient than older T12 bulbs.
- T12 Bulbs: These are older and thicker, measuring 12/8ths of an inch (one and a half inches) in diameter. Many T12 fixtures use magnetic ballasts, which are less efficient and can cause flickering.
- T5 Bulbs: These are the slimmest tubes, measuring 5/8ths of an inch in diameter. They are often used in more compact fixtures and are known for their energy efficiency.
When selecting replacement bulbs, always check the wattage, length, and base type (e.g., G13 bi-pin for T8 and T12) of your current bulbs.
Upgrading to LED Fluorescent Tubes
This is where the real magic happens. You can now purchase LED tubes designed to fit directly into your existing fluorescent fixtures. This is known as a LED fluorescent conversion. These tubes are a fantastic kitchen lighting retrofit solution.
Benefits of LED Fluorescent Tubes:
- Instant On: No more waiting for the lights to warm up and flicker. LEDs turn on to full brightness immediately.
- Improved Light Quality: LEDs offer excellent color rendering (high CRI), making colors in your kitchen look natural and appealing. You can often choose between different color temperatures (warm white, cool white, daylight) to suit your preference.
- Significant Energy Savings: LEDs use much less energy than fluorescent bulbs, often cutting lighting energy consumption by 50% or more.
- Longer Lifespan: LEDs can last 50,000 hours or more, significantly longer than fluorescent tubes.
- No Mercury: Safer for disposal and the environment.
Types of LED Fluorescent Conversion:
There are generally two main ways to perform an LED fluorescent conversion:
- Direct Replacement (Ballast Compatible): These LED tubes are designed to work with your existing fluorescent ballast. You simply remove the old fluorescent tube and install the new LED tube. This is the easiest method, but it means you’re still relying on the efficiency and lifespan of the old ballast.
- Ballast Bypass (Direct Wire): These LED tubes require you to bypass or remove the existing ballast and wire the LED tubes directly to the mains power. This method offers the highest energy efficiency and eliminates the ballast as a potential failure point. However, it involves more electrical work and requires careful attention to wiring safety. If you’re not comfortable with electrical work, it’s best to hire an electrician for this type of conversion.
Table: LED Fluorescent Tube Conversion Options
| Feature | Ballast Compatible LED Tube | Ballast Bypass LED Tube |
|---|---|---|
| Installation | Simple plug-and-play (matches existing ballast) | Requires bypassing or removing ballast; direct wiring |
| Ballast Required | Yes (uses existing ballast) | No (ballast is bypassed or removed) |
| Energy Efficiency | Good (less than ballast bypass, better than fluorescent) | Excellent (highest efficiency) |
| Lifespan | Good (depends on ballast condition) | Excellent (no ballast to fail) |
| Flicker | Generally no flicker | No flicker |
| Safety | Safe if compatible with ballast | Requires electrical wiring knowledge; can be hazardous if done incorrectly |
| Cost | Often slightly more expensive upfront | Can be slightly cheaper for the tube itself |
| Suitability | For those who want a simple, quick upgrade with minimal electrical work | For maximum efficiency and long-term savings; requires more technical skill |
Considerations for LED Tube Replacement:
- Color Temperature: Choose a color temperature that suits your kitchen. Warm white (around 2700K-3000K) offers a cozy, inviting feel, while cool white (4000K-5000K) provides a brighter, more task-oriented light. Daylight (5000K-6500K) is very bright and can mimic natural daylight but may feel too stark for some.
- Color Rendering Index (CRI): Look for bulbs with a CRI of 80 or higher. A higher CRI means colors will appear more natural under the light.
- Fixture Compatibility: Ensure the LED tubes are compatible with your fixture’s voltage and type.
- Dimming Capabilities: If your existing fluorescent fixture is on a dimmer, you’ll need to ensure your chosen LED tubes and ballast (if using ballast-compatible) are also dimmable.
Option 2: The Complete Kitchen Light Fixture Upgrade
If your fluorescent fixture is old, damaged, or simply unattractive, a complete kitchen light fixture upgrade is the way to go. This allows you to choose a new style of fixture that better complements your kitchen’s decor and offers the latest in lighting technology.
Replacing the Entire Fixture
This involves removing the old fluorescent unit entirely and installing a new ceiling light fixture. This is a more involved process than just replacing bulbs but offers the greatest potential for aesthetic and functional improvement.
Popular Modern Kitchen Lighting Fixture Options:
- LED Panel Lights: These are flat, modern-looking fixtures that provide uniform, bright light. They are incredibly energy-efficient and offer excellent light quality. Many come with dimming capabilities and adjustable color temperatures. They are a fantastic option for a clean, contemporary look.
- Recessed Lighting (Can Lights): These fixtures are installed flush with the ceiling, providing a sleek, unobtrusive look. You can install multiple recessed lights to evenly illuminate the kitchen. Modern LED recessed lights are highly efficient and available in various beam angles and color temperatures. They are a popular choice for kitchen renovation lighting.
- Track Lighting: Offers flexibility, allowing you to direct light to specific areas of the kitchen. You can install multiple spotlights or floodlights on a track.
- Pendant Lights: These decorative fixtures hang from the ceiling and are often used over kitchen islands or dining areas to add a focal point and task lighting.
- Flush Mount Fixtures: A wide variety of styles are available, from minimalist designs to more decorative options. Many modern flush mount fixtures now use integrated LED technology.
Benefits of a Full Fixture Upgrade:
- Enhanced Aesthetics: Choose a fixture that perfectly matches your kitchen’s style, from modern and minimalist to farmhouse chic.
- Superior Light Quality: Modern fixtures often feature integrated LEDs with excellent CRI and a choice of color temperatures.
- Increased Energy Efficiency: New fixtures, especially those with integrated LEDs, are designed for maximum energy savings.
- Smart Home Integration: Many new fixtures can be controlled via smart home systems, allowing for voice control, scheduling, and remote operation.
- Improved Functionality: You can select fixtures that offer specific lighting solutions, such as focused task lighting or ambient mood lighting.
Installation Considerations for Fixture Upgrades:
- Electrical Safety: This type of upgrade involves working directly with your home’s electrical wiring. If you are not experienced with electrical work, it is strongly recommended to hire a qualified electrician. Improper wiring can lead to electrical shocks, fires, or damage to your home.
- Ceiling Type and Support: Ensure your ceiling can support the weight of the new fixture. Recessed lighting, for example, may require specific mounting brackets or joist spacing.
- Wiring: You may need to run new wiring, especially if you’re changing the location or type of fixture.
- Dimmer Switches: If you want dimmable lights, you’ll need to install a compatible dimmer switch. Ensure the new fixture is also rated for dimming.
Option 3: Complementary Lighting for Enhanced Ambiance
Even if you keep your main overhead fluorescent fixture (or have upgraded it), adding secondary lighting sources can significantly enhance your kitchen’s functionality and appeal.
Under Cabinet Lighting
This is a highly recommended addition for any kitchen. Under cabinet lighting provides crucial task lighting for countertops, eliminating shadows cast by overhead lights and making food preparation much easier and safer.
Types of Under Cabinet Lighting:
- LED Strips: Flexible, self-adhesive strips of LEDs that can be easily cut to size and installed under cabinets. They offer continuous light and are very energy-efficient.
- LED Puck Lights: Small, circular lights that can be mounted individually. They offer more focused light and can be good for highlighting specific areas.
- Integrated LED Fixtures: Small, slim bar-style fixtures that offer a clean look and excellent illumination.
Benefits of Under Cabinet Lighting:
- Improved Task Lighting: Makes chopping, mixing, and other kitchen tasks safer and more enjoyable.
- Enhanced Ambiance: Creates a warm, inviting atmosphere in the kitchen, especially when used with dimmable options.
- Highlights Countertops and Backsplashes: Draws attention to decorative elements in your kitchen.
- Reduces Eyestrain: By providing light at your work surface level.
Other Complementary Lighting Ideas:
- Pendant Lights over an Island: As mentioned earlier, these add style and focused light.
- Sconces: Wall-mounted lights can add decorative flair and ambient light in dining nooks or along walls.
- In-Cabinet Lighting: Lights installed inside cabinets or glass-front display cabinets can showcase dishware and create a sophisticated look.
Troubleshooting Common Fluorescent Lighting Issues
Before you dive into upgrades, it’s worth knowing how to address common problems with your existing fluorescent lights. Sometimes, a simple fix can extend their life or improve their performance until you’re ready for a full replacement.
Flickering Lights
Flickering is often caused by a failing ballast replacement or a worn-out starter (in older fixtures).
- Check the Bulb: Sometimes, a flickering bulb is simply at the end of its life or not seated correctly. Try rotating or reseating the fluorescent tube.
- Check the Starter: For fixtures with starters (usually older T12 fixtures), the starter can wear out. Replacing a starter is a very simple and inexpensive fix.
- Ballast Issues: If the bulb and starter seem fine, the ballast might be failing. A failing ballast can cause flickering, humming, and dim light. Replacing a ballast can be a bit more involved and requires electrical knowledge.
Humminng Lights
A humming sound often indicates a problem with the ballast. As ballasts age, they can become noisy. This is another indicator that a ballast replacement or a full fixture upgrade might be necessary.
Dim or Uneven Light
This can be due to aging bulbs, a failing ballast, or improper voltage. Ensure all bulbs are correctly seated. If the issue persists, it’s likely the ballast or bulbs need replacing.
Important Safety Precautions
Working with electricity can be dangerous. Always prioritize safety:
- Turn Off Power: Before touching any wiring or fixtures, always turn off the power to that circuit at your main electrical panel (breaker box). Double-check that the power is off by trying to turn on the light.
- Use Insulated Tools: Use tools with insulated handles to prevent electrical shock.
- Follow Instructions: Carefully read and follow the manufacturer’s instructions for any new fixtures or bulbs.
- Consult an Electrician: If you are unsure about any part of the installation process, or if you’re dealing with older wiring or complex fixtures, do not hesitate to hire a qualified electrician. They have the expertise to ensure the job is done safely and correctly.
Frequently Asked Questions (FAQ)
Q1: How much does it cost to update fluorescent kitchen lighting?
The cost varies greatly depending on the method. Replacing fluorescent tubes with LED tubes can cost anywhere from $10-$30 per tube. A complete kitchen light fixture upgrade can range from $100 for a basic LED flush mount fixture to several hundred dollars or more for designer pendants or sophisticated recessed lighting systems. Professional installation will add to the cost.
Q2: Do LED fluorescent conversion kits require special wiring?
It depends on the type of LED tube. Ballast compatible LED tubes are designed to work with your existing ballast and usually require no special wiring – just a simple tube swap. Ballast bypass LED tubes require you to bypass or remove the old ballast and wire the tubes directly to the mains power, which does involve special wiring and electrical knowledge.
Q3: What is the best type of lighting for a kitchen?
The “best” lighting depends on your needs and preferences. A layered approach is usually ideal:
- Ambient Lighting: General overhead lighting (like LED panel lights or recessed lights) to illuminate the entire space.
- Task Lighting: Focused light for work areas, such as under cabinet lighting or pendants over an island.
- Accent Lighting: Used to highlight specific features, like artwork or decorative elements.
LEDs are generally recommended for all layers due to their energy efficiency, longevity, and excellent light quality.
Q4: Can I put LED bulbs in my old fluorescent fixture?
Yes, you can use LED fluorescent conversion tubes specifically designed to fit into existing fluorescent fixtures. However, you cannot simply put a standard screw-in LED bulb into a fluorescent fixture that requires a tube. You must use the correct type of LED tube replacement.
Q5: How do I choose the right color temperature for my kitchen lighting?
- Warm White (2700K-3000K): Cozy, inviting, similar to traditional incandescent bulbs. Good for general ambient lighting or if you prefer a warmer feel.
- Cool White (4000K-5000K): Brighter, crisper light. Excellent for task lighting and areas where you need good visibility, like over countertops.
- Daylight (5000K-6500K): Very bright, cool light that mimics natural daylight. Can be good for very functional workspaces but may feel too stark for some living spaces.
Most homeowners find 3000K to 4000K to be a good balance for general kitchen lighting.
Q6: What does “ballast replacement” mean in relation to fluorescent lights?
The ballast is an electrical component within a fluorescent light fixture that controls the current to the lamp. It starts the lamp and regulates the voltage. When a ballast fails, it can cause flickering, humming, or prevent the light from working at all. Replacing a ballast is part of maintaining or upgrading fluorescent fixtures.
Q7: Is it worth upgrading to LED lighting?
Absolutely! The energy savings, significantly longer lifespan, improved light quality, and reduced environmental impact make upgrading to LED lighting a worthwhile investment for almost any home. Over time, the savings on your electricity bills will often pay for the initial upgrade cost.
By taking the time to explore your options and plan your kitchen lighting retrofit, you can transform your kitchen from a dimly lit space into a bright, welcoming, and energy-efficient heart of your home. Whether it’s a simple fluorescent tube replacement or a complete kitchen light fixture upgrade, a brighter kitchen is within reach!