
Can you remove a kitchen soffit yourself? Yes, with the right tools and a careful approach, you can absolutely tackle kitchen soffit removal yourself. This guide will walk you through the entire process, from planning to the final cleanup.
Soffits in kitchens are those often bulky, rectangular structures that run above your cabinets. They typically house ductwork, plumbing, or electrical wiring. While they serve a purpose, they can also make a kitchen feel dated and closed in, limiting your cabinet space and overall design potential. Embarking on kitchen cabinet soffit removal can dramatically open up your space, allowing for taller cabinets, better lighting, and a more modern aesthetic. This process is a common and rewarding project for anyone considering a kitchen renovation soffit upgrade.
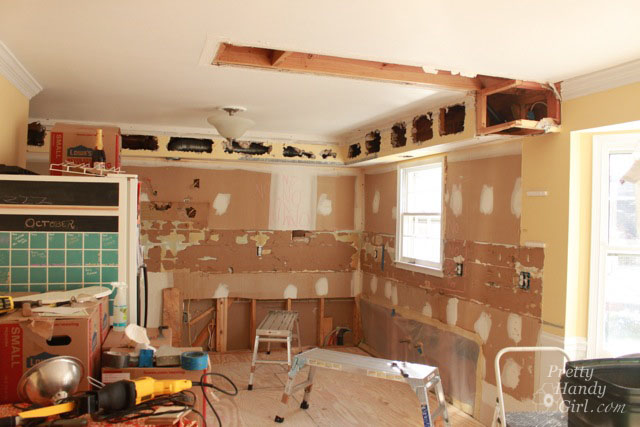
Image Source: prettyhandygirl.com
Deciding if Soffit Removal is Right for Your Kitchen
Before you grab a pry bar, it’s crucial to assess if removing your kitchen soffit is the right move for your home. This isn’t just about aesthetics; it’s about understanding what lies within that boxed-in space.
Factors to Consider Before Soffit Demolition
-
What’s Inside? The most important step is to determine what services are hidden within your soffit. This could include:
- HVAC Ducts: Air conditioning and heating vents are commonly found here. Removing soffits containing large ducts can be complicated and might require rerouting these essential systems.
- Plumbing: Sometimes, water supply or drain pipes are routed through soffits.
- Electrical Wiring: Outlets, lighting circuits, or even junction boxes might be present.
- Ventilation Fans: Range hood exhaust ducts frequently run through soffits.
- Structural Elements: In rare cases, soffits might incorporate or conceal structural beams.
-
Accessing Utilities: If you find essential utilities, you’ll need to decide if you can reroute them or if professional help is needed. This is a critical part of soffit removal DIY.
-
Budget: While DIY removal saves on labor, factor in potential costs for rerouting utilities, patching walls and ceilings, and potential aesthetic upgrades like new cabinets or lighting.
-
Your Skill Level: Soffit ceiling repair and drywall soffit removal require some level of comfort with basic construction tasks. If you’re new to home improvement, start with smaller projects or consider hiring a professional for the more complex parts.
-
Aesthetic Goals: Visualize the impact of removing the soffit. Will it create the open, airy feel you desire? Will it allow for taller cabinets that maximize storage?
What is a Kitchen Soffit?
A kitchen soffit is an architectural feature that extends downwards from the ceiling, typically above kitchen cabinets. It’s essentially a constructed box designed to conceal building components like ventilation, plumbing, and electrical wiring, as well as to create a more finished look where cabinets meet the ceiling.
Can I Remove Overhead Cabinets to Access Soffit?
Yes, you may need to remove overhead cabinets to gain full access to the soffit and its internal components. This adds an extra layer of work but is often necessary for a clean and complete removal.
Gathering the Right Soffit Removal Tools
Having the correct soffit removal tools makes the job safer, faster, and more efficient. Investing in or renting quality tools can prevent damage to your walls and ceilings.
Essential Tools for Soffit Removal
Here’s a comprehensive list of tools you’ll likely need for cabinet soffit demolition:
-
Safety Gear:
- Safety Glasses: Essential for protecting your eyes from dust and debris.
- Work Gloves: Protect your hands.
- Dust Mask or Respirator: Crucial for preventing inhalation of dust and potential mold or asbestos if your home is older.
- Sturdy Work Boots: For foot protection.
-
Demolition and Pry Tools:
- Pry Bar Set: Various sizes are useful for gently separating materials.
- Putty Knife or Scraper: For scoring caulk or paint lines.
- Hammer: For tapping tools and dislodging stubborn materials.
- Reciprocating Saw (Sawzall) with Wood/Metal Blades: For cutting through wood framing and potentially metal ductwork.
- Drywall Saw or Utility Knife: For cutting drywall.
- Orbital Sander or Block Sander: For smoothing rough edges after drywall removal.
-
Measurement and Marking Tools:
- Tape Measure: For accurate measurements.
- Pencil: For marking cut lines.
- Stud Finder: To locate wall studs for support and to avoid cutting into them unnecessarily.
-
Electrical and Plumbing Safety:
- Voltage Tester (Non-Contact): To confirm that electrical circuits are off.
- Adjustable Wrench or Pliers: For disconnecting any accessible plumbing fixtures if necessary.
-
Cleanup Tools:
- Drop Cloths or Plastic Sheeting: To protect floors and countertops.
- Shop Vacuum with HEPA Filter: For efficient dust collection during and after the work.
- Heavy-Duty Trash Bags or a Small Utility Trailer: For debris disposal.
- Broom and Dustpan: For initial cleanup.
Specialized Tools for Soffit Boxing Removal
If your soffit is constructed with specific materials, you might need:
- Oscillating Multi-Tool: Excellent for precise cuts in tight spaces and for cutting through caulk and paint lines cleanly.
Step-by-Step Guide to Kitchen Soffit Removal
This detailed process will guide you through safely and effectively removing your kitchen soffit.
Step 1: Preparation and Safety First
This is arguably the most critical step. Taking your time here will prevent accidents and damage.
Initial Site Preparation
- Clear the Area: Remove all items from countertops, tables, and the floor around the soffit area.
- Protect Surfaces: Cover countertops, backsplashes, appliances, and flooring with drop cloths or plastic sheeting. Secure them with painter’s tape.
- Shut Off Utilities: Crucially, if you suspect electrical wiring or plumbing within the soffit, turn off the power to those circuits at your main electrical panel and shut off the water supply to the relevant fixtures. Test with a voltage tester to confirm the power is off. If you are unsure, hire a qualified electrician or plumber.
Assessing the Soffit Construction
Before any demolition, take a close look at how your soffit is built.
- Material: Is it drywall, wood paneling, or another material?
- Attachment: How is it secured to the ceiling and cabinets? Look for screws or nails along the cabinet line and at the wall.
- Internal Contents: Try to get a visual of what’s inside. If possible, open an access panel or carefully make a small exploratory cut in an inconspicuous area (like the underside) to see what you’re dealing with.
Step 2: Disconnecting and Removing Cabinets (If Necessary)
If your soffit wraps around or is attached to your overhead cabinets, you’ll need to remove them first.
How to Remove Overhead Cabinets
- Empty Cabinets: Remove all items from the cabinets.
- Support Cabinet: Use adjustable cabinet support jacks or sturdy blocks of wood to hold the cabinet in place from below.
- Locate Mounting Screws: Cabinet mounting screws are usually found on the inside of the cabinet, attaching it to wall studs or blocking. They might also be screwed from the cabinet above into the soffit, or from the side into adjacent cabinets or walls.
- Remove Screws: Carefully remove all screws. If the cabinet is particularly heavy, have a helper assist you.
- Gently Detach: Once screws are removed, gently pull the cabinet away from the wall and soffit.
- Label and Store: Label each cabinet door and shelf, and store hardware in labeled bags.
Step 3: Making Initial Cuts and Removing Drywall
This is where the drywall soffit removal begins.
Cutting Along Edges
- Score Paint/Caulk Lines: Use a sharp utility knife or an oscillating multi-tool to score along all edges where the soffit meets the ceiling and the wall. This prevents paint and drywall paper from tearing off the adjacent surfaces.
- Locate Studs: Use your stud finder to mark the location of studs within the soffit structure. This will help you understand where to cut and where support might be.
Cutting the Drywall Panels
- Start with the Underside: Begin by cutting away the drywall on the underside of the soffit.
- If you know where ductwork or other obstacles are, you might want to make smaller, controlled cuts first.
- Alternatively, if you’ve confirmed no major obstructions, you can attempt to remove larger sections.
- Use a Drywall Saw or Reciprocating Saw:
- For controlled cuts, a drywall saw is excellent.
- For faster removal or if you encounter hidden wood framing, a reciprocating saw with a fine-tooth wood blade is effective.
- Be Mindful of Utilities: As you cut, proceed with extreme caution. If you hit a wire or pipe, stop immediately and reassess. This is where the soffit removal DIY approach can become tricky if not planned well.
Step 4: Removing Internal Framing and Utilities
Once the drywall is removed, you’ll see the internal structure.
Removing Wood Framing
- Identify Joins: Soffits are typically framed with wood, often 2x4s or 1x4s, screwed or nailed to the ceiling joists, wall studs, and cabinet supports.
- Cut or Pry Away: Use your reciprocating saw to cut through the framing members. If the pieces are small, you can use a pry bar to carefully detach them.
- Work Systematically: Remove framing piece by piece, working from the easiest to access areas.
Dealing with Ducts and Wiring
- Ductwork:
- If ductwork is present and you plan to keep your HVAC system functional, you’ll need to carefully work around it. You might be able to gently bend flexible ductwork out of the way or carefully cut sections of rigid ductwork that are no longer needed.
- If you need to reroute ductwork, this is a job for a professional HVAC technician.
- Wiring:
- If electrical wires are present, ensure the power is definitely off.
- You can often gently push wires back into the wall cavity or ceiling.
- If you need to reroute or terminate wiring, it’s highly recommended to hire a qualified electrician. Improper electrical work can be dangerous.
- Plumbing:
- Similar to wiring, if plumbing is found, ensure water is shut off.
- Pipes can often be carefully maneuvered.
- Any significant plumbing alteration or rerouting should be handled by a licensed plumber.
Soffit Boxing Removal Considerations
When undertaking soffit boxing removal, pay close attention to how the box is constructed. Is it a simple drywall shell over wood framing, or is it more integrated with the cabinet structure? The method of removal will depend on this.
Step 5: Patching and Repairing Walls and Ceiling
After all the soffit materials and framing are removed, you’ll have holes and exposed studs or joists.
Preparing for Repair
- Clean Up Debris: Vacuum up all dust and debris from the work area.
- Inspect for Damage: Check the surrounding walls and ceiling for any unintended damage caused during removal.
- Trim Rough Edges: Use a utility knife or saw to clean up any jagged edges of drywall or wood framing.
Patching Drywall
- Small Holes: For small nail holes or minor damage, spackle and sandpaper are usually sufficient.
- Larger Holes:
- Cut Back to Studs: If you have large gaping holes, cut the damaged drywall back to the nearest studs or framing members.
- Install New Backing (If Needed): If there isn’t solid framing to attach new drywall to, you may need to add wood blocking.
- Cut New Drywall: Measure and cut pieces of new drywall to fit the holes.
- Attach New Drywall: Screw the new drywall pieces to the studs or blocking.
- Tape and Mud: Apply drywall tape to the seams and cover with joint compound (mud) in multiple thin layers, allowing each layer to dry and lightly sanding between coats.
- Prime and Paint: Once the mud is dry and smooth, prime the patched areas and paint to match the existing walls and ceiling. This is the soffit ceiling repair stage.
Step 6: Final Touches and Cleanup
The final steps involve tidying up and preparing for the next phase of your renovation.
Final Cleanup
- Sweep and Vacuum: Thoroughly sweep and vacuum the entire work area, including cabinets and any remaining shelves.
- Wipe Down Surfaces: Wipe down countertops and any exposed surfaces to remove dust.
- Dispose of Debris: Bag up all construction debris and dispose of it properly according to local regulations.
Reinstalling Cabinets (If Removed)
If you removed overhead cabinets, now is the time to reinstall them.
- Position Cabinets: Place cabinets back in their original positions, ensuring they are level and plumb.
- Secure Cabinets: Re-screw cabinets to wall studs and adjacent cabinets.
- Reattach Doors and Shelves: Put doors and shelves back on.
Table: Soffit Removal Project Checklist
| Task | Status | Notes |
|---|---|---|
| Safety Gear Acquired | [ ] | Safety glasses, gloves, dust mask |
| Tools Assembled | [ ] | Pry bar, saw, hammer, voltage tester, etc. |
| Area Cleared & Protected | [ ] | Countertops, floors covered |
| Utilities Shut Off | [ ] | Power and water confirmed off |
| Soffit Contents Assessed | [ ] | Identified ducts, wires, pipes |
| Cabinets Removed (If needed) | [ ] | Supported and detached carefully |
| Drywall Cut & Removed | [ ] | Cleanly scored edges, careful cuts |
| Framing Disassembled | [ ] | Wood members cut or pried away |
| Utilities Handled | [ ] | Rerouted or secured by professionals if necessary |
| Holes Patched | [ ] | Drywall seams taped and mudded |
| Surfaces Primed & Painted | [ ] | Patched areas blended with existing surfaces |
| Cabinets Reinstalled | [ ] | Secured and leveled |
| Final Cleanup Complete | [ ] | Debris removed, area clean |
When to Call a Professional
While soffit removal DIY is achievable for many, there are situations where hiring professionals is highly recommended.
Situations Requiring Professional Assistance
- Extensive Ductwork or Plumbing: If the soffit contains major HVAC ductwork or complex plumbing, rerouting these services is often best left to specialists.
- Unknown or Suspected Asbestos: Homes built before the 1980s may contain asbestos in insulation or ceiling materials. If you suspect its presence, do not disturb it and contact a certified asbestos abatement professional.
- Structural Components: If you discover that the soffit is supporting part of your home’s structure, consult a structural engineer or contractor.
- Lack of Confidence or Experience: If you feel uncomfortable with any part of the process, especially when dealing with utilities, it’s wise to bring in an expert.
- Time Constraints: If you don’t have the time to dedicate to the project, hiring a contractor for the entire kitchen renovation soffit job can be a good option.
Frequently Asked Questions (FAQ)
Q1: How long does it typically take to remove a kitchen soffit?
A1: The time can vary greatly depending on the size of the soffit, what’s inside it, and your skill level. A simple drywall soffit without major obstructions might take a weekend for a DIYer. If cabinets need to be removed and utilities rerouted, it could extend to several days or require professional intervention, pushing the timeline further.
Q2: Will removing the soffit reveal any issues like mold?
A2: It’s possible. Old soffits can sometimes conceal moisture issues leading to mold growth, especially if there were leaks from plumbing or condensation from ductwork. Always be prepared for this possibility and wear appropriate respiratory protection. If significant mold is found, professional remediation may be necessary.
Q3: What are the benefits of removing a kitchen soffit?
A3: The primary benefits include:
* Increased Cabinet Space: Allows for taller, floor-to-ceiling cabinets, maximizing storage.
* Modern Aesthetic: Creates a cleaner, more contemporary look.
* Improved Lighting: Opens up space for better task and ambient lighting.
* Perceived Space: Makes the kitchen feel larger and more open.
Q4: Can I remove just a portion of the soffit?
A4: Yes, you can remove a portion of a soffit if it allows you to achieve your design goals, such as installing taller cabinets in one area. However, ensure that any remaining sections are securely fastened and that any exposed utilities are properly managed.
Q5: What should I do if I find wiring in the soffit?
A5: First and foremost, confirm the power is turned off at the breaker box. If you need to reroute or terminate the wiring, it is strongly recommended to hire a qualified electrician to ensure safety and compliance with building codes.
By following these steps and prioritizing safety, you can successfully remove your kitchen soffit and transform your kitchen space.