
Kitchen islands are a popular addition to many homes, offering extra counter space, storage, and a gathering spot for family and friends. But how do these large fixtures stay put? Kitchen islands are typically attached to the floor using a combination of cabinet base connections, specialized floor mounting hardware, and robust anchoring methods to ensure stability and safety. This post will delve into the various ways kitchen islands are secured, from basic designs to complex custom island installations.
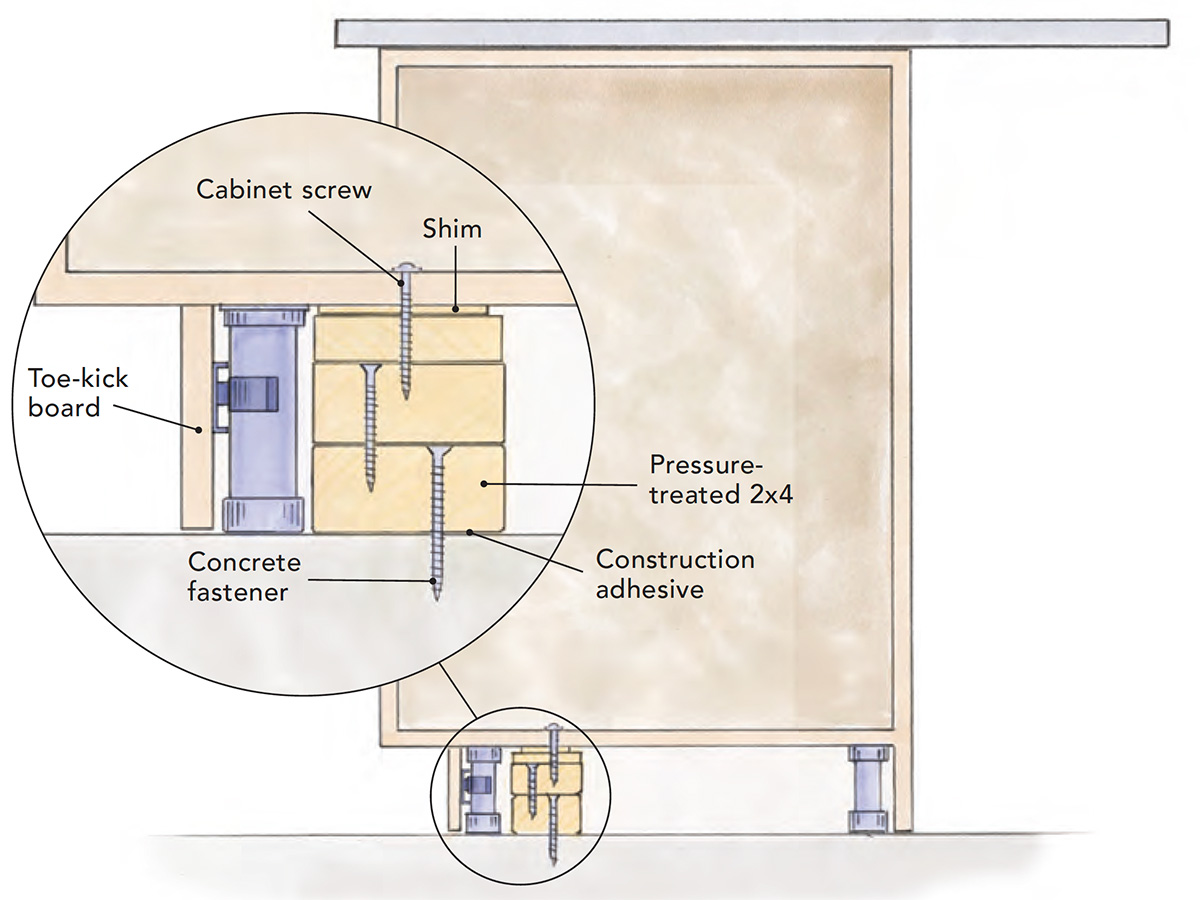
Image Source: images.finehomebuilding.com
The Foundation of Stability: Cabinet Base Attachment
At the heart of most kitchen island designs lies the cabinet base. This is the sturdy framework that supports the countertops and often houses drawers and doors. The way this cabinet base interacts with the floor is crucial for its stability.
How Cabinet Bases are Secured
Most kitchen islands are built on a cabinet base that is essentially a collection of sturdy, often interconnected, cabinets. These cabinets are designed to be heavy and stable on their own, but for long-term security, they need to be fastened to the subfloor.
- Direct Attachment to Subfloor: In many cases, the cabinet base is screwed directly into the subfloor beneath the finished flooring. This is a strong and reliable method, especially for islands that will experience significant use.
- Using Ledger Boards: For added strength, especially on older floors or where the subfloor might be less robust, a “ledger board” can be installed. This is a piece of lumber that is securely attached to the subfloor, and then the cabinet base is screwed into this ledger board. This distributes the weight and stress more effectively.
- Island Construction: The inherent island construction plays a vital role. Islands built with solid wood frames and strong joinery will be more stable and easier to secure than those made with lighter materials or less robust construction methods.
Essential Hardware: Floor Mounting Solutions
Beyond the cabinet base itself, specific floor mounting hardware is used to create a secure bond between the island and the room. This hardware is designed to withstand the weight and potential movement of the island.
Types of Floor Mounting Hardware
The choice of hardware often depends on the type of floor and the weight of the island.
- L-Brackets and Metal Straps: These are common. L-brackets are L-shaped metal pieces that can be screwed into the bottom of the cabinet base and then into the floor. Metal straps can wrap around the base and be anchored to the floor.
- Angle Brackets: Similar to L-brackets, angle brackets provide corner support and can be used to connect different sections of the cabinet base to each other and to the floor.
- Threaded Rods and Plates: For very heavy islands, especially those with stone countertops, threaded rods can be embedded into the subfloor with epoxy or anchors. The cabinet base can then be attached to these rods using mounting plates and nuts. This offers exceptional strength.
- Specialized Anchors: Depending on the flooring material (e.g., concrete slab, hardwood, tile), different types of anchors are used. For concrete, wedge anchors or sleeve anchors are typical. For wood, lag screws are common.
Diverse Anchoring Methods for Island Security
The term anchoring methods covers the techniques used to fix the island firmly in place. This isn’t just about screwing it down; it’s about creating a system that resists tipping and shifting.
Exploring Different Anchoring Techniques
- Screwing Through the Cabinet Base: This is the most straightforward method. Screws or lag bolts are driven through the bottom of the cabinet base directly into the subfloor. The number and size of screws are important for adequate support.
- Using Mounting Plates: Metal plates can be attached to the floor, and then the cabinet base is bolted to these plates. This provides a very strong connection, especially useful if the subfloor is not ideal for direct screwing.
- Securing to Wall Studs (if applicable): If an island is positioned against a wall or has a section that abuts a wall, it can be additionally secured by screwing the cabinet base into wall studs. This significantly increases stability.
- Attaching to Joists: For the ultimate in security, particularly in basements or during new construction, the island base can be directly attached to the floor joists below the subfloor using heavy-duty lag bolts or specialized anchoring hardware.
Island Supports: More Than Just Legs
While some islands are essentially large cabinets, others incorporate island supports that are more visible and integral to their design. These supports also need to be securely fastened.
Types of Island Supports and How They’re Secured
- Leg Attachments: Islands with furniture-style legs need robust leg attachments. These legs are typically screwed or bolted into reinforced points within the cabinet base. The attachment points themselves are often reinforced with metal plates or thicker wood blocks to prevent the screws from pulling out under load.
- Pedestal Base: A pedestal base is a single, substantial support column that elevates the countertop. These bases are usually very heavy and are either permanently fixed to the floor via an internal mounting plate or are so weighty that they rely on gravity and their broad footprint for stability. If they are attached, the floor mounting hardware will be integrated into the pedestal’s design.
- Decorative Corbels or Brackets: While often decorative, substantial corbels or brackets that support an overhang are usually screwed into the cabinet base and also into the floor or a reinforced ledger board. Their primary role might be aesthetic, but their attachment contributes to the overall stability.
Custom Island Installation: Tailored Security
For a custom island installation, the attachment methods are often tailored to the unique design and the specific requirements of the space. This is where creativity and engineering often meet.
Tailoring Security for Custom Designs
- Unique Shapes and Sizes: A custom island might have an irregular shape or a significantly larger footprint. This requires a more comprehensive anchoring strategy, potentially involving multiple attachment points across the entire base.
- Integrated Electrical or Plumbing: If the island includes sinks or outlets, the island construction will need to accommodate these. The anchoring methods must ensure that these utilities are not stressed or damaged by the island’s movement. The cabinet base might have cutouts for pipes or conduits, and the anchoring needs to work around these.
- Material Considerations: The materials used in a custom island (e.g., heavy granite, solid wood, metal accents) will dictate the required strength of the anchoring methods. Heavier materials demand more robust floor mounting hardware and a greater number of attachment points.
- Aesthetic Integration: In a custom installation, the goal is often to hide the floor mounting hardware as much as possible. This might involve recessing mounting plates into the subfloor or using decorative trim to conceal the attachment points.
Fixed Island Attachment: Ensuring Permanence
The term fixed island attachment highlights the intention to make the island a permanent fixture in the kitchen. This contrasts with portable islands, which are designed to be moved.
The Importance of a Fixed Connection
- Safety: A firmly fixed island prevents it from tipping over, which is particularly important in households with children or pets. It also prevents it from sliding, which could cause damage or injury.
- Functionality: A stable island provides a reliable workspace for cooking, food preparation, and dining. Wobbling or shifting surfaces are inconvenient and potentially dangerous.
- Durability: Proper anchoring methods protect both the island and the flooring from undue stress and wear and tear caused by movement.
Different Flooring Materials and Their Impact
The type of flooring you have in your kitchen will influence how an island is secured.
Securing Islands to Various Floor Types
| Flooring Type | Attachment Method Considerations |
|---|---|
| Hardwood Floors | Screws or lag bolts can be driven through the subfloor. Care must be taken not to split the hardwood. Pilot holes are essential. Ledger boards can distribute weight and prevent floor damage. |
| Tile Floors | The tile itself is not strong enough to hold an island. The island must be anchored to the subfloor beneath the tile. This often involves drilling through the tile and into the subfloor. |
| Laminate/Vinyl | Similar to tile, these are surface coverings. Anchoring must go through to the subfloor. Screws should be flush or countersunk to avoid damaging the surface flooring. |
| Concrete Slab | Concrete anchors (e.g., wedge anchors, sleeve anchors) are used to secure mounting plates or the cabinet base directly to the concrete. Epoxy anchors offer exceptional strength. |
Common Misconceptions about Island Attachment
It’s important to distinguish between islands that are meant to be moved and those that are permanent fixtures.
Clarifying Island Security
- “It’s too heavy to move”: While weight contributes to stability, it’s not a substitute for proper anchoring methods. A heavy island can still shift or tip under certain conditions.
- “I’ll just put heavy things on it”: Adding weight can help, but it doesn’t create a secure connection to the floor.
- “It came with wheels, so it’s mobile”: Islands with wheels are designed for mobility and are not intended for fixed island attachment. If you want a permanent fixture, you’ll need to remove the wheels and secure the base.
When to Call a Professional
While some DIYers can confidently tackle island installation, there are times when professional help is recommended.
Deciding on Professional Installation
- Complex Designs: Custom islands or those with intricate features often require specialized knowledge.
- Uncertainty About Subflooring: If you’re unsure about the condition or type of your subfloor, a professional can assess it and recommend the best anchoring methods.
- Heavy Countertops: Stone countertops add significant weight and require careful handling and secure attachment to prevent damage or injury.
- Desire for a Flawless Finish: A professional installer will ensure that all floor mounting hardware is concealed and that the custom island installation is aesthetically pleasing as well as secure.
Conclusion: A Stable Island for a Safer Kitchen
Securing your kitchen island is paramount for both safety and functionality. By utilizing a robust cabinet base, appropriate floor mounting hardware, and reliable anchoring methods, you can ensure your island remains a stable and integral part of your kitchen for years to come. Whether it’s a simple unit or a custom island installation, the principles of secure island construction and fixed island attachment remain the same: a strong connection to the floor is key. From leg attachments to pedestal base stability, every element contributes to a well-anchored and secure kitchen island.
Frequently Asked Questions (FAQ)
Q1: Do all kitchen islands need to be attached to the floor?
A1: Not all kitchen islands need to be attached to the floor, but it is highly recommended for safety and stability, especially for islands that are not portable. Islands designed to be permanently fixed in place should always be anchored.
Q2: Can I attach a kitchen island directly to a tile floor?
A2: No, you cannot attach a kitchen island directly to a tile floor. The tile is a surface covering and lacks the structural integrity to support the island. You must attach the island to the subfloor beneath the tiles.
Q3: What is the strongest way to anchor a kitchen island?
A3: The strongest way to anchor a kitchen island is typically by screwing or bolting the cabinet base directly into the floor joists below the subfloor, or by using heavy-duty concrete anchors if installed on a concrete slab. Using reinforced mounting plates and robust lag bolts provides excellent strength.
Q4: How do I secure a kitchen island if I have a concrete subfloor?
A4: If you have a concrete subfloor, you will typically use concrete anchors such as wedge anchors or sleeve anchors. These anchors are driven into pre-drilled holes in the concrete, and the island’s base or mounting plates are then secured to these anchors.
Q5: Can I install a kitchen island without drilling into the floor?
A5: For islands that are truly meant to be permanent fixtures, drilling into the floor is generally necessary for secure fixed island attachment. Some very heavy islands might rely primarily on their weight for stability, but this is less common and often not as safe as anchoring. Islands with a substantial pedestal base might be an exception if the base is extremely heavy and wide.
Q6: What if I want to move my kitchen island later?
A6: If you anticipate moving your island, you may opt for less permanent anchoring methods, such as using screws that can be removed or mounting plates that are easier to detach. However, even removable attachments will leave holes in your flooring. For islands with wheels, no floor attachment is typically used.
Q7: How do I secure a kitchen island with a granite countertop?
A7: Kitchen islands with granite countertops are usually quite heavy, so securing them firmly is essential. The cabinet base should be securely attached to the floor using robust floor mounting hardware and multiple anchoring methods. Ensure the attachment points can handle the significant weight of the granite.
Q8: What are the different types of island supports?
A8: Island supports can include furniture-style legs, which require secure leg attachments, or a solid pedestal base. Some islands might also use decorative but structurally important corbels or brackets. Each type of support needs to be firmly integrated into the island construction and secured to the floor if it contributes to the island’s overall stability.