
Can you paint laminate kitchen cabinets? Yes, you absolutely can paint laminate kitchen cabinets! With the right preparation and materials, you can transform your tired laminate cabinets into a fresh, modern focal point of your kitchen. This guide will walk you through everything you need to know for a successful and durable DIY laminate cabinet makeover.
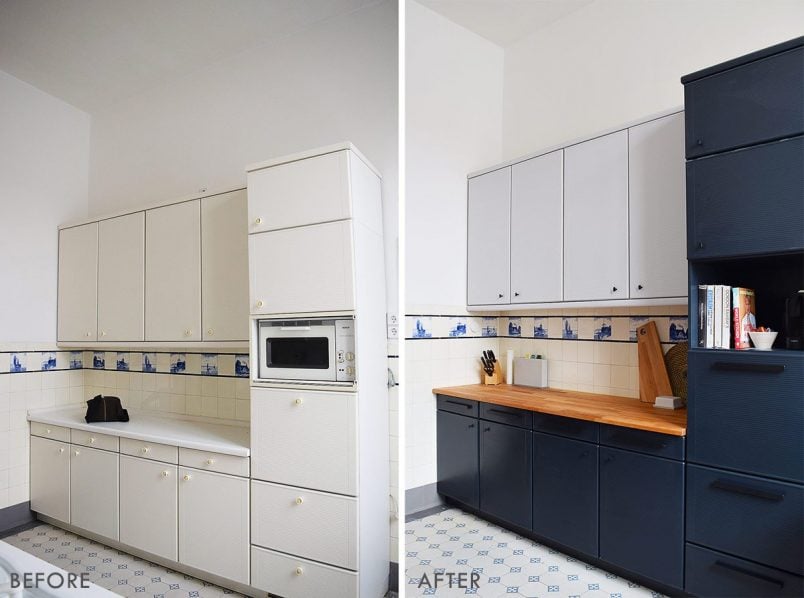
Image Source: www.littlehouseonthecorner.com
Why Paint Laminate Kitchen Cabinets?
Laminate cabinets, while budget-friendly and easy to clean, often lack the visual appeal of real wood. Over time, the laminate can chip, fade, or simply go out of style. Painting offers a cost-effective and creative way to:
- Update your kitchen’s aesthetic: Achieve a designer look without the hefty price tag of replacing cabinets.
- Extend the life of your cabinets: Cover up wear and tear, giving them a renewed lease on life.
- Personalize your space: Choose any color imaginable to match your kitchen decor.
- Boost home value: A fresh coat of paint can make a significant difference when selling your home.
Laminate Cabinet Refinishing: Pros and Cons
Before you dive in, it’s helpful to weigh the advantages and disadvantages of painting laminate cabinets.
Pros of Painting Laminate Cabinets
- Cost-Effective: Significantly cheaper than replacing cabinets or opting for a professional refacing.
- Customization: Offers complete control over color and finish.
- Accessibility: Many DIYers can achieve great results with careful planning.
- Time-Saving: Can often be completed in a weekend or two, depending on the project scope.
- Environmentally Friendly: Reusing existing cabinets is more sustainable than discarding them.
Cons of Painting Laminate Cabinets
- Durability Concerns: Without proper prep and the right products, paint can chip or peel.
- Time-Intensive Prep: The preparation stage is crucial and can be tedious.
- Potential for Unsightly Finish: Mistakes in application can lead to brush strokes, drips, or an uneven look.
- Not Always a Perfect Match: Some very glossy or textured laminates can be more challenging to get a perfectly smooth finish on.
Getting Started: Essential Supplies
Gathering the right tools and materials is key to a successful project.
Essential Tools
- Screwdriver (for removing hardware)
- Painter’s tape
- Drop cloths or old sheets
- Putty knife or scraper
- Sanding sponge (fine-grit, 150-220 grit)
- Orbital sander (optional, for larger areas)
- Clean cloths or tack cloths
- Paint rollers (foam or micro-fiber, suitable for cabinets)
- Paint brushes (high-quality synthetic for trim and details)
- Paint tray
Essential Materials
- Cleaner: Degreaser cleaner for cleaning laminate cabinets before painting. A good option is TSP (trisodium phosphate) substitute or a strong all-purpose cleaner.
- Primer: Best primer for laminate cabinets is a high-adhesion bonding primer. Look for primers specifically designed for slick surfaces like laminate or melamine.
- Paint: A durable paint for laminate is essential. Alkyd enamel or a high-quality acrylic latex enamel in a satin or semi-gloss finish is recommended for their durability and washability.
- Topcoat/Sealer (Optional but Recommended): A clear polyurethane or polycrylic topcoat adds an extra layer of protection.
Step-by-Step Guide to Painting Laminate Kitchen Cabinets
Following these steps diligently will help you achieve a professional-looking and long-lasting finish.
Step 1: The Crucial Prep Work – Prep Laminate Cabinets
This is arguably the most important step. Skipping or rushing this will compromise the longevity of your paint job.
Cleaning Laminate Cabinets Before Painting
- Remove Hardware: Take off all door handles, hinges, and drawer pulls. Place them in a baggie with screws so you don’t lose them.
- Deep Clean: Use your degreaser cleaner to thoroughly scrub down all cabinet surfaces. Laminate, especially in kitchens, accumulates grease and grime. You want a perfectly clean surface for the primer to adhere to.
- Rinse and Dry: Wipe down the cabinets with a damp cloth to remove any cleaner residue. Ensure cabinets are completely dry before proceeding.
De-glossing the Surface (Sanding vs. No Sanding)
This is where the debate often arises: painting laminate cabinets without sanding. While some bonding primers claim to adhere to slick surfaces without sanding, a light scuff-sanding is always recommended for maximum adhesion and durability.
Option A: Light Sanding (Recommended)
- Why Sand? Sanding creates a microscopic profile on the laminate surface, giving the primer something to grip onto. This significantly reduces the risk of peeling.
- How to Sand: Use a fine-grit sanding sponge (around 150-220 grit). Lightly sand all surfaces that will be painted. You don’t need to remove the laminate or scratch deeply; just dull the sheen.
- Clean Up: After sanding, wipe down all surfaces with a damp cloth to remove dust. Then, use a tack cloth to pick up any remaining fine particles.
Option B: No-Sanding Method (Use with Caution)
- When to Consider: If your laminate is very smooth and you’re using a high-quality bonding primer specifically designed for slick surfaces, you might be able to skip sanding.
- The Process: After thorough cleaning and drying, you would proceed directly to priming. However, be aware that this method carries a higher risk of adhesion failure over time.
Step 2: Priming for Adhesion
Applying a good primer is non-negotiable when painting laminate. The best primer for laminate cabinets is a bonding primer.
Choosing Your Primer
- Look for primers labeled “for laminate,” “for melamine,” “for slick surfaces,” or “high-adhesion.”
- Oil-based or shellac-based primers often offer superior adhesion to laminate but can have stronger fumes. Water-based bonding primers are also available and are easier to work with.
Applying the Primer
- First Coat: Apply a thin, even coat of primer. Use a high-quality synthetic brush for edges and corners, and a foam roller for larger flat surfaces. Avoid overloading your brush or roller, as this can lead to drips and an uneven finish.
- Drying Time: Allow the primer to dry completely according to the manufacturer’s instructions. This is crucial.
- Second Coat (If Needed): Some primers may require a second coat for full coverage or optimal adhesion. Inspect the first coat once dry.
- Light Sanding (Optional but Recommended): After the primer is fully dry, you can very lightly scuff-sand with an extra-fine grit (220-320 grit) sandpaper or a sanding sponge. This further smooths the surface and enhances paint adhesion. Wipe away dust with a tack cloth.
Step 3: Painting with the Right Laminate Cabinet Painting Technique
Now for the color! The laminate cabinet painting technique you use will impact the final look and feel.
Selecting Your Paint
- Type: For kitchens, a durable paint for laminate that can withstand moisture and cleaning is vital. Alkyd enamel paints offer excellent durability but can have stronger odors and longer drying times. High-quality acrylic latex enamels are more user-friendly and have low VOCs, but ensure they are specifically designed for high-traffic areas.
- Finish: Satin or semi-gloss finishes are generally preferred for kitchen cabinets. They are easier to clean and more resistant to moisture than a flat finish.
Application Methods
- Brush and Roller: This is the most common method for DIYers.
- Edges and Details: Use a high-quality synthetic angled brush for crisp lines on edges and around hardware holes.
- Flat Surfaces: Use a small foam roller or a micro-fiber roller for smooth, even coverage on cabinet doors and drawer fronts. Load the roller lightly to avoid drips.
- Spraying (Advanced): For the most professional, factory-like finish, spray painting is an option. This requires a paint sprayer and proper ventilation and masking. If you’re new to spraying, practice on scrap material first.
The Painting Process
- Thin, Even Coats: Apply thin, even coats of paint. It’s better to apply two or three thin coats than one thick one.
- Roller Technique: Load your roller with paint and roll it onto the surface in long, even strokes. Overlap each stroke slightly to avoid lines. Work in one direction.
- Brush Technique: Use smooth, consistent strokes with your brush. Don’t overwork the paint.
- Drying Between Coats: Allow each coat of paint to dry completely according to the manufacturer’s instructions before applying the next. This is crucial for durability.
- Multiple Coats: Most projects will require at least two coats of paint, and sometimes three, for full coverage.
Step 4: Finishing Laminate Cabinets for Durability
This final step adds a protective layer and enhances the lifespan of your painted cabinets.
Applying a Topcoat (Recommended)
- Purpose: A clear topcoat (polyurethane or polycrylic) protects the paint from scratches, moisture, and general wear and tear.
- Type: Water-based polycrylic is generally easier to work with, has low VOCs, and won’t yellow over time like some oil-based polyurethanes.
- Application: Apply 1-3 thin coats using a high-quality synthetic brush or foam applicator. Allow each coat to dry completely and lightly sand with extra-fine grit sandpaper (320-400 grit) between coats for a smoother finish. Ensure you wipe away all dust with a tack cloth after sanding.
Step 5: Reassembly
Once the paint and topcoat are completely cured (this can take several days to a week, so be patient!), you can reattach the hardware and rehang the cabinet doors and drawers.
Can You Use Chalk Paint on Laminate Cabinets?
Yes, you can use chalk paint laminate cabinets, but with some caveats. Chalk paint is known for its matte, chalky finish and its ability to adhere to many surfaces without extensive prep.
- Pros: Minimal prep (often just cleaning), unique matte finish.
- Cons: Chalk paint is porous and requires a protective topcoat (wax or polycrylic) to be durable, especially in a kitchen. The finish can be prone to water spots if not sealed properly. Reapplying a durable topcoat is essential for longevity.
If you choose chalk paint, the process would be:
1. Clean thoroughly.
2. Apply chalk paint in thin coats.
3. Allow to dry.
4. Apply wax or polycrylic for protection.
Chalk Paint vs. Enamel for Laminate Cabinets
| Feature | Chalk Paint | Enamel Paint (Acrylic/Alkyd) |
|---|---|---|
| Prep | Minimal (usually just cleaning) | Cleaning + light sanding (recommended) |
| Finish | Matte, chalky, velvety | Satin, semi-gloss, gloss (more durable sheen) |
| Durability | Requires significant topcoat for durability | Inherently more durable, especially with topcoat |
| Application | Easy, forgiving | Requires more care for smooth finish |
| Odor/VOCs | Typically low VOCs, less odor | Varies, alkyd can have strong odors |
| Topcoat | Essential (wax or polycrylic) | Recommended for extra protection |
| Best For | Desired matte look, quick refresh | Long-lasting, high-traffic areas, easier cleaning |
Frequently Asked Questions About Painting Laminate Cabinets
Q1: How long does it take for painted laminate cabinets to cure?
While paint might feel dry to the touch within hours, it takes much longer to fully cure. This means it reaches its maximum hardness and durability. Most paints and topcoats will take 3-7 days to fully cure. Avoid heavy use or aggressive cleaning during this period.
Q2: What’s the best way to clean painted laminate cabinets?
Use a soft cloth and mild soap with water. Avoid abrasive cleaners or scrub brushes, as these can damage the paint finish. Always dry the cabinets thoroughly after cleaning.
Q3: Can I paint over the laminate directly?
Yes, but only if you use the correct primer. The primer acts as an adhesion promoter, allowing the paint to stick to the slick laminate surface. Without it, the paint will likely peel.
Q4: My laminate cabinets have a very glossy finish. Will the paint stick?
Glossy finishes are the most challenging. Thorough cleaning and light sanding to dull the sheen are highly recommended. Using a high-adhesion bonding primer designed for slick surfaces is critical.
Q5: What if I make a mistake while painting?
For wet paint, use a damp cloth to gently wipe away the mistake. If the paint has already started to dry, you may need to lightly sand the area and reapply paint once dry. Always work in thin coats to minimize the visibility of touch-ups.
Q6: Is it worth painting laminate cabinets?
For most homeowners, the answer is yes! The cost savings compared to replacement or refacing are significant, and the visual transformation can be dramatic. The key to success is meticulous preparation and using the right products.
Conclusion: Your Dream Kitchen Awaits
Painting laminate kitchen cabinets is a rewarding DIY project that can completely transform your kitchen’s look and feel. By focusing on thorough preparation, using a high-quality bonding primer, selecting a durable paint, and employing a careful laminate cabinet painting technique, you can achieve a beautiful, long-lasting finish. Remember to be patient, follow each step carefully, and enjoy the process of creating your dream kitchen!