
Determining the right number of can lights for your kitchen is crucial for effective kitchen lighting design. A good starting point is to aim for one can light for every 4 to 6 feet in a grid pattern across your kitchen ceiling. This general rule helps ensure even illumination, but the precise number of recessed lights for kitchen spaces will depend on several factors. The primary goal is to achieve the right kitchen lighting requirements for both task and ambient lighting, creating a functional and inviting atmosphere.
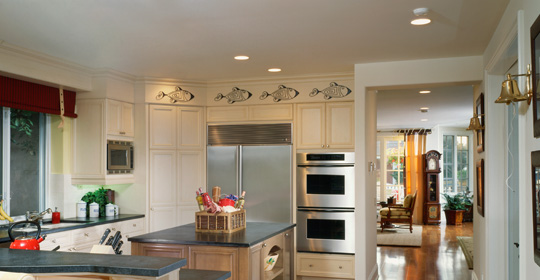
Image Source: www.lampsplus.com
Fathoming Your Kitchen Lighting Layout
Creating a functional and beautiful kitchen lighting layout involves more than just placing lights randomly. It’s about layering light to serve different purposes, from chopping vegetables to setting a mood. Can lights, also known as recessed lights, are a cornerstone of modern kitchen illumination. They offer a clean, uncluttered look while providing essential overhead light. However, getting the can light spacing right is key to avoiding dark spots or overly bright areas.
The Purpose of Can Lights in Your Kitchen
Can lights provide what’s known as ambient lighting. This is the general, overall light in a room. In the kitchen, good ambient lighting is vital for safety and general visibility. It’s the light you turn on when you first walk in, allowing you to see the space clearly.
Beyond ambient light, kitchens often benefit from task lighting and accent lighting. Task lighting is focused light directed where you need it most, such as over countertops where you prepare food. Accent lighting is used to highlight specific features, like artwork or cabinetry. While can lights primarily serve ambient purposes, their placement can also contribute to task lighting if positioned correctly.
Why Lighting Matters So Much in Kitchens
The kitchen is often the heart of the home. It’s where meals are prepared, families gather, and conversations flow. The quality of light directly impacts how the space feels and functions. Poor lighting can make a kitchen feel dim, cramped, and uninviting. Conversely, well-planned kitchen ceiling lights can make a space feel larger, brighter, and more pleasant.
Consider these key aspects of kitchen lighting:
- Task Performance: You need bright, even light to safely chop vegetables, read recipes, and perform other kitchen tasks.
- Atmosphere and Mood: The right lighting can make your kitchen a cozy place to relax or a vibrant hub for entertaining.
- Safety: Adequate lighting prevents accidents, especially in areas with heavy foot traffic or where sharp objects are used.
- Aesthetics: Proper lighting highlights the design elements of your kitchen, from cabinet finishes to backsplash tiles.
Calculating the Number of Recessed Lights for Your Kitchen
So, how to calculate can lights for your kitchen? Several methods and considerations go into this. The goal is to achieve even illumination without excessive fixtures.
The Foot-Candle Method
One common approach is to use foot-candles, a unit of illuminance. Different areas of the kitchen have different foot-candle requirements:
- General Kitchen Areas (walkways, dining areas): 10-20 foot-candles
- Countertops and Task Areas: 50-75 foot-candles
- Sink and Stovetop: 70-80 foot-candles
You can use a light meter or online calculators to estimate the foot-candles your chosen lights will produce at a certain height. This method is more technical but can yield very precise results.
The Grid Method: A Simpler Approach
A more straightforward way to calculate can lights is the grid method. This involves dividing your kitchen into equal sections based on the beam spread of your chosen can lights.
Formula:
- Room Length / Fixture Spacing = Number of Lights per Row
- Room Width / Fixture Spacing = Number of Rows
For example, if your kitchen is 15 feet long and you plan for lights with a 5-foot beam spread, you’d divide 15 by 5 to get 3 lights per row. If the kitchen is 10 feet wide, you’d divide 10 by 5 to get 2 rows. This would mean 6 lights in total.
Factors Influencing Can Light Needs
The simple grid method is a good starting point, but several factors will modify the ideal number of recessed lights for kitchen spaces:
- Ceiling Height: Higher ceilings require lights with wider beam spreads or more fixtures to achieve the same level of illumination on the floor.
- Room Size and Shape: Larger or irregularly shaped rooms may need more lights or a different layout than a simple rectangular space.
- Light Fixture Type: The wattage, lumen output, and beam angle of your chosen can lights will significantly impact how many you need.
- Cabinetry and Obstructions: The placement of upper cabinets, bulkheads, or other ceiling features can create shadows that need to be addressed with careful optimal can light placement.
- Task Lighting Integration: If you plan to rely on under-cabinet lighting for task illumination, you might need fewer overhead can lights.
- Personal Preference: Some people prefer brighter kitchens, while others like a softer ambiance.
Determining Can Light Spacing
Proper can light spacing is crucial for achieving even light distribution. Too close, and you’ll have overlapping pools of light; too far apart, and you’ll have dark areas.
General Guidelines for Can Light Spacing
A common rule of thumb for kitchen fixture spacing is to divide the ceiling height by two to get the ideal spacing between fixtures.
Formula:
- Ceiling Height (in feet) / 2 = Recommended Spacing (in feet)
So, for a standard 8-foot ceiling, you’d aim for lights to be spaced about 4 feet apart. For a 9-foot ceiling, you’d space them around 4.5 feet apart.
Spacing from Walls
It’s also important to consider spacing from walls. Generally, place the first row of can lights 2 to 3 feet away from the walls. This prevents harsh shadows directly against the cabinetry and ensures light reaches the edges of the room.
Spacing Over Specific Areas
- Work Surfaces: For countertops, ensure that there is at least one can light directly above the edge of the counter to provide ample task lighting without creating shadows from your body. This often means placing them closer to the wall where cabinets are.
- Island or Peninsula: If you have a kitchen island or peninsula, you’ll want to center the can lights over the surface to provide even lighting. The spacing here will depend on the width of the island and the beam spread of the lights.
Visualizing the Layout
It’s helpful to sketch out your kitchen on paper, marking cabinets, appliances, windows, doors, and the island. Then, draw a grid on top of this plan and experiment with different can light spacing patterns.
Choosing the Right Can Lights for Your Kitchen
Not all can lights are created equal. The type of fixture and bulb you select will affect the overall illumination and aesthetic.
Types of Recessed Lighting Fixtures
- Standard Baffled Trims: These are the most common. The baffle lining helps reduce glare. They are available in various sizes (e.g., 4-inch, 6-inch).
- Gimbal Trims: These allow you to aim the light in a specific direction, which is great for highlighting artwork or specific areas.
- Adjustable Trims: Similar to gimbals, these allow for tilting and sometimes even rotation.
- Eyeball Trims: These have a trim that pivots and tilts to direct light.
Bulb Types and Considerations
- LEDs: Light Emitting Diodes (LEDs) are the most energy-efficient and longest-lasting option. They come in a wide range of color temperatures, from warm white (around 2700K) to cool white (4000K) or daylight (5000K+). For kitchens, a neutral to cool white (3000K-4000K) is often preferred for good visibility.
- Wattage vs. Lumens: Don’t just look at wattage; focus on lumens, which measure brightness. A 60-watt incandescent bulb is roughly equivalent to 800 lumens.
- Beam Angle: This determines how wide the cone of light is. Wider beam angles (e.g., 90-120 degrees) are good for general ambient lighting, while narrower beams (e.g., 30-60 degrees) are better for accent lighting.
Sizing Your Can Lights
- 6-inch: These are common for general ambient lighting in larger rooms.
- 4-inch: These are more discreet and can be used in smaller kitchens or for more focused lighting. They are also good for creating a more modern, less obtrusive look.
Creating a Layered Lighting Scheme
A truly effective kitchen lighting design uses multiple layers of light. Can lights are just one part of the equation.
Ambient Lighting (Can Lights)
As discussed, this is your primary overhead illumination. The kitchen lighting layout using can lights should aim for even coverage.
Task Lighting
This is essential for food preparation. Common sources include:
- Under-Cabinet Lighting: LED strips or puck lights mounted beneath upper cabinets provide excellent, shadow-free light directly onto countertops.
- Pendant Lights: Often hung over kitchen islands or dining areas, pendants can provide focused task light while also serving as decorative elements.
- Recessed Lights: Strategically placed over work areas, can lights can also contribute to task lighting.
Accent Lighting
This layer adds visual interest and highlights architectural features or decor. Examples include:
- In-Cabinet Lighting: Lights inside glass-front cabinets can showcase dishware.
- Track Lighting: Can be used to direct light onto artwork or specific architectural details.
- Sconces: Wall-mounted fixtures can add decorative flair and a softer light.
Putting It All Together: Practical Examples
Let’s look at a couple of hypothetical kitchens to illustrate the principles of how to calculate can lights.
Example 1: Small, Standard Kitchen (10ft x 12ft, 8ft Ceiling)
For a kitchen this size, an 8-foot ceiling means lights should be spaced about 4 feet apart (8 ft / 2 = 4 ft).
- Lengthwise (12ft): 12 ft / 4 ft = 3 lights.
- Widthwise (10ft): 10 ft / 4 ft = 2.5. Round down to 2 rows to avoid being too crowded.
Layout: A 2×3 grid of lights, spaced approximately 4 feet apart.
- Place the first row 2 feet from one 10ft wall, then 4 feet for the next row, then 2 feet from the opposite 10ft wall.
- Place lights along each row about 3 feet from the 12ft walls, and then 4 feet apart.
This would mean 6 can lights total. If your primary work areas are along one wall, you might adjust the spacing to ensure a light is centered over that counter space.
Example 2: Large Kitchen with Island (15ft x 20ft, 9ft Ceiling)
With a 9-foot ceiling, aim for roughly 4.5-foot spacing (9 ft / 2 = 4.5 ft).
- Lengthwise (20ft): 20 ft / 4.5 ft ≈ 4.4. You’ll likely need 4 or 5 lights along the length.
- Widthwise (15ft): 15 ft / 4.5 ft ≈ 3.3. You’ll likely need 3 rows across the width.
Layout Consideration:
- Island: Let’s say the island is 3ft x 6ft and centered in the 20ft length. You’d want to center can lights over the island. For a 3ft wide island, two lights spaced about 3 feet apart might be ideal.
- Main Area: You might have two rows of lights flanking the island, spaced about 4.5 feet from the walls and 4.5 feet apart from each other.
This could result in:
* Two rows of 4 lights each for the main kitchen area (8 lights).
* Two lights centered over the island.
* Total: 10 can lights.
This is just an example; your specific kitchen’s layout and your preferences for lighting intensity will influence the final number. The goal is even coverage and adequate light where it’s needed most.
Avoiding Common Pitfalls in Kitchen Lighting
Even with the best intentions, kitchen lighting design can sometimes go wrong. Here are common mistakes to avoid:
The “Airport Runway” Effect
This happens when lights are spaced too evenly and too far apart, creating a linear, rather than diffused, light pattern. It can make the kitchen feel less inviting and create noticeable dark strips between the lights. Proper can light spacing and considering the beam spread are key to avoiding this.
Too Few Lights
It’s better to have a few extra lights on a dimmer than not enough. Under-lit kitchens are dim, uninviting, and can be hazardous.
Too Many Lights
Conversely, an excessive number of can lights can make a kitchen feel sterile or like an operating room, especially without dimmers. It can also be costly to install and operate.
Incorrect Beam Angle
Using lights with very narrow beam angles for general ambient lighting will create distinct spots of light with dark areas in between. Conversely, using very wide beam angles might not provide enough focused light on task areas.
Ignoring Dimmers
Dimmers are your best friend in kitchen lighting. They allow you to adjust the light levels for different activities and moods. Always install dimmers on your overhead recessed lighting kitchen fixtures.
Forgetting Task Lighting
Relying solely on overhead can lights for task lighting is a common mistake. Under-cabinet lighting is often essential for comfortable food preparation.
The Role of Dimmers and Smart Lighting
Modern technology offers excellent ways to control your kitchen lighting:
Dimmers
- Control Brightness: Dimmers allow you to adjust the intensity of your lights, from bright for cooking to low for a relaxed evening.
- Save Energy: Dimming lights reduces energy consumption.
- Extend Bulb Life: Especially with LED bulbs, dimmers can help prolong their lifespan.
Smart Lighting Systems
- App Control: Control lights from your smartphone or tablet.
- Voice Control: Integrate with smart home assistants like Alexa or Google Home.
- Scheduling: Set lights to turn on or off at specific times.
- Scene Creation: Design lighting “scenes” for different activities (e.g., “Cooking,” “Dinner,” “Relax”).
Frequently Asked Questions (FAQ)
Q1: How far apart should can lights be in a kitchen?
A general rule of thumb is to space can lights roughly half the ceiling height apart. For an 8-foot ceiling, aim for 4 feet apart. Also, place the first row of lights 2-3 feet from walls.
Q2: How many 6-inch can lights do I need for a 10×12 kitchen?
For a 10×12 kitchen with an 8-foot ceiling, using the spacing rule (4 feet), you would typically need a grid of 2 lights across the 10-foot width and 3 lights along the 12-foot length, totaling 6 lights.
Q3: Can I use can lights for task lighting in my kitchen?
Yes, but it’s best to place them strategically. For countertops, ensure a can light is positioned directly over the working edge to avoid shadows from your body. However, under-cabinet lighting is generally more effective for task illumination.
Q4: What’s the difference between 4-inch and 6-inch can lights?
6-inch cans are more common for general ambient lighting and provide a wider spread of light. 4-inch cans are more discreet and can be used for more focused lighting or in smaller spaces, offering a cleaner aesthetic.
Q5: Should I put can lights over my kitchen island?
Yes, centering can lights over a kitchen island provides excellent illumination for food prep and makes the island a focal point. The number and spacing will depend on the island’s size and the desired light intensity.
Q6: What is the best color temperature for kitchen lights?
For kitchens, a neutral to cool white light is often preferred for clarity and task performance. Look for bulbs in the 3000K to 4000K range. Warmer temperatures (2700K) can be used in dining areas within the kitchen for a cozier feel.
Q7: Do I need a dimmer for every kitchen light?
It’s highly recommended to have dimmers on all your overhead kitchen ceiling lights and potentially on other fixtures. Dimmers offer flexibility to adjust the light for different times of day and activities.
Q8: How do I calculate lumen requirements for my kitchen?
A general guideline is 20-30 lumens per square foot for general kitchen lighting. For task areas, you’ll want 50-75 lumens per square foot. Multiply your area (in square feet) by the desired lumens per square foot to get your total lumen requirement. Divide this by the lumens per bulb to find the number of bulbs needed.
By carefully considering your kitchen’s dimensions, ceiling height, the type of fixtures you choose, and the specific lighting needs of each area, you can create a well-lit, functional, and beautiful kitchen. Remember that layering light and using dimmers will provide the most versatile and effective lighting solution.