
Yes, you can absolutely change the colour of your kitchen cabinets yourself! This DIY guide will walk you through everything you need to know for a successful kitchen cabinet makeover, whether you’re aiming for a fresh coat of paint, a new stain, or a complete cabinet resurfacing.
Updating your kitchen cabinets is one of the most impactful ways to transform your kitchen’s appearance without a full renovation. Tired of those dated oak cabinets? Want a sleek, modern look? Changing the color of your kitchen cabinets is a rewarding project that can significantly boost your home’s aesthetic and value. This in-depth guide covers cabinet refinishing, painting kitchen cabinets, cabinet staining, and other cabinet update ideas to help you achieve professional-looking results on a DIY budget.
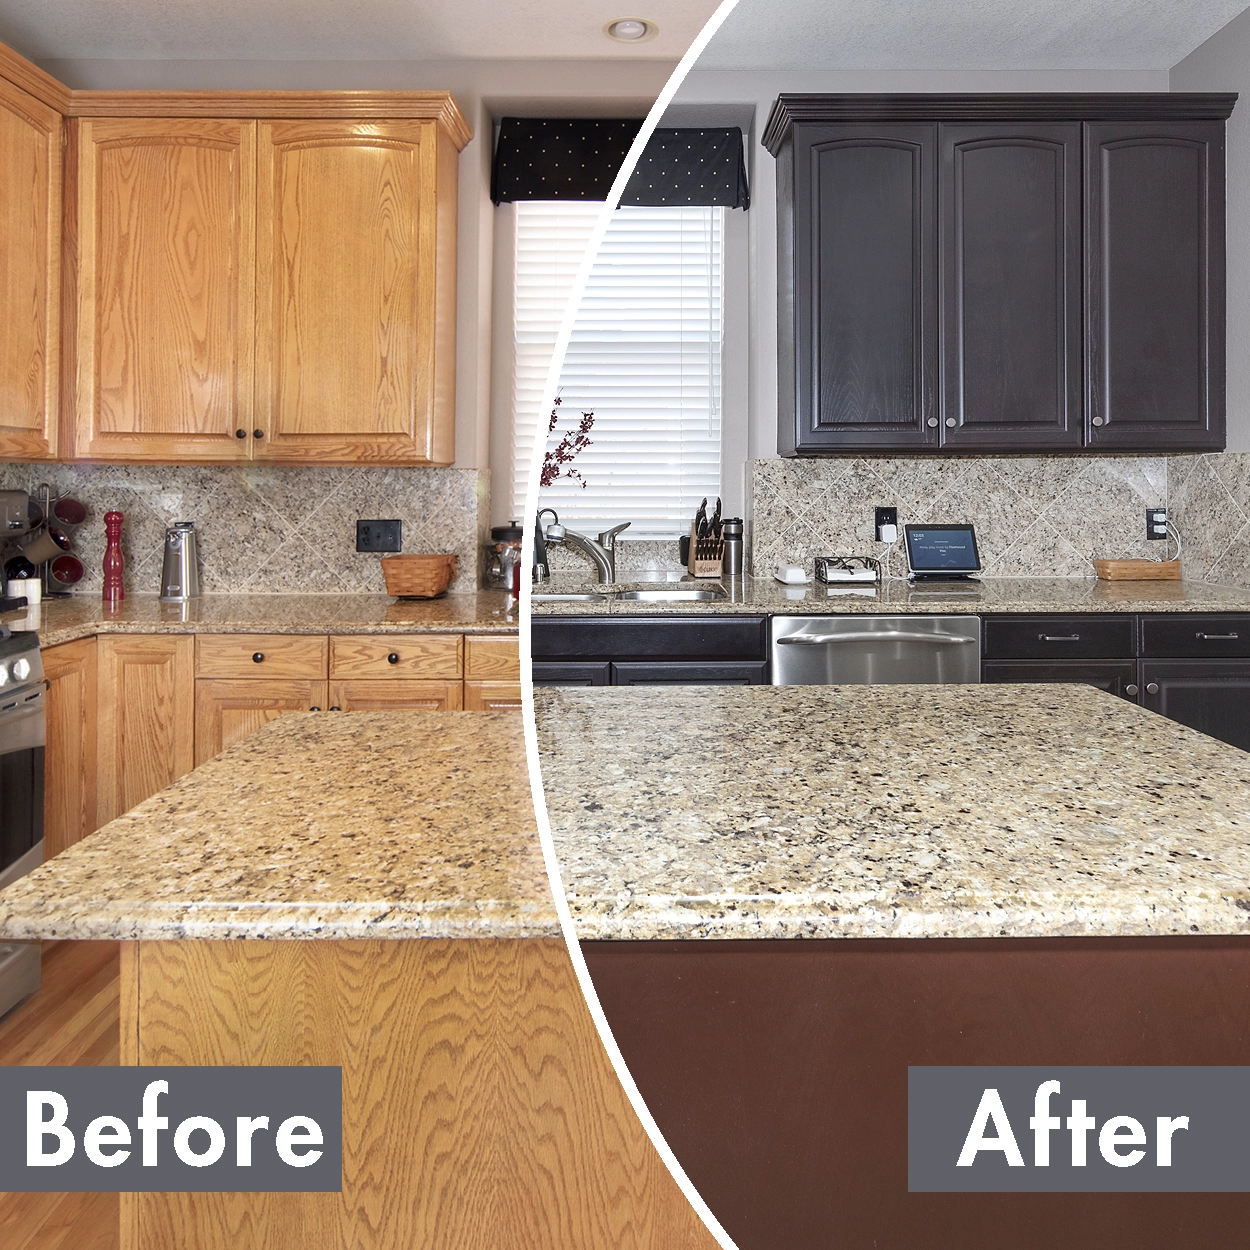
Image Source: www.nhance.com
Planning Your Kitchen Cabinet Makeover
Before you grab a paintbrush, careful planning is key to a successful cabinet update. This stage involves deciding on the final look, choosing the right products, and gathering all your supplies.
Choosing Your Cabinet Update Style
Consider your existing kitchen décor and the overall atmosphere you want to create.
- Classic White/Off-White: Always a popular choice, white cabinets offer a clean, bright, and timeless look. They make spaces feel larger and are versatile, pairing well with almost any countertop or backsplash.
- Grey Tones: From light, airy greys to deep charcoal, these shades provide a modern and sophisticated feel. They offer a nice alternative to white and can be very grounding.
- Bold Colors: Don’t be afraid of color! Navy blues, deep greens, or even a vibrant accent color on an island can add personality and make your kitchen stand out.
- Natural Wood Tones (Cabinet Staining): If your cabinets are solid wood but the color is dated (like orangey oak), cabinet staining can reveal beautiful grain patterns and achieve a more contemporary or warm look.
- Two-Tone Cabinets: Combine different colors on your upper and lower cabinets, or paint your island a contrasting shade. This adds visual interest and can highlight architectural features.
Deciding Between Painting and Staining
The best method for changing your cabinet color depends on the material of your existing cabinets and your desired finish.
- Painting:
- Best for: Laminate, thermofoil, or wood cabinets with a less desirable grain.
- Pros: Wide range of color options, can hide imperfections, offers a smooth finish.
- Cons: Can be labor-intensive to prepare properly, paint can chip if not applied correctly.
- Staining:
- Best for: Solid wood cabinets with attractive grain patterns.
- Pros: Enhances the natural beauty of the wood, durable finish.
- Cons: Limited color options compared to paint, requires careful sanding to remove old finishes, won’t hide significant wood imperfections.
- Cabinet Resurfacing: This often involves applying a new veneer or laminate over the existing cabinet doors and drawer fronts. It’s a more involved process, often best left to professionals, but can give a brand-new look. For DIY, we’ll focus on painting and staining.
Essential Supplies for Your Project
Gathering all your tools and materials beforehand will make the process smoother.
For Painting:
- Screwdriver (for removing hardware)
- Drop cloths or old sheets
- Painter’s tape
- Degreaser or TSP (trisodium phosphate) substitute
- Fine-grit sandpaper (150-220 grit)
- Sanding block or orbital sander
- Tack cloths
- Sanding sponge
- Wood filler (if needed)
- Cabinet primer (oil-based or water-based, depending on your paint)
- Paint (alkyd enamel or a high-quality latex paint specifically designed for cabinets)
- High-density foam rollers (for smooth surfaces)
- High-quality synthetic bristle paintbrushes (for details and edges)
- Paint tray
- Safety glasses
- Dust masks
- Gloves
- Optional: Paint sprayer for a factory-like finish
For Staining:
- All supplies listed above for painting (except primer and paint)
- Wood conditioner (if using pine or other softwoods)
- Wood stain in your chosen color
- Clean, lint-free cloths or foam applicators
- Polyurethane or other clear topcoat (satin, semi-gloss, or gloss)
Step-by-Step Guide to Painting Kitchen Cabinets
Painting kitchen cabinets is a popular and effective way to achieve a dramatic kitchen cabinet makeover. This process requires patience and attention to detail for a durable, beautiful finish.
1. Cabinet Cleaning and Prepping: The Foundation of Success
This is arguably the most crucial step for painting kitchen cabinets or any cabinet refinishing. Proper cabinet cleaning and prepping ensures your paint adheres properly and lasts for years.
- Empty Cabinets: Remove everything from inside your cabinets and drawers.
- Remove Doors and Drawers: Use your screwdriver to carefully detach all cabinet doors and drawer fronts. Label each piece with painter’s tape and a marker (e.g., “Upper Left,” “Drawer 1”) so you know exactly where it goes back.
- Remove Hardware: Unscrew hinges, handles, and knobs. Store them in a safe place, or plan to replace them as part of your cabinet hardware replacement.
- Clean Thoroughly: Kitchen cabinets are exposed to grease, food splatters, and general grime. Use a degreaser or a TSP substitute mixed with warm water. Scrub all surfaces, including the inside edges of the cabinet frames. Rinse with clean water and allow everything to dry completely. A clean surface is essential for paint adhesion.
2. Sanding for Optimal Adhesion
Sanding removes the existing finish (if any) and creates a slightly rough surface for the primer and paint to grip.
- Light Sanding: For most pre-finished cabinets (like laminate or thermofoil), a light sanding with 150-220 grit sandpaper is sufficient. You’re not trying to remove the entire finish, just dull it.
- Wood Cabinets: If you’re working with solid wood, you might need to sand more thoroughly, especially if there’s an old varnish or paint. Start with a slightly coarser grit (like 100-120) if needed, then move to 150-220 grit.
- Sanding Technique: Use a sanding block or an orbital sander for flat surfaces. For detailed areas or curves, use a sanding sponge. Always sand in the direction of the wood grain if applicable.
- Dust Removal: After sanding, wipe down all surfaces with a tack cloth to remove every speck of dust. This is vital for a smooth finish.
3. Repairing Imperfections
Inspect your cabinet doors and frames for any nicks, dents, or scratches.
- Wood Filler: For deeper imperfections, use wood filler. Apply it with a putty knife, pressing it firmly into the damaged area. Let it dry completely according to the product instructions.
- Sanding Filled Areas: Once dry, sand the filled areas smooth, flush with the surrounding surface. Use fine-grit sandpaper (220 grit). Again, wipe away all dust with a tack cloth.
4. Applying Cabinet Primer
Primer is your best friend when painting kitchen cabinets. It creates a uniform surface, blocks stains from bleeding through (especially important for wood), and ensures your topcoat adheres well.
- Choosing the Right Primer:
- Oil-based primer: Excellent for blocking stains and providing a very durable base, especially on wood. It has a strong odor and requires mineral spirits for cleanup.
- Water-based (latex) primer: Lower odor, easier cleanup with water. Many high-quality water-based primers are now formulated for excellent adhesion and stain blocking.
- Application:
- Doors and Drawers: Lay them flat on a protected surface. Apply a thin, even coat of primer using a high-density foam roller for the large, flat areas and a good quality paintbrush for edges and details. Work in thin, even coats.
- Cabinet Frames: Apply primer to the cabinet boxes while the doors are off. Use a brush for corners and edges, and a small roller for flat panels.
- Drying and Sanding: Allow the primer to dry completely according to the manufacturer’s instructions. Once dry, lightly sand any rough spots or drips with 220-grit sandpaper or a sanding sponge. Wipe away dust with a tack cloth. You may need a second coat of primer, especially if you’re painting over a dark color or dealing with wood that tends to bleed tannins.
5. Painting Your Kitchen Cabinets
Now for the exciting part! Applying the paint to achieve your desired cabinet update ideas.
- Choosing Paint:
- Type: Alkyd enamel or a high-quality acrylic enamel paint designed for cabinets is recommended. These paints offer durability, a hard finish, and resistance to chipping and moisture.
- Finish: Satin or semi-gloss finishes are popular for kitchens as they are durable and easier to clean. A matte finish can look beautiful but may be less forgiving with spills.
- Application Techniques:
- Doors and Drawers: Lay them flat. Apply paint in thin, even coats using a high-density foam roller for the panels and a good quality synthetic brush for the edges and details. Avoid overloading the roller or brush, which can lead to drips and an uneven finish.
- Cabinet Frames: Paint the frames similarly, using a brush for tight spots and a small roller for larger areas.
- Multiple Coats: Most projects require at least two, and often three, thin coats of paint for full coverage and durability.
- Drying Between Coats: Allow adequate drying time between coats as recommended by the paint manufacturer. Lightly sand with 320-grit sandpaper or a sanding sponge between coats if needed to smooth out any imperfections, then wipe with a tack cloth.
- Allow for Full Curing: Paint continues to harden and cure for several days or even weeks after it’s dry to the touch. Be gentle with your newly painted cabinets during this time.
6. Reassembling and Hardware Replacement
Once the paint has fully cured, it’s time to put everything back together.
- Reattach Hardware: If you’re keeping your old hardware, clean it thoroughly and reattach it.
- Cabinet Hardware Replacement: This is a great opportunity to update your look. New knobs, pulls, or even hinges can make a significant difference. Measure the existing hole spacing to ensure new hardware will fit without drilling new holes.
- Rehang Doors and Reinsert Drawers: Carefully reattach the doors and drawer fronts using the labels you made. Adjust hinges if necessary so doors hang straight and close properly.
Guide to Cabinet Staining for a Natural Look
If you have solid wood cabinets and love the idea of showcasing the wood grain, cabinet staining is an excellent choice for a sophisticated cabinet refinishing.
1. Preparing for Cabinet Staining
Similar to painting, preparation is paramount for successful cabinet staining.
- Remove Doors and Drawers: Follow the same steps as for painting to remove all doors, drawers, and hardware. Label everything.
- Strip Old Finish (If Necessary): If your cabinets have a thick varnish, poly or old paint, you’ll need to strip it. Chemical strippers are effective but require good ventilation and protective gear. Alternatively, thorough sanding can remove most finishes.
- Sanding:
- Initial Sanding: For cabinets that only need a refresh or after stripping, start with 100-120 grit sandpaper to remove any remaining finish.
- Progressive Sanding: Move up to 150-grit, then 180-grit, and finally 220-grit sandpaper. Ensure you sand in the direction of the wood grain.
- Cabinet Conditioner: For woods like pine, maple, or birch, applying a pre-stain wood conditioner is highly recommended. This helps the stain penetrate evenly and prevents blotchiness. Follow the product’s instructions for application and drying time.
2. Applying Wood Stain
Achieving an even and rich stain color requires care.
- Stain Application:
- Method: Apply the stain using a clean, lint-free cloth, foam applicator, or a brush. Work in small sections, applying the stain generously.
- Working the Stain: Immediately after applying, use a clean cloth to wipe off the excess stain. Move in the direction of the wood grain. The longer you leave the stain on before wiping, the darker the color will be.
- Testing the Stain: Always test your stain color on a scrap piece of the same wood, or on the back of a cabinet door, to ensure you like the result before committing to all your cabinets.
- Achieving Deeper Colors: For a darker, richer color, apply multiple coats of stain, allowing each coat to dry according to the manufacturer’s instructions before applying the next. Remember to wipe off excess after each application.
3. Sealing and Protecting Your Stained Cabinets
A protective topcoat is essential to seal the stain and protect the wood from moisture and wear.
- Choosing a Topcoat: Polyurethane (oil-based or water-based), varnish, or lacquer are common choices. For kitchens, a durable, moisture-resistant finish like a polyurethane in a satin or semi-gloss sheen is ideal.
- Application:
- Thin Coats: Apply the topcoat in thin, even coats using a high-quality synthetic brush or a foam roller.
- Light Sanding Between Coats: Allow each coat of topcoat to dry thoroughly. Then, lightly sand with 320-grit sandpaper or a fine-grit sanding sponge to smooth the surface and ensure good adhesion for the next coat. Wipe away dust with a tack cloth after each sanding.
- Number of Coats: Typically, two to three coats of topcoat are sufficient for good protection.
Other Cabinet Update Ideas
Beyond painting and staining, other methods can refresh your kitchen cabinets.
Cabinet Resurfacing (Professional Consideration)
While often a professional job, it’s worth mentioning. Cabinet resurfacing involves applying a new surface, like a thin veneer or laminate, over the existing cabinet fronts. This can give a completely new look without the mess of sanding and painting but is usually more expensive.
Replacing Doors and Drawer Fronts
For a drastic change or if your existing doors are damaged, you can replace just the doors and drawer fronts. You can order custom-sized doors to fit your existing cabinet boxes, then paint or stain them to match your desired aesthetic. This is a significant undertaking but can yield a like-new appearance.
Cabinet Hardware Replacement
As mentioned earlier, a simple cabinet hardware replacement can dramatically alter the style of your kitchen. Swapping out old, dated knobs and pulls for modern, sleek ones is a quick and relatively inexpensive DIY project that offers a significant visual upgrade. Consider the style of your kitchen and the finish of your cabinets when choosing new hardware.
Frequently Asked Questions (FAQ)
Q1: Can I paint over stained cabinets?
Yes, you can paint over stained cabinets, but proper preparation is key. You’ll need to clean, sand, and apply a good quality cabinet primer specifically designed for adhesion to glossy or stained surfaces.
Q2: How long does it take to paint kitchen cabinets?
The entire process, from preparation to reassembly, can take anywhere from a few days to a week or more, depending on the size of your kitchen, the number of coats, and drying times. Painting itself might take 2-3 days of active work, but you need to factor in drying and curing times between coats.
Q3: What is the best paint for kitchen cabinets?
The best paints are typically alkyd enamel or high-quality acrylic enamel paints formulated for cabinets. These offer durability, moisture resistance, and a hard finish that can withstand frequent use. Look for paints specifically labeled for cabinets or trim.
Q4: How do I get a smooth finish when painting cabinets?
Achieving a smooth finish involves several factors: thorough cabinet cleaning and prepping, light sanding between coats, using high-density foam rollers for flat surfaces, and applying thin, even coats of paint. Avoid overloading your brush or roller.
Q5: Do I need to prime wood cabinets before painting?
Yes, priming is highly recommended for wood cabinets, especially if they have knots or a tendency to bleed tannins (like red oak). Primer blocks stains, creates a uniform surface, and ensures better adhesion for your topcoat.
Q6: Can I update the color of my laminate or thermofoil cabinets?
Absolutely! Laminate and thermofoil cabinets can be painted, but they require thorough cleaning and sanding to create a surface the primer and paint can adhere to. Use a good quality primer designed for slick surfaces, and then follow with your chosen cabinet paint.
By following these detailed steps and tips, you can confidently tackle the project of changing the color of your kitchen cabinets. Whether you choose to paint, stain, or refresh your hardware, a kitchen cabinet makeover can revitalize your space and provide immense satisfaction. Enjoy your newly transformed kitchen!