
Image Source: www.mrrooter.com
Clean Sink Drain: How To Clean Kitchen Sink Drain With Garbage Disposal
A clean sink drain is essential for a hygienic and functional kitchen. If you’re wondering how to clean kitchen sink drain with garbage disposal, the answer is simpler than you might think. Regular cleaning and proper usage are key to maintaining your garbage disposal and preventing unpleasant odors and clogs. This comprehensive guide will walk you through everything you need to know about kitchen sink cleaning and garbage disposal maintenance.
Why a Clean Sink Drain Matters
A clogged or smelly sink drain can be more than just an annoyance; it can be a sign of bigger plumbing issues. Food particles, grease, and soap scum can build up over time, creating blockages and attracting bacteria. For homes with a garbage disposal, proper cleaning is even more critical to ensure it operates efficiently and safely. Neglecting your sink and disposal can lead to costly repairs and unpleasant kitchen conditions.
Essential Tools for the Job
Before you begin your sink drain and garbage disposal cleaning, gather these helpful items:
- Rubber gloves: To protect your hands.
- Old toothbrush or small scrub brush: For getting into tight spaces.
- Baking soda: A natural abrasive and deodorizer.
- White vinegar: A powerful cleaning agent that reacts with baking soda.
- Dish soap: For general cleaning.
- Ice cubes: To help scour the disposal blades.
- Citrus peels (lemon, lime, orange): For a fresh scent and mild cleaning.
- Plunger: For more stubborn clogs.
- Drain snake or auger: For deeper blockages.
- Bucket: To catch any debris or water.
Step-by-Step Guide: How to Clean Your Kitchen Sink Drain and Garbage Disposal
Here’s a detailed plan to tackle your sink drain and garbage disposal, covering various cleaning and unclog sink drain techniques.
Step 1: Preparation and Safety First
- Turn off the power: This is crucial for safety when working with a garbage disposal. Locate the switch that controls your disposal (often under the sink or on the wall nearby) and turn it off. For extra safety, you can also trip the breaker for the kitchen.
- Clear the sink: Remove all dishes, sponges, and any other items from the sink basin.
- Protect yourself: Put on your rubber gloves.
Step 2: Cleaning the Sink Basin
Start with the visible parts of your kitchen sink.
- Scrub the basin: Use a sponge or cloth with warm water and dish soap to scrub the entire sink basin. Pay attention to the edges, corners, and around the drain.
- Rinse thoroughly: Rinse the sink basin with clean water.
Step 3: Addressing the Garbage Disposal – The Core of Kitchen Sink Cleaning
This is where you’ll focus on the disposal itself.
- Remove visible debris: Use tongs or pliers to carefully remove any large pieces of food or debris that you can see inside the disposal chamber. Never put your hands into the disposal.
- The Baking Soda and Vinegar Method: This is a fantastic and natural way to deep clean your disposal and pipes.
- Pour baking soda: Pour about half a cup to a full cup of baking soda directly into the disposal drain.
- Add vinegar: Slowly pour about one cup of white vinegar over the baking soda. You’ll see a fizzy reaction, which helps loosen grime and deodorize.
- Let it sit: Allow the mixture to bubble and work for about 10-15 minutes.
- Flush with hot water: After the fizzing subsides, run hot water down the drain for a minute or two to flush away the loosened debris.
- Using Ice Cubes: Ice can help harden grease and scrape away stubborn residue from the disposal’s grinding components.
- Fill the disposal with ice: Place several ice cubes into the disposal.
- Run the disposal (briefly): Turn the power back on for your disposal and run it with cold water for about 30 seconds. The ice will help scour the inside of the disposal.
- Turn off the disposal and rinse: Turn off the disposal and flush with more cold water.
- Citrus Peels for Freshness: This is a simple but effective method for a pleasant scent.
- Grind citrus peels: Cut up some lemon, lime, or orange peels into small pieces.
- Run through disposal: Feed the citrus peels into the disposal one by one while running cold water. This will help clean the blades and leave a fresh aroma.
Step 4: Cleaning the Sink Drain Itself
Beyond the disposal, the drain pipes can also accumulate gunk.
- Hot Water Flush: After cleaning the disposal, run a continuous stream of hot water down the drain for several minutes. This helps melt away any grease or soap buildup in the pipes.
- Baking Soda and Hot Water: If odors persist or you suspect minor buildup, pour about half a cup of baking soda down the drain, followed by a kettle of boiling water (be careful not to splash yourself). Let it sit for 15-20 minutes, then flush with more hot water. This is a simple yet effective drain cleaning hack.
Step 5: Dealing with Clogs – How to Unclog Sink Drain
If you notice slow draining or a complete blockage, it’s time to unclog sink drain.
- The Plunger Method:
- Create a seal: Ensure there’s enough water in the sink to cover the plunger’s rubber cup. If you have a double sink, block the other drain with a wet cloth or stopper to create better suction.
- Plunge vigorously: Place the plunger over the drain opening and plunge up and down forcefully several times.
- Check drainage: Remove the plunger and see if the water drains. Repeat if necessary.
- Using a Drain Snake (Auger): For tougher clogs, a drain snake is invaluable for kitchen plumbing maintenance.
- Insert the snake: Feed the end of the snake into the drain opening.
- Crank the handle: As you push the snake into the pipe, crank the handle to help it navigate bends and break up or snag the clog.
- Retrieve the clog: Once you feel resistance or believe you’ve hooked the clog, slowly pull the snake back out, bringing the debris with it.
- Flush the drain: Run hot water to clear any remaining debris.
Disposal Cleaning Tips: Beyond the Basics
To keep your garbage disposal in top shape and to actively prevent drain clogs, consider these advanced disposal cleaning tips:
- Regular Flushing: Always run plenty of cold water when using the disposal, and let it run for about 15-30 seconds after grinding is complete. This helps flush food particles through the pipes.
- Avoid Problematic Foods: Certain foods are notorious for causing issues in garbage disposals and contributing to clogs. These include:
- Fibrous vegetables (celery, corn husks, asparagus)
- Grease, oil, and fat (they solidify in pipes)
- Coffee grounds (they clump together)
- Eggshells (can dull blades and create a gritty paste)
- Starchy foods (pasta, rice – they expand)
- Fruit pits and seeds
- Bones and tough meat scraps
- Rinse After Use: Even with acceptable foods, a good rinse with cold water after each use is beneficial.
- Monthly Deep Clean: Implement the baking soda and vinegar method at least once a month to keep the disposal fresh and clean.
Preventing Drain Clogs: Proactive Kitchen Plumbing Maintenance
The best approach to a clean sink drain is to prevent drain clogs from happening in the first place. Consistent garbage disposal maintenance and mindful usage are your best defenses.
What Not to Put Down the Garbage Disposal
A critical aspect of kitchen plumbing maintenance is knowing what to avoid. Here’s a list of items that should never go into your garbage disposal:
- Non-food items: Such as paper towels, plastic, metal, glass, and sponges.
- Grease, oil, and fats: These solidify and coat pipes, leading to severe blockages.
- Fibrous materials: Like celery stalks, corn husks, artichokes, and rhubarb. They don’t grind well and can wrap around the blades.
- Starchy foods: Rice, pasta, and bread can expand with water and form a sticky mass.
- Coffee grounds and eggshells: While often debated, they can accumulate and contribute to clogs over time.
- Hard items: Fruit pits, bones, and shells can damage the disposal blades.
- Chemical drain cleaners: These are harsh and can damage your plumbing and the disposal unit itself.
Best Practices for Disposal Usage
- Always run cold water: Cold water solidifies any grease, allowing the disposal to grind and flush it away more effectively. Hot water can melt grease, which then re-solidifies further down the pipe.
- Feed food gradually: Don’t overload the disposal. Feed food scraps slowly, allowing the disposal to grind them completely before adding more.
- Cut large items: If you are disposing of larger items, cut them into smaller pieces first.
- Run disposal until clear: Ensure all food has been ground before turning off the disposal. Continue running water for about 15-30 seconds afterward.
Troubleshooting Common Disposal Issues
| Issue | Possible Cause | Solution |
|---|---|---|
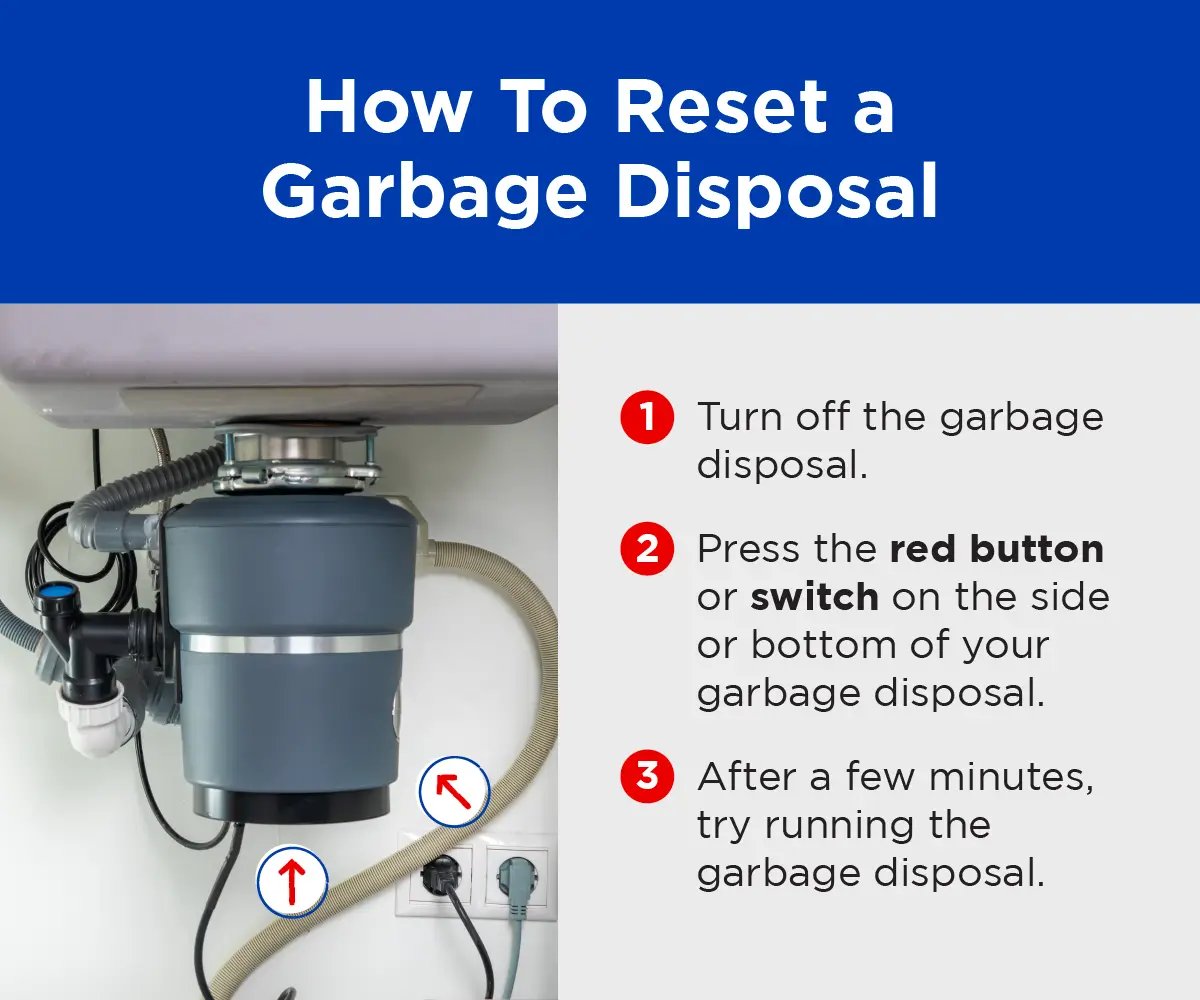
| Disposal won’t turn on | No power, tripped reset button, or jammed motor | Check power switch/breaker. Locate and press the reset button (usually red, on the bottom of the unit). Check for jams (turn off power first!). |
| Leaking Disposal | Loose connections, damaged seals, or cracked housing | Inspect all connections under the sink. Tighten if loose. If the housing is cracked, replacement is likely needed. |
| Grinding Noises | Foreign object in the disposal | Turn off power. Use tongs or pliers to remove foreign objects. |
| Slow Draining | Partial clog in the disposal or drain pipes | Try the plunger or drain snake method. Perform a deep clean with baking soda and vinegar. |
| Unpleasant Odors | Food debris stuck in the disposal or pipes | Clean with baking soda and vinegar, ice, and citrus peels. Ensure regular use and proper flushing. |
When to Call a Professional Plumber
While many sink drain and garbage disposal issues can be handled with DIY methods, there are times when professional help is necessary.
- Persistent Clogs: If you’ve tried plungers and drain snakes without success, the clog might be too deep or severe for home remedies.
- Recurring Problems: If you constantly battle clogs or odors, there might be a more significant underlying issue with your plumbing system that requires expert diagnosis.
- Disposal Leaks: Significant leaks, especially from the disposal unit itself, can indicate damage that needs professional repair or replacement.
- Electrical Issues: If you suspect an electrical problem with the disposal, do not attempt to fix it yourself. Contact a qualified electrician or plumber.
Frequently Asked Questions (FAQ)
Q: How often should I clean my garbage disposal?
A: It’s a good practice to clean your garbage disposal at least once a month using the baking soda and vinegar method. Regular flushing after each use also contributes to its cleanliness.
Q: Can I use commercial drain cleaners in my garbage disposal?
A: It is generally not recommended to use harsh chemical drain cleaners in your garbage disposal. They can damage the unit’s seals and blades and are often too aggressive for the disposal’s components. Natural methods are safer and more effective for routine cleaning.
Q: What are the best foods to grind in a garbage disposal?
A: Softer, easily ground foods are best, such as small pieces of fruit and vegetables (excluding fibrous ones), cooked leftovers, and small scraps. Always run plenty of cold water.
Q: My disposal is making a loud noise, what should I do?
A: Immediately turn off the power to the disposal. There might be a foreign object lodged inside. After ensuring the power is off, use tongs or pliers to carefully remove any visible objects. Never use your hands.
Q: How can I eliminate odors from my sink drain?
A: Odors are usually caused by trapped food debris. Cleaning the disposal with baking soda and vinegar, followed by flushing with hot water and grinding citrus peels, is a very effective way to eliminate these smells.
By implementing these cleaning routines and best practices, you can ensure your kitchen sink drain remains clean and your garbage disposal operates efficiently, contributing to a healthier and more pleasant kitchen environment. Regular kitchen plumbing maintenance saves you time, money, and hassle in the long run.