
Designing a kitchen cabinet layout perfectly involves considering the “work triangle” and “kitchen zoning” for optimal workflow, ensuring ample “kitchen storage solutions,” and integrating “kitchen appliance placement” seamlessly.
Creating a kitchen cabinet layout that is both beautiful and functional is a key goal for any homeowner embarking on a renovation or building a new home. A well-designed layout makes cooking, cleaning, and entertaining a joy, rather than a chore. But how do you achieve that perfect balance? This comprehensive guide will walk you through the essential “Kitchen cabinet design principles” and “Kitchen layout ideas” to help you craft an efficient and aesthetically pleasing space.
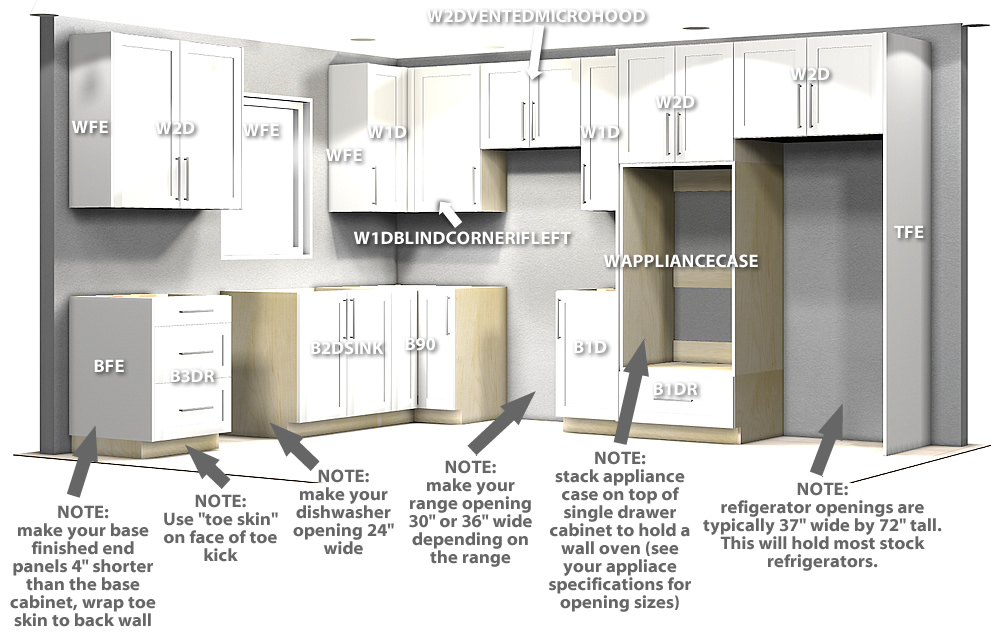
Image Source: www.barkercabinets.com
Fathoming the Foundation: The Work Triangle
At the heart of many “functional kitchen layouts” lies the concept of the work triangle. This principle, developed decades ago, connects the three primary work areas in the kitchen: the sink, the refrigerator, and the stove/cooktop. The idea is that these three points should form a triangle with legs that are not too short (leading to cramped working conditions) and not too long (causing unnecessary travel).
The Three Points of the Triangle
- The Sink: This is where food preparation begins, and dishes are washed. It’s often the central hub of activity.
- The Refrigerator: This is where food is stored, from fresh produce to frozen items. Accessing ingredients is crucial.
- The Stove/Cooktop: This is where cooking happens. Moving hot pots and pans safely is a priority.
Ideal Dimensions for the Work Triangle
While there are no strict rules, general guidelines suggest:
- Each leg of the triangle: Should ideally be between 4 feet and 9 feet long.
- The sum of the legs: Should be between 13 feet and 26 feet.
- No single leg: Should be less than 4 feet or more than 9 feet.
- Obstructions: The work triangle should be free of major obstructions like islands or dining tables.
Adapting the Work Triangle for Modern Kitchens
In larger or more complex kitchens, the simple work triangle can be expanded upon. Many modern kitchens incorporate multiple work zones, making the concept of “kitchen zoning” even more important. Think of a kitchen with a primary prep area, a baking station, and a beverage center.
Implementing Kitchen Zoning for Optimal Workflow
“Kitchen zoning” takes the work triangle concept a step further by dividing the kitchen into distinct areas, each dedicated to specific tasks. This approach enhances “optimal kitchen workflow” by reducing clutter and streamlining movement.
Core Kitchen Zones
- Prep Zone: This is the primary area for chopping, mixing, and assembling food. It typically includes ample counter space, often located between the sink and the cooktop. Consider your “cabinetry dimensions” here to ensure enough usable countertop.
- Cooking Zone: Centered around the stove or cooktop, this zone also includes ovens and microwaves. Easy access to utensils, pots, and pans is essential.
- Cleaning Zone: Dominated by the sink, dishwasher, and trash/recycling bins. Proximity to storage for cleaning supplies is key.
- Storage Zone: This encompasses the refrigerator, pantry, and cabinets where dry goods, canned items, and cookware are stored.
- Serving/Eating Zone (Optional): In larger kitchens, this could be a breakfast bar or a nearby dining area.
Designing Within Zones
When designing your cabinet layout, think about which zones are most important for your cooking style. If you do a lot of baking, ensure your prep zone is generous and conveniently located near your pantry and mixing appliances. If you entertain often, consider how your zones will facilitate serving guests.
Strategic Cabinet Placement Strategies
The placement of your cabinets is paramount to achieving a functional and aesthetically pleasing kitchen. “Cabinet placement strategies” should always prioritize ease of access, workflow, and safety.
The Foundation of Placement: The Kitchen Layout
Before placing cabinets, you need to establish your overall kitchen layout. Common layouts include:
- Galley Kitchen: Two parallel runs of cabinets and countertops. Excellent for smaller spaces and offers efficient workflow.
- L-Shaped Kitchen: Cabinets and countertops along two adjoining walls. Offers good workspace and can incorporate a dining area.
- U-Shaped Kitchen: Cabinets and countertops along three walls. Provides abundant storage and workspace, with minimal traffic flow interruption.
- Island Kitchen: Incorporates a central island with cabinets, countertops, and potentially appliances. Adds significant workspace and storage, ideal for larger kitchens.
- Peninsula Kitchen: Similar to an island but attached to a wall or cabinet run. Good for defining spaces and adding extra counter area.
Key Considerations for Cabinet Placement
- Countertop Space: Ensure adequate, uninterrupted countertop space in your prep zone.
- Appliance Proximity: Place cabinets containing frequently used items near the appliances they are associated with (e.g., pots and pans near the stove, dishes near the dishwasher).
- Traffic Flow: Avoid placing cabinets or appliances in ways that block essential pathways. Aim for at least 36 inches of clearance for walkways.
- Door and Drawer Clearance: Make sure all cabinet doors and drawers can open fully without hitting other cabinets, appliances, or walls. This is a crucial aspect of “ergonomic kitchen design.”
- Wall Cabinets: Position these at a comfortable height, typically 18 inches above the countertop, to allow for easy access to items and comfortable working below.
- Base Cabinets: These provide the bulk of your storage. Consider the internal configurations (drawers vs. shelves) based on what you’ll be storing.
Optimizing Kitchen Storage Solutions
Effective “kitchen storage solutions” are the backbone of an organized and stress-free kitchen. Your cabinet layout directly dictates how well you can store everything.
Types of Cabinets and Their Uses
- Base Cabinets: The workhorses of kitchen storage.
- Standard Base Cabinets: Typically 34.5 inches high and 24 inches deep. Come with shelves or drawers.
- Sink Base Cabinets: Designed to accommodate a sink and plumbing, usually wider than standard base cabinets.
- Corner Base Cabinets: Address awkward corner spaces, often featuring Lazy Susans or pull-out shelves for accessibility.
- Wall Cabinets: Mounted above countertops.
- Standard Wall Cabinets: Common depths are 12 or 13 inches. Heights vary (e.g., 30, 36, 42 inches).
- Tall or Pantry Cabinets: Extend from floor to ceiling, providing significant storage for food or small appliances.
- Specialty Cabinets:
- Drawer Bases: Offer excellent accessibility for pots, pans, and smaller items.
- Appliance Garages: Conceal small appliances like toasters or blenders.
- Trash Pull-outs: Integrate waste and recycling bins discreetly.
- Spice Racks/Pull-outs: Slim cabinets designed for spice organization.
Maximizing Storage Within Cabinets
- Drawers vs. Shelves: For base cabinets, drawers are generally more efficient, allowing you to see and access everything easily. Shelves can work well for larger items.
- Drawer Organizers: Use dividers and trays to keep utensils, spices, and other small items tidy.
- Adjustable Shelves: Allow you to customize shelf height to accommodate various items.
- Pull-out Shelves/Trays: Make accessing items in the back of deep cabinets much easier, especially in base cabinets.
- Vertical Dividers: Perfect for storing baking sheets, cutting boards, and platters upright.
- Corner Solutions: Lazy Susans, corner drawers, or magic corners transform dead corner space into usable storage.
Integrating Kitchen Appliance Placement
“Kitchen appliance placement” is a critical element of cabinet design. Appliances are often the largest components and must be integrated thoughtfully into your layout.
Key Appliance Placement Considerations
- Refrigerator:
- Work Triangle: Place it as a point in your work triangle.
- Door Swing: Ensure the refrigerator door can open fully without obstruction. Consider the swing direction – a right-hinged door might be inconvenient if it opens into a main walkway.
- Counter Depth: For a sleeker look and to prevent the fridge from protruding too far into the room, consider a counter-depth model, but be aware of slightly reduced internal capacity.
- Oven and Cooktop:
- Work Triangle: Position them as another point in your work triangle.
- Ventilation: Ensure proper ventilation is installed above the cooktop.
- Wall Oven: Often placed in a cabinet run, freeing up counter space. Consider its proximity to the refrigerator and sink for efficient meal prep.
- Dishwasher:
- Proximity to Sink: It should be adjacent to the sink for easy loading and plumbing access.
- Drawer Clearance: Ensure its door can open without interfering with other cabinet doors or drawers.
- Microwave:
- Convenience: Place it at a comfortable height, either on the counter, above the range (as a vent-hood combo), or built into cabinetry.
- Countertop Microwave: If placed on the counter, ensure it doesn’t take up valuable prep space.
- Built-in Microwave: Offers a cleaner look but requires dedicated cabinetry.
Standard Cabinetry Dimensions and Appliance Integration
Knowing standard “cabinetry dimensions” is crucial when planning appliance placement.
| Appliance Type | Typical Widths (inches) | Depth (inches) | Height (inches) | Cabinetry Considerations |
|---|---|---|---|---|
| Refrigerator | 30-36 | 25-36 | 67-72 | Ensure adequate clearance for door swing. Consider surrounding panels for a built-in look. Check electrical outlet placement. |
| Dishwasher | 24 | 24 | 34-35 | Typically fits in a standard 24-inch base cabinet. Ensure plumbing and electrical hookups are accessible. |
| Standard Range | 30 | 25-28 | 36 | Requires a 30-inch base cabinet opening. Ensure proper ventilation and electrical/gas hookups. |
| Wall Oven (Single) | 24-30 | 24 | 27-30 | Requires a dedicated cabinet opening (e.g., 24-inch or 30-inch wide, 27-30-inch high). |
| Microwave (Built-in) | 24-30 | 20-24 | 15-20 | Requires a specific cabinet opening. Consider ventilation requirements if installed above a range. |
Note: These are general dimensions; always check the specific appliance specifications.
Prioritizing Ergonomic Kitchen Design
“Ergonomic kitchen design” focuses on creating a kitchen that is comfortable, safe, and efficient for the user. This means considering the physical demands of cooking and ensuring your cabinet layout supports healthy movement.
Key Ergonomic Principles
- Reach and Accessibility: Place frequently used items at an easy reach height (between waist and shoulder level). Less-used items can be placed higher or lower.
- Countertop Heights: Standard countertop height is 36 inches. However, consider variations for specific tasks. A lower counter (around 30-32 inches) can be more comfortable for chopping or baking.
- Knee Space: Provide knee space under areas where you’ll be standing for extended periods, like a prep area or a small desk, if applicable.
- Clearance: Maintain adequate clearance around appliances and in walkways to prevent bumps and strains.
- Lighting: Good task lighting is crucial for safety and comfort, especially over prep areas and the cooktop.
- Minimize Bending and Reaching: Utilize pull-out shelves, drawers, and tiered organizers to reduce the need to bend down or stretch excessively.
Applying Ergonomics to Cabinetry
- Drawer Placement: Prioritize drawers in base cabinets for better accessibility to contents. Place heavier items in lower drawers.
- Wall Cabinet Height: The standard 18-inch clearance between countertops and wall cabinets is generally ergonomic, but adjust slightly based on user height.
- Appliance Height: Consider whether a wall oven is more ergonomic than a range oven for your needs.
- Corner Cabinet Accessibility: Invest in solutions like Lazy Susans or pull-out corner mechanisms to make corner cabinets easy to use.
Achieving Beautiful and Functional Kitchen Layout Ideas
Beyond pure function, your kitchen cabinet layout contributes significantly to the overall aesthetic of your home.
Balancing Form and Function
- Visual Appeal: Choose cabinet styles, finishes, and hardware that complement your home’s decor.
- Symmetry and Balance: Consider how the cabinets will look visually across the room. Even layouts can create a sense of order.
- Open Shelving: Can add visual lightness and display space, but requires careful organization.
- Cabinet Depth: Standard base cabinets are 24 inches deep, but shallower options (15-18 inches) are available for smaller kitchens or specific needs.
- Appliance Integration: Integrated appliances that are hidden behind cabinet panels create a seamless, high-end look.
Popular Kitchen Layout Configurations
- Single Wall Kitchen: All cabinets and appliances are on one wall. Best for very small spaces.
- Galley Kitchen: Two parallel walls of cabinets. Efficient for smaller footprints.
- L-Shaped Kitchen: Cabinets on two adjacent walls. Flexible and good for open-plan living.
- U-Shaped Kitchen: Cabinets on three walls. Maximizes workspace and storage.
- Island Kitchen: Adds a focal point, extra storage, and workspace. Requires ample floor space.
- Peninsula Kitchen: Similar to an island but attached to a wall. Defines spaces and adds counter area.
Frequently Asked Questions (FAQ)
Q1: What is the most important principle when designing a kitchen cabinet layout?
A1: The most important principle is creating an efficient workflow by considering the work triangle and kitchen zoning. This ensures that the essential work areas (sink, refrigerator, stove) are logically placed for ease of movement and task completion.
Q2: How much counter space do I need?
A2: Aim for at least 9 linear feet of continuous counter space. For the prep zone, at least 36 inches of clear counter space is ideal, ideally located between the sink and the cooktop.
Q3: Can I put a cabinet in a corner without wasting space?
A3: Yes, by using specialized corner cabinet solutions like Lazy Susans, pull-out shelves, or corner drawers. These maximize accessibility and prevent that space from becoming a dead zone.
Q4: What is the standard height for wall cabinets?
A4: Standard wall cabinets are typically mounted 18 inches above the countertop. This height provides enough clearance for most tasks and access to items stored within.
Q5: How do I decide between drawers and shelves in base cabinets?
A5: Drawers are generally preferred for base cabinets as they offer better visibility and accessibility to contents, especially for pots, pans, and smaller appliances. Shelves are more suitable for larger, infrequently accessed items.
Q6: What are the essential “cabinetry dimensions” to know?
A6: Key dimensions include standard base cabinet height (34.5 inches), depth (24 inches), and width (typically starting from 9 inches up to 36 inches or more). Wall cabinet depths are usually 12-13 inches, with varying heights. Always refer to specific appliance requirements.
Q7: How does “kitchen appliance placement” affect cabinet design?
A7: Appliance placement dictates the size and type of cabinets needed. For example, a dishwasher requires a specific base cabinet opening, while a wall oven needs a dedicated tall cabinet. The refrigerator’s door swing also influences nearby cabinet placement.
Q8: What makes a kitchen layout “ergonomic”?
A8: An ergonomic kitchen layout minimizes unnecessary bending, reaching, and stretching. This is achieved through thoughtful placement of appliances and cabinets, appropriate countertop heights, and the use of accessible storage solutions like drawers and pull-out shelves.
Q9: What are some good “kitchen layout ideas” for small spaces?
A9: For small spaces, galley kitchens or L-shaped layouts are very effective. Utilizing vertical space with taller wall cabinets and incorporating multi-functional elements like a rolling island can also maximize efficiency.
Q10: How can I ensure my “cabinet placement strategies” are effective?
A10: Effective strategies involve creating a functional work triangle, implementing kitchen zoning, ensuring adequate clearance for movement and appliance doors, and prioritizing accessibility for frequently used items.
By carefully considering these “Kitchen cabinet design principles,” “Kitchen layout ideas,” and “Cabinet placement strategies,” you can design a kitchen that is not only beautiful but also supremely functional, supporting “optimal kitchen workflow” and providing excellent “kitchen storage solutions.” Remember to always prioritize “ergonomic kitchen design” and the seamless integration of “kitchen appliance placement” to create a truly perfect kitchen.