
Can I measure for kitchen countertops myself? Yes, you can! This comprehensive guide will walk you through the process of getting accurate kitchen counter measurements so your new countertops fit perfectly. Measuring for new kitchen countertops might seem daunting, but with a little patience and the right approach, you can confidently tackle this DIY task. This countertop measuring guide is designed to empower you to get precise measurements, whether you’re installing laminate, granite, quartz, or another material.
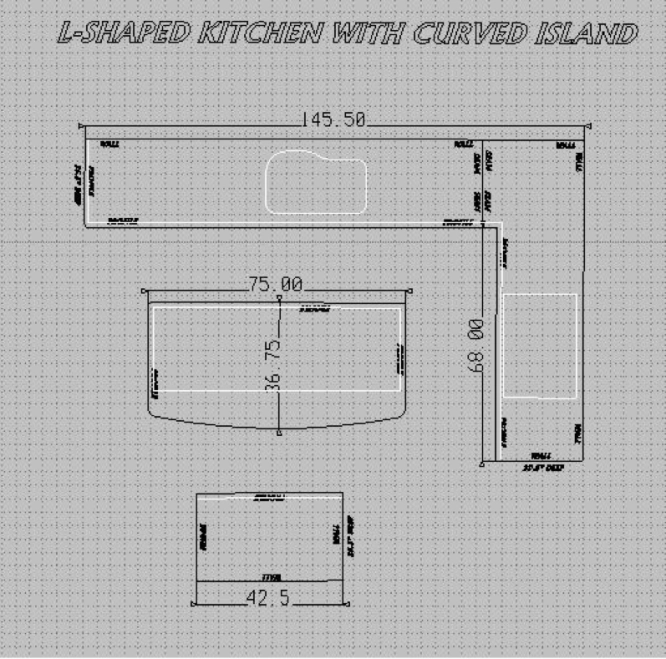
Image Source: www.archcitygranite.com
Why Accurate Measurements Matter
Getting your kitchen counter measurements right is the most crucial step in the entire countertop replacement process. Even the slightest error can lead to significant problems down the line:
- Increased Costs: Incorrect measurements can result in ordering too much material, leading to wasted money. Conversely, ordering too little means you’ll face additional costs for a second delivery or a partial fabrication.
- Delayed Installation: If your countertops don’t fit, your installation will be delayed. This means your kitchen remains unusable for longer than anticipated, which can be a major inconvenience.
- Fitment Issues: Countertops are often fabricated to exact specifications. If the measurements are off, they simply won’t fit flush against walls or seamlessly around sinks and cooktops.
- Aesthetic Problems: Gaps or ill-fitting edges detract from the overall look of your kitchen. Precision ensures a clean, professional finish.
Essential Tools for Measuring
Before you begin, gather the necessary tools. Having everything ready will make the process smoother and more efficient.
- Steel Measuring Tape: A good quality, sturdy steel measuring tape is essential. Ensure it’s at least 25 feet long for accuracy.
- Graph Paper or Notebook: For sketching your kitchen layout and recording measurements.
- Pencil or Pen: For marking and writing down dimensions.
- Calculator: To help with calculations and material estimation.
- Safety Glasses: Always protect your eyes when working with tools.
- Stiff Cardboard or Poster Board: For creating templates, especially for irregular shapes.
- Scissors or Utility Knife: To cut cardboard for templates.
- Straight Edge or Laser Level: For drawing straight lines and checking plumbness.
- Digital Camera or Smartphone: To take photos of your kitchen, which can be helpful for reference and communicating with fabricators.
Preparing Your Kitchen for Measuring
A little preparation goes a long way. Clear the decks before you start measuring.
- Empty Countertops: Remove everything from your countertops. This includes appliances, decorative items, and anything else that obstructs your measuring path.
- Clear Cabinet Tops: Ensure the tops of your cabinets are free of clutter.
- Open Drawers and Doors: If you need to measure around appliance cutouts or unusual cabinet configurations, open any relevant drawers or cabinet doors.
- Inspect Existing Countertops: Take a moment to note any existing issues with your current countertops, such as unevenness or damage. This information can be valuable for the fabricator.
Step-by-Step: Measuring Your Kitchen Countertops
This is where the real work begins. Follow these steps carefully to get the most accurate measurements. Remember, measuring for kitchen cabinets is a separate process, but the layout of your cabinets will dictate your countertop measurements.
1. Sketch Your Kitchen Layout
Start by drawing a birds-eye view of your kitchen on graph paper. This sketch should represent the overall shape of your kitchen and the placement of your cabinets and appliances. Don’t worry about perfect scale; focus on accurately showing the arrangement of different countertop sections.
- Draw Cabinet Runs: Represent each cabinet base or bank of cabinets as a rectangle.
- Mark Appliance Locations: Indicate where your sink, cooktop, dishwasher, refrigerator, and any other built-in appliances are.
- Note Obstructions: Mark windows, doors, outlets, light switches, and any other features that might affect countertop placement or require special cuts.
2. Measure Each Straight Section (Length)
For each continuous section of countertop, measure the length from wall to wall or from the end of one cabinet run to the beginning of another.
- Start at One End: Place the end of your measuring tape firmly against one wall or the end of a cabinet.
- Extend to the Other End: Pull the tape measure taut across the surface to the opposite wall or the end of the next cabinet run.
- Record the Measurement: Write down this measurement to the nearest 1/16th of an inch.
- Measure from the Backsplash: If you have a backsplash, measure from the front edge of the countertop to the back wall where the backsplash meets the wall.
- Repeat for All Sections: Do this for every distinct countertop section.
3. Measure Depth
The depth of your countertop is usually standard, but it’s important to confirm.
- Measure from Front to Back: Place your measuring tape at the front edge of the countertop and measure straight back to the wall.
- Common Depths: Standard kitchen countertop depths are typically 25 inches for base cabinets, with a 3-inch overhang at the front. However, custom cabinets or unique layouts might require different depths.
- Record the Depth: Note this measurement for each section.
4. Measure Height/Thickness
While not always a critical measurement for ordering raw material, it’s good to note the thickness of your existing countertop or your desired thickness for new material.
- Measure from the Cabinet Top to the Countertop Surface: This gives you the thickness of the existing countertop.
- Desired Thickness: If you’re ordering new material, you’ll specify the thickness (e.g., 3cm for granite or quartz).
5. Account for Overhangs
Countertops typically extend beyond the cabinet boxes to provide a more functional and aesthetically pleasing surface.
- Front Overhang: The standard front overhang is typically 1 to 1.5 inches past the cabinet doors. Measure this from the front edge of your cabinet box to the front edge of your countertop.
- Side Overhangs: If your countertop extends past the end of a cabinet run, measure this overhang. This is common on islands or peninsulas.
- Backsplash Considerations: If you are not getting a separate backsplash, your countertop will extend back to the wall. If you are getting a separate backsplash, the countertop measurement will stop at the wall.
6. Measuring for Sinks and Cooktops (Cutouts)
Accurate cutouts for sinks and cooktops are vital.
- For Undermount Sinks:
- Measure the Sink Itself: Get the exact length and width of the sink basin.
- Determine Cutout Size: The fabricator will typically add a small tolerance (e.g., 1/8 to 1/4 inch) to these measurements for the cutout.
- Edge of Sink to Edge of Countertop: Measure the distance from the edge of the sink cutout to the front edge of the countertop, the back edge, and the side edges. This is crucial for positioning.
- For Drop-in (Top-Mount) Sinks:
- Measure the Lip: For drop-in sinks, you need to measure the overall size of the sink and then subtract the lip that rests on top of the countertop. The cutout is for the sink basin itself.
- Record Lip Dimensions: Note how much of the sink lip will be visible.
- For Cooktops:
- Consult the Manufacturer’s Specifications: The best way to get accurate cooktop cutout measurements is to refer to the installation manual provided by the cooktop manufacturer. These manuals will specify the exact dimensions and any required clearances.
- Measure the Actual Cooktop: If you don’t have the manual, carefully measure the outer dimensions of the cooktop and the dimensions of the cutout area.
- Consider Grates and Knobs: Ensure your measurements account for any protruding parts of the cooktop.
7. Measuring a Kitchen Island
Measuring kitchen island countertops requires similar precision, but islands often have more complex shapes and overhangs.
- Overall Dimensions: Measure the length and width of the island base.
- Overhangs: Measure all overhangs precisely. Islands commonly have significant overhangs on seating sides.
- Edge Details: Note the shape of the island’s edges. If it’s not a simple rectangle, you’ll need to measure each side.
- Cutouts: If your island has a sink or cooktop, measure for those cutouts as described above.
- Consider Waterfall Edges: If you’re planning a waterfall edge (where the countertop material extends down the side of the island to the floor), you’ll need to measure the height of the island base on those sides.
8. Measuring for Walls and Corners
Walls are rarely perfectly straight, and corners can be tricky.
- Measure at Multiple Points: For long wall sections, take measurements at the front, middle, and back. Use the shortest measurement to ensure a snug fit.
- Check for Plumbness: Use a level to check if your walls are plumb (perfectly vertical). If they are not, the measurement from the wall might vary depending on how the countertop is installed.
- Inside Corners: Measure the length of each wall leading into the corner.
- Outside Corners: Measure the length of each surface leading to the corner.
- Radiused Corners: If you have rounded corners, you’ll need to measure the radius accurately. This is where a template for countertops becomes invaluable.
Creating a Template for Countertops
For complex shapes, irregular angles, or if you want the ultimate guarantee of a perfect fit, creating a physical template is highly recommended. This is often the preferred method for fabricators, especially for natural stone or quartz.
What is a Template?
A template is a full-scale pattern of your countertop, typically made from thin, flexible material like cardboard, poster board, or specialized templating plastic. It precisely outlines the shape of your countertop, including all cutouts and edges.
When to Use a Template
- Irregular Shapes: Curved countertops, L-shaped or U-shaped kitchens with many angles.
- Bay Windows or Niches: Areas where a simple tape measure might not capture the exact contour.
- Exacting Fit: If you want to ensure a seamless fit against a curved wall or around existing cabinetry.
- DIY Fabricator Communication: It provides a clear visual and physical guide for your countertop fabricator.
How to Create a Template
- Gather Your Materials: Use sturdy poster board or thin cardboard. You might need to tape multiple pieces together.
- Trace the Outline: Carefully place the template material on your existing countertop or cabinet base. Trace the exact perimeter of where the new countertop will go.
- Mark Cutouts: For sink and cooktop cutouts, trace the exact shape and location of the opening onto the template.
- Mark Edges and Overhangs: Clearly indicate the desired front, side, and back overhangs. If you have a specific edge profile in mind, you can sometimes use a piece of wood or other material to mark this.
- Number and Label: Number each piece of the template clearly (e.g., “Left Peninsula Front,” “Main Kitchen Backsplash Wall”). Label all dimensions and features.
- Cut Out the Template: Carefully cut out the template pieces using a sharp utility knife or scissors.
- Test Fit: Place the template pieces back in your kitchen to ensure they fit together as intended and align with cabinets and appliances.
Pro Tip for Templating:
For complex curves or walls that aren’t straight, use thin strips of wood or cardboard and secure them with tape or small weights to follow the exact contour of the wall or existing counter. Then, trace these guides onto your template material.
Calculating Countertop Material
Once you have your precise measurements and/or template, you can begin calculating the amount of material you need. This is a critical part of calculating countertop material.
For Straight Sections:
- Area = Length x Depth
- For example, a 6-foot section of countertop that is 25 inches deep would be:
- Length: 6 feet x 12 inches/foot = 72 inches
- Area = 72 inches x 25 inches = 1800 square inches
For Irregular Shapes:
- Break down the shape into simpler geometric forms (rectangles, squares, triangles) and calculate the area of each, then sum them up.
- Alternatively, use your template. Fabricators often have specialized software that can calculate material needs from a digital template.
Slab Materials (Granite, Quartz, Marble):
- Natural stone and quartz are typically sold by the slab. Slabs have standard dimensions (e.g., approximately 120 inches x 56 inches).
- You need to consider how your countertop pieces will be cut from the slab to minimize waste and optimize the pattern (veining, etc.). This is often done by the fabricator.
- Layout Planning: A good fabricator will create a “layout” showing how your pieces will be cut from a specific slab, indicating any seams.
Laminate Countertops:
- Laminate is often sold in standard sheet sizes (e.g., 4 ft x 8 ft, 5 ft x 10 ft). You’ll calculate linear feet needed, keeping in mind the width and any edge banding requirements.
Allowance for Waste and Seams:
- Always add a percentage for waste (typically 10-20%) due to cuts, edge profiling, and potential material defects.
- Consider where seams will be placed. Seams are necessary when a single piece of material is not long enough to cover a run, or when combining different sections. Discuss seam placement with your fabricator.
Measuring for Countertop Edge Profiles
The edge profile of your countertop refers to the shape of the exposed edge. This is part of the countertop edge measurement.
- Common Edge Profiles:
- Square/Eased Edge: A simple, flat edge with slightly softened corners.
- Beveled Edge: An angled edge.
- Bullnose: A rounded edge.
- Ogee: An S-shaped curve.
- Decorative Edges: More intricate carved designs.
- How to Measure: The edge measurement is the linear footage of the edges that will receive a specific profile. You measure the total perimeter of your countertop sections, minus any areas that butt up against a wall or are integrated into a backsplash.
- Communicate Clearly: Specify the desired edge profile to your fabricator for each section of your countertop.
Final Checks and Communicating with Your Fabricator
Before submitting your measurements or template, do a final review.
- Double-Check All Measurements: Compare your recorded numbers against your sketches and the actual dimensions.
- Verify Cutout Sizes and Locations: Ensure sink and cooktop cutout measurements are accurate and that their placement relative to the edges is clearly indicated.
- Note Any Special Requirements: Mention any unusual features like appliance garages, angled walls, or specific overhang requirements.
- Take Photos: Photograph your kitchen and any challenging areas. This can be a valuable reference for both you and your fabricator.
- Provide a Detailed Drawing: Along with your measurements, provide a clear, labeled drawing of your kitchen layout.
When you submit your measurements or template, you are essentially providing the countertop order dimensions. It’s crucial that these are as accurate as possible to ensure a smooth kitchen countertop installation guide.
What to Discuss with Your Fabricator:
- Seam Placement: Where will seams be placed and how will they look?
- Edge Profile: Confirm the chosen edge profile for all exposed edges.
- Overhangs: Reiterate desired overhang dimensions.
- Sink and Cooktop Cutouts: Confirm the exact dimensions and placement.
- Material Layout: If using a patterned material, discuss how the pattern will flow across your countertops.
- Installation Schedule: Understand the process and timeline for fabrication and installation.
FAQs About Measuring for Kitchen Countertops
Q: What if my walls aren’t straight?
A: Measure the distance from the cabinet front to the wall at several points along the run (e.g., at the front, middle, and back). Use the shortest measurement to ensure the countertop will fit flush. For very irregular walls, a physical template is the best option.
Q: How precise do my measurements need to be?
A: Precision is key. Measure to the nearest 1/16th of an inch. Small errors can lead to significant problems during installation.
Q: Do I need to measure the underside of my cabinets?
A: Typically, no. Countertop fabricators will measure the actual dimensions of the cabinet boxes or work from a template to ensure the countertop sits correctly. However, knowing the cabinet height and depth is useful.
Q: Can I order countertops based on the measurements from my cabinet installer?
A: While cabinet installers are skilled, countertop fabrication requires specific measurements. It’s always best to either measure yourself meticulously or have a professional countertop template service do it. If you use your cabinet installer’s measurements, double-check them yourself.
Q: What is a “layout” for natural stone countertops?
A: A layout is a diagram provided by the fabricator showing how the specific slab(s) of stone will be cut to create your countertop pieces. It indicates seam locations and how the stone’s pattern will flow.
Q: How do I measure for a corner countertop section?
A: For an inside corner, measure the length of each countertop section leading up to the corner. For an outside corner, do the same. If the corner is radiused, you’ll need to measure the radius or create a template.
Q: What are the standard countertop dimensions?
A: Standard kitchen countertop depth is typically 25 inches for base cabinets, allowing for a 1.5-inch overhang (totaling 26.5 inches). Standard countertop thickness for materials like granite or quartz is often 3cm (about 1.2 inches). However, these can vary based on cabinet size and design.
Q: Do I need to provide measurements for my backsplash?
A: If you’re having a separate backsplash installed, you’ll need to measure its height and length similar to how you measured the countertops. If the countertop material itself extends up as a backsplash, this will be incorporated into the main countertop measurements and cut.
By following these detailed steps and employing pro tips, you can confidently measure for your new kitchen countertops, setting the stage for a successful and beautiful renovation.