
Can you paint a kitchen table? Yes, you absolutely can paint a kitchen table! With a little preparation and the right materials, you can transform your old, tired kitchen table into a stunning centerpiece for your dining space. This comprehensive guide will walk you through every step of a DIY table makeover, from table prep and priming to achieving a beautiful and durable kitchen table paint finish. Whether you’re looking for a full kitchen table restoration or just a fresh coat of color, this guide will make the process simple and rewarding.
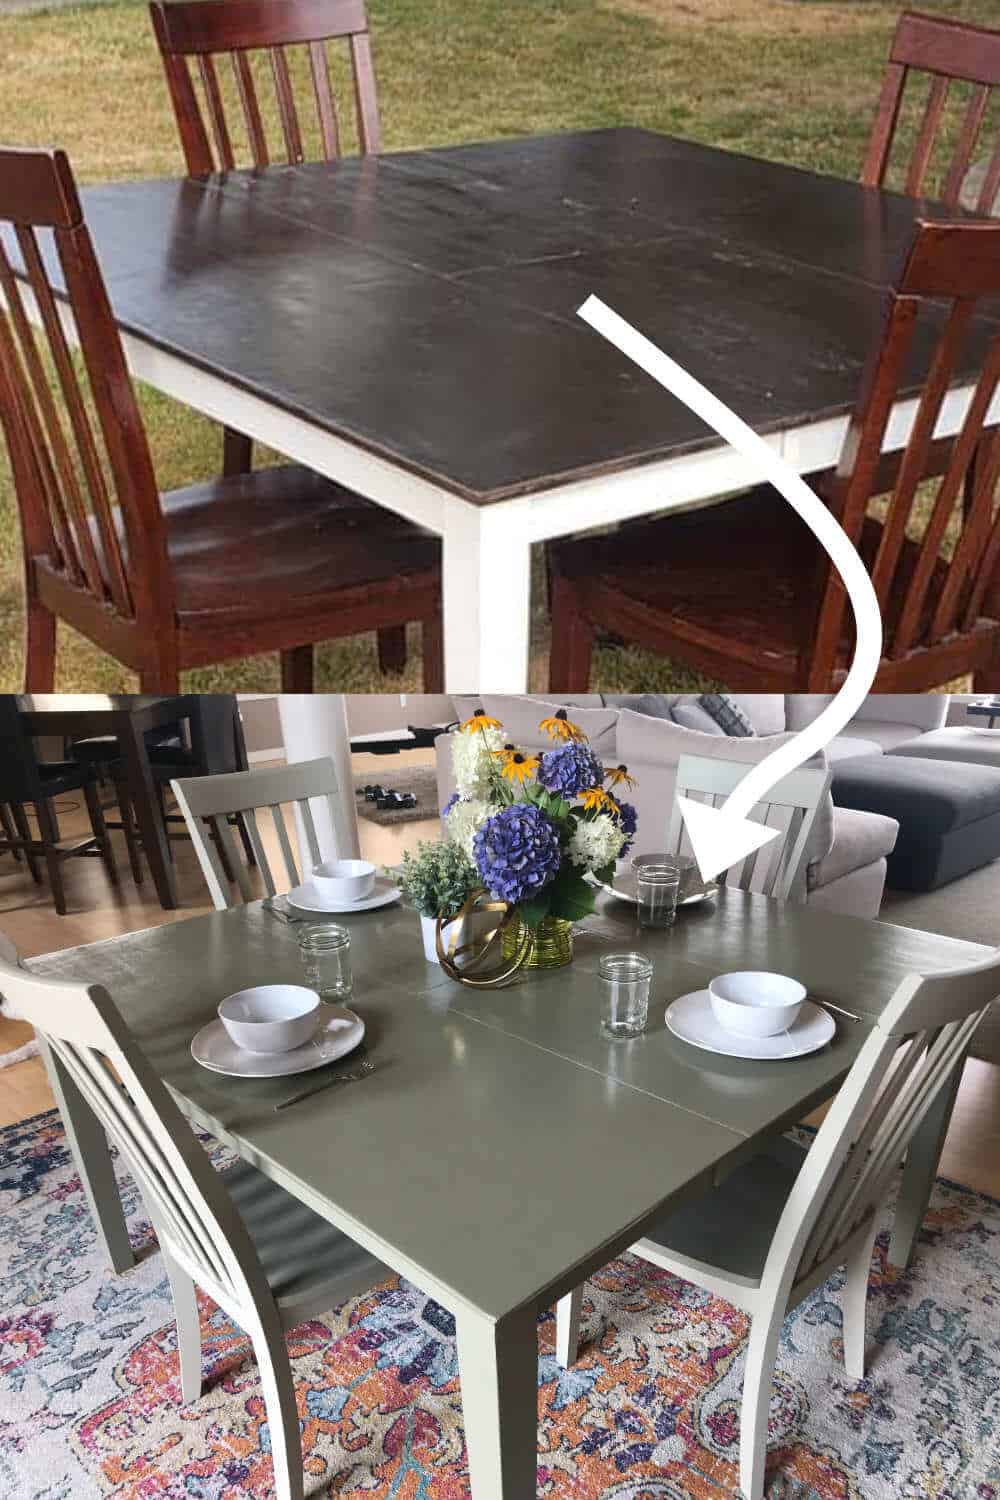
Image Source: sunshineandrainydays.com
Why Paint Your Kitchen Table?
Kitchen tables often bear the brunt of daily life. Spills, scratches, and general wear and tear can leave them looking dull and unappealing. Painting offers an incredibly cost-effective and creative way to breathe new life into your furniture. It allows you to:
- Update your kitchen’s style: Match your table to new decor, colors, or themes.
- Cover imperfections: Hide scratches, stains, and fading.
- Add personality: Choose any color or finish you desire.
- Save money: Refinishing is far cheaper than buying a new table.
Choosing Your Paint: The Best Paint for Kitchen Tables
Selecting the right paint is crucial for a successful and long-lasting finish. You need something that is durable, easy to clean, and looks good.
Popular Paint Options for Kitchen Tables
Here are some of the most popular and effective paint types for painting furniture, especially kitchen tables:
- Chalk Paint: Known for its matte, velvety finish and minimal prep, chalk paint table projects are very popular. It adheres well to most surfaces without extensive sanding. However, it requires a topcoat for durability and protection.
- Milk Paint: Similar to chalk paint in its matte finish and easy application, milk paint often gives a more rustic or antique look. It can chip naturally, giving a distressed effect. Like chalk paint, it needs a sealant.
- All-in-One Paints: These paints combine primer, paint, and topcoat in one. They offer convenience and good durability. Look for ones specifically formulated for furniture.
- Acrylic Latex Paints (Water-Based): High-quality acrylic latex paints, especially those labeled “cabinet and furniture” or “enamel,” can be excellent choices. They offer good durability and come in a wide range of finishes (satin, semi-gloss, gloss). They require thorough preparation and a good primer.
- Mineral Paints: These offer a durable, chalk-like finish that is often more robust than traditional chalk paint. They are generally low in VOCs and eco-friendly.
- Spray Paint: While convenient for small projects, spray painting table legs or intricate details can work well. For tabletops, it can be tricky to get an even, durable finish without specialized techniques.
Factors to Consider When Choosing Paint
- Durability: Your table surface needs to withstand frequent use, cleaning, and potential spills.
- Finish: Matte, satin, semi-gloss, or gloss? Satin and semi-gloss are popular for tables as they offer a balance of sheen and cleanability.
- Ease of Application: Are you comfortable with brushes, rollers, or spray cans?
- Sheen: The shinier the finish, generally the more durable and easier to wipe clean.
- VOCs (Volatile Organic Compounds): Consider low-VOC or no-VOC paints for a healthier home environment.
Essential Supplies for Your DIY Table Makeover
Gathering all your supplies beforehand will make the process smoother.
What You’ll Need:
- Paint: Your chosen color and type.
- Primer: A good quality primer is essential for adhesion and a smooth finish.
- Topcoat/Sealer: Crucial for chalk paint and milk paint, and recommended for other finishes for added durability. Options include polyurethane (water-based is best for lighter colors), polycrylic, or wax.
- Sandpaper: Various grits (e.g., 120, 180, 220) for sanding.
- Sanding Block or Electric Sander: For easier sanding.
- Orbital Sander (Optional): For larger surfaces or heavy stripping.
- Painter’s Tape: For masking off areas you don’t want to paint.
- Drop Cloths or Old Sheets: To protect your floors and surrounding areas.
- Cleaning Supplies: Mild soap, water, degreaser, tack cloths, lint-free rags.
- Applicators: High-quality paint brushes (synthetic for latex/acrylic, natural for oil-based), foam rollers, or a paint sprayer.
- Paint Tray or Bucket: For your paint.
- Screwdriver or Wrench: If you need to remove table legs or hardware.
- Safety Gear: Gloves, safety glasses, dust mask.
Step-by-Step Guide to Painting Your Kitchen Table
Let’s get started on your kitchen table refinishing project!
Step 1: Table Preparation is Key
This is arguably the most important step. Proper preparation ensures your paint adheres well and lasts.
Cleaning Your Table
- Remove Hardware: If your table has hardware (like drawer pulls or decorative elements), remove them.
- Deep Clean: Thoroughly wash the entire table with a mild soap and water solution. A degreaser can be very helpful to remove any grease or grime accumulated over time.
- Rinse and Dry: Rinse off all soap residue with clean water and let the table dry completely.
Sanding Your Table
Sanding removes the old finish, creates a surface for the primer to grip, and smooths out any imperfections.
- Initial Sanding: Start with a medium-grit sandpaper (around 120-grit) to scuff up the existing finish. You don’t need to remove all the old paint or stain unless it’s peeling or in bad condition. The goal is to create a “tooth” for the primer to adhere to.
- Smooth Sanding: Move to a finer grit (180 or 220-grit) to smooth the surface further.
- Table Prep and Priming: If you’re using chalk paint or milk paint, you might be able to skip heavy sanding. However, a light scuff sand (220-grit) is still recommended for better adhesion. For latex or acrylic paints, thorough sanding is more critical.
- Clean the Dust: After sanding, it’s crucial to remove all dust.
- Use a vacuum with a brush attachment.
- Wipe down the entire surface with a tack cloth. These sticky cloths pick up fine dust particles that vacuums might miss. Repeat this process until no dust remains.
Repairing Imperfections
- Fill Cracks and Holes: Use wood filler to fill any dents, gouges, or cracks. Let it dry completely according to the product instructions.
- Sand Filled Areas: Once dry, sand the filled areas smooth with fine-grit sandpaper.
- Clean Dust Again: Remove all dust from repairs with a tack cloth.
Step 2: Priming for Success
Priming is a vital step that provides a uniform base for your paint, enhances adhesion, and can block stains from bleeding through.
Choosing the Right Primer
- For most paints: A good quality water-based or oil-based primer designed for furniture is suitable.
- For dark colors or wood with stain bleed-through issues (like oak or cherry): An oil-based primer, like Kilz or Zinsser B-I-N, is highly recommended as it offers superior stain-blocking capabilities.
- For chalk paint: You can often skip primer, but using a specific gripping primer can improve adhesion and reduce the amount of topcoat needed.
Applying the Primer
- Apply a Thin, Even Coat: Use a high-quality brush or roller for a smooth application. Avoid applying it too thickly, as this can lead to drips and an uneven finish.
- Allow to Dry: Let the primer dry completely according to the manufacturer’s instructions. Drying times can vary significantly.
- Light Sanding (Optional but Recommended): Once the primer is dry, lightly sand the surface with very fine-grit sandpaper (220-grit or higher). This will knock down any brush strokes or imperfections and create an even smoother surface for paint.
- Clean Dust: Wipe down the surface with a tack cloth to remove any sanding dust.
Step 3: Painting Your Kitchen Table
Now for the fun part – applying the color!
Application Techniques
- Brushing: For detailed work or if you prefer a visible brush stroke texture, use a high-quality synthetic bristle brush for water-based paints. Apply paint in the direction of the wood grain.
- Rolling: For larger, flat surfaces like tabletops, a foam roller or a high-density mini-roller can give a very smooth finish.
- Spray Painting: Spray painting table surfaces offers the smoothest, most factory-like finish. Ensure you have a well-ventilated area, wear a respirator, and practice on scrap pieces first. Keep the can moving at a consistent speed and distance.
Applying Paint Coats
- Apply Thin Coats: Apply your paint in thin, even coats. It’s better to do several thin coats than one thick, drippy one.
- Follow Drying Times: Allow each coat to dry completely according to the paint manufacturer’s instructions before applying the next. This is crucial for a durable finish.
- Light Sanding Between Coats (Optional but Recommended): For an ultra-smooth finish, lightly sand between coats with very fine-grit sandpaper (220-320 grit). This removes any tiny bumps or dust nibs. Always wipe down with a tack cloth after sanding.
- Number of Coats: You’ll likely need 2-3 coats of paint for full coverage and a solid color. For very light colors over a dark primer or surface, you might need more.
Step 4: Applying a Topcoat for Durability
This step is essential for protecting your paint job and making it washable and durable, especially on a kitchen table.
Topcoat Options
- Water-Based Polyurethane or Polycrylic: These are excellent choices. Polycrylic is generally preferred for lighter colors as it won’t yellow over time. They offer good protection and are easy to clean.
- Furniture Wax: Often used over chalk paint or milk paint, wax provides a soft sheen and a degree of protection. It needs to be reapplied periodically.
- Clear Spray Sealants: Can be used, but ensure they are durable and suitable for furniture.
Applying the Topcoat
- Ensure Paint is Fully Cured: Most paints need at least 24-72 hours to cure (harden) before applying a topcoat. Check your paint can for specific recommendations.
- Apply Thin, Even Coats: Use a high-quality brush or foam applicator.
- Follow Drying Times: Allow each coat to dry completely before applying the next.
- Multiple Coats: Apply 2-3 coats of your chosen topcoat for maximum protection.
- Buffing (for Wax): If using wax, you’ll typically buff it with a soft, lint-free cloth after it has hazed over to achieve a smooth, protective finish.
Step 5: Finishing Touches
Once the paint and topcoat are completely dry and cured (this can take several days to a week, depending on the product), you can reattach any hardware you removed.
Popular Kitchen Table Refinishing Techniques
Beyond a simple paint job, there are other kitchen table finishing techniques you can explore.
Using Chalk Paint Table for a Rustic Look
Chalk paint table projects are favored for their ease of use and the beautiful, matte finish they provide.
- Minimal Prep: Often, you only need to clean the table and perhaps do a light scuff sand.
- Layering Colors: Apply multiple thin coats of different chalk paint colors, lightly sanding between them to create depth and dimension.
- Distressing: After the paint is dry, use fine-grit sandpaper or a sanding sponge to gently distress edges and high-wear areas for an antique look.
- Wax Finish: Seal with clear or dark furniture wax. Dark wax can be used in crevices and sanded areas to enhance the distressed look.
Spray Painting Table for a Smooth Finish
Spray painting table surfaces can yield a very smooth, professional finish, especially on metal or sleek modern tables.
- Thorough Prep: Essential for spray painting. Ensure surfaces are clean, smooth, and properly primed.
- Ventilation: Always spray in a well-ventilated area or outdoors.
- Consistent Application: Keep the can moving at a steady pace, about 10-12 inches from the surface. Overlap each pass by about 50%.
- Thin Coats: Apply multiple very thin coats rather than one heavy one.
- Curing Time: Allow ample curing time for spray paint, as it can be more delicate when freshly applied.
Table Restoration with Stains and Glazes
While this guide focuses on painting, a full kitchen table restoration might involve stripping old finishes, sanding down to bare wood, and applying new stains or glazes. This is a more labor-intensive process but can bring back the original beauty of a wood table or create entirely new looks.
Caring for Your Newly Painted Kitchen Table
To keep your freshly painted table looking its best:
- Clean Gently: Use a soft cloth and mild soap. Avoid abrasive cleaners or scrub brushes, especially on matte finishes.
- Wipe Spills Immediately: Don’t let liquids sit on the surface.
- Use Placemats and Coasters: Protect the surface from heat, scratches, and moisture.
- Avoid Harsh Chemicals: Do not use furniture polish or harsh cleaners, as they can damage the finish.
- Periodic Waxing (if applicable): If you used wax, a light reapplication every 6-12 months can refresh the finish.
Frequently Asked Questions (FAQ)
Q1: Do I really need to prime my kitchen table?
A1: Yes, priming is highly recommended for most paint jobs on kitchen tables. It ensures better adhesion, a more uniform color, and can prevent stains from bleeding through your new paint.
Q2: Can I paint over a laminate or veneer kitchen table?
A2: Yes, but preparation is even more critical. Ensure the surface is thoroughly cleaned and degreased. Use a high-quality gripping primer specifically designed for tricky surfaces like laminate or veneer, and follow with 2-3 thin coats of your chosen paint.
Q3: How long does it take to paint a kitchen table?
A3: The actual painting time might only be a few hours, but the entire process, including drying and curing times between coats and for the final finish, can take several days to a week. Rushing the drying process can compromise the durability of the finish.
Q4: What’s the most durable paint for a kitchen table?
A4: High-quality acrylic latex enamel paints or mineral paints, when properly primed and sealed with a durable topcoat like polyurethane or polycrylic, offer excellent durability and are easy to clean.
Q5: My chalk paint is chipping too easily. What did I do wrong?
A5: This usually happens if the table wasn’t cleaned properly, wasn’t lightly sanded for adhesion, or if the topcoat (wax or polycrylic) wasn’t applied sufficiently or allowed to cure properly. Ensure you have at least 2-3 coats of a good quality topcoat.
By following these steps and choosing the right materials, you can achieve a beautiful, durable, and personalized DIY table makeover that will be the envy of your kitchen. Happy painting!