
Can you refinish kitchen cabinets without sanding? Yes, you absolutely can refinish kitchen cabinets without sanding, especially with modern products designed for this purpose. Refinishing your kitchen cabinets can give your kitchen a fresh, new look without the hassle and dust of traditional sanding. This guide will walk you through the process of cabinet refinishing no sand, making it easier than you might think to paint kitchen cabinets no sanding or even tackle laminate cabinet refinishing. We’ll cover everything you need to know for a successful cabinet makeover no sanding.
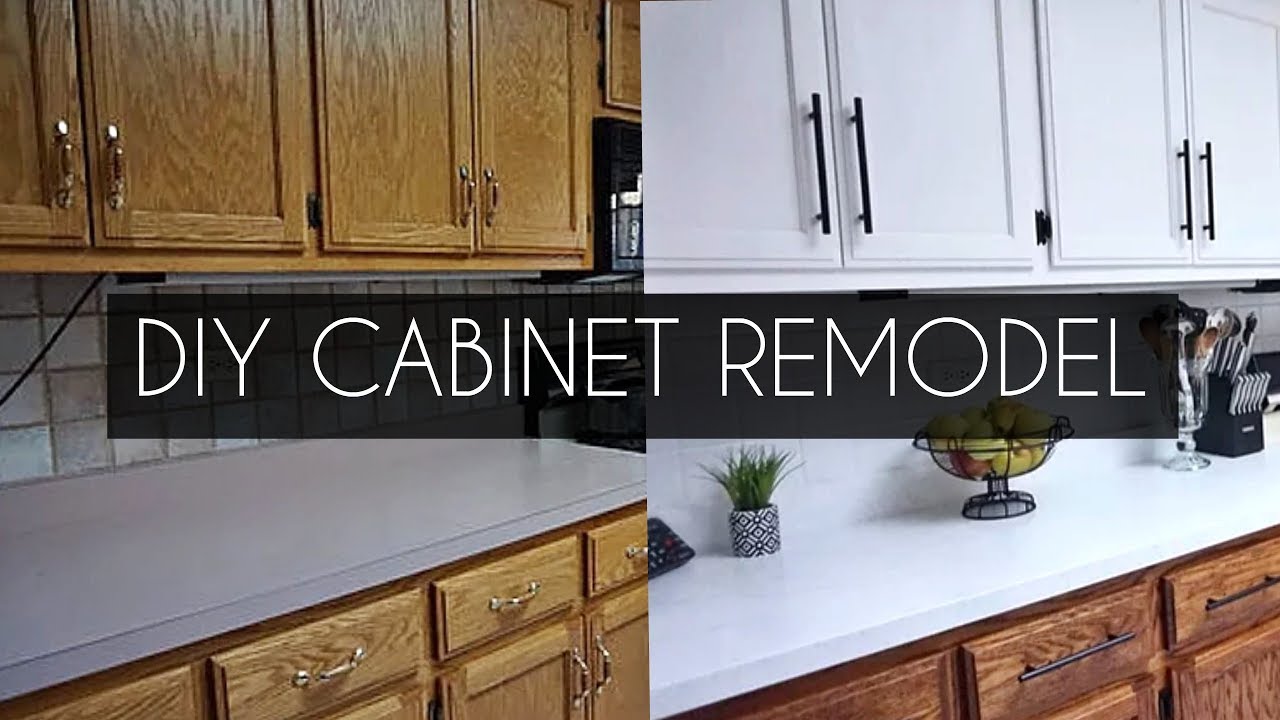
Image Source: i.ytimg.com
Why Skip the Sanding?
Sanding is often seen as a necessary evil in DIY projects. It creates dust, takes time, and can be physically demanding. For those looking for a quicker, less messy way to update their kitchen, skipping the sanding step is a game-changer. This approach is perfect for anyone who wants a significant visual upgrade without the major undertaking of traditional prep work. If you’ve ever wondered “Can I paint my kitchen cabinets without sanding?”, the answer is a resounding yes!
Is Cabinet Refinishing No Sanding for Everyone?
While the “no sand” method is fantastic, it’s important to know what surfaces it works best on. This method is ideal for cabinets that are already in decent condition. If your cabinets have peeling laminate, deep gouges, or significant damage, a more intensive prep process, which might include some sanding, could be necessary for the best results. However, for cabinets with a smooth, intact finish, this method is a fantastic option.
Preparing Your Workspace and Cabinets
Good preparation is key to any successful paint job, even when you’re skipping the sanding. Taking these steps will ensure your cabinet refinishing no sand project goes smoothly and the final result looks professional.
Clearing the Kitchen
- Empty the Cabinets: Remove everything from your cabinets and drawers. This makes them easier to work on and protects your belongings.
- Remove Cabinet Doors and Drawer Fronts: Carefully take off all doors and drawer fronts. Label each one with a small piece of painter’s tape to ensure you put them back in the right place.
- Remove Hardware: Unscrew all knobs, pulls, and hinges. Keep them in a safe place, perhaps in a labeled baggie.
- Protect Your Surfaces: Cover countertops, floors, and backsplashes with drop cloths or old sheets. Use painter’s tape to mask off any areas you don’t want to paint, like the inside edges of the cabinet frames or appliance surrounds.
Cleaning is Crucial for Cabinet Refinishing No Sand
This is arguably the most important step in the cabinet refinishing no sand process. You need a perfectly clean surface for any paint or primer to adhere properly.
Materials for Cleaning:
- Mild dish soap
- Warm water
- Clean rags or sponges
- Degreaser (a specialized kitchen degreaser or a solution of TSP substitute)
- Clean rinse water
- Rubbing alcohol (optional, for final wipe-down)
Cleaning Steps:
- Initial Wipe-Down: Mix mild dish soap with warm water. Wipe down all cabinet surfaces (doors, drawer fronts, and frames) to remove dust and general grime. Rinse with a clean, damp cloth and dry thoroughly.
- Degreasing: Kitchen cabinets, especially those near the stove, can accumulate greasy residues. Use a good degreaser. Follow the product instructions carefully. You might need to let it sit for a few minutes to break down the grease.
- Rinsing: This is vital! Make sure to rinse off all degreaser residue. Leftover degreaser can prevent paint from sticking. Use clean water and clean rags, rinsing several times if necessary.
- Final Wipe (Optional but Recommended): After the cabinets are completely dry, give them a final wipe-down with rubbing alcohol. This helps remove any lingering contaminants and ensures a clean surface for your primer.
Why This Cleaning is More Important Than Sanding for Some Finishes:
Many modern paints and primers designed for cabinet refinishing no sand are formulated to bond to existing finishes. However, they can only bond to a surface that is clean and free of grease, grime, or old wax. Skipping this thorough cleaning is a common reason why “no-sand” finishes can fail.
The Magic of Modern Primers and Paints
The advancements in paint technology have made cabinet refinishing no sand much more achievable and durable. The key is using the right products.
The Role of a No-Sand Cabinet Primer
A good no-sand cabinet primer is your best friend in this project. These primers are designed to:
- Adhere to various surfaces: They grip onto existing finishes like laminate, old paint, or varnish without the need for sanding.
- Create a uniform base: They cover any imperfections or slight color variations in the original cabinet.
- Provide a surface for paint to grip: They act as a bridge, ensuring your topcoat of paint sticks well and lasts.
What to Look for in a No-Sand Primer:
- Good Adhesion: Check the product label for claims of “excellent adhesion” or suitability for “difficult surfaces.”
- Water-Based vs. Oil-Based: Water-based primers are generally easier to clean up and have lower VOCs (Volatile Organic Compounds). Oil-based primers can offer superior adhesion and a harder finish but require mineral spirits for cleanup and have stronger fumes.
- Enamel Undercoater: Many good primers for cabinets are labeled as enamel undercoaters, which means they are designed to provide a hard, durable base for oil-based or water-based topcoats.
Paint Options for Cabinet Refinishing No Sand
When it comes to painting cabinets without sanding, you have several excellent paint choices.
1. Latex or Acrylic Enamel Paints
These are the most common and easiest to work with.
- Pros: Low VOCs, easy cleanup with water, quick drying, available in a vast range of colors, good durability when properly primed.
- Cons: Can be prone to chipping if not properly prepped and primed.
- Application: Can be applied with a high-quality synthetic brush, a foam roller, or a paint sprayer. For a smooth finish, consider a paint specifically formulated for cabinets or furniture.
2. Alkyd or Oil-Based Paints
These offer a very hard, durable finish.
- Pros: Excellent durability, smooth finish, good adhesion.
- Cons: Higher VOCs, stronger odor, longer drying times, cleanup requires mineral spirits.
- Application: Best applied with a high-quality natural bristle brush or a paint sprayer.
3. Chalk Paint Kitchen Cabinets No Sanding
Chalk paint is known for its matte finish and minimal prep.
- Pros: Extremely easy to use, adheres to most surfaces with minimal prep, creates a distinctive matte, often “distressed” look.
- Cons: Requires a topcoat (wax or polycrylic) for durability, which can be a multi-step process. The matte finish can be less resistant to stains and wear compared to enamels if not sealed properly.
- Application: Typically applied with a brush, often with visible brush strokes for effect.
4. All-in-One Cabinet Paints
Some brands offer “all-in-one” cabinet paints that claim to prime and paint in one step.
- Pros: Simplifies the process even further.
- Cons: Results can vary, and sometimes a separate primer can offer superior adhesion and a more professional finish, especially on challenging surfaces. It’s still wise to test these on a small area.
Step-by-Step Guide to Cabinet Refinishing No Sand
Now that you’re armed with the knowledge of the right products, let’s get to the actual process.
Step 1: Thorough Cleaning (Revisited)
As stressed before, this is non-negotiable. Clean, clean, clean. Use your degreaser and rinse thoroughly. Ensure all cabinets are completely dry before moving on.
Step 2: Applying the No-Sand Cabinet Primer
This is where the magic happens for cabinet refinishing no sand.
Application Methods for Primer:
- Brush: Use a high-quality synthetic brush for water-based primers or a natural bristle brush for oil-based primers. Apply thin, even coats.
- Roller: A small, high-density foam roller is excellent for achieving a smooth finish on flat surfaces like cabinet doors.
- Sprayer: For the most professional, even finish, a paint sprayer is ideal. This is particularly useful if you want a smooth, factory-like finish. However, it requires more masking and practice.
Primer Application Tips:
- Thin Coats: Apply thin, even coats of primer. It’s better to apply two thin coats than one thick coat. This helps prevent drips and ensures better adhesion.
- Even Coverage: Make sure to cover all surfaces you intend to paint. Pay attention to corners and edges.
- Drying Time: Allow the primer to dry completely according to the manufacturer’s instructions. This is crucial for adhesion. Rushing this step can lead to failure.
- Light Sanding (Optional but Recommended): Even with a “no-sand” primer, a very light scuff sand (using a fine-grit sanding sponge, like 220 or 320 grit) after the primer has dried can improve adhesion for the topcoat and create an even smoother surface. If you choose to do this, wipe away all dust with a tack cloth or damp cloth. This step is minimal compared to full sanding and can significantly boost durability.
Step 3: Applying the Topcoat (Paint)
Once your primer is dry and you’ve optionally done a light scuff sand, it’s time for the color.
Paint Application Tips:
- Thin Coats are Key: Just like with primer, apply multiple thin coats of paint. This will give you a much more durable and professional-looking finish than one or two thick coats.
- Brush Strokes: If brushing, maintain a wet edge and try to brush in the same direction to minimize visible brush marks.
- Roller Technique: If using a roller, use light pressure and overlap your strokes slightly to avoid roller marks.
- Spraying: If spraying, follow the manufacturer’s recommendations for thinning the paint and maintaining the correct distance and speed.
- Drying Between Coats: Allow each coat of paint to dry completely according to the product instructions before applying the next. This is essential for adhesion and a smooth finish.
- Number of Coats: Most cabinet refinishing projects will require at least two to three coats of paint for full coverage and durability.
Step 4: Applying a Protective Topcoat (Optional but Recommended)
For added durability, especially in high-traffic areas like kitchens, a clear topcoat can be beneficial.
- Polycrylic: This is a water-based polyurethane that is durable, non-yellowing, and easy to clean up. It’s a great choice for painted cabinets.
- Water-Based Polyurethane: Similar to polycrylic, offering good protection.
- Wax: If you used chalk paint, a wax finish is common. Apply in thin layers and buff to a sheen.
Application of Topcoat:
- Apply thin, even coats using a high-quality synthetic brush or foam applicator.
- Allow each coat to dry thoroughly before applying the next.
- Typically, one to two coats of a clear topcoat are sufficient.
Step 5: Reassembly
Once all the paint and any topcoats are completely dry and cured (this can take several days to a week for full hardness, though it’s dry to the touch much sooner), you can reassemble your cabinets.
- Reattach cabinet doors and drawer fronts.
- Screw on the hardware (knobs and pulls).
- Put your belongings back into the cabinets.
Refinishing Laminate Cabinets Without Sanding
Laminate cabinets can be a bit trickier, but with the right products, you can achieve a great laminate cabinet refinishing result without sanding.
Key Considerations for Laminate:
- Smooth Surface: Laminate is inherently smooth, which is good for “no-sand” adhesion.
- Potential for Peeling: If the laminate is already peeling or delaminating from the substrate (the wood or particleboard underneath), you’ll need to address those areas first. This might involve gluing down peeling sections with strong adhesive or, in severe cases, removing the laminate and dealing with the underlying material.
- Plastic-like Surface: Some laminates have a very slick, almost plastic-like surface that requires a specialized primer designed for laminate or high-gloss surfaces. Look for primers that explicitly state they bond to laminate or plastics.
The Process for Laminate:
- Extreme Cleaning: Due to the non-porous nature of laminate, cleaning is even more critical. Ensure no grease or residue remains.
- Specialized Primer: Use a primer specifically designed for laminate or difficult-to-adhere surfaces. These primers often have excellent gripping properties for plastic and laminate. Some “bonding” primers work well here.
- Paint Choice: A high-quality acrylic enamel or a cabinet-specific paint will work well over the primer.
- Thin Coats: Apply thin, even coats of primer and paint. Laminate can be unforgiving of drips.
- Durability: Be mindful that laminate can be more prone to chipping or scratching than wood if the adhesion isn’t perfect. Proper priming and careful application are paramount.
Cabinet Refacing vs. Refinishing No Sanding
It’s important to distinguish between cabinet refacing and cabinet refinishing. Cabinet refacing no sanding usually refers to replacing the visible parts of your cabinets, like the doors and drawer fronts, with new ones, and then applying a veneer or laminate to the existing cabinet boxes. This is a more involved and costly process than simply painting.
Our focus here is on cabinet refinishing no sanding, which is about updating the look of your existing cabinets through cleaning, priming, and painting. It’s a DIY-friendly and budget-conscious way to transform your kitchen.
Spray Paint Cabinets No Prep? Not Exactly
While the goal is to minimize prep, spray paint cabinets no prep is not a realistic approach for a durable, professional finish. Even spray painting requires thorough cleaning and the right primer for the paint to adhere properly and avoid peeling or chipping. You can spray paint cabinets without sanding, but you cannot spray paint cabinets with no prep whatsoever. The “no prep” phrase often implies skipping sanding, not skipping cleaning and priming.
Brush On Cabinet Finish No Sanding
A brush on cabinet finish no sanding is entirely achievable. The key is to use a good quality brush and to apply the paint or finish in thin, even coats.
- Brush Selection: Invest in good quality brushes. Synthetic bristles are best for water-based paints, while natural bristles are for oil-based paints. A good quality brush will leave fewer brush marks.
- Application Technique: Load the brush with paint but avoid overloading it. Apply in long, smooth strokes. Try to work in sections and maintain a wet edge to avoid lap marks.
- Multiple Coats: Building up the finish with multiple thin coats applied by brush will yield a smoother, more durable result than trying to get coverage with one thick coat.
Common Pitfalls and How to Avoid Them
Even with the “no sand” method, some mistakes can derail your project.
- Insufficient Cleaning: This is the number one reason for adhesion failure. Degrease and clean thoroughly.
- Skipping Primer: While some “all-in-one” paints exist, a dedicated no sand cabinet primer provides a crucial layer for adhesion and a smooth finish.
- Applying Thick Coats: This leads to drips, runs, and a less durable finish. Always aim for thin, even coats.
- Not Allowing Proper Drying/Curing Time: Paint needs time to bond. Rushing the process will compromise durability.
- Using Low-Quality Paint or Brushes: Good products make a significant difference in the final outcome and longevity.
Table: Product Comparison for Cabinet Refinishing No Sand
| Product Type | Best For | Pros | Cons | Prep Notes |
|---|---|---|---|---|
| No-Sand Primer | Bonding to existing finishes without sanding | Excellent adhesion, creates smooth base | May require a topcoat for maximum durability | Thorough cleaning is paramount. Light scuff sanding after priming is optional but good. |
| Latex/Acrylic Enamel | General cabinet painting, wide color range | Easy cleanup, low VOCs, quick drying, durable with prep | Can chip if prep is poor | Requires primer. |
| Chalk Paint | Matte, vintage, or distressed finishes | Easy to apply, minimal prep, unique look | Needs a protective topcoat (wax/polycrylic), less durable if unsealed | Minimal prep, but topcoat is essential. |
| Laminate Bonding Primer | Adhering to laminate or plastic surfaces | Specifically formulated for slick surfaces, excellent grip | Can be more expensive, specific application instructions | Crucial for laminate. Extreme cleaning is necessary. |
| All-in-One Cabinet Paint | Simplification of process | Combines priming and painting | Durability can vary; often better with a separate primer | Thorough cleaning still essential. Test in an inconspicuous area. |
Frequently Asked Questions (FAQ)
Q1: Can I paint over old polyurethane without sanding?
Yes, with the right products. You’ll need a high-adhesion primer designed for slick surfaces or a dedicated no sand cabinet primer. Thorough cleaning to remove any wax or grease from the polyurethane is essential.
Q2: What is the best paint for kitchen cabinets without sanding?
High-quality acrylic enamel paints or specialized cabinet paints are generally recommended for their durability and finish. Chalk paint can also be used but requires a robust protective topcoat.
Q3: How long does refinishing cabinets without sanding take?
The time can vary greatly depending on the size of your kitchen, your experience level, and whether you spray or brush. However, skipping sanding can cut the prep time significantly. Expect anywhere from a weekend to a full week for drying and application of multiple coats.
Q4: Will paint applied without sanding chip or peel?
If you skip the cleaning and priming steps, yes, it is much more likely to chip or peel. However, with thorough cleaning, a high-quality no sand cabinet primer, and proper application of a good cabinet paint, the finish can be very durable.
Q5: What’s the difference between cabinet refacing and refinishing?
Cabinet refacing involves replacing doors, drawer fronts, and often adding a new veneer to the cabinet boxes. Refinishing is the process of painting or staining your existing cabinets to update their look. This guide focuses on refinishing without sanding.
Q6: Can I use liquid sandpaper for cabinet refinishing?
Liquid sandpaper cabinet refinishing products (also known as de-glosser or surface preparation solutions) can be helpful. They work by chemically etching the surface, creating a bit of “tooth” for the paint to adhere to, mimicking some of the effect of light sanding. They are a good alternative if you want to avoid physical sanding altogether. Apply according to the product instructions after cleaning.
Q7: What about spraying cabinets without sanding? Is it a good idea?
You can spray paint cabinets without sanding, but “no prep” is a misnomer. You still need to clean and prime thoroughly. Spraying offers a very smooth, professional finish, but it requires a good sprayer, practice, and meticulous masking of surrounding areas.
Q8: My cabinets are laminate. Can I still refinish them without sanding?
Yes, laminate cabinet refinishing without sanding is possible. However, it’s crucial to use a primer specifically designed to adhere to laminate or plastic surfaces, as these are often very slick. Thorough cleaning is even more important for laminate.
Q9: What is a cabinet makeover no sanding?
A cabinet makeover no sanding refers to a project where you update the appearance of your kitchen cabinets without the labor-intensive step of sanding. This typically involves cleaning, priming, and painting or using other modern finishes.
Q10: Do I really need a special no-sand cabinet primer?
While some high-quality paints claim to adhere directly, using a no sand cabinet primer is highly recommended. It provides a reliable base for your paint to adhere to, ensuring a longer-lasting and more professional-looking finish, especially on surfaces that are naturally slick like laminate or existing varnish. It acts as a critical bonding layer.
Conclusion
Refinishing kitchen cabinets without sanding is a fantastic way to achieve a dramatic kitchen transformation with less effort and mess. By focusing on meticulous cleaning, using the right modern products like a quality no-sand cabinet primer and durable cabinet paint, and applying them with care, you can achieve a beautiful, updated look for your kitchen. Whether you’re looking to paint kitchen cabinets no sanding, tackle laminate cabinet refinishing, or simply want a fresh cabinet makeover no sanding, this guide provides the steps for success. Enjoy your refreshed kitchen!