
Can you remove a tile backsplash yourself? Yes, with the right tools and a bit of patience, you can definitely remove a tile backsplash yourself. This guide will walk you through the entire process, from preparation to the final clean-up, making kitchen backsplash removal a manageable DIY project.
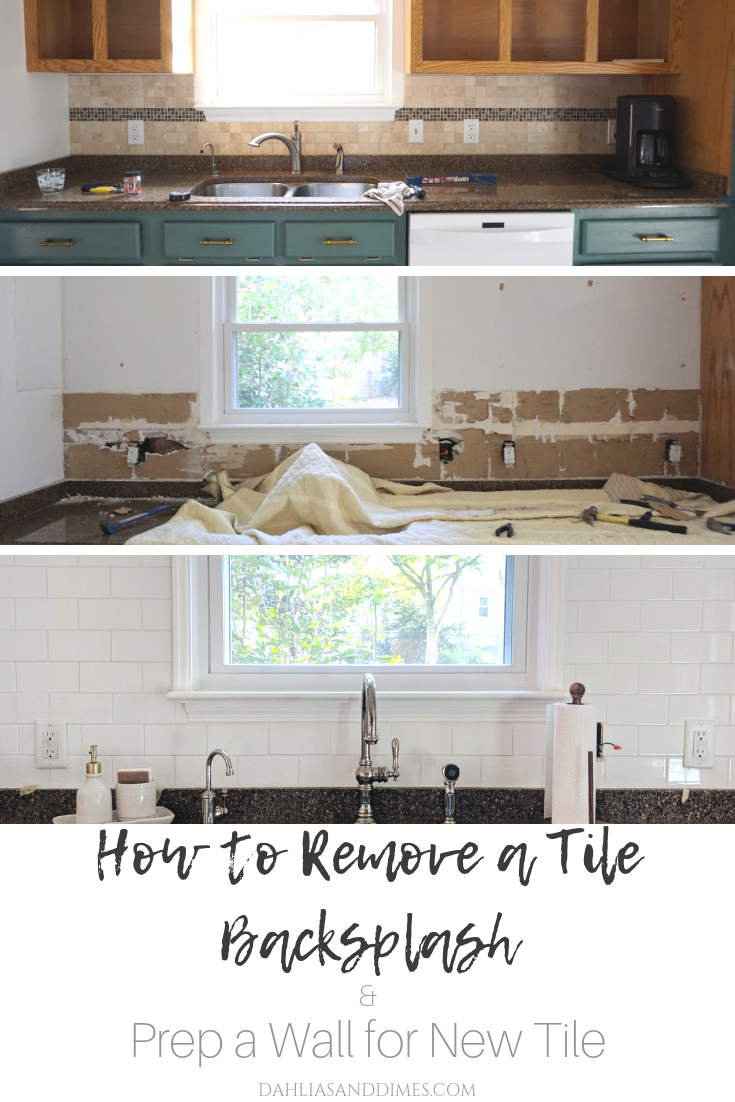
Image Source: forresterhome.com
Getting Ready for Tile Backsplash Removal
Before you begin demoing kitchen backsplash, proper preparation is key to a smooth and safe experience. This involves gathering your supplies, protecting your surroundings, and understanding the scope of the job.
What You’ll Need: Essential Tiling Tools and Safety Gear
Having the right tools makes all the difference when tackling DIY tile removal. Here’s a list of essential items you’ll need:
- Safety Glasses: Protect your eyes from flying debris.
- Work Gloves: Prevent cuts and abrasions from sharp tile edges and tools.
- Dust Mask: Essential for preventing inhalation of dust and grout particles.
- Putty Knife or Scraper: For scraping tile adhesive and loose grout. A stiff, wide blade is best.
- Grout Saw or Utility Knife: To cut through the grout lines, making tile removal easier.
- Hammer: For breaking stubborn tiles or tapping in pry tools.
- Pry Bar or Flat Bar: To gently pry tiles away from the wall.
- Chisel (Cold Chisel or Masonry Chisel): For breaking up tiles or chipping away stubborn adhesive.
- Scraper (Heavy-Duty): For removing thick layers of tile adhesive.
- Bucket and Sponge: For cleaning up dust and debris.
- Drop Cloths or Plastic Sheeting: To protect countertops, floors, and appliances.
- Painter’s Tape: To secure drop cloths and protect adjacent surfaces.
- Utility Knife: For scoring paint or caulk around the backsplash.
- Optional: Oscillating Multi-Tool with Scraper Blade: Can significantly speed up adhesive removal.
- Optional: Heat Gun: Can soften old adhesive, making it easier to remove.
- Optional: Bucket or Heavy-Duty Trash Bags: For disposing of removed tiles.
Protecting Your Workspace: Shielding Your Kitchen
Protecting your kitchen is crucial to avoid damage and unnecessary cleaning.
Protecting Countertops and Appliances
- Lay down sturdy drop cloths or thick plastic sheeting over your countertops, sink, and any appliances that cannot be moved.
- Secure the edges of the drop cloths with painter’s tape to prevent them from shifting during the backsplash demolition.
- For appliances like your oven or refrigerator, consider covering them completely, especially if they are close to the backsplash area.
Protecting Flooring
- Extend your drop cloths or plastic sheeting onto the kitchen floor in front of the backsplash.
- If you have sensitive flooring, consider using a heavier-duty floor protection material like cardboard or Ram Board, especially if you anticipate significant debris.
Disconnecting Utilities (If Necessary)
- If your backsplash is behind an electrical outlet or a gas appliance, safe tile removal means turning off the power or gas supply to those areas at the breaker box or main shut-off valve. If you are unsure about this, it’s best to consult a qualified professional.
The Removal Process: A Step-by-Step Approach
Now that your workspace is prepped, it’s time to get down to the business of removing the tile backsplash.
Step 1: Removing Grout – The First Line of Defense
The grout is what holds the tiles together and bonds them to the wall. Removing it is often the first step in tile grout removal.
Using a Grout Saw or Utility Knife
- Grout Saw: This specialized tool has a serrated blade designed to cut through grout. Work the saw back and forth along each grout line. Apply steady pressure.
- Utility Knife: For a less intensive approach, a sharp utility knife can be used to score and cut through the grout. You may need to make multiple passes.
- Scraping: Once scored, use a putty knife or scraper to push out the loosened grout. Work carefully to avoid damaging the tiles or the wall behind them.
Tips for Effective Grout Removal
- Work in Sections: Don’t try to remove all the grout at once. Tackle one section at a time.
- Keep Blades Sharp: Dull blades will make the job harder and can lead to damaging the wall.
- Be Patient: This step can be tedious but is important for easier tile removal.
Step 2: Loosening and Removing Tiles
With the grout lines cleared, you can start loosening the tiles.
Gentle Prying Techniques
- Start with Loose Tiles: Look for any tiles that might already be loose. These are your starting points.
- Insert a Pry Bar: Gently insert the tip of a flat bar or putty knife into the grout line next to a tile.
- Leverage Carefully: Apply gentle, steady pressure to pry the tile away from the wall. Avoid excessive force, which can damage the drywall.
- Work Around Edges: If prying from one side doesn’t work, try inserting the tool along another edge.
Breaking Stubborn Tiles
- Hammer and Chisel: For tiles that are firmly adhered, you might need to break them. Place the tip of a chisel against the tile, ideally in a corner or edge.
- Tap Gently: Lightly tap the end of the chisel with a hammer. The goal is to crack the tile.
- Work in Small Pieces: Once cracked, you can use the chisel and hammer to break the tile into smaller, more manageable pieces. Be sure to wear your safety glasses, as pieces can fly.
- Scraping Adhesive as You Go: As tiles loosen, use your putty knife to start scraping tile adhesive that is still attached.
Dealing with Different Tile Materials
- Ceramic and Porcelain: These are generally harder and may require more effort, including the hammer and chisel method.
- Glass Tiles: Glass tiles are more fragile. They may shatter, so proceed with extra caution and ensure thorough eye protection.
- Natural Stone: Stone tiles can be beautiful but also brittle. Treat them with care, using gentler prying methods.
Step 3: Removing Tile Adhesive
Once the tiles are off, you’ll likely be left with a layer of adhesive. This is a critical step in the kitchen backsplash removal process.
Scraping Away Old Adhesive
- Stiff Putty Knife/Scraper: Use a stiff putty knife or a heavy-duty scraper to chip and scrape away as much of the adhesive as possible. Work at an angle to lift the adhesive.
- Hammer and Chisel: For thicker, more stubborn patches of adhesive, the hammer and chisel combination can be effective. Again, be mindful of the wall material.
- Heat Gun (Optional): A heat gun can warm and soften certain types of adhesive, making it much easier to scrape off. Hold the heat gun a few inches from the surface and move it back and forth. Caution: Do not overheat the wall, especially if it’s drywall. Test in an inconspicuous area first.
- Oscillating Multi-Tool: If you have one, an oscillating tool with a scraper blade attachment is excellent for removing adhesive quickly and efficiently.
Preparing the Wall for New Materials
- Smooth Surface: Aim to create as smooth a surface as possible. Any significant bumps or ridges can affect the installation of new materials.
- Check for Damage: As you remove the adhesive, inspect the underlying wall for any damage like gouges or soft spots. Address these before proceeding to the next step.
Step 4: Dealing with What’s Behind the Tile
Sometimes, there’s more than just the wall surface behind your tile backsplash.
Stripping Wallpaper Behind Tile
- If the tiles were installed over wallpaper, you might need to remove the wallpaper after the tiles are gone.
- Score the Wallpaper: Use a scoring tool to create small perforations in the wallpaper. This allows water or stripper to penetrate.
- Apply Wallpaper Remover: Follow the product instructions for your chosen wallpaper remover solution or use hot water with a bit of dish soap.
- Let it Soak: Allow the solution to soak into the wallpaper for the recommended time.
- Peel and Scrape: Use a wide putty knife or scraper to peel away the loosened wallpaper. You may need to repeat the process for stubborn sections.
- Clean the Wall: Once the wallpaper is off, clean the wall thoroughly with a sponge and water to remove any residue.
Repairing Wall Damage
- Drywall Damage: If you notice holes or gouges in the drywall, you’ll need to repair them. Small holes can be filled with spackling compound and sanded smooth once dry. Larger holes may require patching with drywall tape and joint compound.
- Water Damage: If you discover signs of water damage (soft spots, mold, discoloration), address the source of the water issue immediately. This might require cutting out and replacing damaged sections of drywall.
Step 5: Final Clean-Up
A thorough clean-up ensures your kitchen is ready for the next stage.
Removing Debris
- Sweep and Vacuum: Sweep up all loose tile fragments, grout dust, and adhesive bits. Use a vacuum cleaner with a hose attachment to get into corners and crevices.
- Wipe Down Surfaces: Use a damp sponge or cloth to wipe down countertops, cabinets, and appliances to remove any remaining dust.
Proper Disposal of Materials
- Bagging Debris: Place all tile fragments and debris into sturdy trash bags.
- Heavy-Duty Bags: For larger or heavier pieces, consider using contractor-grade trash bags.
- Check Local Regulations: Some areas have specific regulations for disposing of construction debris. Check with your local waste management service.
Frequently Asked Questions About Kitchen Backsplash Removal
Here are answers to common questions people have when removing a tile backsplash.
Q1: How long does it take to remove a tile backsplash?
A: The time it takes varies greatly depending on the size of the backsplash, the type of tile, the adhesive used, and your experience level. A small backsplash might take a few hours, while a large, heavily tiled area could take a full day or more, especially if there are stubborn adhesives or underlying wall issues.
Q2: Can I remove tile backsplash without damaging the drywall?
A: It’s possible, but it requires patience and the right techniques. Using gentler tools like a putty knife and prying carefully can minimize damage. However, some minor drywall damage is often unavoidable, especially with strong adhesives or older walls. Plan for potential drywall repairs.
Q3: What is the best tool for scraping tile adhesive?
A: A stiff, wide-bladed putty knife or a heavy-duty scraper is generally best for scraping tile adhesive. For more challenging adhesives, an oscillating multi-tool with a scraper blade or a heat gun can be very effective.
Q4: Do I need to remove all the old adhesive?
A: It’s highly recommended to remove as much of the old adhesive as possible for a clean and even surface for replacing kitchen backsplash. Thick, uneven adhesive can make it difficult to install new tiles or other backsplash materials and can compromise the adhesion of the new material.
Q5: What if my backsplash is installed over plaster instead of drywall?
A: Working with plaster can be different. Plaster is generally harder than drywall. You might find that tiles are more difficult to pry off without chipping the plaster. Use a sharp chisel and hammer carefully, and be prepared for more plaster dust. You may also need to repair any gouges or chips in the plaster.
Q6: Can I just tile over the old backsplash?
A: In some cases, yes, but it’s usually not the best practice. Tiling over an existing backsplash can add significant thickness to your wall, potentially creating issues with cabinet clearances, outlet covers, and overall aesthetics. It also doesn’t address any underlying issues with the original installation. For the best results and a professional finish, DIY tile removal is often the preferred route.
Q7: What are the risks involved in safe tile removal?
A: The main risks include:
* Eye Injury: From flying debris or shattered tiles.
* Cuts and Scrapes: From sharp tile edges or tools.
* Inhaling Dust: Grout and tile dust can be harmful to your lungs.
* Drywall Damage: Prying too hard can rip chunks out of your drywall.
* Electrical Hazards: If working near outlets without turning off power.
* Plumbing Issues: If you accidentally hit a pipe, though this is rare with backsplashes.
Conclusion: Ready to Transform Your Kitchen?
Removing a tile backsplash might seem daunting, but with this step-by-step guide, you’re well-equipped to tackle the backsplash demolition. Remember to prioritize safety, protect your kitchen, and work methodically. Once the old backsplash is gone and the wall is prepped, you’ll be one step closer to installing your beautiful new replacing kitchen backsplash and giving your kitchen a fresh, updated look. Happy demolishing!