
Can you easily repair screw holes in kitchen cabinets? Yes, you absolutely can! With a few common household items and some simple steps, you can make those unsightly screw holes disappear, restoring the pristine look of your kitchen cabinets. Whether you’re removing old hardware, making a mistake during installation, or simply dealing with the wear and tear of time, fixing these small imperfections is a straightforward DIY project that anyone can tackle.
Kitchen cabinets are a significant investment in your home’s aesthetic and functionality. Over time, you might find yourself wanting to update your cabinet hardware, or perhaps you’ve encountered a stripped screw hole during a DIY project. Whatever the reason, addressing visible screw holes can dramatically improve the appearance of your cabinetry. This guide will walk you through how to fill screw holes cabinets, patch cabinet holes, and generally repair cabinet holes with confidence.
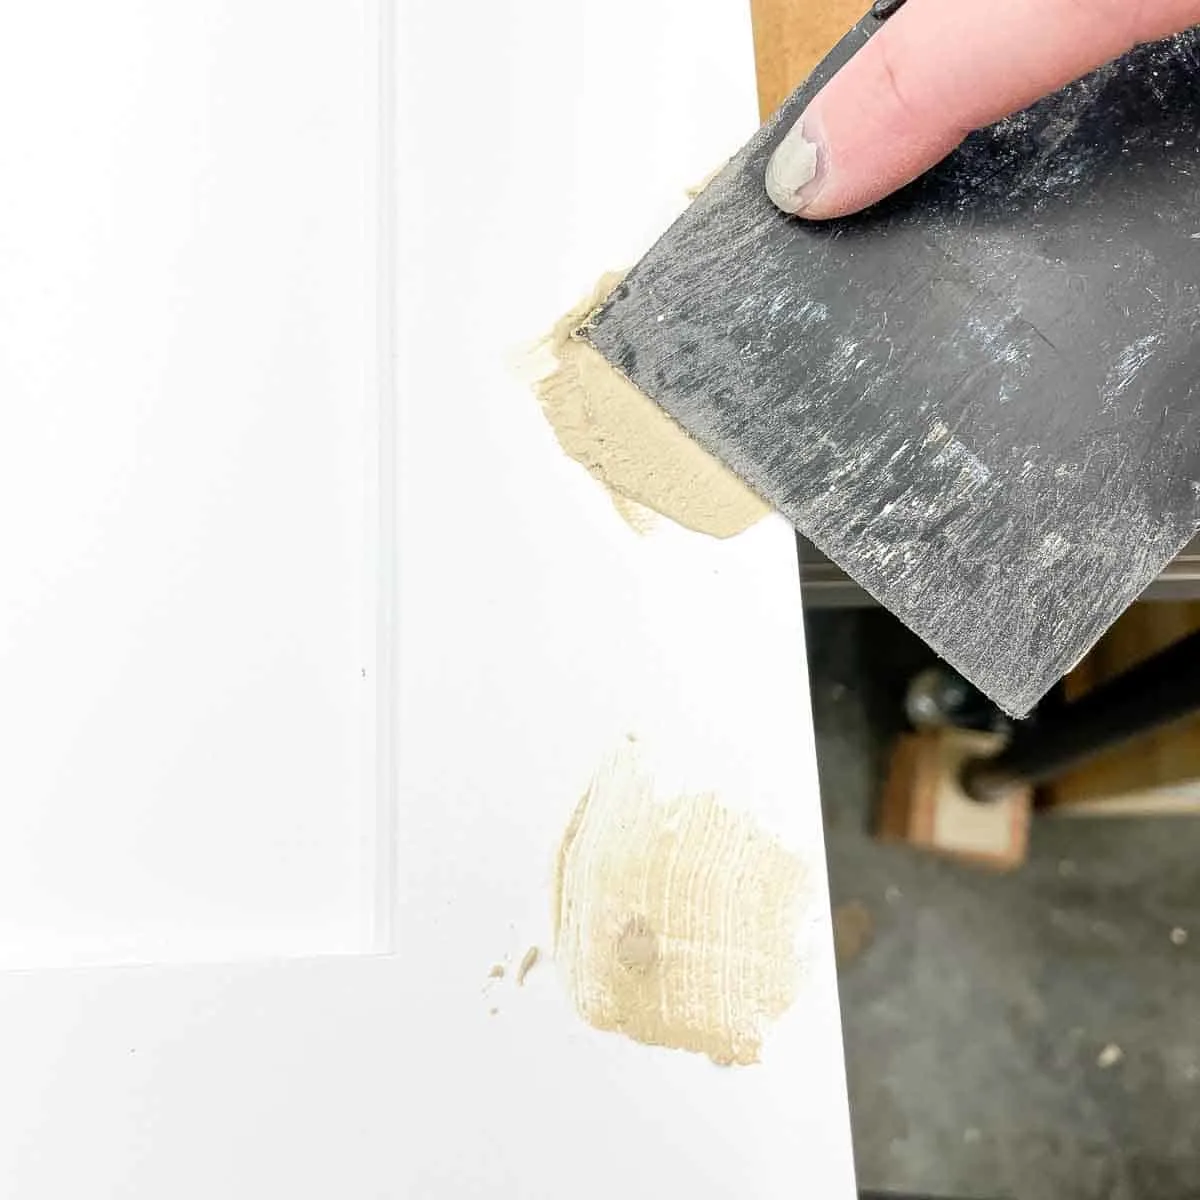
Image Source: www.thehandymansdaughter.com
Why Repair Screw Holes in Kitchen Cabinets?
Visible screw holes can detract from the overall beauty of your kitchen. They can make cabinets look worn, unfinished, or even damaged. Repairing them not only enhances the visual appeal but also prevents dust and grime from accumulating in these small crevices, making cleaning easier. It’s a simple step that makes a big difference in maintaining a clean and polished kitchen environment.
Assessing the Damage: Types of Screw Holes
Before you start to patch cabinet holes, it’s helpful to know what kind of hole you’re dealing with. Most commonly, you’ll encounter two main types:
1. Standard Screw Holes
These are clean holes created by a screw being driven into the cabinet material. They are typically consistent in size and shape.
2. Stripped Screw Holes
These occur when the screw has spun too many times, reaming out the material around the hole. The screw will no longer tighten properly. This is a common issue when trying to fix stripped screw holes.
3. Enlarged or Damaged Holes
Sometimes, a screw might have been too large, or the material around the hole has become soft or damaged, leading to a larger or irregular opening.
Gathering Your Supplies: What You’ll Need
To effectively fill screw holes cabinets, you’ll want to gather a few essential items. Having everything ready before you begin will make the process smoother and more efficient.
- Wood Filler or Putty for Cabinets: This is your primary material for patching. There are various types, so choosing the right one is important.
- Putty Knife or Spreader: For applying and smoothing the filler.
- Fine-Grit Sandpaper (e.g., 220-grit): For smoothing the dried filler.
- Clean Cloths or Paper Towels: For cleaning up excess filler and dust.
- Primer (optional): If you plan to paint over the repair.
- Paint or Stain: To match your existing cabinets.
- Small Brush or Applicator: For applying touch-up paint or stain.
- Gloves: To keep your hands clean.
- Screwdriver: To remove any existing hardware.
- Toothpicks or Small Wooden Dowels (for stripped holes): A common trick to help fix stripped screw holes.
Choosing the Right Wood Filler for Cabinets
The type of filler you use depends on the cabinet material and the desired finish. This is a crucial step when you want to repair cabinet holes successfully.
Types of Wood Fillers:
| Filler Type | Description | Best For | Considerations |
|---|---|---|---|
| Water-Based Wood Filler | Comes in a paste or cake form. It’s easy to use and cleans up with water. Dries relatively quickly. | Small holes, nail holes, minor dents. Good for interior use. | Can shrink slightly as it dries, may require a second application for larger holes. |
| Solvent-Based Wood Filler | Often comes in a can and is more durable. It’s excellent for larger repairs and exterior applications. | Deeper holes, gouges, and structural repairs. Holds screws well after drying. | Requires mineral spirits for cleanup. May have stronger fumes. Can be harder to sand. |
| Two-Part Epoxy Filler | A very strong and durable option. It consists of two components that are mixed together. | Deep holes, structural repairs, areas that need to withstand significant stress. | Dries very hard and can be difficult to sand. Requires precise mixing. Excellent for fixing stripped screw holes. |
| Wood Putty | Softer and more pliable than wood filler. It’s designed to be used on finished surfaces without sanding. | Filling small imperfections where sanding is not possible or desired. | Not suitable for structural repairs or areas that will bear weight. May not accept stain or paint. |
For most cabinet hardware repair, a good quality wood filler for cabinets that can be sanded and painted or stained is ideal. Look for products specifically labeled for furniture or cabinetry.
Step-by-Step Guide: How to Repair Screw Holes in Kitchen Cabinets
Let’s get down to the practical steps for how to repair screw holes in kitchen cabinets. This guide covers both standard holes and the common problem of how to fix stripped screw holes.
Step 1: Prepare the Area and Remove Hardware
First, remove any cabinet hardware that is in the way of the screw hole you want to repair. Use your screwdriver to carefully take out hinges, handles, or knobs. If you’re only repairing a small hole, you might be able to work around larger hardware, but it’s usually best to remove it for a cleaner finish.
Next, clean the area around the screw hole. Use a damp cloth to remove any dust, grease, or debris. A clean surface ensures the filler adheres properly.
Step 2: Fill the Screw Hole (Standard Holes)
This is where you’ll fill screw holes cabinets with your chosen filler.
- Apply the Filler: Take a small amount of wood filler using your putty knife.
- Overfill Slightly: Press the filler firmly into the screw hole, ensuring it fills the entire cavity. It’s better to slightly overfill the hole, as the filler may shrink a little as it dries.
- Smooth the Surface: Scrape off any excess filler with the putty knife, leaving the surface as smooth as possible and slightly raised above the cabinet surface.
Allow the wood filler to dry completely according to the manufacturer’s instructions. Drying times can vary from a few minutes to several hours.
Step 3: Address Stripped Screw Holes
If you’re dealing with a stripped screw hole, the process is a bit different. The goal here is to provide new material for the screw to grip. Here’s how to fix stripped screw holes:
Method 1: Toothpicks or Golf Tees
- Insert Toothpicks: Dip a few wooden toothpicks (or a wooden golf tee) into wood glue.
- Pack the Hole: Insert the toothpicks into the stripped hole until it’s packed tightly.
- Break Off Excess: Break or cut off the ends of the toothpicks so they are flush with the cabinet surface.
- Let it Dry: Allow the glue to dry completely.
- Proceed to Fill (Optional): Once dry, you can gently sand the area and then apply a small amount of wood filler over the toothpicks for a perfectly smooth finish, if needed. This creates a solid base for the screw.
Method 2: Wood Glue and Sawdust
- Mix Paste: Mix wood glue with sawdust from your cabinets (or fine sawdust from a craft store) to create a thick paste.
- Pack the Hole: Use a putty knife or toothpick to pack this paste firmly into the stripped screw hole.
- Let it Dry: Allow the mixture to dry and harden completely.
- Sand and Refill: Once dry, sand the area smooth. You might need to patch cabinet holes with a bit of wood filler if there’s any shrinkage.
Method 3: Wood Dowels
- Drill Out: For larger stripped holes, you might need to use a drill bit slightly larger than the original screw hole to create a clean, uniform opening.
- Glue Dowel: Apply wood glue to a small wooden dowel (choose a diameter that fits snugly).
- Insert and Tap: Insert the dowel into the drilled hole and tap it gently with a hammer until it’s flush or slightly above the surface.
- Let it Dry: Let the glue dry completely.
- Cut and Sand: Once dry, use a flush-cut saw to carefully cut off the excess dowel. Then, sand the area smooth. You might need a touch of filler to ensure a perfectly seamless finish.
After using one of these methods to repair cabinet holes, the screw should now have something solid to grip.
Step 4: Sanding for a Smooth Finish
Once the wood filler is completely dry, it’s time to sand.
- Gentle Sanding: Use your fine-grit sandpaper (220-grit is usually sufficient) to gently sand the dried filler.
- Feather the Edges: Sand in a circular motion, feathering the edges of the repair so it blends seamlessly with the surrounding cabinet surface. The goal is to create a smooth, level surface.
- Clean Dust: Wipe away all sanding dust with a clean, dry cloth. For a more thorough cleaning, you can use a slightly damp cloth, but ensure the surface is completely dry before proceeding.
Step 5: Priming and Painting or Staining
The final step is to make the repair invisible by matching the surrounding cabinet finish.
- Prime (if painting): If your cabinets are painted, apply a thin coat of primer over the repaired area. Allow it to dry completely. Primer helps the paint adhere better and prevents the filler from showing through.
- Paint or Stain: Apply a thin coat of paint or stain that matches your cabinet’s finish. You might need multiple thin coats to achieve good coverage. Use a small brush for precision.
- Drying: Allow each coat to dry thoroughly according to the product’s instructions.
- Touch-Up: Once the final coat is dry, check for any discrepancies. You may need to do some very light sanding with extra-fine grit sandpaper (like 320-grit or higher) between coats for a perfectly smooth finish.
If your cabinets are stained, you’ll need to find a stain that closely matches the existing color. Testing the stain on an inconspicuous area first is highly recommended. Sometimes, you might need to use a combination of stains to get a perfect match. For this, having a screw hole filler kitchen that accepts stain well is key.
Tips for a Perfect Repair
- Patience is Key: Don’t rush the drying times for glue or filler.
- Thin Coats: Apply paint or stain in thin, even coats rather than one thick one.
- Lighting: Work in good lighting so you can see imperfections clearly.
- Test First: If you’re unsure about a paint or stain match, test it on a scrap piece of wood or an unseen area of the cabinet.
- Quality Matters: Using good quality wood filler and sandpaper will yield better results.
- Cabinet Hardware Repair: When reattaching hardware, ensure you’re using the correct size screws. Don’t overtighten, especially if you’ve had to repair stripped holes.
Specific Scenarios for DIY Cabinet Holes
Let’s consider some specific scenarios you might encounter when attempting DIY cabinet holes repair.
Scenario 1: Holes from Old Shelf Pins
Often, shelves are adjustable, and the holes for shelf pins can become unsightly if you decide to change the layout or remove a shelf altogether. These are typically small, clean holes.
How to Repair:
- Use a good quality wood filler for cabinets.
- Apply the filler with a small putty knife or even a toothpick.
- Ensure it’s packed well and slightly overfilled.
- Once dry, sand smooth and touch up with paint or stain to match.
- This is a great use for putty for cabinets if you want a quick fix without sanding.
Scenario 2: Holes from Removed Drawer Pulls
Drawer pulls often leave two holes spaced apart. If you’re changing to a different style of hardware or opt for a seamless look, you’ll need to patch these.
How to Repair:
- For standard holes, follow the steps outlined in Section 5.
- If the holes are larger or the wood is soft, consider using small wood dowels as described in Step 3 (Method 3) for maximum strength and a seamless finish.
- After filling and sanding, you might need to prime and paint carefully to hide the repair, especially if the original finish was painted.
Scenario 3: Accidental Drill Holes
Sometimes, during a project, you might accidentally drill a hole in the wrong place.
How to Repair:
- Assess the size and depth of the hole.
- For small, clean holes, wood filler is usually sufficient.
- For larger or deeper holes, you might need to use a small block of wood that’s glued into place, then sand and finish. This method is more advanced but ensures a solid repair.
- The goal is to patch cabinet holes so they are undetectable.
Frequently Asked Questions (FAQ)
Here are some common questions people have when tackling cabinet repairs:
Q1: Can I use toothpaste to fill screw holes in cabinets?
A1: While toothpaste is sometimes suggested for very minor cosmetic fixes on surfaces like walls, it is not recommended for filling screw holes in kitchen cabinets. Toothpaste is not designed to harden permanently, it can attract moisture, and it will likely crumble or wash away over time, leaving the hole exposed again. Always use a proper wood filler for cabinets or putty for cabinets for lasting results.
Q2: How do I match the paint color for my cabinet repairs?
A2: The best way to match paint is to find the original paint can if possible. If not, you can try to find a paint chip from a small, inconspicuous area (like the back of a door or inside a cabinet) and take it to a paint store for color matching. Alternatively, you can buy a small sample pot of various shades that look similar and test them on a piece of scrap wood or a hidden cabinet surface until you find the best match.
Q3: Will wood filler hold a screw after it dries?
A3: Most standard wood fillers are not designed to hold screws after they dry. They are primarily for filling holes for cosmetic purposes. If you need to re-install hardware in a repaired hole, you must first fix the hole using methods that provide structural integrity, such as using wood glue and toothpicks, dowels, or a two-part epoxy filler for a truly solid repair. This is crucial for effective cabinet hardware repair.
Q4: How long does wood filler take to dry?
A4: Drying times vary significantly depending on the type of wood filler, the depth of the hole, and humidity levels. Water-based fillers can dry in as little as 15-30 minutes for thin applications, but thicker applications or deeper holes may take several hours. Solvent-based and epoxy fillers typically have longer drying and curing times. Always check the product packaging for specific drying and recoating instructions.
Q5: What is the best way to repair a hole in a laminate cabinet?
A5: Repairing holes in laminate cabinets requires different materials than wood. For laminate, you’ll typically use a laminate repair kit, which often includes colored putty or filler that can be color-matched. For small holes, a good quality epoxy or a specialized laminate filler might work. Sanding is usually not an option for laminate as it can damage the surface. The focus is on filling and then color matching.
Conclusion
Repairing screw holes in kitchen cabinets is a rewarding DIY task that can significantly enhance your kitchen’s appearance. By following these steps, choosing the right materials like wood filler for cabinets or putty for cabinets, and taking your time, you can effectively fill screw holes cabinets, patch cabinet holes, and repair cabinet holes with professional-looking results. Whether it’s a simple screw hole filler kitchen job or addressing stripped screw holes, these techniques will help you maintain and improve the beauty of your cabinetry. Happy fixing!