
Can you sand and repaint kitchen cabinets yourself? Yes, you absolutely can sand and repaint your kitchen cabinets yourself! With the right preparation, tools, and a little patience, you can achieve a professional-looking finish that transforms your kitchen. This guide will walk you through the entire process, offering pro tips for a successful cabinet refinishing project.
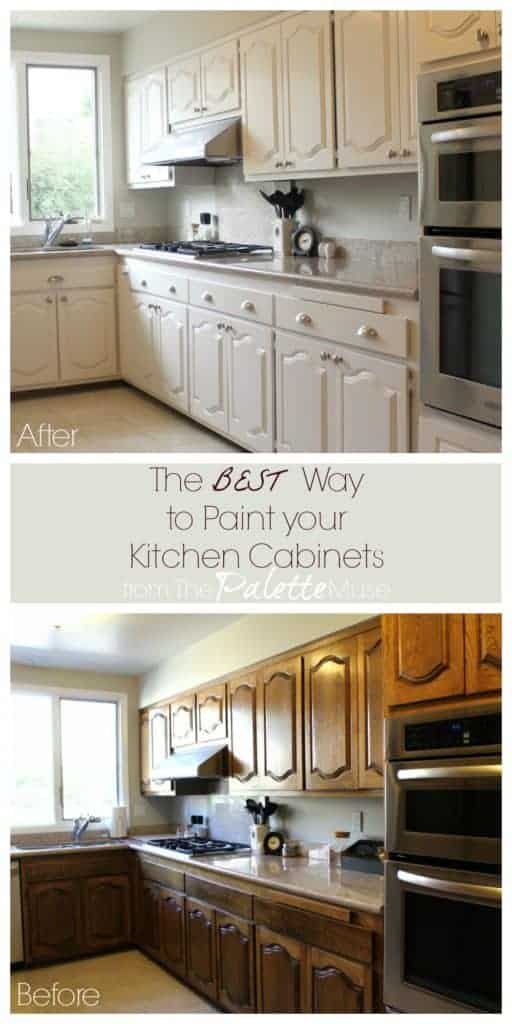
Image Source: thepalettemuse.com
How To Sand And Repaint Kitchen Cabinets: Pro Tips
Giving your kitchen cabinets a fresh coat of paint is one of the most impactful DIY projects you can undertake. It’s a budget-friendly way to update your kitchen’s look without the expense of refacing kitchen cabinets or a full remodel. However, achieving a smooth, durable, and beautiful finish requires careful attention to detail, especially during the cabinet painting prep and sanding stages. Let’s dive into how to sand and repaint kitchen cabinets like a pro.
Deciphering the Cabinet Refinishing Process
Cabinet refinishing is the process of restoring the appearance of your cabinets. This often involves cleaning, sanding, priming, and painting or staining. Repainting is a popular method of cabinet refinishing because it offers a dramatic visual transformation. For our purposes, we’ll focus on repainting.
Laying the Groundwork: Essential Cabinet Painting Prep
Proper preparation is the cornerstone of any successful painting project, and cabinet painting prep is no exception. Skipping steps here will almost certainly lead to a less-than-perfect final product.
Step 1: Empty and Remove Cabinet Doors and Drawers
- Clear Everything Out: Begin by removing all items from your cabinets and drawers.
- Label Everything: As you remove doors and drawers, label them clearly. Use painter’s tape and a pen to mark the corresponding cabinet opening. This is crucial for putting everything back in the correct place. You can number the doors and draw corresponding numbers inside the cabinet frames.
- Keep Hardware Together: Store all hinges, knobs, and screws in labeled bags to avoid confusion.
Step 2: Clean the Cabinets Thoroughly
Grease, grime, and food splatters are enemies of good paint adhesion. A deep clean is non-negotiable.
- Degreaser is Key: Use a good quality degreaser or a solution of TSP (Trisodium Phosphate) substitute and water. Apply with a sponge or cloth, working in sections.
- Rinse and Dry: Wipe down the cabinets with a clean, damp cloth to remove any degreaser residue. Then, dry them thoroughly with a clean towel. Any remaining moisture can interfere with sanding and priming.
Step 3: Protect Your Workspace
Painting can be messy. Protect your countertops, floors, and appliances.
- Drop Cloths: Use sturdy drop cloths or old sheets to cover your work surfaces.
- Painter’s Tape: Apply painter’s tape along the edges of your countertops, backsplashes, walls, and any areas you want to protect from paint. Ensure a tight seal to prevent paint bleed.
- Ventilation: Open windows or use fans to ensure good ventilation, especially if you are using stronger cleaners or primers.
The Art of Cabinet Sanding Techniques
Sanding is vital for creating a smooth surface for paint to adhere to. It removes old finishes, smooths out imperfections, and creates a “tooth” for the primer to grip. Mastering cabinet sanding techniques will elevate your kitchen cabinet restoration.
Step 4: Sanding the Cabinet Surfaces
The goal here isn’t to strip the cabinets down to bare wood (unless you’re planning a stain finish), but to scuff up the existing finish.
- Sanding Grit Selection:
- Initial Sanding: Start with a medium-grit sandpaper, around 100-120 grit. This will effectively remove any high spots or minor imperfections and create a good base.
- Finishing Sanding: Follow up with a finer grit, such as 150-180 grit. This smooths out the surface, preparing it for primer and paint.
- Sanding Tools:
- Orbital Sander: For larger, flat areas like cabinet doors, an orbital sander can speed up the process. Use gentle pressure and keep it moving to avoid creating divots.
- Sanding Blocks: For edges, corners, and smaller areas, a sanding block or a folded piece of sandpaper is ideal.
- Detail Sanders: For intricate areas or tight corners, a detail sander or even a sanding sponge can be very useful.
- Cabinet Sanding Techniques:
- Go with the Grain: Always sand in the direction of the wood grain. This helps prevent visible scratches.
- Even Pressure: Apply even pressure across the surface. Don’t press too hard, as this can gouge the wood.
- Check Your Work: Periodically wipe away dust and inspect the surface. You should see a dull finish rather than a shiny one, indicating the surface is ready for the next step.
- Stripping Cabinet Paint (If Necessary): If your cabinets have thick, peeling, or damaged paint, you might consider stripping the old paint before sanding. This is a more labor-intensive step.
- Chemical Strippers: These are effective but require good ventilation and protective gear. Follow the product instructions carefully.
- Heat Guns: A heat gun can soften paint, making it easier to scrape off. Be cautious not to scorch the wood.
- Sanding Only: For lightly damaged paint, thorough sanding might be sufficient.
Step 5: Dust Removal is Critical
After sanding, there will be a fine layer of dust. This must be completely removed.
- Tack Cloths: These are your best friends for removing fine dust. They are slightly sticky and pick up dust particles that vacuums or brushes might miss.
- Microfiber Cloths: Use clean microfiber cloths to wipe down all surfaces.
- Vacuum: A shop vac with a brush attachment can help remove larger dust particles from crevices.
Choosing the Best Primer for Cabinets
Primer is essential for ensuring good paint adhesion and a uniform color. Choosing the best primer for cabinets makes a significant difference in the final outcome.
Step 6: Priming Your Cabinets
Primer acts as a bridge between the cabinet surface and your topcoat of paint.
- Types of Primers:
- Water-Based (Latex/Acrylic) Primer: Good for general use, dries quickly, and has low odor. Look for one specifically formulated for cabinets or high-traffic areas.
- Oil-Based Primer: Excellent adhesion, provides a very smooth finish, and is great for covering stains. However, it has a stronger odor and takes longer to dry.
- Shellac-Based Primer: Fantastic for blocking stains (like wood tannins) and odors. It dries very quickly but can be more challenging to work with.
- What is the best primer for cabinets? For most DIYers, a high-quality water-based primer specifically designed for cabinets or trim is a great choice. If you have significant staining or are painting over a dark color with a light one, an oil-based or shellac-based primer might be preferred.
- Application:
- Thin Coats: Apply thin, even coats of primer. Avoid overloading your brush or roller.
- Brush and Roll: Use a good quality synthetic brush for edges and details, and a foam roller for the larger flat surfaces.
- Drying Time: Allow the primer to dry completely according to the manufacturer’s instructions.
- Light Sanding After Priming: Once the primer is dry, do a light sanding with a very fine-grit sandpaper (220 grit or higher). This will smooth out any imperfections and ensure an ultra-smooth surface for the paint. Wipe away dust again with a tack cloth.
Mastering Cabinet Painting Supplies and Techniques
With the prep work complete and primer applied, you’re ready for the main event: painting! Having the right cabinet painting supplies and employing proper techniques will ensure a professional-looking finish.
Step 7: Painting the Cabinets
This is where your cabinets start to transform.
- Choosing Your Paint:
- Paint Type: For cabinets, you want a durable, washable paint. Alkyd (oil-based) enamels offer superior hardness but are harder to work with and have strong fumes. Water-based alkyd hybrids or high-quality acrylic enamels offer good durability and are easier to use.
- Sheen: Semi-gloss or satin finishes are generally recommended for kitchen cabinets. They are durable, easy to clean, and hide imperfections better than high-gloss while still offering a subtle sheen.
- Cabinet Painting Supplies:
- High-Quality Paint Brushes: Synthetic brushes (for water-based paints) or natural bristle brushes (for oil-based paints) are essential for detail work.
- Foam Rollers: Small, high-density foam rollers provide a smooth, lint-free finish on flat surfaces.
- Paint Sprayer (Optional): For the most professional and smooth finish, a paint sprayer is ideal. However, it requires more prep work to protect surrounding areas and practice to master.
- Painting Techniques:
- Work in Sections: Paint one door or drawer front at a time.
- Edges First: Use a brush to paint the edges and any detailed areas.
- Rollers for Flat Surfaces: Follow with a foam roller for the larger, flat surfaces, ensuring even coverage. Avoid overworking the paint.
- Thin Coats are Key: Apply multiple thin coats rather than one thick coat. This prevents drips and runs and results in a much smoother finish.
- Drying Between Coats: Allow each coat of paint to dry completely according to the manufacturer’s instructions before applying the next. This is crucial for durability.
- Sanding Between Coats (Optional but Recommended): For an ultra-smooth finish, you can lightly sand between paint coats with 220-320 grit sandpaper or a sanding sponge, then wipe with a tack cloth.
Step 8: Applying Multiple Coats
Patience is rewarded with a beautiful finish.
- Number of Coats: Typically, two to three thin coats of paint are sufficient for good coverage and durability.
- Drying and Curing: Paint dries to the touch relatively quickly, but it takes much longer to cure (harden fully). Avoid heavy use or harsh cleaning for at least 7 days after painting.
Cabinet Finishing Tips for Lasting Beauty
Beyond the painting itself, these cabinet finishing tips will ensure your kitchen cabinet restoration looks great for years to come.
Step 9: Reassembling Cabinets
Once the paint is fully dry and cured, it’s time to put everything back together.
- Reattach Hardware: Carefully reattach hinges, knobs, and drawer pulls using your labeled bags of hardware.
- Rehang Doors and Drawers: Rehang the doors and reinsert the drawers, ensuring everything aligns correctly.
Step 10: Final Touches and Maintenance
- Check for Imperfections: Inspect your newly painted cabinets for any missed spots or minor flaws. You can often touch these up carefully with a small brush.
- Clean Gently: When cleaning your cabinets, use a soft cloth and mild soap. Avoid abrasive cleaners or scrub brushes that can damage the finish.
Comparing DIY Cabinet Painting with Refacing Kitchen Cabinets
It’s worth noting the differences between DIY cabinet painting and refacing kitchen cabinets.
| Feature | DIY Cabinet Painting | Refacing Kitchen Cabinets |
|---|---|---|
| Cost | Significantly lower (paint, primer, supplies) | Moderate to high (new veneers, doors, hardware) |
| Labor | DIY, requires time and effort | Professional installation often recommended |
| Appearance | Can achieve a professional look with care and skill | Offers a brand-new cabinet appearance |
| Durability | Depends on paint quality and prep work | High, as it involves new materials |
| Customization | Wide range of color options | Limited to available door styles and finishes |
| DIY Difficulty | Moderate | High, often requires specialized tools and skills |
For those seeking a dramatic change on a budget, DIY cabinet painting is an excellent option. If your cabinet boxes are in poor condition or you desire a completely new door style, refacing kitchen cabinets might be a better long-term investment.
Frequently Asked Questions (FAQ)
Q1: How long does it take to paint kitchen cabinets?
A: The time it takes varies greatly depending on the size of your kitchen, the number of doors and drawers, and your experience level. However, a realistic estimate for DIY cabinet painting is anywhere from a long weekend to a full week or more, accounting for drying times between coats.
Q2: Do I need to strip cabinet paint?
A: You only need to strip cabinet paint if the existing finish is heavily damaged, peeling, or if you are trying to achieve a natural wood grain look (stain). For most repainting jobs where the old paint is in good condition, thorough cleaning and sanding to create a “tooth” for the new paint is sufficient.
Q3: What is the best way to apply paint to cabinets?
A: For a smooth, professional finish, a combination of brushing and rolling is often best for DIYers. Use a high-quality synthetic brush for details and edges, and a high-density foam roller for flat surfaces. For the absolute smoothest finish, a paint sprayer is recommended, but it requires more advanced skill and preparation.
Q4: How many coats of paint do I need?
A: Typically, two to three thin coats of paint are recommended for good coverage, durability, and a smooth finish. Always allow adequate drying time between coats as per the paint manufacturer’s instructions.
Q5: Can I paint over existing varnish or stain?
A: Yes, you can paint over varnish or stain. The crucial steps are to clean the cabinets thoroughly, lightly sand the surface to create adhesion, and use a good quality primer designed for adhesion to various surfaces.
By following these detailed steps and incorporating these pro tips, you can confidently tackle the task of sanding and repainting your kitchen cabinets. The result will be a beautifully refreshed kitchen that you can be proud of for years to come. Happy painting!