
What is the best way to fill the space above kitchen cabinets? The best way to fill the space above kitchen cabinets is by combining practical storage solutions with attractive kitchen decor, making use of valuable vertical space. This often involves a mix of display shelves, cabinet fillers, and carefully chosen decorative items.
That awkward gap between your upper kitchen cabinets and the ceiling can feel like a wasted opportunity. It’s a dust magnet, yes, but it’s also a prime spot for some clever storage solutions and stylish accents that can transform your kitchen. Let’s explore how to fill that space effectively, turning it from a blank canvas into a functional and beautiful extension of your kitchen.
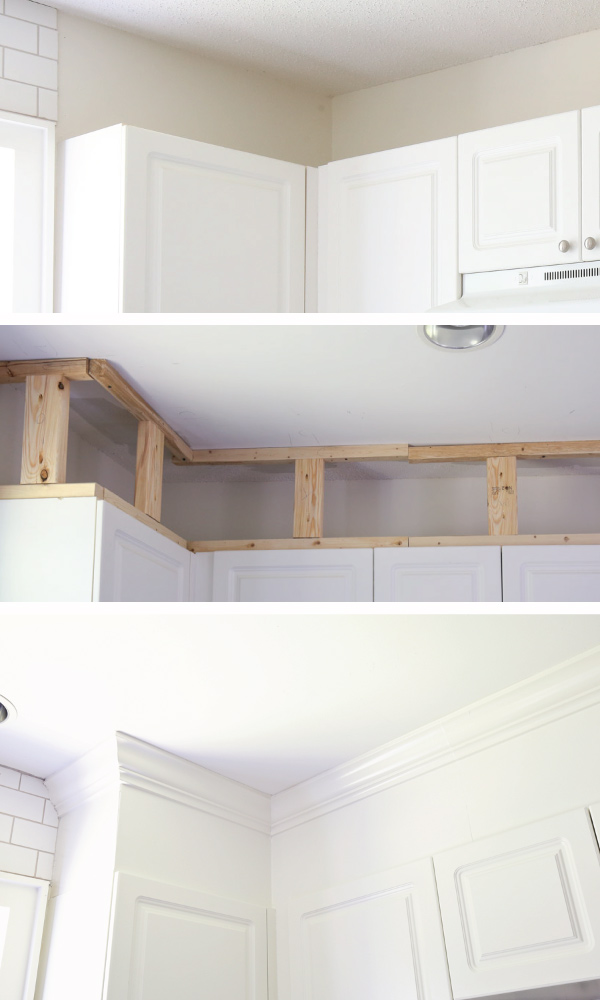
Image Source: angelamariemade.com
Maximizing Storage: Beyond the Cabinet Doors
Many kitchens, especially older ones or those in smaller homes, suffer from a lack of accessible storage. The space above cabinets is often overlooked, but it offers a significant opportunity for maximizing storage. By implementing smart strategies, you can significantly increase your kitchen’s capacity for both everyday items and those you don’t need constant access to.
Utilizing Vertical Space Effectively
Think of that space as untapped real estate. It’s all about going vertical. Instead of letting it gather dust, consider how you can bring items up and off your countertops, or how you can add decorative elements that enhance the overall aesthetic.
Smart Storage Solutions for the Upper Reaches
When we talk about storage solutions, we often focus on drawers and lower cabinets. However, the area above your cabinets is perfect for less frequently used items, seasonal cookware, or even decorative pieces that add personality.
1. Extending Cabinetry: The Seamless Look
One of the most sought-after custom solutions is to extend your existing cabinetry all the way to the ceiling. This creates a cohesive and high-end look, while also providing maximum storage.
Benefits of Extended Cabinets
- Aesthetic Appeal: It creates a unified and polished appearance, making the kitchen feel more luxurious and complete.
- Maximum Storage: You gain valuable storage space for items you don’t use daily, such as seldom-used appliances, bulk food items, or seasonal decorations.
- Easy Cleaning: Eliminates the dust-collecting gap, making cleaning much simpler.
Considerations for Extended Cabinets
- Cost: This is often the most expensive option, as it involves custom carpentry.
- Accessibility: The highest shelves might require a step stool, so consider what you’ll store there.
- Style Match: Ensure the extended cabinets match your existing style.
DIY vs. Professional Installation
While some handy individuals might attempt this as a DIY project, it typically requires professional carpentry skills for a seamless and sturdy finish. Hiring a contractor or cabinet maker is usually the best route.
2. Installing Display Shelves: Showcasing Your Style
Display shelves are a fantastic way to fill the void while adding visual interest and providing accessible storage for frequently used or attractive items.
Types of Display Shelves
- Open Shelving: Simple wooden or metal shelves that provide easy access.
- Glass-Fronted Cabinets: These mimic upper cabinets but are often shallower and designed for display.
- Floating Shelves: Modern and sleek, they create a minimalist look.
What to Display on Upper Shelves
- Decorative Items: Vases, sculptures, plants, or framed photos.
- Cookbooks: Keep your favorite recipes within easy reach.
- Attractive Serveware: Beautiful bowls, platters, or pitchers.
- Pantry Staples in Nice Containers: Jars of pasta, grains, or spices can look very appealing.
- Themed Decor: Seasonal items like holiday decorations or themed kitchenware.
Styling Tips for Display Shelves
- Curate Carefully: Don’t overcrowd the shelves. Less is often more.
- Vary Heights and Textures: Mix different types of items for visual appeal.
- Consider Lighting: Small LED strip lights can highlight your displays beautifully.
- Group Items: Arrange items in small groups for a more organized look.
3. Adding Cabinet Fillers: Bridging the Gap Creatively
Cabinet fillers are specifically designed to bridge the gap between cabinets and the ceiling. They can be purely decorative or incorporate practical storage solutions.
Decorative Cabinet Fillers
These are often made of wood or decorative molding and can be painted to match your cabinets. They simply fill the visual gap, giving a more finished look.
Functional Cabinet Fillers
- Open Shelving Units: Small, shallow shelves that can be built into the filler space.
- Glass Front Cabinets: Similar to open shelving but with glass doors to protect items from dust.
- Built-in Lighting: Adding LED strip lighting within the filler can create a beautiful ambient glow.
DIY Cabinet Filler Projects
Creating simple cabinet fillers can be a rewarding DIY project. You can build simple wooden boxes, add decorative trim, or even incorporate small shelves.
- Measure Accurately: Precise measurements are crucial for a good fit.
- Choose Appropriate Materials: Wood is common, but you can also use MDF.
- Paint or Stain: Match your existing cabinets or choose a contrasting color.
- Secure Firmly: Use screws and wood glue for a durable installation.
4. Utilizing Decorative Baskets and Containers
For a more casual and flexible approach, decorative items like attractive baskets or bins can be placed on top of cabinets.
Benefits of Baskets and Bins
- Conceal Clutter: Ideal for hiding less attractive items.
- Easy Access: You can pull them down when needed.
- Adds Texture and Color: Can introduce a new element to your kitchen decor.
What to Store in Baskets
- Less Frequently Used Cookware: Special occasion pans or serving dishes.
- Small Appliances: Portable blenders, waffle makers.
- Extra Linens: Dish towels, oven mitts.
- Children’s Party Supplies: Paper plates, napkins, decorations.
Choosing the Right Baskets
- Material: Woven seagrass, rattan, fabric, or metal.
- Size: Ensure they fit the space without looking cramped.
- Style: Complement your overall kitchen aesthetic.
5. Incorporating Lighting: Ambiance and Illumination
Adding lighting above your cabinets can dramatically change the mood and functionality of your kitchen.
Types of Lighting
- LED Strip Lights: Flexible and easy to install, they provide a soft, ambient glow.
- Puck Lights: Small, battery-operated or wired lights that can be mounted discreetly.
- Recessed Lighting: If you have a dropped ceiling or soffits, these offer a clean, integrated look.
Benefits of Upward Lighting
- Enhanced Ambiance: Creates a warm and inviting atmosphere.
- Highlights Architectural Features: Draws attention to the ceiling or any decorative elements you’ve added.
- Task Lighting (Indirect): Can subtly illuminate the countertop area.
Installation Considerations
- Electrical Access: If using wired lights, you’ll need an electrical source. Consider hiring an electrician.
- Heat: Ensure any lighting fixtures are rated for use near cabinetry and won’t cause damage.
- Control: Install a switch for easy on/off control.
Creative Solutions for Various Kitchen Styles
The best way to fill the space above your cabinets depends heavily on your kitchen’s style, your storage needs, and your budget.
Modern Kitchens
In modern kitchens, clean lines and minimalism are key.
- Extended Sleek Cabinetry: Flat-panel cabinets that go to the ceiling.
- Floating Shelves: Minimalist shelves in lacquered finishes or stainless steel.
- Integrated LED Lighting: Recessed or strip lighting that’s barely visible.
- Artistic Vases or Sculptures: A few carefully chosen, striking decorative items.
Traditional Kitchens
Traditional kitchens often feature more ornate details and a warmer feel.
- Crown Molding: Adding decorative crown molding to the existing cabinets can visually extend them upwards.
- Open Shelving with Decorative Brackets: Use ornate wood or metal brackets.
- Glass-Fronted Display Cabinets: Ideal for showcasing china or glassware.
- Baskets with a Rustic Feel: Woven materials that add texture.
- Ceramic Jugs or Antique Finds: Displaying vintage kitchenware.
Farmhouse Kitchens
Farmhouse style embraces coziness and practicality.
- Open Shelving: Perfect for displaying enamelware, rustic pottery, or cookbooks.
- Wooden Crates or Baskets: Use them to store extra linens or small pantry items.
- Galvanized Metal Bins: For a touch of industrial farmhouse charm.
- Decorative Signs or Wreaths: Adding charming touches.
- Repurposed Items: Old watering cans or ceramic pitchers.
Transitional Kitchens
Transitional kitchens blend modern and traditional elements.
- Combination of Open Shelving and Closed Storage: A mix of practicality and display.
- Simple Floating Shelves with Decorative Accents: Balance clean lines with warmer items.
- Baskets that Coordinate with Cabinetry: Choose materials like woven hyacinth or neutral-toned fabric.
Making the Most of Your Vertical Space: A Practical Guide
Let’s break down some of the most effective strategies for utilizing that often-neglected area.
Table: Storage Solutions and Their Applications
| Solution | Primary Use | Aesthetic Contribution | Best For | DIY Potential |
|---|---|---|---|---|
| Extended Cabinets | Maximum hidden storage, seamless look | High-end, cohesive, complete | Those needing significant storage and a premium finish. | Low |
| Display Shelves | Accessible storage, showcasing decorative items | Adds personality, color, and visual interest | Cookbooks, serveware, decorative items, frequently used pantry staples. | Medium |
| Cabinet Fillers | Fills gap, can add decorative or storage elements | Completes the look, customizable | Bridging the visual gap, adding small storage niches or lighting. | Medium-High |
| Decorative Baskets | Concealed storage, adds texture and color | Casual, adds warmth, hides clutter | Less frequently used items, seasonal goods, extra kitchen linens. | High |
| Lighting | Ambiance, subtle illumination | Creates mood, highlights features | Softening the kitchen atmosphere, drawing attention upwards. | Medium |
Frequently Asked Questions (FAQ)
Q1: Is it necessary to fill the space above kitchen cabinets?
No, it’s not strictly necessary, but it’s highly recommended for both aesthetic and functional reasons. Leaving the space open can make the kitchen look unfinished and creates a gathering spot for dust and grease.
Q2: Can I use the space above cabinets for everyday items?
While you can, it’s generally best to reserve the highest shelves for items you don’t use frequently, due to accessibility issues. However, if you install easily accessible shelves, everyday items can certainly be stored there.
Q3: How do I clean the space above cabinets if I don’t fill it?
Regular dusting with an extendable duster or a vacuum cleaner with a brush attachment is essential. If grease has accumulated, use a degreaser spray and a microfiber cloth.
Q4: What if my ceilings are very high?
For very high ceilings, you might consider a combination of solutions. Perhaps extending cabinets part of the way up, then adding decorative open shelving or a statement piece of art. Another idea is to use taller, decorative baskets.
Q5: Should cabinet fillers match my cabinets exactly?
Not necessarily. While a perfect match offers a seamless look, a slightly contrasting or complementary color can add visual interest. For example, a darker wood filler can ground the cabinetry.
Q6: Are there any safety concerns with storing items above cabinets?
Yes, especially with heavier items. Ensure any shelving or storage solutions are securely mounted. If you’re using ladders or step stools, always ensure they are stable. Avoid storing flammable materials.
Q7: Can I put plants above my kitchen cabinets?
Yes, but choose plants that tolerate indirect light and aren’t too messy. Consider a drip tray to protect your cabinets from water. You might also want to choose plants that don’t require frequent watering.
Q8: What is the cheapest way to fill the space above cabinets?
The most budget-friendly options often involve DIY solutions like creating simple wooden shelves, painting the wall above to match your cabinets, or using decorative baskets. Even a few well-chosen decorative items can make a big difference without a huge cost.
Q9: How do I decide between storage and decoration?
Consider your primary goal. If your kitchen lacks storage, prioritize functional solutions like shelves or enclosed fillers. If you have ample storage but want to enhance the look, focus on decorative items and lighting. Often, a blend of both is the most effective approach.
By carefully considering these options, you can transform that overlooked space into a stylish and functional extension of your kitchen, enhancing both its appearance and its practicality.