
Getting new kitchen countertops is exciting! But before you pick out that beautiful granite or sleek quartz, you need to know how to measure for them. How do you measure for kitchen countertops? Accurate measuring is the first and most crucial step in the entire process, ensuring a perfect fit for your new kitchen surfaces. This guide will walk you through everything you need to know to measure for granite, quartz, and laminate countertops, whether you’re tackling a standard kitchen or a custom kitchen island.
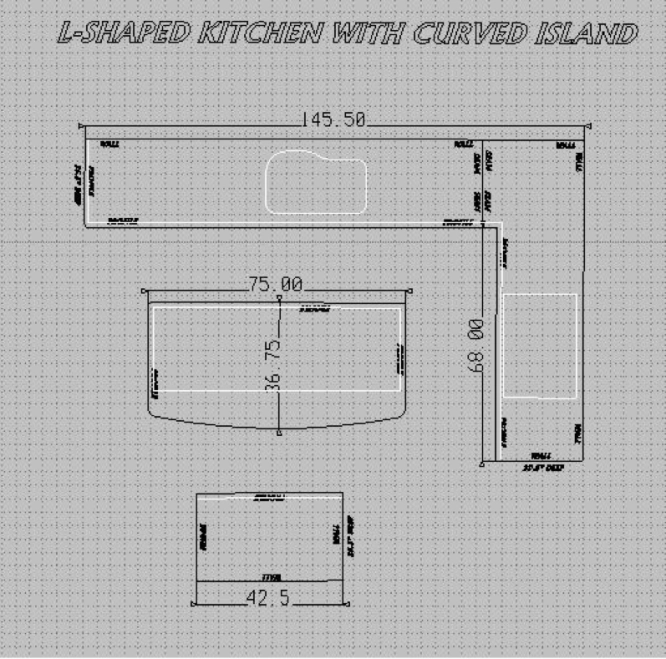
Image Source: www.archcitygranite.com
Why Precise Measurements Matter
Mistakes in measuring can lead to costly errors. Incorrect measurements can result in:
- Wasted Material: Especially with natural stone like granite or quartz, cutting errors mean you’ll pay for more slabs than you need.
- Delayed Installation: If the countertops don’t fit, your renovation project will be put on hold.
- Increased Costs: You might have to pay for remakes or extra labor to fix the problem.
- Poor Fit and Finish: Gaps or overhangs that are too large or too small can ruin the look of your kitchen.
The Role of a Kitchen Countertop Template
For granite and quartz, a kitchen counter template is often the most accurate way to get your measurements. Fabricators use these templates to cut the stone precisely. You can either have a professional template your kitchen, or in some cases, you might be able to create a template yourself. Laminate countertops are usually measured directly.
Getting Started: What You’ll Need
Before you start measuring, gather these essential tools:
- Measuring Tape: A sturdy, metal measuring tape is best.
- Paper and Pencil: For jotting down all your measurements and notes.
- Graph Paper (Optional): Useful for drawing a more precise layout.
- Level: To check if your cabinets are even.
- Calculator: For calculating square footage or area.
- Someone to Help (Recommended): An extra pair of hands makes measuring, especially longer runs, much easier and more accurate.
Measuring Your Kitchen Cabinets for Countertops
The foundation for your new countertops rests on your existing kitchen cabinet measurements for countertops. It’s vital to get these right.
Standard Countertop Runs
For straight sections of countertop, the process is fairly straightforward.
-
Measure the Depth:
- Start at the back of your cabinet and measure straight out to the front edge.
- Standard kitchen cabinet depth is usually 24 inches.
- Measure at multiple points along the run, especially if your cabinets are older or appear uneven. Note the longest measurement.
-
Measure the Length:
- Measure from the very end of one cabinet run to the very end of the next.
- If you have a corner, measure to the inside corner of the cabinet.
- Important: If you have an L-shaped or U-shaped kitchen, you’ll need to measure each “leg” of the layout separately.
-
Note Any Obstructions or Features:
- Sink Cutout: Measure the exact dimensions of your sink (length and width) and its distance from the front edge and side edges of the cabinet. Note whether the sink will be undermount, drop-in, or integrated. This is crucial for countertop fabrication measurements.
- Cooktop Cutout: Measure your cooktop’s dimensions and its position on the countertop.
- Backsplash Height: If you have an existing backsplash, measure its height. If you’re planning a new one, decide on its height.
- Windows or Doors: Note any windows or doors that might affect countertop installation or overhangs.
- Wall Cabinets or Shelves: Mark any areas where cabinets or shelves extend over the countertop.
Measuring Your Kitchen Island
Measuring a how to measure kitchen island correctly is critical, as islands often have unique shapes and overhangs.
-
Measure the Length and Width:
- Measure the longest part of the island for its length.
- Measure the widest part for its width.
- Take these measurements at the cabinet base.
-
Account for Overhangs:
- Seating Overhang: If your island will have a seating area, measure the desired overhang for comfortable legroom. Typically, this is 10-15 inches for a standard bar height island.
- Edge Overhang: Decide on the overhang for the sides and front of the island. A common overhang is 1 to 1.5 inches past the cabinet face.
- Important: Add these overhang measurements to your base cabinet dimensions to get the final countertop dimensions.
-
Note the Shape:
- Is your island rectangular, square, or a more complex shape (e.g., with curves or angles)?
- For complex shapes, you’ll likely need to create a physical template.
Working with Corners and Seams
- Inside Corners: Measure each wall from the corner outwards.
- Outside Corners: Measure the length of each side of the corner.
- Seams: For long countertop runs, you may need seams. Decide on the placement of seams and measure the length of each piece. Fabricators prefer to place seams in less visible areas or where there are natural breaks, like at a sink or cooktop.
Specific Material Measuring Considerations
While the basic principles of measuring kitchen counters apply to all materials, there are nuances for measuring for granite countertops, measuring for quartz countertops, and measuring for laminate countertops.
Measuring for Granite and Quartz Countertops
Granite and quartz are natural or engineered stones, respectively. They are heavy, require specialized cutting, and are often fabricated off-site.
-
Professional Templating is Recommended: For granite and quartz, it is highly recommended to have a professional template your kitchen. This is part of the countertop installation measurements process and ensures the highest accuracy. The templator will:
- Measure all dimensions precisely.
- Mark the exact location for sink and cooktop cutouts.
- Confirm edge profiles (e.g., eased, bullnose, ogee).
- Determine backsplash height and any specific details.
- Discuss seam placement with you.
- The template is then sent to the fabrication shop to cut your stone.
-
DIY Templating (Use with Caution): If you choose to DIY template for granite or quartz (not advised for complex designs or if you’re inexperienced), you’ll need to create precise templates using plastic or cardboard.
- Accuracy is Paramount: Even a slight error can be very costly.
- Include Overhangs: Ensure your templates reflect the desired overhangs.
- Mark Cutouts Clearly: Indicate exact sink and cooktop locations and dimensions.
- Consider Edges: If you’re using a special edge profile, the template needs to account for this.
Measuring for Laminate Countertops
Laminate countertops are generally more forgiving and are often measured directly by the installer or a salesperson.
- Measure Length, Width, and Depth: As described above, measure all straight runs.
- Specify Edge Details: Laminate countertops come with different edge treatments (e.g., square edge, post-form). Make sure you know what you want.
- Sink and Cooktop Cutouts: Specify the type of sink (e.g., drop-in) and its dimensions. Cutouts are typically made at the fabrication facility or on-site.
- Backsplash: Measure the height of the backsplash you want.
- Corner Details: If you have a corner, specify how the laminate will be joined.
Creating a Diagram and Notating Your Measurements
A clear diagram is as important as accurate measurements.
Drawing Your Kitchen Layout
- Sketch the Overall Shape: Draw a simple outline of your kitchen, showing the walls and cabinet layouts.
- Add Cabinet Runs: Draw in each cabinet run.
- Label Each Section: Number or label each distinct countertop section (e.g., “Main Wall L-Shape,” “Island”).
- Mark Dimensions: Clearly write down the length, width, and depth measurements for each section.
- Indicate Cutouts: Draw and label the exact location and size of sink, cooktop, or any other cutouts.
- Note Overhangs: Mark any standard or custom overhangs.
- Detail Special Features: Include notes about any angles, curves, or unusual cabinet configurations.
Example Measurement Table
| Section Name | Length (inches) | Depth (inches) | Width (inches) | Cutout Type | Cutout Size (L x W) | Cutout Distance from Edge (Front/Side) | Notes |
|---|---|---|---|---|---|---|---|
| Main Wall Left | 72 | 25 | 36 | Sink | 30 x 18 | 2 inches from front, 5 inches from left | Undermount sink |
| Main Wall Corner | – | – | – | – | – | – | |
| Main Wall Right | 96 | 25 | 36 | None | – | – | Wraps around corner |
| Peninsula | 48 | 25 | 36 | None | – | – | 1.5-inch overhang on front and sides |
| Island (Rectangular) | 72 | 40 | 36 | None | – | – | 12-inch seating overhang on one side |
Important Measuring Tips for Accuracy
- Measure Twice, Cut Once: This old adage is crucial for countertops.
- Use the Widest Measurement: If a cabinet run is slightly uneven, always use the widest measurement.
- Check for Levelness: Use a level to ensure your cabinets are sitting evenly. Uneven cabinets can cause issues with countertop fit and appearance.
- Account for Wall Irregularities: Walls are rarely perfectly straight. For granite and quartz, the templator will account for this. If you’re doing laminate, be aware that a perfectly cut slab might leave small gaps against an uneven wall. You might need to account for a small filler strip or a slightly larger backsplash.
- Don’t Forget the Backsplash: Measure the height and length of any backsplash, whether it’s integrated into the countertop or a separate piece.
- Consider Appliance Clearances: Ensure there’s enough space around appliances like dishwashers or ranges.
The Templating Process Explained (for Stone Countertops)
The kitchen counter template process is where precise measurements are finalized for granite and quartz.
- Scheduling the Templating Appointment: Once your cabinets are fully installed and secured, schedule your templating appointment.
- On-Site Measurement: A professional templator will come to your home. They use specialized tools, often including laser templating systems, to capture the exact dimensions and shape of your cabinets.
- Confirming Details: This is your chance to confirm:
- Sink and cooktop placement and type.
- Edge profiles.
- Backsplash height and details.
- Any overhangs for seating or aesthetic purposes.
- Seam locations.
- Creating the Template: The templator creates a physical or digital template that perfectly mirrors your countertop area. For complex shapes, this might involve multiple pieces of plastic or templating material.
- Fabrication: The template is sent to the fabrication shop. This is what the countertop fabrication measurements are based on. They use the template to cut the stone slabs with precision.
Finalizing Your Order
Once your measurements or template are complete, you’ll finalize your order with the countertop supplier or fabricator.
- Review Your Measurements: Always double-check the measurements provided on your quote or order form against your own notes.
- Confirm Material: Ensure the correct granite, quartz, or laminate is specified.
- Verify Edge Profiles and Finishes: Make sure the edge details, sink cutouts, and any special finishes are as you requested.
- Understand the Installation Process: Discuss the countertop installation measurements with your installer to know what to expect on installation day.
FAQ: Frequently Asked Questions
Q: How do I measure for a countertop with a farm sink?
A: Farm sinks typically have a cutout that needs to be precise. Measure the outside dimensions of the sink where it will sit on the countertop. Note how much of the sink lip will be exposed and how much will be covered by the countertop. For stone countertops, the templator will pay special attention to this.
Q: What is the standard countertop overhang?
A: The standard countertop overhang past the cabinet face is usually 1 to 1.5 inches. For seating areas on islands or peninsulas, a 10-15 inch overhang is common for bar height, and 15-18 inches for counter height seating. Always check local building codes for safety.
Q: Do I need to account for the thickness of the countertop when measuring?
A: When measuring the length and width of your kitchen cabinets, you are measuring the space your countertop will occupy. The thickness of the countertop material is a separate specification that is usually standard for the material chosen (e.g., 2cm or 3cm for granite/quartz, typically 1.5 inches for laminate). Your fabricator will know how to incorporate the thickness into the final product.
Q: What if my cabinets are not level?
A: If your cabinets are significantly out of level, this can impact how your countertops sit. For stone countertops, the templator can often compensate for minor unevenness. For laminate or other materials, you might need to shim your cabinets before installation. It’s best to address this with your installer.
Q: How are seams handled in granite and quartz countertops?
A: Seams are necessary for large or complex layouts. Fabricators aim to place seams in inconspicuous locations, such as behind the sink, at cooktop cutouts, or at logical breaks in the countertop run. They will discuss seam placement with you during the templating process. The quality of the seam depends on precise countertop fabrication measurements.
By following this comprehensive guide, you can confidently measure for your new kitchen countertops, setting the stage for a smooth renovation process and beautiful, perfectly fitted results.