
Image Source: images.finehomebuilding.com
How Is A Kitchen Island Attached To The Floor: Secure DIY Guide
A kitchen island is typically attached to the floor for stability and safety. The method used often depends on the island’s construction and the type of flooring in your kitchen.
Why Secure Your Kitchen Island?
A freestanding kitchen island, while a popular design choice, can pose a safety risk if not properly secured. Imagine a heavy countertop, hot appliances, or even children leaning on the island. Without a firm connection to the floor, it could tip or slide, potentially causing serious injury or damage. This is why kitchen island floor anchoring is a crucial step in any DIY installation or even when a professional fits a new island.
Beyond safety, a securely attached island prevents the annoyance of it shifting or rocking when you use it. No one wants their cutting board to slide during food prep or their blender to wobble precariously. Proper kitchen island installation hardware ensures a solid, reliable workspace.
Methods for Kitchen Island Floor Anchoring
There are several common methods for securing a kitchen island to the floor. Each has its advantages and is best suited to different situations.
1. Attaching Through the Cabinet Base
This is the most common and robust method for securing most kitchen islands. It involves fastening the island’s cabinet base directly to the subfloor.
Securing to a Wooden Subfloor
If your kitchen has a traditional wooden subfloor (plywood or OSB), you’ll be screwing directly into the joists or the subfloor itself.
Materials You’ll Need:
- Island Cabinet Base: The structural frame of your island.
- Wood Screws: Long, sturdy screws (e.g., 2.5 to 3 inches) designed for wood.
- Drill/Driver: For pre-drilling holes and driving screws.
- Drill Bits: Appropriate sizes for pilot holes.
- Stud Finder: To locate floor joists.
- Level: To ensure the island is plumb.
- Measuring Tape: For precise placement.
- Pencil: For marking.
- Safety Glasses: Essential for eye protection.
- Optional: Wood Shims: To level the island if your floor is uneven.
Steps:
- Position the Island: Carefully move your kitchen island into its final desired location. Ensure it’s centered and aligned as you want it.
- Level the Island: Use your level to check if the island is sitting flush on the floor. If not, use wood shims underneath the cabinet base to bring it level.
- Locate Joists (Recommended): For maximum stability, it’s best to screw into the floor joists. Use your stud finder to locate them under the island’s footprint. Mark their positions.
- Pre-Drill Pilot Holes:
- If screwing into joists, pre-drill pilot holes through the bottom of the island’s cabinet base and into the joists. The pilot hole should be slightly smaller than the screw’s shank diameter.
- If you cannot hit joists, or if the manufacturer recommends it, pre-drill pilot holes through the cabinet base and directly into the subfloor. Use screws long enough to get good purchase in the subfloor.
- Drive Securing Screws: Use your drill/driver to drive long wood screws through the pilot holes and firmly into the floor joists or subfloor. Space your screws evenly along the base, typically every 12-18 inches. Ensure the screws are long enough to penetrate at least 1.5 inches into the subfloor or joist.
- Check for Stability: Once all screws are in, give the island a gentle push and pull to ensure it’s solid and doesn’t wobble.
- Conceal Fixings: If your island has a toe-kick or a decorative baseboard, you can often hide the screws by drilling at an angle or using screws that will be covered by the finishing elements. Alternatively, if you’re attaching an island cabinet to the floor, the cabinet itself will usually conceal the screws.
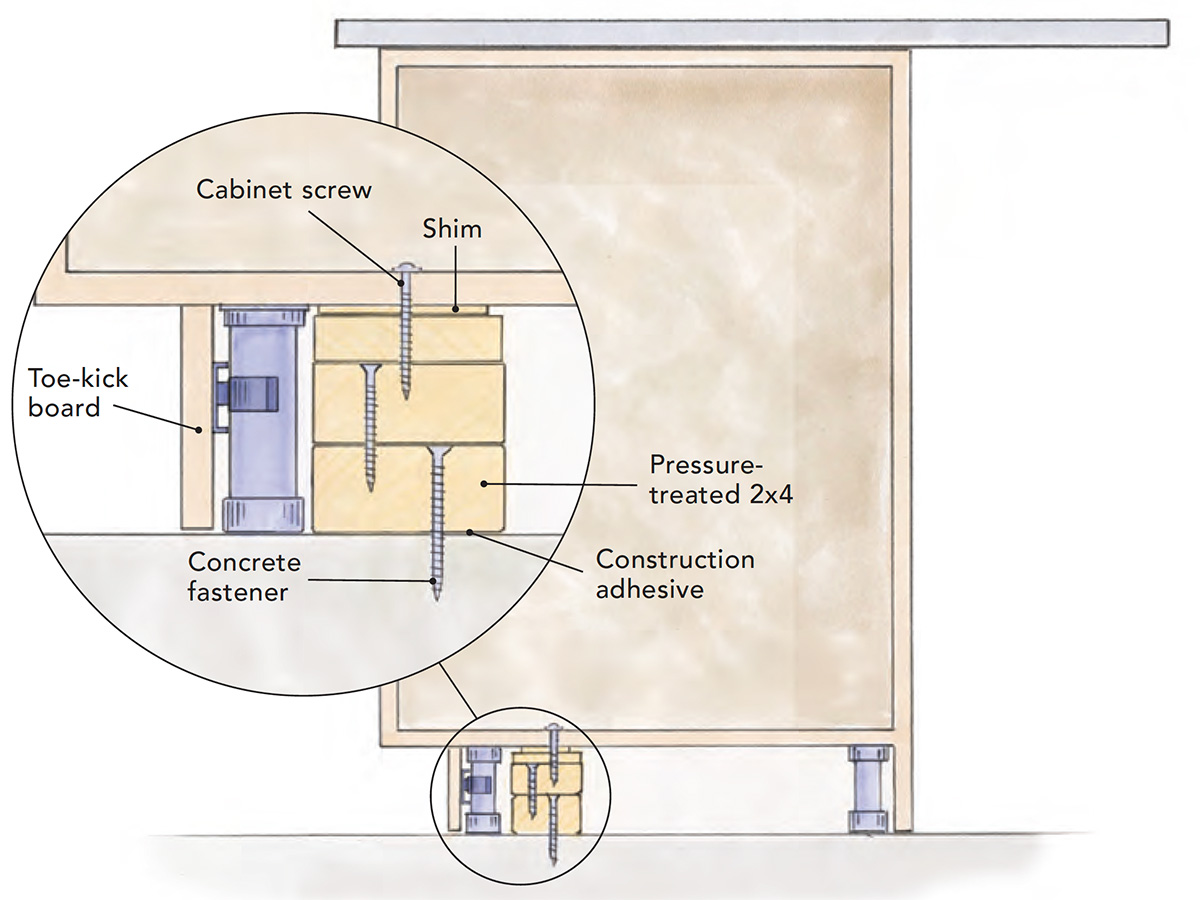
Mounting to a Concrete Floor
Mounting a kitchen island to concrete requires different hardware. You cannot simply screw into concrete.
Materials You’ll Need:
- Island Cabinet Base: As before.
- Concrete Screws (e.g., Tapcons): Specifically designed for drilling into concrete.
- Hammer Drill: Essential for drilling into concrete.
- Masonry Drill Bits: Appropriate sizes for your concrete screws.
- Impact Driver/Drill: For driving the concrete screws.
- Level: For accuracy.
- Measuring Tape: For placement.
- Pencil: For marking.
- Safety Glasses and Ear Protection: Concrete drilling can be noisy and produce dust.
- Dust Mask: To protect your lungs from concrete dust.
- Optional: Concrete Anchors/Sleeve Anchors: For heavier loads or less robust concrete.
- Optional: Washers: To distribute the screw’s pressure.
Steps:
- Position and Level: Place the island in its final spot and level it using shims if necessary.
- Mark Hole Locations: With the island leveled and in place, mark through the bottom of the cabinet base where you want to place your concrete screws. Aim for at least 4-6 anchor points around the base, spaced evenly.
- Remove Island (for Drilling): Carefully move the island away from the marked spots.
- Drill into Concrete:
- Using your hammer drill and the correct size masonry bit, drill holes at the marked locations. The depth of the hole should match the length of your concrete screws.
- Clean out the dust from the holes using a brush or vacuum.
- Install Concrete Screws:
- Place the island back over the drilled holes.
- Insert the concrete screws through the cabinet base and into the drilled holes in the concrete.
- Use your impact driver or drill to drive the screws firmly into the concrete. Tighten them until they are snug but avoid over-tightening, which can strip the concrete.
- Check Stability: Test the island for any movement.
- Conceal: As with wooden floors, conceal the screw heads if possible with trim or by drilling at an angle.
2. Using Floor Flanges for Island Legs
Some island designs, especially those with a more open or furniture-like aesthetic, might use legs. In this case, the attachment method changes.
Floor Flange for Island Legs
A floor flange for island legs is a circular metal plate with pre-drilled holes around its perimeter and a threaded hole in the center. The leg screws into the center, and the flange is then screwed to the floor.
Materials You’ll Need:
- Island Legs: The structural supports.
- Floor Flanges: Sized to match your legs.
- Screws: Appropriate screws for your flooring (wood screws for wood subfloors, concrete screws for concrete).
- Drill/Driver:
- Drill Bits:
- Level:
- Measuring Tape:
- Pencil:
- Safety Gear:
Steps:
- Attach Legs to Flanges: Screw the threaded end of each island leg into the center of a floor flange.
- Position Island: Place the island on its legs in the desired location.
- Level the Island: Use shims under the legs if needed to make the island perfectly level.
- Mark Flange Locations: Once leveled, mark the screw hole locations of each flange onto the floor.
- Remove Island: Carefully lift the island away.
- Secure Flanges to Floor:
- For Wood Floors: Pre-drill pilot holes at your marks, then use wood screws to secure the flanges to the subfloor or joists.
- For Concrete Floors: Drill holes into the concrete at your marks using a hammer drill and masonry bit, then secure the flanges with concrete screws.
- Re-Position Island: Place the island back onto its secured legs.
- Final Check: Ensure the island is stable and doesn’t move.
3. Hidden Island Leg Support
For a cleaner aesthetic, some designs incorporate a hidden island leg support. This might involve a strong metal bracket or frame that is attached to the underside of the island’s base and then secured to the floor.
Materials You’ll Need:
- Custom or Pre-fabricated Support Bracket: Designed for your island.
- Strong Wood Screws or Concrete Screws: Depending on your flooring.
- Drill/Driver:
- Drill Bits:
- Level:
- Measuring Tape:
- Pencil:
- Safety Gear:
Steps:
- Attach Support to Island: Secure the hidden support bracket or frame to the underside of the island’s cabinet base according to the manufacturer’s instructions.
- Position Island: Place the island in its final spot.
- Level the Island: Use your level and shims as needed.
- Mark Floor Attachment Points: Mark where the support bracket will meet the floor.
- Remove Island: Carefully move the island aside.
- Secure Support to Floor:
- For Wood Floors: Pre-drill pilot holes through the support bracket and into the subfloor/joists. Secure with appropriate wood screws.
- For Concrete Floors: Drill holes in the concrete, then secure the support bracket using concrete screws or anchors.
- Re-Position Island: Place the island back over the secured support.
- Final Stability Test: Check that the island is firm and immobile.
4. Island Countertop Support Beams
While not directly attaching the island to the floor, island countertop support beams are critical for the overall structural integrity, especially for islands with overhangs. These beams are usually integrated into the island’s cabinet structure. They bear the weight of the countertop and any items placed on it, transferring that load to the island’s base, which is then anchored to the floor.
If your island has a significant overhang for seating, you might also need additional leg or bracket support that attaches to the floor to prevent the countertop from tilting or breaking.
Flooring Support for Island
The type of flooring you have will influence how you secure your island.
- Hardwood or Laminate Flooring: You’ll need to screw through the flooring material and into the subfloor. If the flooring is very thick, you might need longer screws. Be careful not to overtighten, which could crack or damage the flooring.
- Tile Flooring: This is trickier. Ideally, you’d aim to hit the grout lines or remove a few tiles in the island’s footprint to access the subfloor. If removing tiles is not an option, you’ll need to use specialized anchors that can grip the concrete subfloor through the tile. This often involves drilling through the tile first with a diamond-tipped bit.
- Vinyl or Linoleum: These are softer materials. You should aim to screw through them and into the subfloor. If the material is very thick, it shouldn’t impede the screws.
The term flooring support for island refers to ensuring your chosen attachment method adequately supports the island’s weight without compromising the flooring material itself.
What About Islands on Wheels?
If your kitchen island has wheels, it’s generally not designed for permanent floor attachment. However, for added safety, especially if the island is large or heavy, you might consider using wheel locks or chocks to prevent it from rolling unintentionally. Some people opt to install removable brackets that can be screwed to the floor and then attached to the island’s base when it’s in its permanent position, offering a compromise between mobility and stability.
Important Considerations for DIY Installation
- Island Weight: Consider the total weight of your island, including the countertop and any appliances. This will help determine the number and type of fasteners needed.
- Subfloor Condition: Ensure your subfloor is sound and free from rot or damage.
- Manufacturer’s Instructions: Always refer to the specific installation instructions provided by the island manufacturer. They may have specific recommendations for attachment.
- Electrical and Plumbing: If your island has electrical outlets or a sink, ensure these are properly installed and routed before permanently securing the island.
Frequently Asked Questions (FAQ)
Q1: Can I attach a kitchen island without screwing it to the floor?
A1: While some very heavy, solid islands might have enough inherent weight to remain stable with just a good base, it’s generally not recommended for safety reasons. For most islands, especially those with overhangs or that will have appliances placed on them, floor attachment is essential for stability.
Q2: What is the best way to attach an island to a tiled floor?
A2: The ideal method is to remove a few tiles in the island’s footprint to screw directly into the subfloor. If that’s not feasible, use a hammer drill with a masonry bit to drill through the tile and into the concrete subfloor, then use concrete screws. Be sure to use a tile-specific drill bit for the initial penetration.
Q3: How many screws do I need to attach a kitchen island?
A3: This depends on the size and weight of the island, but typically, you’ll want at least 4-6 anchor points around the base, spaced about 12-18 inches apart, for a standard-sized island. Always aim for the strongest attachment points, ideally into floor joists.
Q4: Do I need to hire a professional to attach my kitchen island?
A4: If you are comfortable with basic DIY tasks and have the right tools, attaching a kitchen island can be a manageable DIY project. However, if you have concerns about your flooring, the structural integrity of your subfloor, or electrical/plumbing connections, hiring a professional carpenter or contractor is a wise choice.
Q5: What are island countertop support beams for?
A5: Island countertop support beams are structural elements, usually wood or metal, integrated into the island’s frame. They carry the weight of the countertop and anything placed on it, transferring the load to the island’s base. This is especially important for countertops with overhangs, preventing them from sagging or breaking.
By following these guidelines, you can ensure your beautiful new kitchen island is not only a functional centerpiece but also a safe and stable addition to your home.