
Repainting kitchen cabinets can transform your kitchen’s look without a complete remodel. So, how long does it take to repaint kitchen cabinets? Generally, you can expect the process to take anywhere from 5 to 14 days, with most DIY projects falling in the 7-10 day range. This includes prep work, painting, and drying time. For those considering professional services, the cabinet refinishing time is often shorter, typically ranging from 5 to 7 days.
Choosing to repaint your kitchen cabinets is a fantastic way to update your space on a budget. However, before you dive in, it’s crucial to get a realistic idea of the time commitment involved. The kitchen cabinet painting duration can vary significantly based on several factors, from the number of cabinets you have to the method you choose. This guide will break down the entire cabinet repaint process length to help you plan effectively. We’ll explore everything from initial preparation to the final coat, giving you a clear picture of the cabinet painting project schedule.
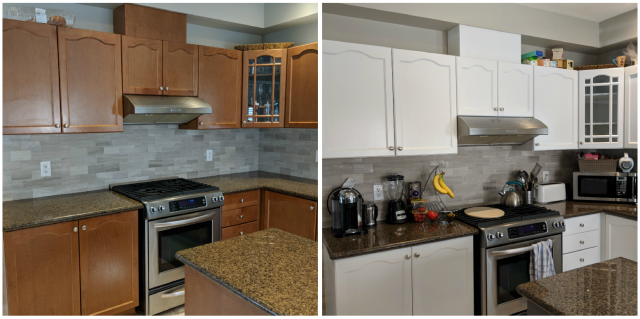
Image Source: www.paintmycabinets.ca
Factors Influencing Kitchen Cabinet Painting Time
Several key elements will dictate how much time to paint cabinets you’ll need. Understanding these will help you create a more accurate DIY cabinet painting timeline or when discussing professional cabinet painting hours with a contractor.
1. Size and Complexity of Your Kitchen
The sheer number of cabinets is the most obvious factor. More cabinets mean more doors, drawers, and frames to prepare, sand, prime, and paint.
- Number of Doors and Drawers: Each door and drawer face is a separate piece that needs individual attention.
- Cabinet Style: Raised panel doors require more detailed work and careful application of paint than flat-panel doors. Intricate details can increase cabinet refinishing time.
- Cabinet Accessibility: If your cabinets are in tight spaces or have difficult-to-reach corners, this will add to the overall kitchen cabinet painting duration.
2. Preparation Method
The preparation stage is often the most time-consuming but also the most critical for a professional finish. Rushing this part can lead to a less-than-perfect outcome.
- Sanding: Thorough sanding is essential for paint adhesion. The grit of sandpaper and the method used (by hand, orbital sander) impact cabinet refinishing time.
- Cleaning: Removing grease and grime is vital. Using degreasers and a good cleaning routine is necessary.
- Repairing Damage: Filling holes, repairing dings, or fixing minor damage will add to the prep time.
- Cleaning Between Coats: Lightly sanding and cleaning between coats of primer and paint is crucial for smoothness. This is often overlooked in quick DIY cabinet painting timelines.
3. Application Method
How you apply the paint will significantly affect the cabinet painting project schedule.
- Spraying: This is the fastest method for achieving a smooth, factory-like finish. However, it requires specialized equipment, a dedicated spray area (like a spray booth or a well-ventilated, protected space), and masking skills. Professional painters often use sprayers, which is why professional cabinet painting hours can be shorter.
- Brushing and Rolling: This is a more common DIY method. It’s slower, and achieving a perfectly smooth finish can be challenging, often requiring multiple thin coats with sanding in between. This can extend the kitchen cabinet painting duration.
4. Paint Type and Number of Coats
The type of paint you choose and how many coats are needed will influence the cabinet repaint process length.
- Primer: Most cabinet repainting projects require a good quality primer for adhesion and to block stains. You’ll typically need at least one coat, but sometimes two.
- Paint: Most paints require two coats for full coverage and durability. Some lighter colors might need a third coat, especially if you’re painting over a dark finish.
- Drying Times: Each coat of primer and paint needs adequate drying time before the next coat is applied or before reattaching hardware. Check the manufacturer’s recommendations, as this can vary greatly. This drying time is a significant part of the overall average cabinet painting duration.
5. Drying and Curing Times
It’s important to distinguish between drying and curing.
- Drying: The surface is dry to the touch.
- Curing: The paint reaches its maximum hardness and durability. This can take several weeks. You can reassemble your cabinets once they are dry to the touch, but you should be gentle with them during the curing period. This factor is crucial when estimating cabinet painting time, especially if you plan to use the kitchen heavily during the process.
DIY Cabinet Painting Timeline Breakdown
Let’s break down a typical DIY cabinet painting timeline. This assumes a standard kitchen with about 15-20 cabinet doors and an equal number of drawer fronts.
Day 1: Demolition and Deep Cleaning
- Morning: Remove all cabinet doors, drawer fronts, and hardware. Label everything meticulously to ensure correct reassembly. This is crucial for your kitchen cabinet makeover time.
- Afternoon: Clean all cabinet boxes, doors, and drawer fronts thoroughly. Use a good degreaser to remove any grease and grime that can prevent paint adhesion.
Day 2-3: Sanding and Repair
- Day 2: Sand all surfaces to be painted. This includes cabinet boxes, doors, and drawer fronts. Aim for a smooth, matte finish. If using an orbital sander, be careful not to over-sand.
- Day 3: Fill any holes or imperfections with wood filler. Allow the filler to dry completely, then sand it smooth. Clean off all sanding dust with a tack cloth or a damp microfiber cloth.
Day 4-5: Priming
- Day 4: Apply the first coat of primer to all cabinet boxes, doors, and drawer fronts. Use a high-quality bonding primer. If spraying, this is faster but requires setup. If brushing/rolling, take your time for even coverage.
- Day 5: Once the primer is dry to the touch (check manufacturer instructions), lightly sand any rough spots with fine-grit sandpaper (220-grit or higher). Wipe down with a tack cloth again. Apply a second coat of primer if needed, especially if you are painting over a dark color or have stubborn stains. Allow adequate drying time.
Day 6-8: Painting
- Day 6: Apply the first coat of paint. If spraying, ensure proper ventilation and protection for surrounding areas. If brushing/rolling, use a high-quality synthetic brush for trim and a foam roller for flat surfaces. Aim for thin, even coats.
- Day 7: Allow the first coat to dry completely. Lightly sand with very fine-grit sandpaper (220-320 grit) to smooth out any imperfections or dust nibs. Clean off dust with a tack cloth. Apply the second coat of paint.
- Day 8: If a third coat is necessary for coverage or color depth, apply it today after light sanding and cleaning. Ensure the final coat is applied smoothly and evenly.
Day 9-10: Drying and Reassembly
- Day 9: Allow the final coat of paint to dry to the touch. This is a crucial step in the cabinet repaint process length. Avoid touching or stressing the painted surfaces.
- Day 10: Carefully reattach all hardware. Rehang doors and reinsert drawers. Be gentle to avoid chipping the new paint. This is a significant milestone in your kitchen cabinet makeover time.
Total DIY Time: Approximately 10 days. This timeline is a guideline; your actual cabinet painting project schedule might be longer or shorter depending on your pace and the complexity of your kitchen.
Professional Cabinet Painting: What to Expect
When you hire professionals, you’re paying for their expertise, speed, and specialized equipment, which significantly impacts the cabinet painting project schedule.
- Efficiency: Professionals are trained in efficient techniques, from masking to spraying.
- Equipment: They use high-quality sprayers, professional-grade primers and paints, and proper ventilation systems.
- Experience: They know how to prepare surfaces correctly and apply paint for a durable, flawless finish, reducing the chance of needing rework, which shortens the cabinet refinishing time.
Professional cabinet painting hours can be condensed because they often have teams working simultaneously and can achieve faster drying times with proper equipment and controlled environments.
Here’s a general idea of how professional cabinet painting hours are spent:
- Day 1-2: Demolition, cleaning, repairs, and thorough sanding.
- Day 2-3: Priming and light sanding between coats.
- Day 3-4: Painting (often spraying) with multiple thin coats.
- Day 4-5: Drying, reassembly, and cleanup.
Total Professional Time: Typically 5-7 days. This significantly reduces the kitchen cabinet painting duration for homeowners.
Estimating Cabinet Painting Time: A Practical Guide
To help you in estimating cabinet painting time, consider this table which outlines common tasks and estimated durations for a moderately sized kitchen when undertaking a DIY project.
| Task | Estimated Time (Hours) | Key Considerations |
|---|---|---|
| Cabinet Removal | 2-4 | Labeling each piece carefully is crucial for reassembly. |
| Deep Cleaning | 3-5 | Essential to remove all grease and grime for proper adhesion. |
| Sanding (Doors/Drawers) | 8-16 | Depends on method (hand vs. sander) and current finish. Proper sanding ensures primer/paint adheres well. |
| Sanding (Cabinet Boxes) | 4-8 | Often less detailed than doors but still requires thoroughness. |
| Repairing Imperfections | 2-6 | Filling holes, cracks, or gouges. |
| Masking/Protection | 4-8 | Protects areas not being painted. Crucial for a clean finish. |
| Priming (1-2 Coats) | 4-8 | Includes drying time between coats. |
| Light Sanding (Between Coats) | 2-4 | Removes dust nibs and creates a smoother surface. |
| Painting (2-3 Coats) | 8-16 | This is the most labor-intensive part for brush/roller application. Includes drying time between each coat. |
| Reassembly | 2-4 | Attaching hardware and rehanging doors/drawers. |
| Cleanup | 1-2 | Final clean-up of the workspace. |
| Total Estimated DIY Time | 40-77 Hours | This translates to roughly 5-10 full days of dedicated work, depending on your pace and efficiency. |
This table provides a more granular look at how much time to paint cabinets each step might take. Remember that these are estimates, and your actual DIY cabinet painting timeline could vary.
Tips for Optimizing Your Cabinet Painting Schedule
To make your cabinet painting project schedule more efficient, whether DIY or professional, consider these tips:
- Invest in Quality Tools: Good brushes, rollers, and sandpaper will make the job easier and yield better results, potentially reducing the overall kitchen cabinet painting duration.
- Prepare a Dedicated Workspace: If spraying, a well-ventilated area is crucial. If brushing/rolling, have a clean, well-lit space to work. This is key to efficient cabinet refinishing time.
- Work in Batches: Remove all doors and drawers at once. Sand them all, prime them all, and paint them all. This avoids constantly switching between tasks.
- Read Paint Manufacturer Instructions: Pay close attention to recommended drying and recoat times. Skipping these can lead to adhesion issues and extend the cabinet repaint process length.
- Don’t Rush Drying Times: This is perhaps the most important tip. Allowing adequate drying between coats is essential for a durable finish and prevents streaks or smudges. This is a vital part of estimating cabinet painting time accurately.
- Consider Off-Season Work: If you have an HVAC system, you might benefit from painting when the humidity is lower, as this can speed up drying times.
Frequently Asked Questions About Repainting Kitchen Cabinets
Here are some common questions people have when planning to repaint their kitchen cabinets:
How long does it take to paint kitchen cabinets?
The average cabinet painting duration for a DIY project is typically between 5 to 14 days, while professional services usually take 5 to 7 days. This includes all preparation, painting, and drying stages.
Can I paint my kitchen cabinets myself?
Yes, absolutely! Many homeowners successfully repaint their kitchen cabinets themselves. It requires patience and attention to detail, especially during the preparation stages. Following a good DIY cabinet painting timeline is key.
How much time to paint cabinets can I save by hiring a professional?
Professionals can often cut the cabinet refinishing time by half or more due to their experience, specialized equipment (like sprayers), and efficient workflow. This means your kitchen cabinet makeover time will be significantly reduced.
What is the most time-consuming part of painting kitchen cabinets?
The preparation phase, which includes removing hardware, cleaning, sanding, and repairs, is often the most time-consuming. This is followed closely by applying multiple thin coats of primer and paint with adequate drying time in between. This contributes significantly to the cabinet repaint process length.
How long should I wait between coats of paint for cabinets?
Always check the paint manufacturer’s instructions, as it varies by product. Generally, you should wait at least 4-8 hours between coats, but some paints recommend 12-24 hours. Rushing this step can ruin your finish and extend your kitchen cabinet painting duration due to potential rework.
When can I put my cabinet doors back on?
You can typically rehang cabinet doors and reinsert drawer fronts once the paint is dry to the touch, usually after 24-48 hours for the final coat. However, the paint will continue to cure for several weeks. Be gentle with the cabinets during this curing period to avoid damage. This is an important consideration when estimating cabinet painting time for full kitchen use.
What’s the difference between drying and curing for cabinet paint?
Drying time refers to when the paint is dry enough to touch and handle without leaving marks. Curing time is when the paint reaches its maximum hardness and durability, which can take up to 30 days or more. You can reassemble your cabinets once dry, but treat them gently until fully cured. This distinction is vital for a successful cabinet painting project schedule.