
Image Source: netpayadvance.com
How to Organize Kitchen Cabinets Diagram: Simple Steps
What is a kitchen cabinet layout diagram? A kitchen cabinet layout diagram is a visual representation of how your kitchen cabinets are arranged. It shows the size, shape, and placement of each cabinet, helping you plan your kitchen storage effectively.
Organizing your kitchen cabinets can feel overwhelming, but with a clear plan, it becomes a simple and rewarding task. This guide will walk you through creating a kitchen cabinet layout diagram and implementing an effective kitchen storage plan. We’ll cover everything from deciphering your current setup to creating a visual cabinet guide that makes finding what you need a breeze. Imagine a cabinet organization chart that finally makes sense, a kitchen drawer layout that works, and cabinet interior organization that maximizes every inch. Let’s transform your kitchen!
Step 1: Assess Your Current Kitchen Cabinet Situation
Before you can organize, you need to know what you’re working with. This involves a thorough look at your existing cabinets.
H4: Emptying and Cleaning
The first, crucial step is to empty everything out. Yes, everything. This might seem daunting, but it’s essential.
- Remove all items: Take out every dish, pot, pan, utensil, spice, and food item.
- Wipe down surfaces: Use a damp cloth with a mild cleaner to wipe down the inside of each cabinet and drawer. This is also a good time to clean shelves and cabinet doors.
- Check for damage: Look for any loose shelves, broken hinges, or other issues that need repair.
H4: Categorizing Your Kitchen Items
As you empty your cabinets, start grouping similar items together. This is the foundation of a good kitchen storage plan.
- Dishware: Plates, bowls, mugs, glasses.
- Cookware: Pots, pans, baking sheets.
- Utensils: Spatulas, whisks, knives, serving spoons.
- Food Storage: Dry goods, canned goods, snacks, spices.
- Small Appliances: Toaster, blender, coffee maker.
- Cleaning Supplies: Soaps, sponges, paper towels.
- Linens: Dish towels, oven mitts.
Step 2: Planning Your Kitchen Cabinet Layout Diagram
Now that you know what you have, it’s time to plan where everything will go. This is where your kitchen cabinet layout diagram comes into play.
H4: Creating Your Diagram
You don’t need to be an artist to create a useful diagram. The goal is to visualize your space.
- Sketch your kitchen: Draw a simple outline of your kitchen, including windows, doors, and major appliances.
- Map out cabinet locations: Mark the general placement of your upper and lower cabinets.
- Label each cabinet/drawer: Assign a number or letter to each distinct cabinet and drawer unit. This will be your reference point for the cabinet organization chart.
Example of a Simple Kitchen Cabinet Layout Diagram:
| Cabinet/Drawer | Location | Contents (Initial Idea) |
|---|---|---|
| U1 | Above Sink | Glasses, Mugs |
| U2 | Above Sink | Plates, Bowls |
| U3 | Left of Stove | Pots, Pans |
| U4 | Right of Stove | Spices, Oils |
| L1 | Under Stove | Baking Sheets, Large Pans |
| L2 | Under Stove | Pots, Pans |
| L3 | Corner Base | Mixing Bowls, Small Appliances |
| D1 | Below Counter | Cutlery, Utensils |
| D2 | Below Counter | Spices, Small Jars |
This is a very basic example. Your diagram can be more detailed.
H4: Principles of Efficient Kitchen Storage Diagram
A well-designed efficient kitchen storage diagram considers workflow and accessibility.
- Zone your kitchen: Think about different tasks. You have a prep zone, a cooking zone, a baking zone, and a cleaning zone. Place items near where you use them.
- Prep Zone: Near the main counter space – knives, cutting boards, mixing bowls.
- Cooking Zone: Near the stove – pots, pans, cooking utensils, spices.
- Baking Zone: Near an oven or counter space – baking sheets, flour, sugar, mixing bowls.
- Cleaning Zone: Near the sink – dish soap, sponges, dish towels.
- Frequently Used Items: Store these in easily accessible cabinets at eye level or in prime drawer locations.
- Less Used Items: These can go in higher or lower cabinets.
- Heavy Items: Store heavy pots and appliances on lower shelves or in sturdy drawers to avoid strain and potential accidents.
H4: Designing Your Cabinet Organization Chart
A cabinet organization chart is a detailed breakdown of what goes where. Use your kitchen cabinet layout diagram as a base.
- List each cabinet/drawer by its label.
- Assign specific categories of items to each.
- Consider the size and depth of each cabinet. Deep cabinets are good for pots and pans, while shallower ones are better for plates and glasses.
Example Cabinet Organization Chart (based on diagram above):
| Cabinet/Drawer | Contents | Notes |
|---|---|---|
| U1 | Glasses (daily use), Mugs, Water Bottles | Keep glasses on the top shelf for easy reach. |
| U2 | Everyday Plates, Bowls, Smaller Serving Dishes | Stack plates neatly; bowls can be nested. |
| U3 | Everyday Pots (saucepan, frying pan), Small Baking Sheet | Store pots with lids stacked or vertically in a rack. |
| U4 | Spices (in a tiered organizer), Cooking Oils, Vinegar | Keep frequently used spices front and center. |
| L1 | Large Baking Sheets, Muffin Tins, Roasting Pan | Use vertical dividers for baking sheets to prevent stacking issues. |
| L2 | Stock Pot, Larger Pots, Colander | Store colander upside down to prevent water pooling. |
| L3 | Mixing Bowls, Measuring Cups, Small Blender, Food Processor Attachment | Nest mixing bowls; store attachments in their own containers. |
| D1 | Cutlery (forks, knives, spoons), Cooking Utensils (spatula, ladle) | Use drawer dividers for each utensil type. |
| D2 | Small Jars (herbs, extracts), Canisters (salt, pepper) | Use small bins or containers to keep items upright and organized. |
This chart becomes your visual cabinet guide.
Step 3: Implementing Your Kitchen Storage Plan
With your plan in place, it’s time to put your organized kitchen into action. This is where cabinet interior organization really shines.
H4: Maximizing Cabinet Space
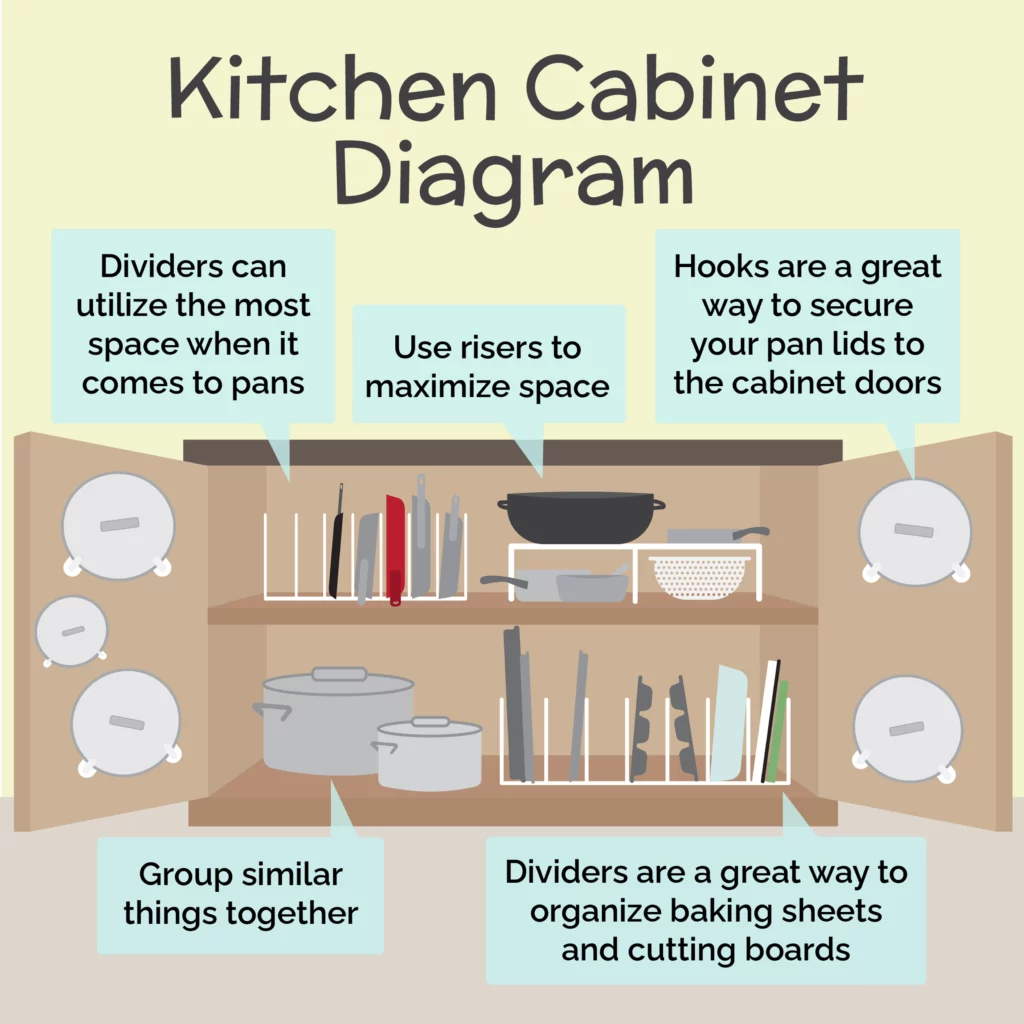
Think vertically and use dividers and organizers to get the most out of every inch.
- Tiered Shelving/Risers: Perfect for creating multiple levels in cabinets, especially for glasses, mugs, and canned goods. This helps you see everything easily.
- Drawer Dividers: Essential for cutlery, utensils, and even spices in drawers. They prevent items from becoming a jumbled mess.
- Lazy Susans (Turntables): Ideal for corner cabinets or for organizing spices and oils. They allow you to spin and access items from the back.
- Vertical Dividers: Great for storing baking sheets, cutting boards, and platters upright, making them easy to grab without toppling everything else.
- Stackable Containers: Use these for dry goods in your pantry. They create a uniform look and maximize shelf space.
- Pull-Out Shelves/Drawers: If your budget allows, these are game-changers for deep cabinets, making it much easier to access items in the back.
H4: Organizing Specific Cabinet Types
Let’s delve into the specifics of how to organize different kitchen areas.
H5: Pantry Shelving Diagram
Your pantry is a prime spot for organization. A good pantry shelving diagram ensures you can find everything.
- Group by category: Canned goods together, dry goods together, snacks together.
- Use clear bins or baskets: These help contain items and make them easy to pull out. Label them!
- Decant dry goods: Transfer items like pasta, rice, flour, and sugar into airtight, clear containers. This not only looks neater but also keeps food fresher and pest-free.
- Place heavier items lower: Cans and bags of flour should be on lower shelves.
- Utilize door space: Over-the-door organizers are great for spices, smaller jars, or even cleaning supplies if your pantry is near the kitchen.
Pantry Shelving Diagram Concept:
- Top Shelf: Infrequently used items, special occasion serving ware.
- Middle Shelves: Daily use dry goods (pasta, rice, cereals), canned goods.
- Lower Shelves: Heavier items (large bags of flour, sugar, potatoes), pet food.
- Floor: Bulk items, large appliances if needed.
H5: Kitchen Drawer Layout
Drawers are often the culprits of kitchen chaos. A smart kitchen drawer layout is key.
- Top Drawer: Cutlery, small utensils, kitchen gadgets. Use dividers!
- Second Drawer: Cooking utensils, spatulas, whisks, ladles, measuring spoons.
- Third Drawer: Dish towels, oven mitts, placemats, napkins.
- Deeper Drawers: Pot lids, larger serving utensils, smaller appliances, or even food storage containers.
Kitchen Drawer Layout Best Practices:
- Keep like with like: Don’t mix spatulas with peelers.
- Use dividers religiously: They are your best friends for organized drawers.
- Consider utensil holders: For drawers with many small items, small bins can be even more effective than dividers.
H5: Under-Sink Cabinet Organization
This is often a dark and cramped space, but with a good plan, it can be very functional.
- Cleaning Supplies: Store them in a caddy or stackable bins. Keep sprays upright.
- Trash Bags/Recycling: Keep them rolled or in a dedicated bin.
- Dish Soap/Dishwasher Detergent: Store these where they are easily accessible.
- Consider a tiered shelf: This can help you fit more under the sink.
Tip: If you have chemicals under the sink, ensure they are stored safely and out of reach of children or pets.
H5: Base Cabinet Interior Organization
These are your workhorses for pots, pans, dishes, and small appliances.
- Pots and Pans: Store them with lids. Vertical pan organizers or stacking racks are excellent. If you have deep cabinets, consider pull-out shelves.
- Dishes: Stack plates and bowls. Use plate racks if you have a lot of them. Store them in a cabinet near your dining area or dishwasher.
- Small Appliances: Store frequently used ones (like a toaster or coffee maker) in easily accessible cabinets. Less-used appliances can go in higher or lower cabinets.
H5: Wall Cabinet Interior Organization
These are typically used for glasses, mugs, and everyday dishware.
- Glasses and Mugs: Stackable risers are perfect here. Place daily-use items at the front.
- Plates and Bowls: Stack them neatly. Consider using plate stands to display them or make them easier to access.
- Baking Ingredients (if in wall cabinets): Use turntables for spices and oils.
Step 4: Maintaining Your Organized Kitchen
Organization isn’t a one-time event; it’s an ongoing habit.
H4: Regular Purges
Schedule a quick declutter every few months.
- Check expiration dates: Discard any expired food items.
- Discard duplicates: Do you really need three can openers?
- Donate items: If you haven’t used something in a year or more, consider donating it.
H4: Putting Items Back Correctly
This is the golden rule of maintaining order.
- “A place for everything, and everything in its place.” Always return items to their designated spots according to your cabinet organization chart.
- Don’t overstuff: Avoid cramming items back into cabinets. This leads to disarray quickly.
H4: Adapting Your System
As your needs change, your kitchen storage plan might need adjustments.
- New appliances or gadgets: Find a new home for them that fits your efficient kitchen storage diagram.
- Changes in cooking habits: If you start baking more, you might need to reconfigure your baking zone.
Frequently Asked Questions (FAQ)
Q1: How do I decide which items go in which cabinets?
A1: Consider accessibility and frequency of use. Items you use daily should be in easily reachable cabinets at eye level or in prime drawers. Less-used items can go higher or lower. Also, think about workflow and place items near where you use them (e.g., pots near the stove).
Q2: What are the best organizers for kitchen cabinets?
A2: Tiered shelf risers, drawer dividers, turntables (Lazy Susans), pull-out shelves, and vertical dividers for baking sheets are some of the most effective organizers. Clear, stackable containers are also excellent for pantries.
Q3: How can I organize a small kitchen with limited cabinet space?
A3: Maximize vertical space with shelf risers. Utilize drawer dividers to keep things tidy. Consider over-the-door organizers for pantries or cabinet doors. Wall-mounted spice racks or magnetic knife strips can free up drawer and counter space. Think about multi-functional items.
Q4: Is it worth investing in custom cabinet organizers?
A4: For some, yes. If you have very specific needs or an unusually shaped cabinet, custom solutions can be highly beneficial. However, many off-the-shelf organizers are very effective and much more budget-friendly. Start with standard organizers and see if they meet your needs.
Q5: How often should I reorganize my kitchen cabinets?
A5: A full reorganization is usually needed once a year. However, regular “mini-purges” every 3-6 months to check expiration dates and tidy up are highly recommended to maintain your system.
By following these steps and creating your kitchen cabinet layout diagram, cabinet organization chart, and kitchen storage plan, you can achieve a functional, beautiful, and efficiently organized kitchen. This visual cabinet guide and the principles of cabinet interior organization will make your kitchen a joy to work in. Remember, the best kitchen cabinet layout is one that works for you and your lifestyle, ensuring efficient kitchen storage diagram principles are followed.