
Can you paint laminate kitchen cabinets? Yes, you absolutely can paint laminate kitchen cabinets, and with the right preparation and materials, you can achieve a beautiful, updated look for your kitchen without the cost of replacement. This guide will walk you through every step of the process for a successful laminate cabinet makeover. We’ll cover everything from the initial prep for painting laminate cabinets to choosing the best paint for laminate cabinets and finally sealing painted laminate cabinets.
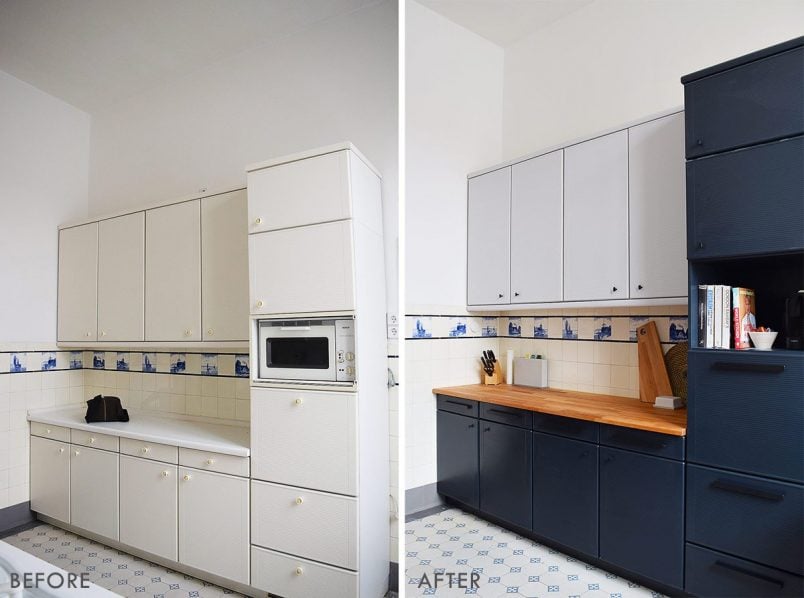
Image Source: www.littlehouseonthecorner.com
Why Paint Your Laminate Cabinets?
Laminate cabinets are a popular choice for kitchens due to their affordability and durability. However, over time, the finish can become dated, scratched, or simply not suit your evolving style. Painting laminate kitchen cabinets offers a cost-effective and impactful way to transform your kitchen’s appearance. It’s a fantastic DIY project that can drastically improve the aesthetic of your home. This DIY laminate cabinet painting project is achievable for most skill levels and provides a significant return on investment in terms of kitchen appeal.
What You’ll Need: A Comprehensive Shopping List
Before you begin your DIY laminate cabinet painting adventure, gather all your supplies. Having everything ready will make the process smoother and more efficient.
Essential Tools and Supplies:
- Screwdriver or Drill: For removing cabinet doors and hardware.
- Sander: An orbital sander is ideal, but a sanding block will work for smaller areas.
- Sanding Sponges or Sandpaper: Various grits, including 120-grit and 220-grit.
- Degreaser or Heavy-Duty Cleaner: For thorough cleaning laminate before painting.
- Microfiber Cloths or Rags: For cleaning and wiping down surfaces.
- Painter’s Tape: High-quality tape to protect areas you don’t want painted.
- Drop Cloths or Plastic Sheeting: To protect your floors and countertops.
- Primer: An adhesion-promoting primer specifically designed for laminate or slick surfaces.
- Paint: High-quality enamel paint or cabinet-specific paint.
- Paint Brushes: High-quality synthetic brushes for a smooth finish.
- Foam Rollers: Small rollers suitable for cabinet surfaces.
- Paint Tray: For pouring and using your paint.
- Stir Sticks: For mixing paint.
- Screws or Hooks: For reattaching hardware.
- Optional: Wood filler (for any gouges), Bondo (for deeper damage).
- Optional: Tack cloth for dust removal.
- Optional: Polyurethane or Acrylic Sealer for added durability.
Step 1: The Crucial Prep Work – Prep for Painting Laminate Cabinets
This is arguably the most critical step in painting laminate kitchen cabinets. Proper preparation ensures the paint adheres well and lasts. Skipping or rushing this stage will lead to peeling and chipping.
a. Remove Cabinet Doors and Hardware
- Open each cabinet door.
- Using your screwdriver or drill, carefully remove the hinges from the cabinet doors and the cabinet frames.
- Keep the screws organized. A good tip is to place screws for each door in a small baggie and label it with the corresponding door number (e.g., “Upper Left Door”). This makes reassembly much easier.
- Remove any knobs, pulls, or other hardware.
b. Deep Cleaning – Cleaning Laminate Before Painting
Laminate surfaces often have a greasy film from cooking and handling. You need to remove this completely.
- Use a strong degreaser or a solution of warm water and a good dish soap.
- Wipe down every surface of the cabinet doors and frames thoroughly with a clean cloth.
- Pay attention to corners and edges where grease can build up.
- Rinse the surfaces with a clean, damp cloth to remove any cleaning residue.
- Allow the cabinets to dry completely. You can use a fan to speed this up.
c. Light Sanding for Adhesion
Laminate is typically smooth and non-porous, which is why primer is essential. However, a light sanding helps create a surface for the primer to grip.
- Using 120-grit sandpaper or a sanding sponge, lightly sand all surfaces of the cabinet doors and frames that you plan to paint.
- The goal is not to remove the laminate but to create a dull, matte finish. You don’t need to see wood grain; just remove the sheen.
- Be gentle, especially around edges and any decorative details.
- After sanding, use a vacuum cleaner with a brush attachment to remove as much dust as possible.
- Then, wipe down all surfaces with a clean, dry microfiber cloth. For an extra clean surface, you can use a tack cloth to pick up any remaining fine dust particles.
d. Repairing Imperfections
- Inspect your laminate cabinets for any gouges, scratches, or dings.
- For minor scratches, light sanding might be enough.
- For deeper nicks or holes, use a high-quality wood filler or Bondo.
- Apply the filler according to the product instructions.
- Once the filler is completely dry and hardened, sand it smooth with 220-grit sandpaper until it is flush with the cabinet surface.
- Wipe away any dust with a clean cloth.
e. Taping and Protecting
- Use high-quality painter’s tape to mask off any areas you don’t want to paint. This includes the inside edges of the cabinet frames, countertops, appliances, and any hardware that you’ve decided not to remove.
- Ensure the tape is pressed down firmly to create a clean seal and prevent paint from bleeding underneath.
- Cover your countertops and floors with drop cloths or plastic sheeting.
Step 2: Priming – The Foundation of a Great Finish
Primer is your best friend when painting laminate kitchen cabinets. It’s the key to ensuring your paint sticks and provides a uniform base for color.
a. Choosing the Right Primer
For laminate surfaces, you need a primer specifically designed to adhere to slick, non-porous materials. Look for:
- Adhesion Promoters: These are formulated to bond to challenging surfaces like laminate, melamine, and vinyl.
- Shellac-Based Primers: These offer excellent adhesion and block stains but can have strong fumes. Ensure good ventilation.
- Water-Based or Latex Primers with Good Adhesion: Some high-quality water-based primers are formulated for laminate. Always check the product label.
A primer with good stain-blocking properties is also beneficial, especially if your laminate has any dark colors or visible blemishes you want to cover.
b. Applying the Primer
- Stir the primer thoroughly with a stir stick.
- Pour some primer into your paint tray.
- Using a high-quality synthetic brush for edges and corners, and a small foam roller for larger flat surfaces, apply a thin, even coat of primer.
- Work in a consistent direction, laying off your strokes with the roller or brush to avoid marks.
- Avoid applying the primer too thickly, as this can lead to drips and an uneven finish.
- Allow the first coat of primer to dry completely according to the manufacturer’s instructions. This usually takes at least 1-2 hours.
c. Second Coat of Primer (Recommended)
For the best adhesion and coverage, a second coat of primer is highly recommended, especially when transitioning from a dark laminate color to a lighter paint color.
- Once the first coat is dry to the touch, lightly sand the entire primed surface with 220-grit sandpaper or a fine-grit sanding sponge. This helps create a super smooth surface for the paint.
- Wipe away all dust with a clean microfiber cloth or a tack cloth.
- Apply a second thin, even coat of primer, following the same method as the first.
- Allow the second coat of primer to dry completely. Check the primer can for recommended drying times before painting.
Step 3: Painting – Bringing Your Vision to Life
Now for the exciting part – applying the color! The choice of paint is crucial for durability and a beautiful finish.
a. Selecting the Best Paint for Laminate Cabinets
When painting laminate kitchen cabinets, durability and a smooth, hard finish are essential.
- Enamel Paints: These are known for their hard, durable finish and are often used for trim and furniture.
- Cabinet-Specific Paints: Many brands offer paints formulated specifically for cabinets, often with self-leveling properties and built-in primers.
- Mineral Paints or Chalk Paints (with caution): While these can work for painting laminate furniture, they require a very robust topcoat for kitchen cabinets due to the wear and tear they experience. If you choose chalk paint, ensure you use a high-quality polycrylic or polyurethane sealer.
- Latex or Acrylic Paints: While generally good for DIY projects, ensure you choose a high-quality “cabinet enamel” or “trim enamel” latex/acrylic paint for the best durability. Look for paints labeled as having good adhesion and a hard finish.
Key Features to Look For:
- Durability: The paint needs to withstand moisture, grease, and cleaning.
- Adhesion: It must bond well to the primed surface.
- Smooth Finish: Ideally, the paint should have good leveling properties to minimize brush strokes or roller marks.
Recommendation: A high-quality water-based enamel or a specialized cabinet paint is generally the best choice for painting laminate kitchen cabinets.
b. Applying the First Coat of Paint
- Stir your chosen paint thoroughly.
- Pour paint into your paint tray.
- Using your synthetic brush for corners and edges, apply a thin, even coat of paint.
- Use your foam roller for the larger flat surfaces. Apply the paint in a consistent direction (e.g., top to bottom, or with the grain if there’s a visible pattern).
- Lay off your strokes by lightly dragging the roller or brush in one direction at the end of each stroke to help blend and avoid marks.
- Avoid overloading your brush or roller, as this can lead to drips.
- Allow the first coat to dry completely according to the paint manufacturer’s instructions. This can take anywhere from 2 to 6 hours, depending on the paint and humidity.
c. Sanding Between Coats
This is another vital step for a smooth, professional finish.
- Once the first coat of paint is completely dry, lightly sand the entire surface with 220-grit sandpaper or a fine-grit sanding sponge.
- The goal here is to knock down any imperfections, dust nibs, or slight texture from the first coat.
- Wipe away all sanding dust thoroughly with a clean microfiber cloth or a tack cloth. Ensure no dust remains.
d. Applying Subsequent Coats
- Apply a second thin, even coat of paint, using the same brush and roller technique.
- Allow it to dry completely.
- Repeat the sanding and wiping process between each coat of paint.
- Most laminate cabinet painting projects will require 2-3 coats of paint for full coverage and a durable finish.
Step 4: Sealing – Protecting Your Work
This step is crucial for the longevity and durability of your painted laminate cabinets. Sealing painted laminate cabinets adds an extra layer of protection against wear, moisture, and stains.
a. Choosing a Sealer
- Polycrylic: This is a water-based polyurethane that is clear, durable, and low in VOCs. It dries clear and is less prone to yellowing than oil-based polyurethanes, making it ideal for lighter paint colors. It’s also easy to clean up with water.
- Polyurethane (Oil-Based): While very durable, oil-based polyurethane can impart a slight amber tint, especially over lighter colors. It also has stronger fumes and requires mineral spirits for cleanup.
- Clear Acrylic Sealers: Similar to polycrylic, these offer good durability and clarity.
Recommendation: For most DIYers, a water-based polycrylic is the best choice for sealing painted laminate cabinets due to its ease of use, clear finish, and durability.
b. Applying the Sealer
- Ensure your final coat of paint is completely dry. Check the paint can for recommended drying times before applying a sealer – this can be 24-72 hours in some cases.
- Stir the sealer gently. Avoid shaking, as this can create air bubbles.
- Using a clean, high-quality synthetic brush or a foam applicator, apply a thin, even coat of sealer.
- Apply in the same direction as your final paint coat.
- Work in manageable sections to ensure an even application.
- Allow the first coat of sealer to dry completely according to the manufacturer’s instructions.
- Lightly sand the sealed surface with 320-grit sandpaper or a very fine sanding sponge.
- Wipe away all dust with a tack cloth.
- Apply a second thin coat of sealer, and if desired, a third coat for maximum durability. Always sand and wipe between coats.
Step 5: Reassembly – The Finishing Touches
Once the sealer is fully cured (this can take several days to a week, so be patient!), it’s time to put everything back together.
- Carefully reattach the cabinet doors to the cabinet frames using the original hinges and screws.
- If you’re updating your hardware, now is the time to install the new knobs and pulls. Drill pilot holes if necessary.
- Remove all painter’s tape and drop cloths.
- Wipe down the cabinets with a soft cloth to remove any dust from reassembly.
Tips for a Flawless Laminate Cabinet Painting Project
- Ventilation is Key: Always work in a well-ventilated area, especially when using primers or paints with strong fumes. Open windows and use fans.
- Work in Good Lighting: Adequate lighting helps you see any missed spots or imperfections during the painting process.
- Patience is a Virtue: Rushing any step, especially drying times, can compromise the final result.
- Test Your Paint: If you’re unsure about how a paint color will look, consider painting a small, inconspicuous area first or painting a spare piece of laminate.
- Clean Up Promptly: Clean your brushes, rollers, and trays immediately after use with the appropriate cleaner (water for latex/acrylic, mineral spirits for oil-based products).
- Consider the Environment: Laminate is a manufactured product, and while painting is a great way to refresh it, remember that some chemicals used in the process can be harsh. Dispose of waste materials responsibly.
Popular Color Choices for Laminate Cabinet Makeovers
When planning your laminate cabinet makeover, color is a significant decision. Here are some popular and effective choices:
- Crisp Whites: Timeless and bright, white cabinets can make a kitchen feel larger and more modern. They pair well with almost any countertop and backsplash.
- Soft Grays: A versatile neutral, gray offers a sophisticated look. Lighter grays can feel airy, while darker charcoals can create a dramatic, contemporary feel.
- Sage Greens or Dusty Blues: These muted, nature-inspired colors add a touch of personality and warmth to the kitchen without being overwhelming.
- Bold Navy or Black: For a dramatic and modern statement, deep blues or blacks can transform a kitchen. They work best with good lighting and contrasting elements.
- Greige (Gray-Beige): This popular neutral blends the warmth of beige with the coolness of gray, offering a sophisticated and adaptable option.
Alternative Laminate Cabinet Refinishing Methods
While painting is the most common method for laminate cabinet refinishing, there are other options to consider:
a. Laminate Cabinet Refinishing with Contact Paper or Vinyl Wraps
- Pros: Quick, relatively inexpensive, wide variety of patterns and colors available, less messy than painting, good for a temporary fix.
- Cons: Can look less “high-end” than paint, may not adhere well to textured laminate, can peel or bubble over time, especially in high-moisture areas or with heat.
- Process: Involves cutting the contact paper to size and carefully applying it to the cabinet surfaces, smoothing out air bubbles.
b. Laminate Cabinet Refinishing with Stencils
- Pros: Adds decorative detail and pattern to otherwise plain cabinets.
- Cons: Labor-intensive, requires careful stencil placement and application.
- Process: After painting and sealing, stencils are used with a stencil brush or roller to apply decorative patterns.
c. Replacing Laminate Doors
- Pros: Can give a completely new look and feel to your cabinetry, allows for different door styles and materials.
- Cons: Can be expensive, requires accurate measurements and compatibility with existing cabinet boxes.
For a comprehensive laminate cabinet makeover that offers lasting beauty and durability, painting laminate kitchen cabinets remains the most popular and often most satisfying DIY approach.
Frequently Asked Questions (FAQ)
Q1: Will paint stick to laminate cabinets?
Yes, paint will stick to laminate cabinets if you properly prepare the surface and use an adhesion-promoting primer. The key is a clean, lightly sanded surface and the right primer.
Q2: What is the best paint for laminate cabinets?
The best paint for laminate cabinets is a high-quality enamel paint or a specialized cabinet paint. These paints are formulated to be durable, hard-wearing, and adhere well to difficult surfaces. Look for water-based enamel or acrylic cabinet paints.
Q3: Can I paint over the laminate finish without sanding?
It is highly not recommended. While some “no-sand” primers exist, for laminate, sanding, even lightly, is crucial to create a surface for the primer to bond to. Skipping this step significantly increases the risk of paint peeling and chipping.
Q4: How many coats of paint do I need for laminate cabinets?
Typically, 2-3 coats of paint are needed for laminate cabinets to achieve full coverage, a uniform color, and a durable finish. Always allow each coat to dry thoroughly before applying the next.
Q5: How long do painted laminate cabinets last?
With proper preparation, priming, painting, and sealing, painted laminate cabinets can last for many years, often 5-10 years or even longer, depending on the quality of materials used and how well they are maintained.
Q6: Can I use a spray painter for painting laminate kitchen cabinets?
Yes, a spray painter (like an HVLP sprayer) can provide an exceptionally smooth and professional finish on laminate cabinets. However, it requires more masking to protect surrounding areas and a higher level of skill to avoid runs and drips. Ensure good ventilation if using a sprayer.
Q7: Do I need to seal painted laminate cabinets?
Yes, it is highly recommended to seal painted laminate cabinets with a durable topcoat like polycrylic. This protects the paint from moisture, grease, and wear, making them easier to clean and extending their lifespan.
Q8: Can I paint just the cabinet doors or the frames too?
You can paint either just the doors or both the doors and the frames. Painting both will give a completely refreshed look. If you only paint the doors, ensure the color and finish complement the existing cabinet frames.
Q9: What if my laminate has a wood grain texture?
If your laminate has a wood grain texture, the prep process remains the same: clean thoroughly and lightly sand. The paint and primer will adhere to the textured surface. The texture will likely show through the paint, which can be a desirable look, mimicking painted wood.
Q10: How do I clean painted laminate cabinets after they are done?
Clean painted laminate cabinets using a soft cloth or sponge with mild soap and water. Avoid abrasive cleaners or scrub brushes, as these can damage the paint finish. For tougher grease spots, a gentle degreaser can be used sparingly.
By following these detailed steps and tips, you can confidently tackle the project of painting laminate kitchen cabinets and achieve a beautiful, durable, and updated look for your kitchen. This rewarding DIY laminate cabinet painting project will undoubtedly enhance your home’s aesthetic.