
Can you paint laminate kitchen cupboards, and will it look good? Yes, absolutely! With the right preparation and materials, you can transform your laminate kitchen cupboards into a stunning, updated look. This guide will walk you through every step, from picking the best paint to achieving a durable finish that you’ll love.
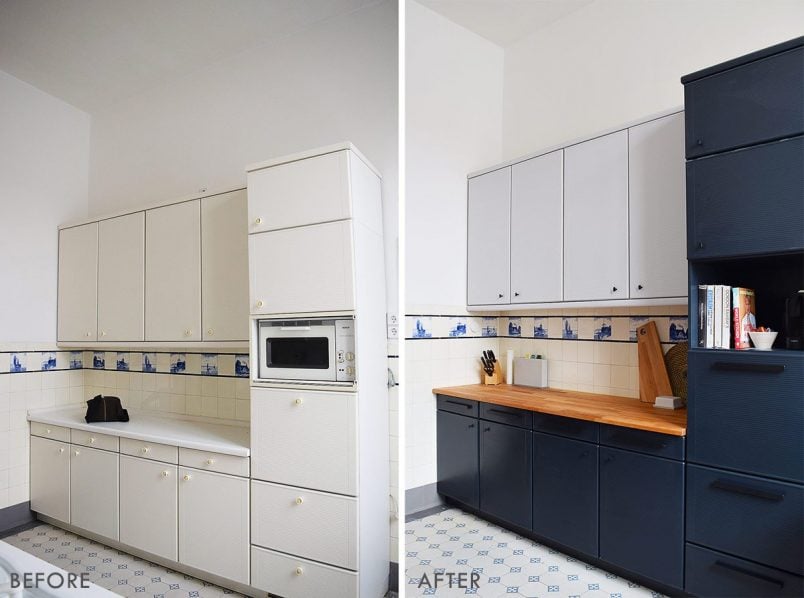
Image Source: www.littlehouseonthecorner.com
Why Paint Your Laminate Kitchen Cupboards?
Updating your kitchen doesn’t always mean a full renovation. Painting laminate kitchen cupboards is a fantastic way to refresh your space without breaking the bank. It’s a budget-friendly alternative to replacing cabinets and offers a significant visual impact. Whether your laminate is dated, chipped, or simply not your style, a fresh coat of paint can make a world of difference. This kitchen cupboard makeover can breathe new life into your entire kitchen, making it feel modern and inviting. If you’re looking for an effective DIY cupboard painting project that delivers professional-looking results, this is it.
Is it Worth Painting Laminate Kitchen Cupboards?
Yes, it is often worth painting laminate kitchen cupboards, especially if the existing finish is in decent condition. You can achieve a beautiful, updated look that rivals the appearance of brand-new cabinets, provided you follow the correct procedures. Many homeowners find it a rewarding and cost-effective way to improve their kitchen’s aesthetic. This laminate cabinet refinishing project can significantly boost your home’s appeal and your enjoyment of your kitchen space.
Preparing Your Laminate for Painting
This is the most crucial step for a successful and lasting paint job on laminate. Skipping or rushing this process will likely lead to paint peeling or chipping. Think of it as laying a solid foundation.
Step 1: Thorough Cleaning
You need to start with perfectly clean surfaces. Any grease, grime, or residue will prevent the primer and paint from adhering properly.
- Degrease: Use a good degreaser. A solution of warm water and dish soap can work, but for stubborn kitchen grease, a dedicated degreaser is best. For a more robust option, a solution of TSP (trisodium phosphate) substitute or diluted ammonia (use in a well-ventilated area and never mix with bleach) can be effective.
- Wipe Down: After degreasing, wipe down all surfaces with a clean, damp cloth to remove any remaining cleaner.
- Dry Thoroughly: Ensure all cupboard doors and frames are completely dry before moving on to the next step. Use a lint-free cloth.
Step 2: Sanding for Adhesion
Laminate surfaces are typically smooth and non-porous, which is why sanding is essential. You’re not trying to remove the laminate, but rather to create a slightly rough surface for the primer to grip.
- Sanding Grit: Use a fine-grit sandpaper, typically around 180 to 220 grit. You can use a sanding block or an orbital sander for larger areas. For smaller, detailed areas, sanding sponges are excellent.
- Light Pressure: Sand lightly. The goal is to scuff up the surface, not to dig into it. You want to create a dull sheen, not remove the laminate’s original finish.
- Dust Removal: After sanding, it’s vital to remove all dust. Use a shop vacuum with a brush attachment to get most of it. Then, wipe down all surfaces with a tack cloth. This sticky cloth picks up even the finest dust particles.
Step 3: Repairing Imperfections
Before you prime, take a moment to fix any nicks, dents, or scratches.
- Wood Filler: For minor dents and scratches, use a good quality wood filler. Choose one that dries hard and can be sanded smooth.
- Application: Apply the filler with a putty knife, pressing it firmly into the damaged area.
- Drying and Sanding: Allow the filler to dry completely according to the manufacturer’s instructions. Once dry, sand the filled areas smooth with your fine-grit sandpaper. Wipe away any dust with a tack cloth.
Choosing the Best Paint for Laminate
Selecting the right paint is paramount for a successful and durable finish. You need something that adheres well to a smooth surface and can withstand the daily wear and tear of a kitchen.
Types of Paint for Laminate
- Adhesion Promoters/Bonding Primers: These are specifically designed to create a strong bond on challenging surfaces like laminate, metal, and plastic. They are usually oil-based or shellac-based, though there are water-based options available.
- Alkyd (Oil-Based) Enamels: These paints are known for their durability, hardness, and smooth finish. They offer excellent adhesion and are resistant to chipping and scratching. However, they require mineral spirits for cleanup and have stronger fumes.
- Water-Based (Latex/Acrylic) Enamels with Primer: High-quality water-based enamels can also work well, especially those formulated for cabinets and furniture. The key is to use a bonding primer specifically designed for slick surfaces. This combination can offer good durability and easier cleanup.
- Cabinet-Specific Paints: Many brands offer paints specifically formulated for cabinets. These often have built-in primers or superior adhesion properties and are designed for a smooth, durable finish.
What is the Best Paint for Laminate?
The best paint for laminate is typically a high-quality bonding primer followed by a durable alkyd (oil-based) enamel or a high-quality water-based acrylic enamel designed for cabinets. If you opt for a water-based paint, ensuring it’s a premium formula with excellent adhesion properties is crucial.
Considerations for Choosing Paint:
- Durability: Kitchen cabinets take a beating – grease, moisture, and frequent touching. Choose a paint known for its toughness.
- Finish: Satin, semi-gloss, or gloss finishes are generally best for kitchens as they are easier to clean and more resistant to moisture and stains than matte finishes.
- VOCs (Volatile Organic Compounds): Consider low-VOC or zero-VOC options if you’re sensitive to fumes or concerned about air quality.
Priming Laminate Cabinets: The Essential First Coat
Priming is non-negotiable when painting laminate. It’s the bridge between your prepared laminate surface and your topcoat, ensuring adhesion and a uniform color.
Why Prime?
- Adhesion: Primers contain special binders that grip the laminate surface, preventing peeling.
- Blocking Stains: Some primers can block wood tannins or existing finishes from bleeding through your new paint.
- Uniform Color: Primer creates a consistent base color, so your topcoat appears even and true to its shade.
- Durability: A good primer contributes to the overall toughness of the paint job.
How to Prime Laminate Cabinets
- Apply Thin, Even Coats: Use a high-quality synthetic brush or a foam roller for smooth application. Avoid over-applying.
- Follow Manufacturer Instructions: Pay close attention to drying times. Rushing this step can compromise adhesion.
- Light Sanding Between Coats: Once the primer is completely dry, lightly sand the surface again with very fine-grit sandpaper (220-320 grit). This smooths out any brush strokes or imperfections and creates an even better surface for the paint to adhere to.
- Wipe Away Dust: Always use a tack cloth to remove all dust after sanding.
- Inspect: Check for any areas that might need a second coat of primer.
Painting Techniques for Laminate
Achieving a smooth, professional finish requires careful technique. The goal is to build up thin, even coats of paint.
Using a Brush and Roller
This is the most common and effective method for DIY cupboard painting.
- Best Tools:
- High-Quality Synthetic Brushes: For cutting in edges, corners, and detailed areas. Synthetic bristles are best for water-based paints, while natural bristles are better for oil-based paints.
- Foam Rollers or High-Density Short-Nap Rollers: For smooth, even coverage on flat surfaces. Foam rollers are excellent for achieving a brush-stroke-free finish.
- Technique:
- Cut In Edges: Use a good quality brush to paint the edges and any detailed areas first.
- Roll Flat Surfaces: For larger, flat areas, use a roller. Load the roller evenly with paint, avoiding drips. Roll in a consistent direction (e.g., from top to bottom, or side to side).
- Avoid Overworking: Don’t go over areas repeatedly with the roller. Apply enough paint to cover, then move on. You want to lay the paint down smoothly.
- Thin Coats: Apply multiple thin coats rather than one thick coat. This ensures better adhesion and a smoother finish.
- Maintain a Wet Edge: Try to keep a “wet edge” as you paint. This means overlapping your strokes slightly with the previously painted area. This helps prevent lap marks.
Spraying Laminate Cabinets (Advanced)
For the most professional, factory-like finish, spray painting is an option. This requires specialized equipment (like a paint sprayer) and practice.
- Equipment: HVLP (High-Volume Low-Pressure) sprayers are ideal for furniture and cabinets.
- Preparation: You’ll need to meticulously mask off all surrounding areas and protect your kitchen from overspray.
- Technique: Spraying requires a consistent distance and speed to achieve an even coat. It’s an advanced technique best suited for those with experience.
Applying the Topcoat for a Durable Cabinet Finish
Once your primer is dry and lightly sanded, it’s time for your topcoat. This is where your laminate cabinet refinishing really starts to shine.
Applying Multiple Coats
- Thin is In: Just like the primer, apply the paint in thin, even coats.
- Drying Time: Allow ample drying time between coats as recommended by the paint manufacturer. This is critical for durability.
- Light Sanding: After the first coat of paint, once fully dry, lightly sand the surface with very fine-grit sandpaper (220-320 grit). This creates a super smooth surface for subsequent coats and helps with adhesion.
- Tack Cloth: Always use a tack cloth to remove all dust after sanding.
- Continue: Apply subsequent coats, sanding and tack-clothing between each one, until you achieve full coverage and the desired finish. Typically, two to three coats of paint are needed.
Achieving a Durable Cabinet Finish
- Paint Choice: As mentioned, using a high-quality enamel paint specifically designed for cabinets is key.
- Curing Time: Paint doesn’t just dry; it cures. Curing is the process where the paint hardens and reaches its maximum durability. This can take anywhere from 7 to 30 days, depending on the paint type and humidity. During this time, be extra gentle with your cabinets. Avoid harsh cleaning or banging things against them.
- Topcoat Sealant (Optional but Recommended): For an extra layer of protection and durability, especially for high-traffic areas, consider a clear topcoat or sealant.
- Polyurethane: A water-based polyurethane is a good choice for durability and ease of cleanup. Look for a “clear, non-yellowing” formula.
- Acrylic Sealants: These can also provide a protective layer.
- Application: Apply this in thin, even coats, following the manufacturer’s instructions.
Refreshing Hardware and Reassembling
Don’t forget the finishing touches!
Hardware
- Clean or Replace: If your existing hardware is in good condition, a good cleaning can make it look new again. For a more dramatic change, consider replacing the knobs and handles.
- Painting Hardware: If you choose to paint your hardware, clean it thoroughly, prime it with a metal primer, and then use a spray paint designed for metal. A few thin coats will provide a durable finish.
Reassembly
- Wait for Full Cure: Ideally, wait for the paint to fully cure before reattaching hardware and reassembling your cabinets.
- Handle with Care: When putting doors back on, handle them carefully to avoid scratching the new paint job.
Summary of the Process: Laminate Cabinet Refinishing Steps
Here’s a quick recap of the essential steps for painting laminate furniture and cabinets:
| Step | Key Actions |
|---|---|
| 1. Preparation | Clean thoroughly with degreaser, sand lightly with fine-grit paper (180-220 grit), remove dust with vacuum and tack cloth, repair imperfections with wood filler and sand smooth. |
| 2. Priming | Apply 1-2 thin coats of a high-quality bonding primer. Allow to dry fully. Lightly sand between coats (220-320 grit) and remove dust with a tack cloth. |
| 3. Painting | Apply 2-3 thin, even coats of your chosen cabinet paint (alkyd enamel or high-quality acrylic enamel). Allow adequate drying time between coats. Lightly sand between coats (220-320 grit) and use a tack cloth to remove dust. |
| 4. Topcoat (Optional) | Apply 1-2 thin coats of a clear protective sealant like water-based polyurethane for added durability. Allow to dry fully. |
| 5. Hardware & Reassembly | Clean or replace hardware. Reattach hardware once paint is fully cured. Handle cabinets carefully during reassembly. |
Painting Techniques for Laminate: Pro Tips for a Flawless Finish
Achieving a flawless finish on laminate requires attention to detail. Here are some pro tips to elevate your kitchen cupboard makeover:
- Work in Good Lighting: Ensure you have plenty of light so you can see any imperfections or missed spots.
- Use a Paint Tray Liner: This makes cleanup much easier.
- Stir Paint, Don’t Shake: Stir your paint thoroughly to mix pigments evenly. Shaking can introduce air bubbles.
- Test a Small Area: Before painting your entire kitchen, test your paint and primer combination on an inconspicuous area of a cabinet door to ensure you like the look and adhesion.
- Ventilation is Key: Always work in a well-ventilated area, especially when using oil-based paints or primers. Open windows and doors, and consider using fans.
- Patience is a Virtue: Don’t rush the drying or curing times. Patience will pay off with a much more durable and beautiful finish.
Frequently Asked Questions (FAQ)
How long does painted laminate kitchen cupboards last?
With proper preparation, the right paint, and careful application, painted laminate kitchen cupboards can last for many years, often 5-10 years or more. The durability is heavily dependent on the quality of materials used and how well the cabinets are maintained.
Can I use chalk paint on laminate cupboards?
While chalk paint can adhere to many surfaces with minimal prep, it’s generally not recommended for high-moisture, high-traffic areas like kitchen cabinets, especially laminate. Chalk paint is porous and usually requires a wax or polycrylic sealant, which may not offer the durability needed for kitchen use. If you do use chalk paint, ensure you use a high-quality primer beforehand and seal it with multiple layers of a durable topcoat.
What is the best way to paint laminate furniture?
The process for painting laminate furniture is very similar to painting laminate kitchen cupboards. Thorough cleaning, light sanding to create a surface for adhesion, priming with a bonding primer, and then applying multiple thin coats of a durable enamel paint are the key steps for painting laminate furniture.
Do I need to sand laminate before painting?
Yes, sanding is crucial. Laminate is a smooth, non-porous surface, and sanding creates a slightly rough texture that allows the primer and paint to adhere properly, preventing chipping and peeling.
What is a bonding primer?
A bonding primer is a type of primer specifically formulated to adhere to slick, non-porous surfaces like laminate, melamine, tile, and metal. It creates a strong foundation for subsequent coats of paint, ensuring better adhesion and durability.
Can I paint over laminate without sanding?
It is strongly not recommended to paint over laminate without sanding. While some “paint and primer in one” products claim to adhere without sanding, laminate’s slick surface typically requires scuff sanding for paint to adhere effectively and last. Skipping sanding is a common cause of paint failure on laminate.
What is the best finish for kitchen cabinets?
For kitchen cabinets, satin, semi-gloss, or gloss finishes are generally preferred. They are more durable, easier to clean, and more resistant to moisture and stains than matte or eggshell finishes.
By following these detailed steps and tips, you can achieve stunning results and transform your laminate kitchen cupboards into a beautiful focal point of your home. This kitchen cupboard makeover is a rewarding project that can significantly update your living space.