
Can you remove lower kitchen cabinets without damaging them? Yes, by following a careful, step-by-step process. This guide will show you how to detach base cabinets from your kitchen safely and effectively, preserving them for reuse or ensuring a clean demolition. Whether you’re planning a full kitchen renovation or simply reorganizing, knowing how to properly remove cabinets is a valuable skill.
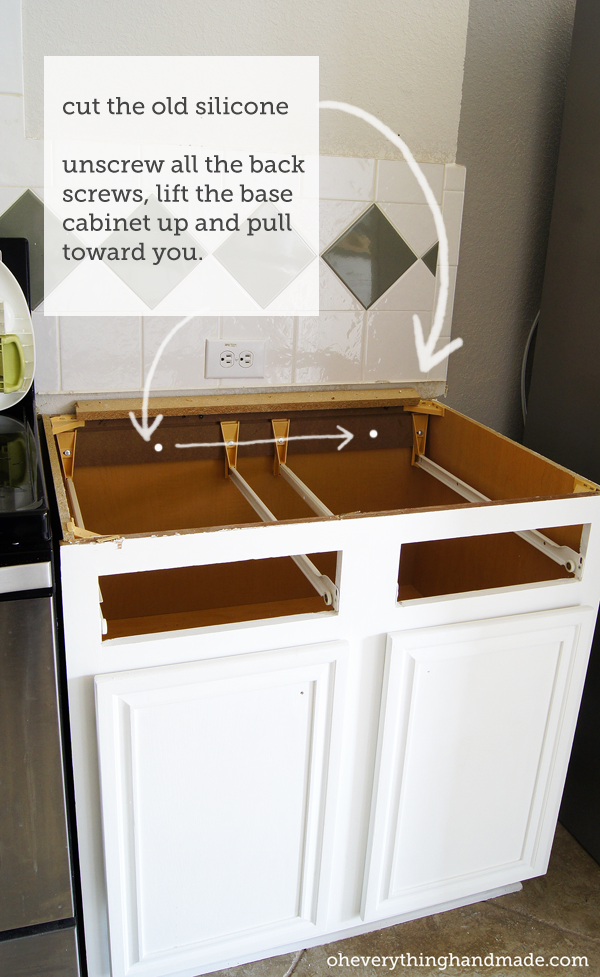
Image Source: www.oheverythinghandmade.com
Preparing for Kitchen Cabinet Removal
Before you even think about unscrewing anything, preparation is key for successful kitchen cabinet removal. This phase is all about gathering your tools, clearing the workspace, and taking precautions to prevent damage. Trying to rush this can lead to frustrating mistakes and potentially costly repairs.
Essential Tools and Materials
Having the right tools at hand makes the entire process smoother and safer. You don’t want to be halfway through uninstalling kitchen cabinets and realize you’re missing a crucial item.
Here’s a list of what you’ll likely need:
- Screwdrivers: Both Phillips and flathead are essential. A cordless drill with various bits will save you a lot of time and effort.
- Pry Bar: A slim, flat pry bar is useful for gently separating cabinets from walls or countertops.
- Putty Knife or Scraper: To carefully lift caulk or paint lines where cabinets meet surfaces.
- Stud Finder: To locate wall studs for secure mounting points and to know where the screws are holding the cabinets.
- Level: To check if cabinets are plumb and level before removal, which can indicate how they were installed.
- Safety Glasses: Protect your eyes from falling debris or dust.
- Work Gloves: To protect your hands.
- Utility Knife: For scoring paint or caulk lines.
- Measuring Tape: To note cabinet dimensions if you plan to reuse them.
- Marker or Labels: To mark cabinets if you’re removing multiple units and plan to reinstall them in the same or a different layout.
- Buckets or Cardboard Boxes: To store removed hardware and small parts.
- Furniture Dollies or Moving Blankets: If you plan to move the cabinets to another location.
Clearing the Work Area
A cluttered kitchen makes safe cabinet removal much harder and increases the risk of accidents. Take the time to create a clear and organized space.
- Remove Everything from the Cabinets: Empty all contents from the cabinets you intend to remove. This reduces weight and prevents items from falling out during the process.
- Clear Countertops: Take everything off the countertops above the base cabinets.
- Protect Flooring: Lay down drop cloths or old blankets to protect your floor from scratches or dents, especially if you’ll be moving heavy cabinets.
- Isolate Utilities (if necessary): If you are removing cabinets that have plumbing or electrical connections (like a dishwasher or sink base), you must shut off the water supply and the electricity to that area at the breaker box. This is a critical safety step.
Step-by-Step Guide to Detaching Base Cabinets
Now that you’re prepared, it’s time to get down to the practical steps of detaching base cabinets. We’ll go through this methodically, focusing on minimizing any damage to the cabinets themselves or the surrounding walls.
Step 1: Remove Cabinet Doors and Drawer Fronts
This is often the first and easiest part of disassembling kitchen cabinets. Removing doors and drawers significantly lightens the cabinets and makes them easier to handle.
Removing Cabinet Doors:
- Locate Hinges: Open each cabinet door to expose the hinges.
- Remove Hinge Screws: Most cabinet hinges have screws that attach the hinge plate to the cabinet frame. Use a screwdriver or drill to carefully remove these screws. Some hinges might have a clip mechanism or a release tab instead of screws.
- Support the Door: As you remove the last screw on a hinge, support the door to prevent it from falling.
- Store Hardware: Place the screws and any other small parts into a labeled bag or container. This is crucial for cabinet hardware removal.
Removing Cabinet Drawers:
- Pull Drawers Out: Extend each drawer as far as it will go.
- Locate Drawer Slides: Look for screws or a release lever on the drawer slides. These are usually located on the sides of the drawer or the frame.
- Disconnect Drawer: Depending on the slide type, you might need to unscrew the drawer from the slide mechanism or depress a plastic lever to release it.
- Label Components: If you plan to reinstall the drawers, label each drawer and its corresponding opening to avoid confusion.
Step 2: Remove Cabinet Hardware
Once the doors and drawers are off, take a moment for thorough cabinet hardware removal. This includes handles, knobs, hinges (if not removed with the doors), and any decorative elements.
- Handles and Knobs: These are usually attached with screws from the inside of the door or drawer front. Simply unscrew them.
- Hinges: If you didn’t remove them with the doors, carefully unscrew the hinge plates from the cabinet frame.
- Shelf Pins and Brackets: Remove any adjustable shelves and their supports.
Step 3: Locate and Remove Fasteners
This is the most crucial step in safe cabinet removal. Base cabinets are typically secured to the wall in several ways. You need to find and remove all of these fasteners.
Identifying Attachment Points:
- Studs: Base cabinets are almost always screwed into wall studs for stability. You can find these studs using a stud finder along the back and sides of the cabinet.
- Countertop: If a countertop is still attached, the cabinets might be screwed to it from underneath.
- Adjacent Cabinets: Cabinets are often joined together with screws or clips, especially in a run of multiple cabinets.
- Plumbing/Electrical: Be mindful of any pipes or wires that might be routed through or near the cabinets.
The Removal Process:
- Check for Visible Screws: Look inside the cabinets for screws attaching the cabinet box to the wall. These are often along the top edge, the back, or the sides.
- Access Hidden Screws:
- Through the Back: If the cabinets have a thin plywood back, you might be able to see screws going into the wall studs from the inside.
- Under the Lip: Sometimes, screws are hidden under the top lip of the cabinet frame. You might need to gently pry the lip away slightly or look closely.
- From Above (if countertop removed): If the countertop has already been removed, you’ll have easier access to any screws holding the cabinets to the wall from the top.
- Use a Stud Finder: Run a stud finder along the wall where the cabinets are mounted. Mark the stud locations. This helps you anticipate where screws are likely to be.
- Carefully Unscrew: Use your screwdriver or drill to remove all identified screws. If a screw is stripped or hard to remove, use a screw extractor.
Step 4: Detaching Cabinets from the Wall
Once all visible and accessible screws are out, you’ll need to gently separate the cabinets from the wall.
- Score Caulk Lines: If the cabinets have been painted or caulked around, use a utility knife to carefully score along the edges where the cabinet meets the wall or countertop. This breaks the seal and prevents paint or drywall damage.
- Gently Pry:
- Place a putty knife or thin piece of wood between the cabinet and the wall to protect the wall.
- Insert your pry bar behind the cabinet.
- Apply gentle, steady pressure to slowly pull the cabinet away from the wall. Work your way along the cabinet, prying in a few spots rather than trying to force it in one.
- Check for Hidden Fasteners: As you pry, be alert for any missed screws or nails. If you encounter resistance, stop and re-examine for fasteners.
- If Cabinets are Joined: If you are removing a section of cabinets, you may need to remove screws connecting the cabinets to each other first. Look for screws along the adjoining sides of the cabinet boxes.
Step 5: Lifting and Removing the Cabinets
With the cabinets detached from the wall, the final step is to lift them out.
- Support the Cabinet: If the cabinet is heavy, have a helper assist you. It’s much easier and safer with two people.
- Lift Carefully: Lift the cabinet straight up and out. If it feels stuck, check again for any missed connections.
- Clear the Area: Move the removed cabinet to your designated staging area. If you’re doing a kitchen cabinet demolition, you might place it directly where debris will be collected. If you’re reusing them, carefully move them to a safe location, perhaps using furniture dollies and padding them with moving blankets.
Special Considerations for Kitchen Cabinet Demolition
When the goal is kitchen cabinet demolition rather than reuse, the approach can be slightly more aggressive, but damage prevention to the surrounding areas (like walls and flooring) is still important.
Working with Adjacent Cabinets
If you’re removing a single base cabinet from a run of cabinets, you’ll need to be extra careful about the cabinets on either side.
- Disconnecting Joined Cabinets: Look for screws that run from the side of one cabinet into the adjoining cabinet. Remove these first. Sometimes, cabinets are joined with clips or dados that require a bit more finesse to separate.
- Support While Working: Ensure adjacent cabinets are stable. If they are leaning precariously, you might need to temporarily brace them.
Dealing with Plumbing and Electrical
This is where safety is paramount.
- Sink Base Cabinet: You must shut off the water supply to the sink and dishwasher before attempting to remove the sink base cabinet. Disconnect the water lines and drain any residual water. If there’s a garbage disposal, ensure the power to it is also off.
- Cabinets with Outlets or Switches: If cabinets have electrical outlets or junction boxes within them, you absolutely need to turn off the power at the breaker box. Even for a demo, it’s wise to ensure no live wires are present. If you’re unsure, call a qualified electrician.
Removing Cabinets with Integrated Features
Some kitchens have base cabinets with built-in features like toe-kick drawers or appliance garages.
- Toe-Kick Drawers: These usually slide out. They might have their own set of rails and need to be detached separately before you can remove the main cabinet box.
- Appliance Garages: If a cabinet has a motorized door or a pull-out mechanism, consult any manufacturer’s instructions or look for specific release mechanisms before attempting removal.
Reinstalling or Storing Removed Cabinets
If your goal is reuse, proper handling during removal is crucial.
For Reinstallation
- Labeling is Key: Ensure every part is clearly labeled (e.g., “Base Cabinet Left,” “Drawer Front Back”).
- Protect Cabinet Interiors: If storing, consider placing silica gel packets inside to absorb moisture and prevent mold.
- Check for Damage: Inspect cabinets for any damage incurred during removal. Minor dings can often be repaired.
For Storage
- Stacking: If stacking, use blankets or cardboard between units to prevent scratching.
- Environment: Store in a dry, climate-controlled environment to prevent warping or damage from humidity.
Frequently Asked Questions (FAQ)
Q1: How long does it take to remove lower kitchen cabinets?
A1: For a single base cabinet, it might take 30 minutes to an hour once you know what you’re doing. For a full kitchen of lower cabinets, it could take a full day or more, depending on the size of the kitchen, how they are installed, and whether you’re reusing them or doing a demolition.
Q2: What if my cabinets are glued to the wall?
A2: While less common for standard base cabinets, some installations might use adhesive. If you encounter significant resistance after removing screws, you might need to carefully work a thin pry bar or putty knife along the edges to break the adhesive bond. Be very gentle to avoid damaging the drywall.
Q3: Do I need to remove the countertop before removing base cabinets?
A3: In many cases, yes. Countertops are often attached to the base cabinets from underneath with screws or adhesive. Trying to remove base cabinets while they are still attached to a heavy countertop can be dangerous and may damage both the cabinets and the countertop. It’s generally best to remove the countertop first, unless it’s a very lightweight laminate that can be carefully maneuvered.
Q4: Can I reuse old kitchen cabinets?
A4: Absolutely! Many older cabinets are well-made and can be updated with new hardware, a fresh coat of paint, or refinishing. This is a great way to save money and reduce waste. Just ensure they are removed carefully to avoid damage.
Q5: What’s the difference between removing cabinets for renovation versus demolition?
A5: When renovating and planning to reuse cabinets, the focus is on safe cabinet removal and preserving the integrity of each piece. For kitchen cabinet demolition, while you still want to protect surrounding structures, the priority shifts from preservation to efficient removal, and pieces might be discarded rather than handled gently. The techniques are similar, but the care level differs.
By following these detailed steps, you can successfully remove lower kitchen cabinets without causing damage, whether for a new kitchen layout, a complete renovation, or a strategic demolition. Remember to prioritize safety and take your time for the best results.