
Image Source: i.ytimg.com
How To Restain Kitchen Cabinets Without Sanding: Easy DIY Guide
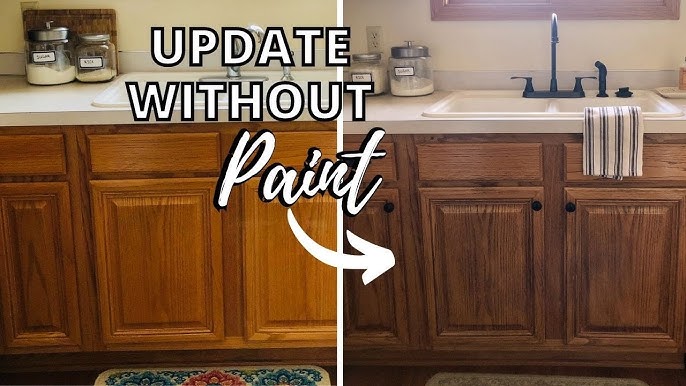
Can you restain kitchen cabinets without sanding? Yes, you absolutely can! With the right products and techniques, you can achieve a beautiful, updated look for your kitchen cabinets without the messy, time-consuming chore of sanding. This guide will walk you through the process of no-sand cabinet refinishing, making it an easy DIY cabinet update.
Updating your kitchen cabinets doesn’t always mean a complete overhaul. If your cabinets are structurally sound but the finish is worn, outdated, or just not your style, cabinet resurfacing no sanding is a fantastic option. This method skips the abrasive sanding process, making it a quicker, cleaner, and more accessible DIY project. We’ll explore various cabinet stripping alternative options and provide a comprehensive plan for cabinet reconditioning without sanding, leading to a stunning no-sanding cabinet makeover. Get ready for a rewarding DIY cabinet refinishing no sanding experience!
Why Skip the Sanding?
Sanding cabinets is a notoriously labor-intensive and dusty process. It requires careful technique to avoid damaging the wood, and the fine dust can get everywhere, requiring extensive cleanup. For many DIYers, the thought of sanding an entire kitchen’s worth of cabinets is enough to deter them from tackling the project altogether. Fortunately, modern brush-on cabinet finish no sanding products and techniques offer a viable and effective alternative.
The benefits of a no-sanding approach include:
- Time Savings: Eliminating sanding significantly cuts down on the project timeline.
- Reduced Mess: No dust means less cleanup and a more pleasant working environment.
- Accessibility: Makes cabinet refinishing achievable for those without extensive DIY experience or specialized tools.
- Preservation of Cabinet Details: Avoids the risk of over-sanding and losing intricate details on cabinet doors or drawers.
- Cost-Effectiveness: Often, no-sand products are comparable in price, and you save on sandpaper, dust masks, and potential equipment rental.
Preparing Your Cabinets: The Crucial First Step
Even without sanding, proper preparation is paramount for a lasting and beautiful finish. This is where the success of your cabinet renewal no sand project truly lies. Think of this as the foundation of your transformation.
H3: Deep Cleaning is Key
Before you even think about applying a new finish, your cabinets need to be immaculately clean. Grease, grime, and old polish can prevent the new finish from adhering properly, leading to peeling or uneven application.
H4: Removing Built-Up Grime
- Gather Your Supplies: You’ll need a good degreaser (such as TSP substitute or a specialized cabinet cleaner), clean cloths or sponges, and buckets of warm water.
- Work in Sections: Tackle one cabinet door or drawer front at a time. This ensures you don’t let the cleaner dry on the surface.
- Degrease Thoroughly: Apply the degreaser according to the product instructions. Gently scrub the surfaces, paying extra attention to areas around handles and corners where grime tends to accumulate.
- Rinse and Dry: Wipe down the cabinets with a clean, damp cloth to remove all traces of the degreaser. Immediately follow with a dry cloth to prevent water spots. Ensure all surfaces are completely dry before moving on.
H4: Dealing with Old Finishes or Paint
If your cabinets have a thick, glossy finish or old paint that is peeling, you might need a cabinet stripping alternative that goes beyond simple cleaning.
-
Chemical Strippers: For very stubborn finishes, a chemical stripper designed for wood can be an effective cabinet stripping alternative. Choose a low-VOC or eco-friendly option.
- Application: Apply the stripper according to product directions, usually with a brush.
- Wait Time: Allow the stripper to work its magic, which usually involves softening the old finish.
- Scraping: Use a plastic scraper or putty knife to gently lift the softened finish. Avoid metal scrapers that can gounge the wood.
- Neutralizing: After removing the bulk of the finish, neutralize the stripper with the recommended product (often mineral spirits or a specialized neutralizer) and a clean cloth.
- Clean Again: Even after stripping, a thorough degreasing and cleaning are essential.
-
Paint Over Cabinets Considerations: If you plan to paint over cabinets, ensure the existing surface is clean and sound. If the old paint is chalky or peeling, you’ll need to address those issues. A good degreaser is often sufficient, but for very glossy finishes, a liquid deglosser can help create a surface for the new paint to adhere to.
H3: Addressing Minor Imperfections
Even without sanding, you can address minor nicks and scratches to create a smoother canvas.
H4: Filling Small Dents and Cracks
- Wood Filler: Use a good quality wood filler that matches your cabinet’s underlying wood tone or is stainable if you’re planning to stain.
- Application: Apply a small amount of filler to the imperfection using a putty knife. Press it firmly into the dent or crack.
- Smooth and Level: Wipe away any excess filler with a damp cloth, being careful not to smear it into surrounding areas. Allow the filler to dry completely according to the product’s instructions.
- Light Touch-Up (Optional): Once dry, you can very lightly scuff the filled area with a fine-grit sanding sponge (220 grit or higher) just to level it with the surrounding surface. This is a minimal sanding, focused only on the filled areas.
H4: Using a Liquid Deglosser
A liquid deglosser is a chemical solution that etches the surface of glossy finishes, creating a duller, more receptive surface for new finishes or paint. It’s a key component for many no-sanding cabinet refinishing projects.
- Application: Apply the deglosser with a clean cloth or applicator pad. Work in the direction of the wood grain.
- Wipe Off: Wipe off the deglosser promptly after application, as directed by the manufacturer. It’s not meant to soak into the wood but to alter the sheen of the existing finish.
- Clean Again: After deglossing, it’s crucial to wipe down the cabinets with a tack cloth or a clean, dry cloth to remove any residue.
Choosing Your No-Sanding Finish
The type of finish you choose will significantly impact the look and durability of your cabinet resurfacing no sanding project. There are excellent products available that are specifically designed for this purpose.
H3: All-in-One Reformulating Paints and Glazes
Many modern products combine primer, paint, and a topcoat in one, or offer specialized glazes that adhere well to prepared surfaces. These are excellent for a cabinet reconditioning without sanding.
- Mineral-Based Paints: These paints often have excellent adhesion and a durable finish, requiring minimal prep. They can be applied directly over a well-cleaned and deglossed surface.
- Gel Stains/Finishes: Gel stains are thicker than traditional stains and adhere well to existing finishes, acting as a brush-on cabinet finish no sanding. They provide a rich, uniform color.
- Cabinet Refinishing Kits: Many brands offer kits specifically for cabinets that include all the necessary products, often with simplified application instructions.
H3: Paint Over Cabinets: A Popular Choice
If you prefer a solid color, painting your cabinets is a fantastic way to achieve a dramatic transformation.
-
Types of Paint:
- Chalk Paint: Known for its matte finish and excellent adhesion, chalk paint often requires very little prep. It’s a great option for a vintage or farmhouse look.
- Mineral Paints: Similar to chalk paint in their adhesion, mineral paints offer a more durable and often a slightly softer finish.
- Milk Paint: Can achieve a chippy, antique look, but may require a bonding agent for better adhesion.
- Cabinet Enamels: These are specifically formulated for cabinets and offer a very durable, smooth finish. Look for low-VOC or water-based options.
-
Primer’s Role: Even when painting over cabinets, a good quality primer is often recommended, especially if you’re switching from a dark to a light color or if your existing finish is unknown. A good bonding primer will ensure the paint adheres well and prevent the old color from showing through.
H3: Restaining Over Existing Finish
For those who love the look of wood grain but want to change the color, restaining is an option.
- Gel Stains: As mentioned, gel stains are ideal for this. They create a translucent color layer over the existing finish without requiring you to strip it down to bare wood. This is a true cabinet renewal no sand solution for changing wood tones.
- Trans-tint Dyes: These concentrated dyes can be mixed with water or alcohol and applied to the surface. They penetrate the existing finish to impart color. However, they require a compatible topcoat for protection.
Application Techniques for a Professional Finish
The way you apply your chosen finish is critical for achieving a smooth, professional look, especially with DIY cabinet refinishing no sanding.
H3: Preparing Your Workspace
- Ventilation: Ensure the area is well-ventilated. Open windows and use fans.
- Protection: Cover your countertops, floors, and any surrounding areas with drop cloths or plastic sheeting.
- Disassembly: Remove cabinet doors, drawer fronts, and hardware. It’s much easier to work on these pieces individually in a well-lit, flat space. Label each door and drawer front so you know exactly where it belongs when you reassemble.
H3: Applying the Finish
H4: Using the Right Tools
- High-Quality Brushes: For a smooth finish, use synthetic brushes for water-based products and natural bristle brushes for oil-based products. Look for brushes with tapered bristles for better control.
- Foam Rollers: For larger, flat surfaces like cabinet doors, high-density foam rollers can provide a smooth, streak-free finish, especially with paint.
- Microfiber Applicator Pads: These are excellent for applying gel stains and some paints, providing an even coat without brush marks.
H4: Application Steps (General Guide)
- Apply Thin Coats: Regardless of the product, applying multiple thin coats is always better than one thick coat. This allows for even drying and reduces the risk of drips and runs.
- Work with the Grain: Always apply your finish in the direction of the wood grain.
- Maintain a Wet Edge: When painting or brushing, overlap your strokes slightly and maintain a “wet edge” to avoid visible lines where one section of application ends and the next begins.
- Drying Between Coats: Allow each coat to dry thoroughly according to the product manufacturer’s instructions. This is crucial for proper adhesion and a durable finish. Lightly scuffing with a very fine grit (320+) or a synthetic steel wool pad between coats can help with adhesion and smooth out any imperfections, but this is often optional with specialized no-sand products. Always wipe away dust with a tack cloth after any light scuffing.
- Topcoat (If Necessary): Some finishes, like chalk paint or certain mineral paints, benefit from a protective topcoat (like a polycrylic or wax) for added durability, especially in high-traffic areas like kitchens. Gel stains usually have their own built-in topcoat or require a compatible one.
H3: Techniques for Specific Products
H4: Painting Cabinets
- Primer: Apply one or two thin coats of primer, allowing adequate drying time between each.
- Paint: Apply your chosen cabinet paint in thin, even coats. Use a brush for edges and corners, and a foam roller for the flat surfaces of the doors and drawer fronts.
- Multiple Coats: Most cabinet painting projects will require at least two to three coats of paint for full coverage and a smooth, even finish.
H4: Applying Gel Stain (No Sanding Cabinet Makeover)
- Apply: Using a foam brush, applicator pad, or lint-free cloth, apply the gel stain in a thin, even layer over the cleaned and prepped surface.
- Wipe Off: Immediately after applying, wipe off the excess stain with a clean, lint-free cloth. The longer you leave the stain on, the darker the color will become. Experiment on a scrap piece of wood or an inconspicuous area first.
- Multiple Layers for Depth: You can build up color by applying additional thin coats, wiping off the excess each time, until you achieve your desired shade. This is a key aspect of cabinet renewal no sand.
Reassembling and Finishing Touches
Once your cabinet doors, drawers, and frames are dry and fully cured, it’s time for the final steps.
H3: Reattaching Hardware
- Clean or Replace Hardware: While your cabinets are being refinished, it’s a great opportunity to clean your existing hardware or upgrade to new handles and knobs.
- Secure Tightly: Reattach all hardware, ensuring it is aligned correctly and secured firmly.
H3: Reinstalling Doors and Drawers
- Refer to Your Labels: Use the labels you created during disassembly to put each door and drawer back in its rightful place.
- Adjust Hinges: Most cabinet hinges have adjustment screws that allow you to fine-tune the alignment of your doors so they hang straight and close properly.
H3: Curing Time
- Patience is a Virtue: Even though the finish might feel dry to the touch, most paints and stains need several days, or even weeks, to fully cure and reach their maximum hardness and durability. Avoid heavy use or harsh cleaning during this period.
Troubleshooting Common Issues in No-Sanding Refinishing
Even with the most straightforward methods, DIY projects can sometimes present challenges.
H3: Streaky Finish
- Cause: Inconsistent application, working with a dry brush, or not maintaining a wet edge.
- Solution: For painted surfaces, you might be able to lightly sand the streaky areas with very fine-grit sandpaper (320+) and reapply thin coats, focusing on a consistent application. For stains, a well-applied topcoat can sometimes even out minor streaks. Ensure you are using high-quality applicators.
H3: Poor Adhesion
- Cause: Inadequate cleaning or deglossing, applying finish to a dirty surface, or using incompatible products.
- Solution: If you notice peeling or chipping, the surface was likely not prepped correctly. You may need to remove the problematic finish and re-prep the area, ensuring thorough cleaning and deglossing before reapplying.
H3: Uneven Color (Especially with Stains)
- Cause: Inconsistent application or wiping of the stain, or variations in the wood’s porosity.
- Solution: For gel stains, the key is consistent application and wiping. If the color is too light in spots, you can often apply another thin coat and wipe. If it’s too dark, you might be able to lighten it slightly with mineral spirits while it’s still wet, though this is tricky and best avoided by careful initial application.
Frequently Asked Questions (FAQ)
Q1: What is the best way to restain kitchen cabinets without sanding?
A1: The best way involves thorough cleaning and degreasing of your cabinets, followed by the application of a specialized no-sand product like a gel stain or a high-adhesion cabinet paint. Using a liquid deglosser can also enhance adhesion.
Q2: Can I paint over existing stained cabinets without sanding?
A2: Yes, you can paint over cabinets without sanding if you properly clean, degrease, and potentially use a liquid deglosser. A good quality bonding primer is also highly recommended for optimal adhesion.
Q3: Is cabinet resurfacing without sanding really durable?
A3: When done correctly with quality products and proper preparation, cabinet resurfacing no sanding can be very durable. The key is the adhesion of the new finish to the existing surface. Using a bonding primer or a deglosser helps create a strong bond.
Q4: What’s a good cabinet stripping alternative if I don’t want to sand?
A4: A chemical stripper is a common cabinet stripping alternative, but if you want to avoid harsh chemicals, a liquid deglosser is an excellent option for preparing glossy surfaces for a new finish without sanding. For painted cabinets, thorough cleaning and degreasing are often sufficient.
Q5: How do I refresh my cabinets without sanding?
A5: You can refresh your cabinets without sanding by cleaning them thoroughly, addressing minor imperfections, and then applying a new finish such as a gel stain, a brush-on cabinet finish no sanding, or a high-adhesion paint. This falls under cabinet reconditioning without sanding.
Q6: What are the pros and cons of no-sanding cabinet refinishing?
A6: Pros include reduced time, less mess, and greater accessibility for DIYers. Cons can include potential adhesion issues if prep isn’t perfect, and the finished look might not be as smooth as a fully sanded and refinished surface, depending on the products used.
Q7: Can I use a standard stain over my existing cabinet finish without sanding?
A7: Standard wood stains are designed to penetrate bare wood. They typically will not adhere well or provide even color over an existing finish. For a cabinet renewal no sand, gel stains or specialized reconditioning products are the preferred choice.
This easy cabinet update allows you to transform your kitchen cabinets into a focal point without the arduous task of sanding, proving that a no-sanding cabinet makeover is both achievable and highly rewarding.