
Are you wondering how to compost kitchen scraps? Yes, you absolutely can! Composting kitchen scraps is a fantastic way to reduce waste and create valuable fertilizer for your plants. This kitchen composting guide will walk you through everything you need to know to get started, even if you have limited space. We’ll explore how to manage kitchen compost, discuss the best kitchen compost bin options, and tackle common concerns like kitchen compost smell. Whether you’re looking for a small kitchen composter or a dedicated countertop compost bin, this guide is for you. This is kitchen composting for beginners, making it easy for everyone to join in.
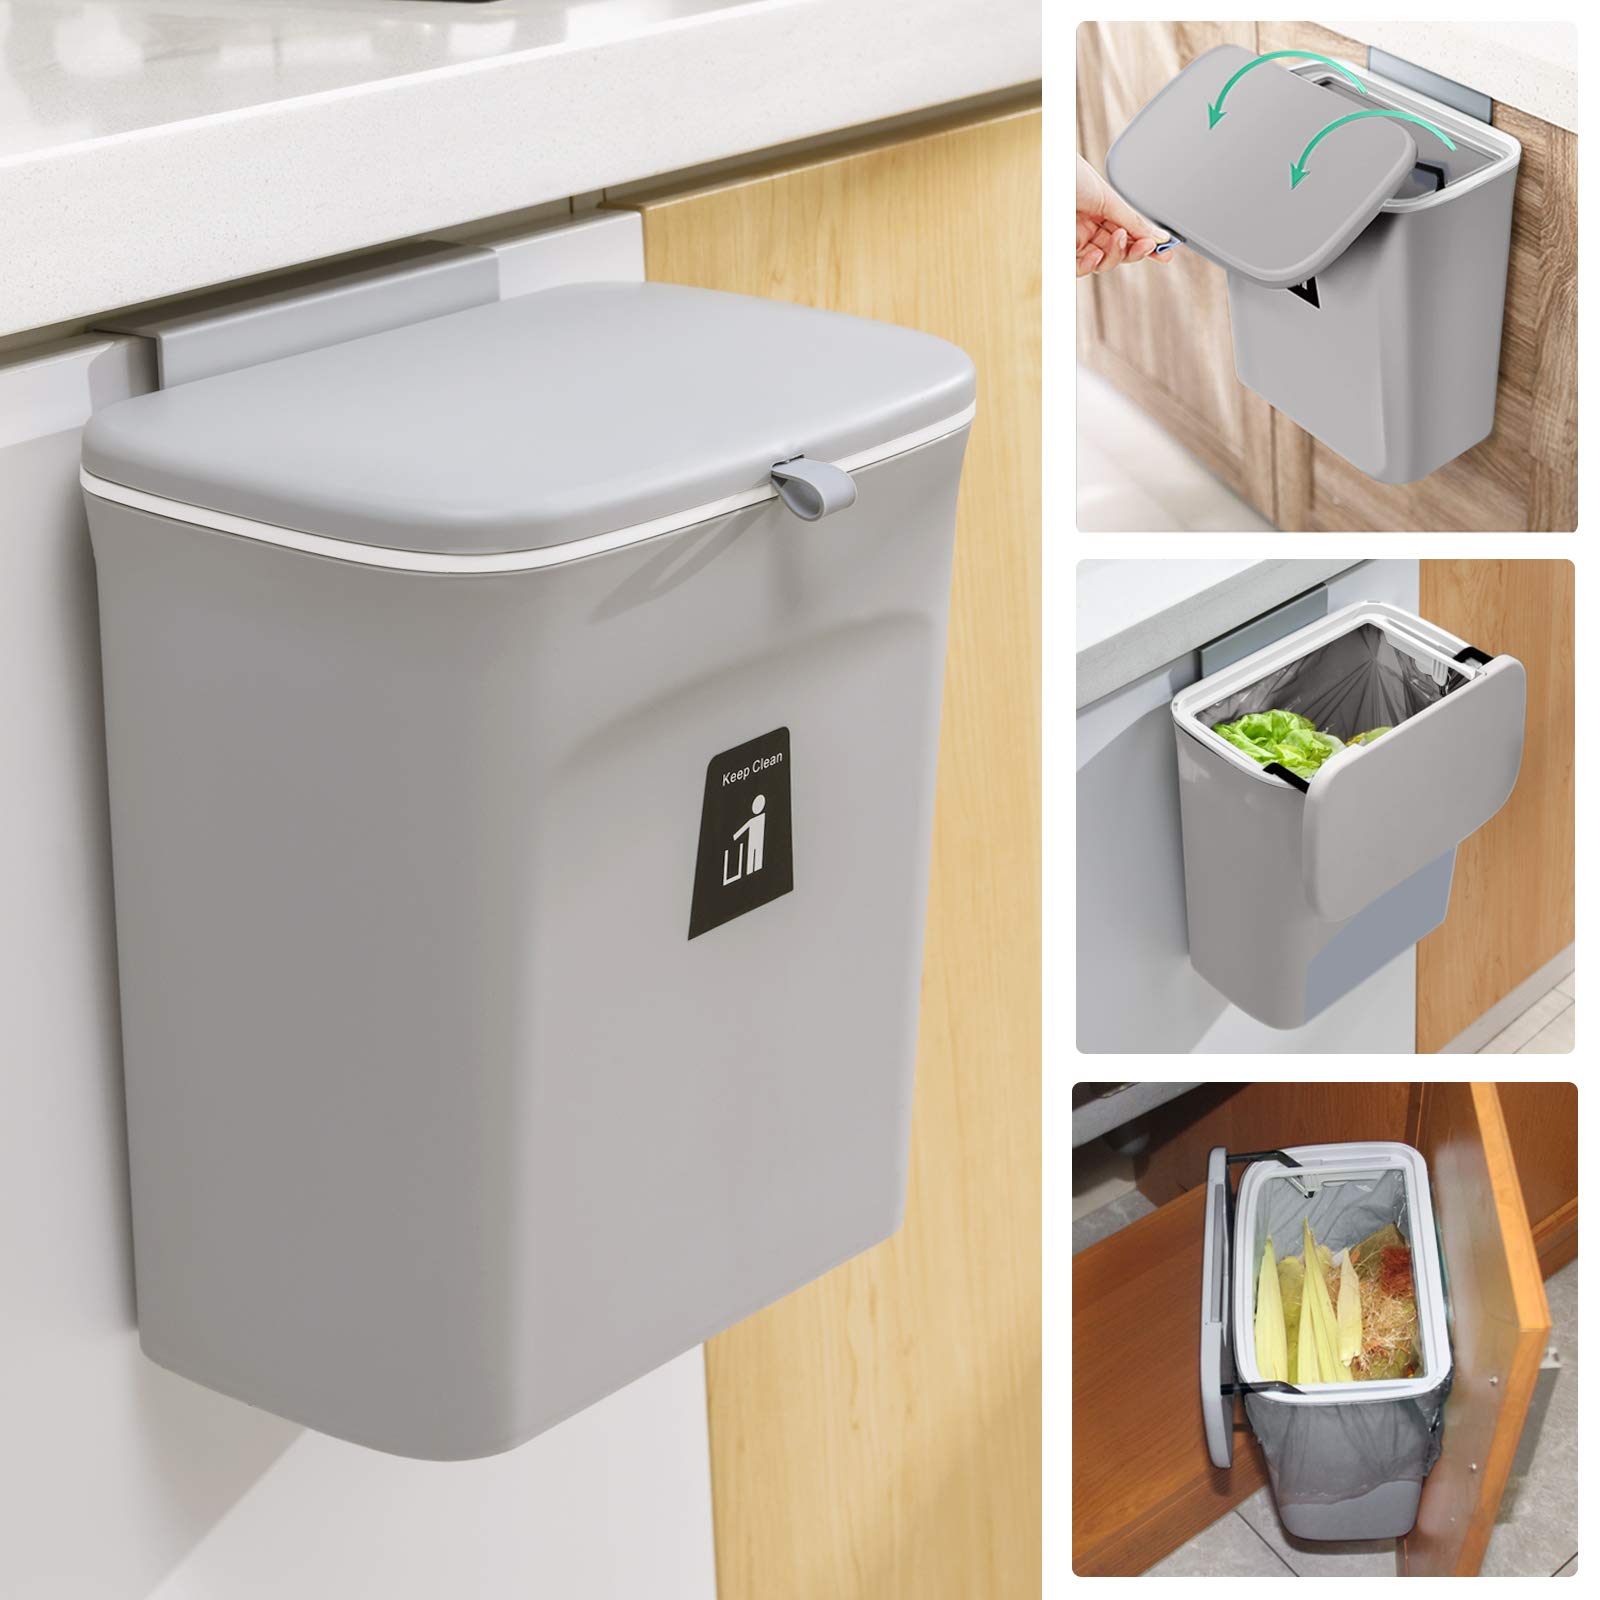
Image Source: kixat.blob.core.windows.net
Why Compost Your Kitchen Scraps?
Composting might seem like a lot of work, but the benefits are huge. It’s not just about throwing food in a bin; it’s about turning waste into a resource.
Environmental Benefits
- Reduces Landfill Waste: Food scraps make up a significant portion of household waste. When these scraps go to landfills, they decompose anaerobically (without oxygen), producing methane, a potent greenhouse gas. Composting diverts this waste, lessening methane emissions.
- Creates Nutrient-Rich Soil: Compost is often called “black gold” for a reason. It’s packed with essential nutrients that improve soil health. Adding compost to your garden helps plants grow stronger and healthier.
- Conserves Water: Compost acts like a sponge, helping soil retain moisture. This means you’ll need to water your plants less often, saving precious water.
- Reduces Chemical Fertilizer Use: Healthy soil from compost can decrease or eliminate the need for synthetic fertilizers, which can have negative impacts on water quality and soil ecosystems.
Benefits for Your Garden
- Improves Soil Structure: Compost helps sandy soils hold more water and nutrients, and it loosens clay soils, improving drainage and aeration.
- Supplies Essential Nutrients: It provides a slow, steady release of nitrogen, phosphorus, potassium, and other trace minerals that plants need to thrive.
- Boosts Beneficial Microorganisms: Compost is teeming with bacteria, fungi, and other microorganisms that are vital for healthy plant growth and disease suppression.
- Suppresses Plant Diseases: The beneficial microbes in compost can help fight off plant diseases and pests.
Getting Started: Your Kitchen Compost Bin Starter Kit
Ready to dive in? Here’s what you need to know about setting up your composting system.
Choosing the Best Kitchen Compost Bin
The “best” bin depends on your needs and kitchen space. Here are some popular options:
Countertop Compost Bin
These are small, convenient bins designed to sit on your kitchen counter. They are great for collecting scraps throughout the day before you take them to a larger outdoor bin or composting service.
- Features to look for:
- Lid with a filter: Charcoal filters are excellent at trapping odors.
- Sturdy handle: For easy carrying.
- Durable material: Stainless steel or sturdy plastic are common.
- Capacity: Usually between 1-3 gallons.
Small Kitchen Composter (Electric/Worm Composter)
For those who want a more contained and faster solution, electric composters or worm composters are excellent choices.
- Electric Composters: These are countertop appliances that use heat and aeration to break down food scraps quickly, often in a matter of hours. They produce a dry, nutrient-rich material that can be added to soil.
- Pros: Fast, odor-free, can handle a wider range of food scraps, compact.
- Cons: Require electricity, can be an initial investment.
- Worm Composters (Vermicomposting): These systems use red wiggler worms to break down food scraps. They are very efficient and produce nutrient-rich worm castings, a highly prized fertilizer.
- Pros: Produces excellent fertilizer, quiet, no electricity needed, great for indoor composting.
- Cons: Requires specific types of worms, needs proper management to keep worms happy, can’t handle all types of food scraps.
Outdoor Compost Bin (for larger volumes)
If you have a yard and produce more scraps, an outdoor bin is ideal. You can buy ready-made bins or build your own.
- Types:
- Tumblers: These rotating bins make turning compost easy and speed up the process.
- Stationary bins: Simple containers, often with lids, where compost breaks down over time.
- Open piles: For those with plenty of space and who don’t mind a less tidy aesthetic.
What to Put In Your Kitchen Compost Bin
It’s a good mix of “greens” (nitrogen-rich) and “browns” (carbon-rich) that makes compost.
Greens (Nitrogen-Rich)
These are typically moist materials that provide nitrogen for the composting process.
- Fruit and vegetable scraps (peels, cores, rinds)
- Coffee grounds and filters
- Tea bags (ensure they are compostable, remove staples)
- Eggshells (crushed)
- Grass clippings (in moderation)
- Plant trimmings from the garden
Browns (Carbon-Rich)
These are drier materials that provide carbon and help with aeration and preventing odors.
- Paper towels and napkins (unsoiled by grease or chemicals)
- Cardboard (torn into small pieces, unbleached)
- Paper egg cartons (torn)
- Dry leaves
- Sawdust (from untreated wood)
- Shredded newspaper (avoid glossy or colored ink)
What NOT to Put In Your Kitchen Compost Bin
Some items can cause problems, attract pests, or introduce pathogens.
- Meat, fish, and dairy products: Can attract pests and cause odors. (Some advanced composting methods can handle these, but it’s best to avoid for beginners).
- Oily or greasy foods: Can slow down decomposition and create odors.
- Diseased plants: Can spread diseases to your garden.
- Weeds that have gone to seed: Can spread unwanted seeds.
- Pet waste (dog, cat): Can contain harmful pathogens.
- Chemically treated wood or paper: Can introduce toxins.
- Coal or charcoal ash: Can contain harmful substances.
How to Use Your Kitchen Compost Bin: Step-by-Step
Now that you have your bin and know what to put in it, let’s get composting!
Step 1: Setting Up Your Countertop Bin
- Choose a location: Place your countertop bin in a convenient spot, like under the sink or on your counter.
- Add a filter: If your bin has a charcoal filter, make sure it’s properly in place. This is key for managing kitchen compost smell.
- Start collecting: Begin adding your acceptable kitchen scraps.
Step 2: Managing Your Kitchen Compost Bin
The goal is to create a balanced environment for decomposition.
The Greens and Browns Ratio
A common rule of thumb is to aim for a ratio of roughly 2 parts browns to 1 part greens by volume. This might seem tricky to measure precisely, but think of it this way: you want enough dry, carbon-rich material to balance the moist, nitrogen-rich food scraps.
- Too many greens: Can lead to a slimy, smelly mess.
- Too many browns: Composting will be slow.
Tip: Keep a small bin of shredded newspaper or paper towels near your compost bin to easily add “browns” whenever you add “greens.”
Layering Your Scraps
When you add food scraps (greens) to your bin, try to cover them with a layer of browns. This helps absorb moisture and odors, minimizing the chance of kitchen compost smell.
Example:
* Add vegetable peels.
* Cover with shredded newspaper or a few coffee filters.
Step 3: Transferring Your Scraps
Your countertop bin is a collection point. You’ll need to transfer the contents to a larger composting system.
Option A: Outdoor Compost Bin
- Once your countertop bin is full, take it to your outdoor compost bin or pile.
- Empty the contents into the bin.
- If you’re using an outdoor bin, aim to mix your kitchen scraps with existing browns (like leaves and yard waste) to maintain the green-to-brown balance.
Option B: Worm Composter
- Empty your countertop bin into your worm bin.
- Gently mix the scraps into the bedding material.
- Red wigglers love fruit and vegetable scraps, coffee grounds, and tea bags. Avoid citrus peels in large quantities, as they can be too acidic for worms.
Option C: Electric Composter
- Follow the manufacturer’s instructions for your specific appliance. Typically, you’ll add the contents of your countertop bin to the electric composter and run a cycle.
Step 4: Maintaining Your Composting System
- Moisture: Your compost should be damp, like a wrung-out sponge. If it’s too dry, add a little water. If it’s too wet, add more browns.
- Aeration: Compost needs oxygen to break down efficiently. If you have an outdoor bin, turn it with a pitchfork every week or two. Tumblers make this easier. For worm bins, the worms naturally aerate the material.
- Patience: Composting takes time. Depending on your method, it can take anywhere from a few weeks to several months to produce finished compost.
Addressing Common Concerns About Kitchen Composting
Let’s tackle some of the questions people often have when starting indoor kitchen composting.
What About Kitchen Compost Smell?
This is perhaps the most common worry. A well-managed compost system should not smell bad. If you detect an unpleasant odor, it’s usually a sign that something is out of balance.
Causes of Odors and Solutions
- Ammonia Smell (like strong urine): Too many greens.
- Solution: Add more browns (shredded paper, dry leaves, sawdust).
- Rotten Egg Smell (sulfur): Too wet and not enough air (anaerobic decomposition).
- Solution: Turn the compost to introduce air. Add browns to absorb excess moisture. Ensure good drainage if using an outdoor bin.
- Sour Smell: Too much acidic material (like citrus peels or tomatoes) or overly wet conditions.
- Solution: Add browns and turn. Reduce the amount of acidic food scraps.
Key to Odor Control:
- Balance Greens and Browns: The correct ratio is crucial.
- Cover Food Scraps: Always bury fresh food scraps under a layer of browns.
- Ensure Aeration: Let air circulate through the compost.
- Use a Filtered Bin: For countertop bins, a charcoal filter is your best friend.
Attracting Pests
Another common concern, especially with outdoor composting.
- What attracts pests: Exposed food scraps, meat, dairy, and oily foods are the biggest culprits.
- How to prevent them:
- Bury Food Scraps: Always cover fresh kitchen scraps with a layer of browns.
- Avoid Problematic Items: Do not add meat, dairy, or oily foods.
- Use a Secure Bin: Ensure your outdoor compost bin has a lid and is made of sturdy material that pests can’t chew through.
- Maintain Proper Moisture: A compost pile that is too wet or too dry can attract more pests.
- Consider Tumblers: These sealed bins offer good protection.
What if I Don’t Have a Yard?
This is where small kitchen composter options and countertop compost bin strategies shine.
- Countertop bin + Local Composting Service: Collect scraps in your countertop bin and take them to a local farmer’s market that offers compost drop-off, or subscribe to a municipal or private composting service.
- Worm Composting (Vermicomposting): This is an excellent indoor kitchen composting solution for apartments and small spaces. Red wigglers are very efficient and manageable.
- Electric Composter: These compact appliances are designed for indoor use and can process scraps quickly without odors or pests.
The Best Kitchen Compost Bin: A Comparison Table
To help you decide, here’s a quick look at popular options:
| Composter Type | Ideal For | Pros | Cons | Odor Control | Pest Resistance |
|---|---|---|---|---|---|
| Countertop Bin | Collecting scraps for transfer | Convenient, small, good for daily use | Not a complete composting solution on its own | Good (with filter) | N/A |
| Worm Composter | Apartments, small spaces, producing fertilizer | Produces rich castings, quiet, no electricity needed, eco-friendly | Needs specific worms, cannot process all food types, requires care | Excellent | Excellent |
| Electric Composter | Small households, fast results, odor-sensitive | Very fast, odorless, handles most food scraps, compact | Requires electricity, initial cost, produces a dry material | Excellent | Excellent |
| Outdoor Tumbler | Homes with yards, larger volumes | Speeds up composting, easy to turn, contained | Requires outdoor space, can be heavy when full | Good | Good |
| Outdoor Stationary Bin | Homes with yards, traditional composting | Simple, can hold large volumes, can be DIY | Slower, requires manual turning, can be more prone to pests | Fair | Fair |
Composting at Home: A Beginner’s Journey
Embarking on kitchen composting for beginners is a rewarding experience. It’s a simple yet powerful way to contribute to a healthier planet and enrich your own garden.
What You Need to Get Started (Kitchen Compost Bin Starter)
- A Countertop Compost Bin: To collect scraps daily.
- A Larger Composting System: This could be an outdoor bin, a worm bin, or an electric composter, depending on your living situation.
- A Source of Browns: Shredded newspaper, paper towels, or dry leaves.
- A Compost Tool: A small trowel or pitchfork for turning (if using an outdoor bin).
Simple Steps for Success
- Gather your tools: Get your countertop bin and your main composting system ready.
- Start collecting: Begin adding your fruit and vegetable scraps, coffee grounds, and tea bags to the countertop bin.
- Cover your greens: Each time you add food scraps, cover them with a layer of browns. This is a crucial habit for controlling kitchen compost smell and deterring pests.
- Transfer regularly: Once your countertop bin is full, transfer its contents to your main composting system.
- Maintain your system: Keep an eye on moisture levels, add browns as needed, and turn your compost if you’re using an outdoor bin.
- Be patient: Composting is a natural process that takes time. Observe the changes and enjoy the journey.
Frequently Asked Questions About Kitchen Composting
Here are some common questions and their answers:
Q1: Can I compost everything from my kitchen?
A1: No, it’s important to avoid meat, dairy, oily foods, and diseased plants. Sticking to fruits, vegetables, coffee grounds, tea bags, and eggshells is best for beginners.
Q2: How often should I empty my countertop compost bin?
A2: It depends on the size of your bin and how much food waste you generate. Aim to empty it every few days to prevent odors and potential pest issues, especially if it doesn’t have a filter.
Q3: My compost smells bad, what should I do?
A3: A bad smell usually indicates an imbalance. Add more “brown” materials (like shredded paper or dry leaves) to absorb excess moisture and improve aeration. Ensure you’re not adding forbidden items like meat or dairy.
Q4: Do I need worms to compost?
A4: Not necessarily. You can compost in an outdoor bin or use an electric composter. However, worm composting (vermicomposting) is a very effective and popular method, especially for indoor kitchen composting.
Q5: How long does it take to get finished compost?
A5: The time varies greatly depending on the method, materials, and how well you manage the compost. Outdoor bins can take 3-12 months, while electric composters can produce a usable material in a matter of hours. Worm compost takes about 2-3 months for the worms to process the scraps.
Q6: What is the best kitchen compost bin for small apartments?
A6: For small apartments, a filtered countertop bin combined with a worm composter or an electric composter is usually the best solution. Many people use a countertop bin for daily collection and then take it to a community garden or composting service if they don’t have space for a larger system.
Composting at home is a journey, not a destination. By following these simple steps and paying attention to the needs of your compost system, you’ll soon be turning your kitchen scraps into valuable, nutrient-rich compost. Happy composting!