
Image Source: www.domesticimperfection.com
How To Vent A Kitchen Sink Under A Window: Easy Guide
Can you run a plumbing vent under a window? Yes, you generally can run a plumbing vent under a window, provided it meets specific clearance and code requirements. The primary goal of a kitchen drain vent is to allow air into the drainage system to prevent siphoning and to let sewer gases escape safely outside, away from your home. This guide will walk you through the process of installing or modifying a kitchen sink vent, particularly when your sink is located beneath a window, offering an easy-to-follow approach. We’ll cover everything from why venting is crucial to how to achieve a safe and compliant installation.
Why Your Kitchen Sink Needs Proper Venting
Proper venting is a cornerstone of a functional plumbing system. Without it, your drains can experience issues like slow draining, gurgling sounds, and the unpleasant return of sewer gases into your home. A vent pipe acts as an air intake. When water flows down a drain, it creates a vacuum. The vent pipe allows air to enter the system, equalizing the pressure. This prevents the water in the traps from being siphoned out. If the trap’s water seal is broken, sewer gases, which can be harmful and smelly, can enter your kitchen.
Common Plumbing Vent Issues:
- Slow Draining: Lack of air can cause water to back up.
- Gurgling Sounds: Air being forced back up through the drain can make noise.
- Sewer Gas Odors: If the trap’s water seal is compromised, gases can enter the room.
- Toilet Not Flushing Properly: Issues with one drain can affect others in the system.
Deciphering the Role of a Kitchen Drain Vent
A kitchen drain vent is an essential part of your home’s plumbing. It connects to your drain pipes and extends upwards, usually through the roof, allowing sewer gases to escape safely outdoors and air to enter the system. This air intake is critical for smooth water flow and maintaining the water seal in your P-traps. The kitchen sink plumbing vent diagram often shows this pipe branching off the main drain line and rising vertically.
Factors to Consider for a Plumbing Vent Under a Window
When your kitchen sink is situated under a window, planning the sink vent pipe location becomes a bit more intricate. You need to ensure the vent pipe doesn’t obstruct the window’s functionality, impact the view significantly, or violate any building codes.
Key Considerations:
- Code Compliance: Always check local plumbing codes. These codes dictate minimum distances from windows, vents, and property lines.
- Aesthetics: While functionality is paramount, consider how the vent pipe will look. Sometimes, creative routing can minimize visual impact.
- Accessibility: Ensure the vent pipe can be accessed for maintenance or repairs if needed.
- Window Operation: The vent should not interfere with opening or closing the window.
- Proximity to Other Vents: If there are other vents nearby, coordinating their placement can lead to a cleaner installation.
Legal Requirements: Plumbing Vent Code Kitchen
Understanding and adhering to plumbing vent code kitchen regulations is non-negotiable. Building codes are in place to ensure safety and proper functioning. For vents located near windows, there are specific rules about how close they can be.
General Code Principles (Always verify with your local authority):
- Distance from Windows: Many codes require vent pipes to be a minimum distance from operable windows to prevent sewer gas kitchen window infiltration. This distance can vary, but often it’s several feet.
- Minimum Vent Size: Codes specify the minimum diameter for vent pipes based on the number of fixture units they serve.
- Vent Terminal Location: The point where the vent pipe terminates (usually through the roof) has specific requirements regarding height above the roof surface and distance from air intakes or property lines.
- Vertical Rise: Vent pipes generally need to maintain a consistent upward slope to the point of termination.
Table: Typical Vent Pipe Clearance Requirements (Illustrative, always check local codes)
| Feature | Minimum Clearance | Notes |
|---|---|---|
| Operable Window | 3 feet (approx.) | Prevents direct entry of sewer gases. |
| Air Intake/Vent | 10 feet (approx.) | Avoids re-entrainment of sewer gases. |
| Property Line | Varies by code | Specific to local zoning and building rules. |
| Mechanical Equipment | 10 feet (approx.) | To prevent gas entry into HVAC systems. |
Planning Your Kitchen Sink Vent Pipe Location
Careful planning is essential when installing kitchen sink vent pipes, especially when working around a window. The goal is to create a vent that is effective, compliant, and as unobtrusive as possible.
Steps for Planning:
- Assess Existing Plumbing: Identify your current drain lines and where you can tie into them. This might involve tracing pipes from other fixtures.
- Determine Vent Path: Decide where the vent pipe will run. Ideally, it should rise vertically with minimal horizontal runs. Horizontal runs can collect condensation and debris, potentially causing clogs.
- Consider Obstructions: Look for joists, beams, electrical wiring, and HVAC ducts that might be in the way.
- Window Clearance: Measure the distance from your planned vent pipe route to the window opening. Ensure it meets or exceeds local code requirements for venting sink near window.
- Roof Penetration: If you need to run the vent through the roof, identify a suitable location that minimizes water intrusion risk and meets code for termination height. An attic vent for kitchen sink might be an option if a direct roof penetration is problematic, but this usually needs to connect to a main vent stack.
Routing Options for a Plumbing Vent Under a Window
There are several ways to route your vent pipe to accommodate a window. The best option depends on your home’s construction and layout.
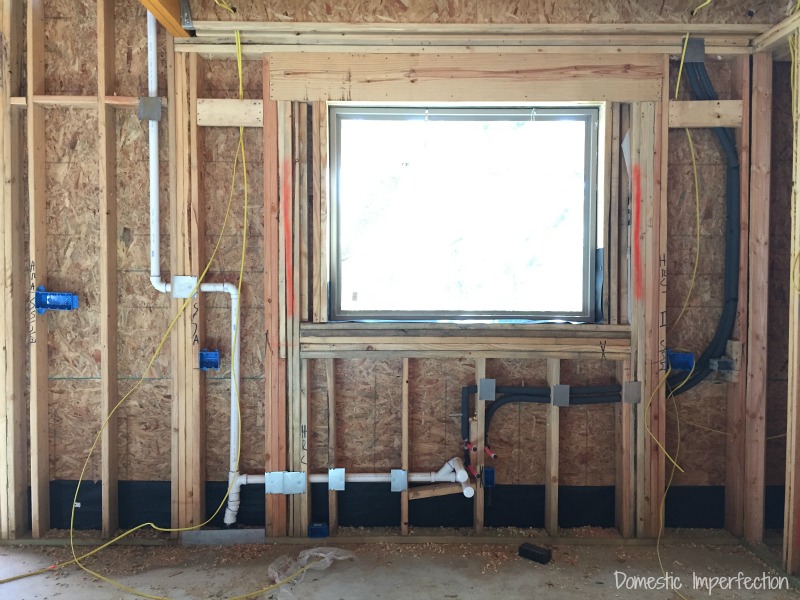
Option 1: Venting Upward Through the Wall (Behind Cabinetry)
This is often the most straightforward method if space allows.
- Process: The vent pipe rises from the drain connection, typically behind the sink cabinet. It then runs vertically within the wall cavity. If the window is directly above the sink, you might need to offset the vent slightly to run up the side of the window opening before continuing upwards.
- Pros: Relatively simple, keeps pipes out of sight.
- Cons: Requires careful routing to avoid wall studs and other obstructions. Might require cutting into drywall.
Option 2: Running the Vent Through the Floor (Less Common for Kitchens)
While less typical for kitchen sinks due to the need to connect to a main stack, it’s a theoretical possibility.
- Process: The vent pipe runs horizontally under the floor joists to connect to another vent pipe or stack.
- Pros: Can avoid window obstructions entirely.
- Cons: More complex, potentially requires significant floor work, and may not be feasible if there isn’t a suitable existing drain or vent line to connect to.
Option 3: Vertical Vent Riser with Offset
If a direct vertical run conflicts with the window, an offset can be used.
- Process: The vent pipe rises vertically from the drain. At a certain height, it uses two 45-degree elbows to create a gradual offset, moving the pipe away from the window’s path before continuing its vertical ascent. This offset must be carefully planned to maintain proper airflow.
- Pros: Allows you to navigate around window frames or sill obstructions.
- Cons: Horizontal sections in offsets can potentially trap debris or condensation if not properly sloped.
Option 4: Utilizing an Attic Vent for Kitchen Sink (If Feasible)
In some scenarios, especially in older homes or specific architectural designs, you might be able to connect your sink vent to an existing attic vent for kitchen sink.
- Process: The vent pipe from your sink is routed into the attic and connects to a larger vent stack that already exits through the roof. This often involves running the pipe horizontally through joist bays.
- Pros: Can utilize existing infrastructure, potentially simplifying the job.
- Cons: Requires attic access. Horizontal runs in attics must be carefully sloped. Connections must be secure and airtight. This may not be suitable if the attic is not properly ventilated or if the existing vent stack is already overloaded.
Materials and Tools for Vent Installation
Before you start installing kitchen sink vent, gather the necessary materials and tools.
Essential Materials:
- PVC Pipe: Schedule 40 PVC is common for DWV (Drain, Waste, Vent) systems. Ensure you use the correct diameter as per code (typically 1.5″ or 2″ for kitchen sinks).
- PVC Fittings: Elbows (90-degree, 45-degree), tees, couplings, adapters.
- PVC Primer and Cement: For solvent welding PVC pipes and fittings.
- Vent Terminal: If penetrating the roof, you’ll need a roof flashing and vent cap.
- Hangers and Straps: To secure the pipe in place.
- Sealant: For sealing around any wall or ceiling penetrations.
Necessary Tools:
- Pipe Cutter or Saw: For clean cuts on PVC pipe.
- Measuring Tape: For accurate measurements.
- Level: To ensure proper pipe slope.
- Drill and Bits: For creating holes for pipes or mounting brackets.
- Screwdriver or Wrench: For securing hangers.
- Safety Glasses and Gloves: For protection.
- Stud Finder: To locate wall studs.
- Caulk Gun: For applying sealant.
Step-by-Step Guide: Venting Sink Near Window
This guide outlines the general steps. Always consult your local building codes and consider hiring a professional if you are unsure.
Step 1: Safety First and Preparation
- Turn off water supply: Shut off the main water supply to your house.
- Clear the area: Remove items from under the sink and around the work area.
- Wear safety gear: Put on safety glasses and gloves.
Step 2: Connecting to the Drain Line
- Locate the existing drain line: This is usually a horizontal pipe connected to your sink’s P-trap.
- Install a wye fitting: Cut into the drain line and install a wye fitting. The branch of the wye will be for your vent pipe. Ensure the wye is installed so the branch points upwards.
- Apply primer and cement: Clean the pipe and fitting ends, apply PVC primer, then PVC cement, and quickly join them together, twisting slightly for a good bond. Hold for a few seconds until set.
Step 3: Routing the Vent Pipe
This is where you navigate the window.
- Vertical Rise: Begin by running the pipe vertically from the wye fitting. Use a level to ensure it’s straight.
- Navigating the Window:
- Behind the Wall: If space allows behind cabinets or in a wall cavity, run the pipe up. If it needs to go past the window, you may have to cut a clean opening in the drywall and run the pipe vertically adjacent to the window frame.
- Offsetting: If a direct vertical run is impossible without hitting the window, use two 45-degree elbows to create an offset. Ensure the horizontal run of the offset is minimized and properly sloped back towards the drain if possible, or towards the vertical rise. Check plumbing vent code kitchen for acceptable offset configurations. The window vent pipe must maintain clearance.
- Securing the Pipe: Use pipe hangers and straps to secure the vent pipe to wall studs or joists as you go. This prevents sagging and ensures stability.
Step 4: Connecting to a Main Vent or Through the Roof
- Connecting to an Existing Stack: If you can route the vent pipe to an existing main vent stack, connect it using a wye fitting. Ensure the connection is made at a point higher than the fixtures it serves.
- Through the Roof: If you need to run it through the roof:
- Locate a suitable spot: Avoid areas with existing penetrations or potential leaks.
- Drill a pilot hole: From inside, drill a small hole through the ceiling and roof sheathing.
- Confirm placement from outside: Go outside and confirm the location. Ensure it meets clearance requirements for plumbing vent under window termination.
- Cut the roof opening: Enlarge the hole to accommodate the vent pipe and a proper roof flashing.
- Install flashing and vent cap: Slide the roof flashing down over the pipe, ensuring it seals against the roof. Install a vent cap to prevent rain, snow, and pests from entering. This is crucial for preventing sewer gas kitchen window issues.
Step 5: Final Connections and Sealing
- Complete the run: Ensure all pipe sections are properly joined with primer and cement.
- Seal penetrations: Use appropriate sealant to seal any gaps where the pipe passes through walls or ceilings to prevent drafts and moisture.
- Check for leaks: Once the cement has fully cured, run water into the sink and check all connections for leaks. Listen for gurgling sounds.
The Attic Vent for Kitchen Sink Option in Detail
Using an attic vent for kitchen sink can be a clever solution when direct roof penetration is difficult or undesirable, especially with window constraints.
How it Works:
Your kitchen sink’s vent pipe is routed from the drain up into the attic space. There, it connects to a larger vent pipe, often called a vent stack, which already serves other plumbing fixtures and typically exits through the roof.
Advantages:
- Avoids Window Issues: Completely bypasses the problem of venting sink near window.
- Utilizes Existing Infrastructure: Can be less invasive if a suitable vent stack is accessible.
- Cleaner Exterior: No need for a secondary roof penetration if an existing one is used.
Considerations and Potential Pitfalls:
- Horizontal Runs: Venting through an attic often involves longer horizontal runs. These must be sloped correctly (typically ¼ inch per foot) towards the main stack to prevent water and debris from accumulating, which can lead to clogs.
- Insulation: In cold climates, pipes in unconditioned attic spaces may need insulation to prevent freezing.
- Attic Ventilation: Ensure the attic itself is adequately ventilated. Poor attic ventilation can exacerbate issues with condensation.
- Complexity: Connecting to an existing vent stack requires ensuring the combined venting capacity is adequate and that the connection is made at the right height according to code.
- Access: You need good access to the attic and the existing vent stack.
When to Call a Professional Plumber
While this guide provides a comprehensive overview, installing kitchen sink vent can be complex. Certain situations warrant calling a licensed plumber:
- Uncertainty about Codes: If you are unsure about local plumbing codes or how to interpret them.
- Complex Layouts: If your home has an unusual layout or many obstructions.
- Structural Concerns: If the work involves significant structural modifications.
- Lack of Experience: If you have little to no experience with plumbing work.
- Main Stack Modifications: If your project requires modifying the main drain or vent stack.
A professional plumber has the expertise, tools, and knowledge of plumbing vent code kitchen to ensure the job is done safely and correctly, preventing costly future repairs.
Frequently Asked Questions (FAQ)
Q1: How close can a plumbing vent be to a window?
A1: Local plumbing codes dictate the minimum distance. Generally, vents need to be at least 3 feet away from operable windows to prevent sewer gas kitchen window infiltration. Always check your local building authority for exact requirements.
Q2: Can I use a ventless sink or an air admittance valve (AAV)?
A2: Air admittance valves (AAVs) can be used in some situations as an alternative to traditional vents, especially in renovations where running a vent pipe is difficult. However, they have limitations and specific code requirements. For kitchens, traditional venting is often preferred due to grease buildup and higher usage. Check your local code for AAV permissibility and installation guidelines.
Q3: What is the correct size for a kitchen sink vent pipe?
A3: The size of the vent pipe depends on the number of fixture units the drain serves and local codes. For a typical kitchen sink, a 1.5-inch or 2-inch diameter vent pipe is common. Always refer to your local plumbing codes.
Q4: My sink is draining slowly, and I hear gurgling. What could be the problem?
A4: This is a classic sign of a venting issue. Either the vent pipe is blocked, or it wasn’t installed correctly. Water is not able to flow freely because air cannot enter the drain to equalize pressure.
Q5: Can I vent my kitchen sink through an existing bathroom vent?
A5: Yes, you can often tie a kitchen sink vent into an existing vent stack or branch that serves other fixtures, like a bathroom. However, you must ensure the connection is made at a high enough point to maintain proper airflow and that the total vent capacity is not exceeded, as per plumbing codes. This is where a kitchen sink plumbing vent diagram can be very helpful.
Q6: Does a vent pipe need to go all the way to the roof?
A6: Yes, for a traditional vent system, the vent pipe needs to extend to the exterior atmosphere, typically through the roof, at a height specified by code. This allows sewer gases to escape safely and air to enter the system. If connecting to an attic vent for kitchen sink, the attic vent itself must terminate correctly through the roof.
Q7: What happens if my kitchen sink is not vented properly?
A7: Improper venting can lead to several problems: slow drains, gurgling sounds, the siphoning of water from the P-traps (which allows sewer gas kitchen window entry), and unpleasant odors in your kitchen.
By carefully planning and following these guidelines, you can effectively vent your kitchen sink, even when it’s located under a window, ensuring a safe and functional plumbing system. Always prioritize safety and compliance with local building codes.