
Image Source: i.ytimg.com
How To Paint Kitchen Cabinets Without Sanding: Step-by-Step
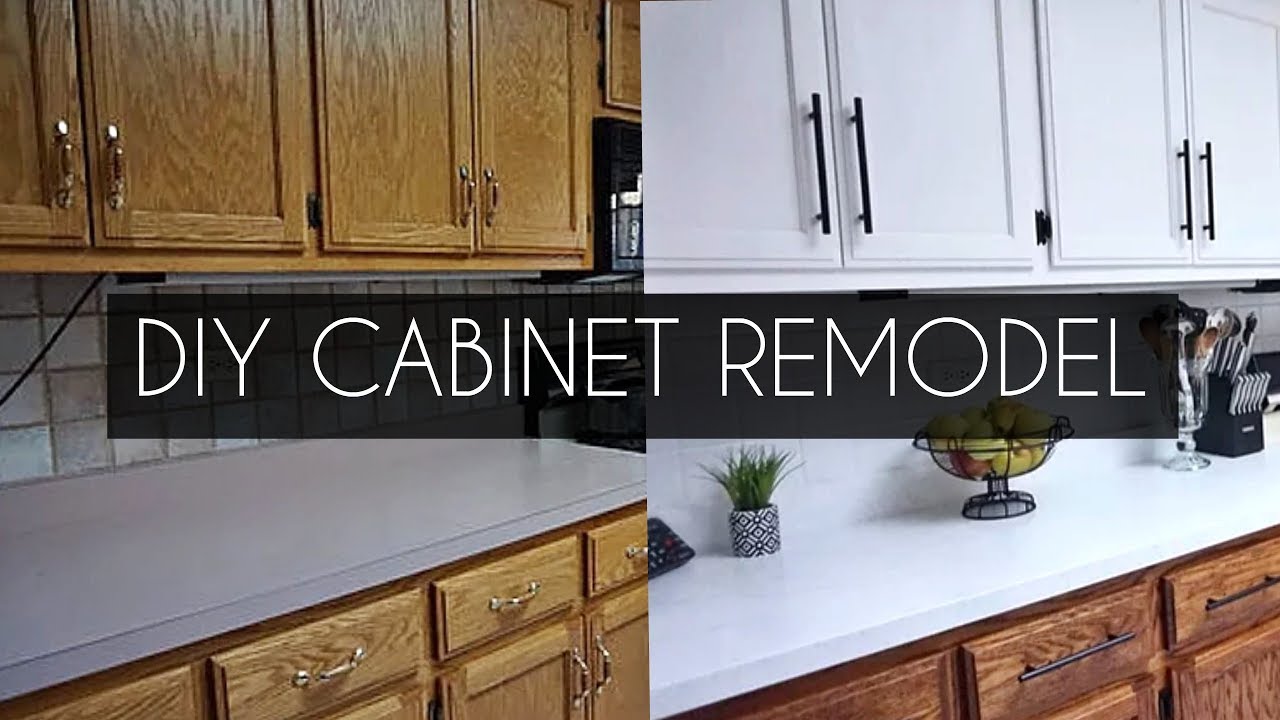
Can you paint kitchen cabinets without sanding? Yes, you absolutely can! Painting kitchen cabinets without sanding is a popular DIY project that can completely transform your kitchen’s look without the dust, mess, and time commitment of traditional sanding. This method relies on specialized primers and paints designed to adhere directly to existing finishes, making it an accessible option for many homeowners. This comprehensive guide will walk you through the entire process, from preparation to the final coat, ensuring a beautiful, durable finish for your no-sanding cabinet paint project.
Why Skip the Sanding?
Sanding cabinets is often considered the most tedious part of the painting process. It’s messy, time-consuming, and requires specific skills to do effectively. For many DIYers, the appeal of cabinet refinishing without sanding lies in:
- Time Savings: Eliminating sanding can cut your project time significantly.
- Reduced Mess: No dust flying everywhere means a cleaner workspace and a less disruptive renovation.
- Accessibility: It opens up cabinet painting to those who might not have the tools or inclination for sanding.
- Preserving Existing Finish: In some cases, you might want to preserve the integrity of the original cabinet material as much as possible.
Is “No Sanding” Really Possible?
The short answer is yes, but with a crucial caveat: you still need to prepare your cabinets properly. “No sanding” refers to skipping the mechanical abrasion of the surface. However, a clean and slightly dulled surface is essential for paint adhesion. This is where degreasing and cleaning come in, acting as the preparatory step that makes the painting kitchen cabinets no prep method effective. Think of it as cleaning and etching the surface at a microscopic level with chemicals rather than sandpaper.
The “No Sanding” Advantage: What You Need
The success of painting cabinets without sanding hinges on using the right products. The key players are:
- High-Adhesion Primer: This is non-negotiable. You need a primer specifically formulated for bonding to slick surfaces like laminate, melamine, or existing painted finishes. Look for primers labeled “bonding primer,” “adhesion primer,” or those designed for difficult surfaces.
- Quality Cabinet Paint: Once primed, you’ll use a durable paint. Cabinet-grade paints are formulated to withstand the wear and tear of kitchen use. Options include:
- Alkyd Enamels: Known for their hard, durable finish but often require mineral spirits for cleanup.
- Water-Based Acrylic Enamels: Easier cleanup with soap and water, with good durability. Look for high-quality formulas.
- Cabinet-Specific Paints: Many brands now offer paints specifically designed for cabinets, often with excellent self-leveling properties.
- Degreaser: A good degreaser is vital for removing grease, grime, and any residue that might prevent adhesion.
- Cleaning Supplies: Sponges, lint-free cloths, buckets.
- Screwdriver or Drill: To remove cabinet doors and hardware.
- Painter’s Tape: For masking off areas you don’t want to paint.
- Drop Cloths: To protect your floors and surrounding areas.
- Applicators:
- High-Quality Foam Rollers: For smooth, even coats on cabinet doors and flat surfaces.
- Angled Sash Brushes: For cutting in edges and detailed areas.
- Paint Sprayer (Optional but Recommended): For the smoothest, most professional finish. This is where spray painting cabinets no sanding truly shines.
Step-by-Step Guide to Painting Cabinets Without Sanding
Let’s break down the process into manageable steps for an easy cabinet painting experience.
Step 1: Remove Doors, Drawers, and Hardware
This is the first crucial step for any cabinet painting project, whether you sand or not.
- Label Everything: As you remove doors and drawers, label them clearly on the back with masking tape. Use numbers or letters to indicate their original position (e.g., “Upper Left 1,” “Lower Right 2”). This will save you a headache when it comes to reassembly.
- Remove Hardware: Unscrew all knobs, pulls, and hinges. Keep hardware in labeled bags for each door/drawer to avoid mix-ups.
- Clean Hardware (Optional): While the hardware is off, you might consider cleaning it, spray painting it a new color, or replacing it entirely.
Step 2: Thoroughly Clean the Cabinet Surfaces
This is where the “no sanding” magic starts. You need to ensure every surface is impeccably clean and free of any grease or residue.
- Degrease: Use a strong degreaser designed for kitchens. TSP (Trisodium Phosphate) substitute is a common choice, but ensure you follow the manufacturer’s instructions and wear protective gear. Alternatively, a mixture of warm water and dish soap can work for less greasy cabinets, but a dedicated degreaser is often more effective.
- Wipe Down: Use sponges or cloths to scrub down all surfaces, including doors, drawer fronts, and the cabinet frames (boxes). Pay close attention to areas around handles and hinges, which tend to accumulate the most grime.
- Rinse and Dry: After degreasing, wipe down all surfaces with a clean, damp cloth to remove any degreaser residue. Then, dry everything thoroughly with lint-free cloths. Any lingering moisture can affect paint adhesion.
Table 1: Cleaning Checklist
| Task | Supplies Needed | Key Considerations |
|---|---|---|
| Degreasing | Heavy-duty degreaser, sponges, buckets, gloves | Remove all kitchen grease, oils, and food residue. |
| Rinsing | Clean water, lint-free cloths | Ensure no degreaser residue remains. |
| Drying | Lint-free cloths, fans (optional) | Surfaces must be completely dry before proceeding. |
Step 3: Lightly Scuff (The “No Sanding” Etch)
While we’re not sanding, a very light scuff can improve adhesion, especially on very glossy finishes. This step is often referred to as “chemical etching” or “dulling.”
- Rubbing Compound or Liquid Sander: Products like liquid deglosser or a rubbing compound can be used. Apply to a cloth and rub down all surfaces. These products contain mild solvents that slightly etch the surface without creating dust.
- Rinse and Dry Again: After using a scuffing agent, wipe down surfaces with a clean, damp cloth to remove any residue, and then dry thoroughly.
Step 4: Protect and Tape Off
Precise taping is crucial for a professional finish.
- Masking: Use high-quality painter’s tape (usually blue or green) to mask off any areas you don’t want to paint. This includes the inside of cabinets, countertops, backsplashes, appliances, and any decorative trim that will remain its original color.
- Cabinet Interiors: Decide if you’re painting the inside of your cabinets. If not, ensure you tape meticulously along the edges of the cabinet boxes.
- Hardware Holes: Use tape to cover any pre-drilled holes for hardware if you plan to reuse them.
Step 5: Apply the High-Adhesion Primer
This is the most critical step for the success of your DIY cabinet update no sanding.
- Choose the Right Primer: As mentioned, use a primer specifically designed for adhesion to slick surfaces. Look for products like Sherwin-Williams Extreme Bond Primer, Kilz Adhesion, or Zinsser B-I-N Advanced even though B-I-N is shellac-based and might require different prep. Always read the product’s technical data sheet.
- Application Methods:
- Roller and Brush: Apply a thin, even coat using a high-quality foam roller for flat surfaces and an angled brush for edges. Avoid overworking the paint, which can lead to brush strokes.
- Spray Gun: If you have a sprayer, this is the ideal method for achieving a smooth, factory-like finish. Thin the primer according to the manufacturer’s instructions for spraying. Ensure you have adequate ventilation and wear a respirator.
- Coverage: Apply one or two coats of primer, allowing the recommended drying time between coats. The primer should completely cover the original finish, creating a uniform base.
- Drying Time: Crucially, allow the primer to cure fully. This can be 24-72 hours, depending on the product and humidity. Refer to the primer’s instructions. Rushing this step will compromise adhesion.
Table 2: Primer Application Tips
| Method | Applicators | Best For | Considerations |
|---|---|---|---|
| Roller/Brush | High-quality foam roller, angled sash brush | DIYers, smaller projects, easier cleanup | Apply thin, even coats. Avoid overworking. |
| Sprayer | HVLP or airless sprayer | Smooth, professional finish, faster coverage on large areas | Requires practice, thinning, good ventilation, and a respirator. |
Step 6: Apply the Cabinet Paint
Once the primer is fully cured, you’re ready for the topcoat.
- Choose Your Paint: Select a high-quality cabinet paint (alkyd enamel or a durable acrylic enamel).
- Application Methods:
- Roller and Brush: Apply thin, even coats. Use your foam roller for large panels and your angled brush for details and edges. Work in sections to maintain a wet edge.
- Spray Gun: Again, this provides the best finish. Apply light, even coats, overlapping each pass by about 50%.
- Multiple Coats: Most projects will require two to three thin coats of paint for full coverage and durability. Allow adequate drying time between coats as recommended by the paint manufacturer.
- Drying vs. Curing: Remember that paint dries to the touch relatively quickly, but it takes much longer to cure. Curing is when the paint reaches its maximum hardness and durability. This can take anywhere from 7 to 30 days. Be gentle with your newly painted cabinets during this curing period.
Exploring Alternative “No Sanding” Options:
While the primer and paint method is the most common, other “no sanding” approaches exist, each with its pros and cons.
- Chalk Paint Cabinets No Sanding: Chalk paint is known for its matte finish and excellent adhesion to various surfaces with minimal prep. You typically just clean, then apply chalk paint. A wax or polycrylic topcoat is usually required for durability, especially in a kitchen environment. The matte finish might not be everyone’s preference for cabinets.
- Milk Paint Cabinets No Sanding: Similar to chalk paint, milk paint can adhere well with minimal prep (cleaning is key). It often creates a chippy, vintage look. However, like chalk paint, it usually needs a protective topcoat for kitchen durability. The aesthetic is specific and may not suit modern kitchens.
- Vinyl Wrap Cabinets No Sanding: This is a completely different approach. Instead of painting, you apply a self-adhesive vinyl film to the cabinet surfaces. This is a true “no sanding” and “no painting” method. It’s a good option if you want a dramatic change, like a wood grain look or a bold color, without any paint involved. However, the durability and longevity can vary greatly depending on the quality of the vinyl and the application. Vinyl wrap cabinets no sanding requires precision to avoid bubbles and wrinkles.
Step 7: Reassemble and Reinstall
Once the paint is fully cured (or at least dry to the touch and hardened somewhat), it’s time to put everything back together.
- Reattach Hardware: Screw the knobs, pulls, and hinges back onto the doors and drawers.
- Rehang Doors and Drawers: Carefully reattach the doors and drawers to the cabinet frames. Use your labels to ensure everything goes back in its original spot.
- Adjust Hinges: If doors aren’t hanging straight, adjust the hinges as needed.
Step 8: Final Touches and Enjoy!
- Remove Tape: Carefully remove all painter’s tape. If any paint bled under the tape, you can carefully score the edge with a utility knife before peeling.
- Clean Up: Clean your workspace and dispose of materials properly.
- Be Gentle: Remember the curing period. Avoid harsh cleaning or slamming doors for the first week or two to allow the paint to reach its maximum hardness.
Tips for a Flawless Finish
- Work in Good Lighting: Adequate light helps you see any missed spots or imperfections.
- Thin Coats are Key: It’s always better to apply multiple thin coats than one thick one, which can lead to drips and an uneven finish.
- Clean Your Rollers and Brushes: If using water-based paints, clean your tools thoroughly between coats and after the project.
- Ventilation: Ensure good ventilation, especially if using oil-based paints or a sprayer.
- Patience: This is a project that rewards patience. Don’t rush the drying or curing times.
Addressing Specific Cabinet Materials
The “no sanding” method works well on most common cabinet materials, but there are nuances:
- Laminate/Melamine: These are notoriously slick surfaces. The high-adhesion primer is absolutely essential for these. Cleaning and degreasing are paramount.
- Previously Painted Cabinets: If the existing paint is in good condition (not peeling or chipping), you can often paint over it without sanding, provided you use a good bonding primer. If the existing paint is glossy, a light scuff (as described in Step 3) is highly recommended.
- Wood Cabinets: While wood can be easily sanded, the “no sanding” method is still viable. Ensure thorough cleaning and degreasing. A bonding primer will ensure adhesion even to the wood grain.
When “No Sanding” Might Not Be the Best Choice
While convenient, this method isn’t universally superior. Consider these points:
- Heavily Damaged Cabinets: If your cabinets have peeling paint, significant scratches, or dents, sanding is usually the best way to create a smooth, uniform surface before priming and painting.
- Desired Finish: If you’re aiming for a very specific high-gloss finish that requires extensive smoothing, some degree of sanding might be necessary.
- Extreme Durability: For the absolute hardest, most chip-resistant finish, traditional sanding and oil-based paints or professional lacquers often provide a slight edge, though modern cabinet paints are incredibly durable.
Frequently Asked Questions (FAQ)
Here are some common questions people have about painting cabinets without sanding:
-
Q1: What is the best primer for painting cabinets without sanding?
A1: The best primers are those specifically designed for high adhesion to slick surfaces. Look for terms like “bonding primer,” “adhesion primer,” or products for laminate/melamine. Popular brands include Zinsser (like B-I-N Advanced), Kilz (like Adhesion), and Sherwin-Williams (like Extreme Bond Primer). Always read the product label to ensure it’s suitable for your cabinet material. -
Q2: Can I use chalk paint or milk paint without sanding?
A2: Yes, you can use chalk paint or milk paint with minimal prep (cleaning and degreasing). However, these paints typically require a protective topcoat (like polycrylic or wax) to achieve the durability needed for kitchen cabinets, especially in high-traffic areas. The matte finish of chalk paint might also not be ideal for everyone in a kitchen setting. -
Q3: How long does it take for “no-sanding” cabinet paint to cure?
A3: While the paint may be dry to the touch within a few hours, it typically takes 7 to 30 days to fully cure. During the curing period, the paint reaches its maximum hardness and durability. It’s best to be gentle with your newly painted cabinets during this time, avoiding harsh cleaning or heavy use. -
Q4: Will the paint chip or peel if I don’t sand?
A4: If you properly clean, degrease, and use a high-quality bonding primer, the paint should adhere very well. The key is thorough preparation and using the right products. However, if the surface isn’t clean or the primer isn’t suitable, chipping or peeling is more likely. -
Q5: What’s the difference between drying and curing for paint?
A5: Drying refers to the evaporation of solvents, allowing the paint to be touchable. Curing is a chemical process where the paint hardens and reaches its maximum durability. Paint cures much slower than it dries. -
Q6: Can I use a vinyl wrap instead of painting?
A6: Yes, vinyl wrapping is a popular alternative for changing the look of cabinets without paint or sanding. It involves applying a self-adhesive vinyl film. The success depends heavily on the quality of the vinyl and precise application. -
Q7: Is spray painting cabinets without sanding a good option?
A7: Absolutely. Spray painting cabinets no sanding often yields the smoothest, most professional-looking finish because it allows for very thin, even coats. It requires a bit more setup (masking, ventilation, and a sprayer) but is highly effective for this method. -
Q8: What kind of paint is best for cabinets?
A8: For cabinets, you want a durable, washable paint. High-quality acrylic enamel paints or alkyd enamel paints specifically formulated for cabinets are excellent choices. Look for paints that mention good leveling properties to minimize brush strokes.
By following these detailed steps, you can successfully paint your kitchen cabinets without the hassle of sanding, giving your kitchen a fresh, updated look with a durable and beautiful finish.