
Yes, you can repaint your kitchen table! Repainting a kitchen table is a fantastic DIY project that can completely transform your dining space. This guide will walk you through the entire process, from choosing the right paint to achieving a durable, beautiful finish. Let’s dive into how to refinish kitchen table for a stunning DIY table makeover.
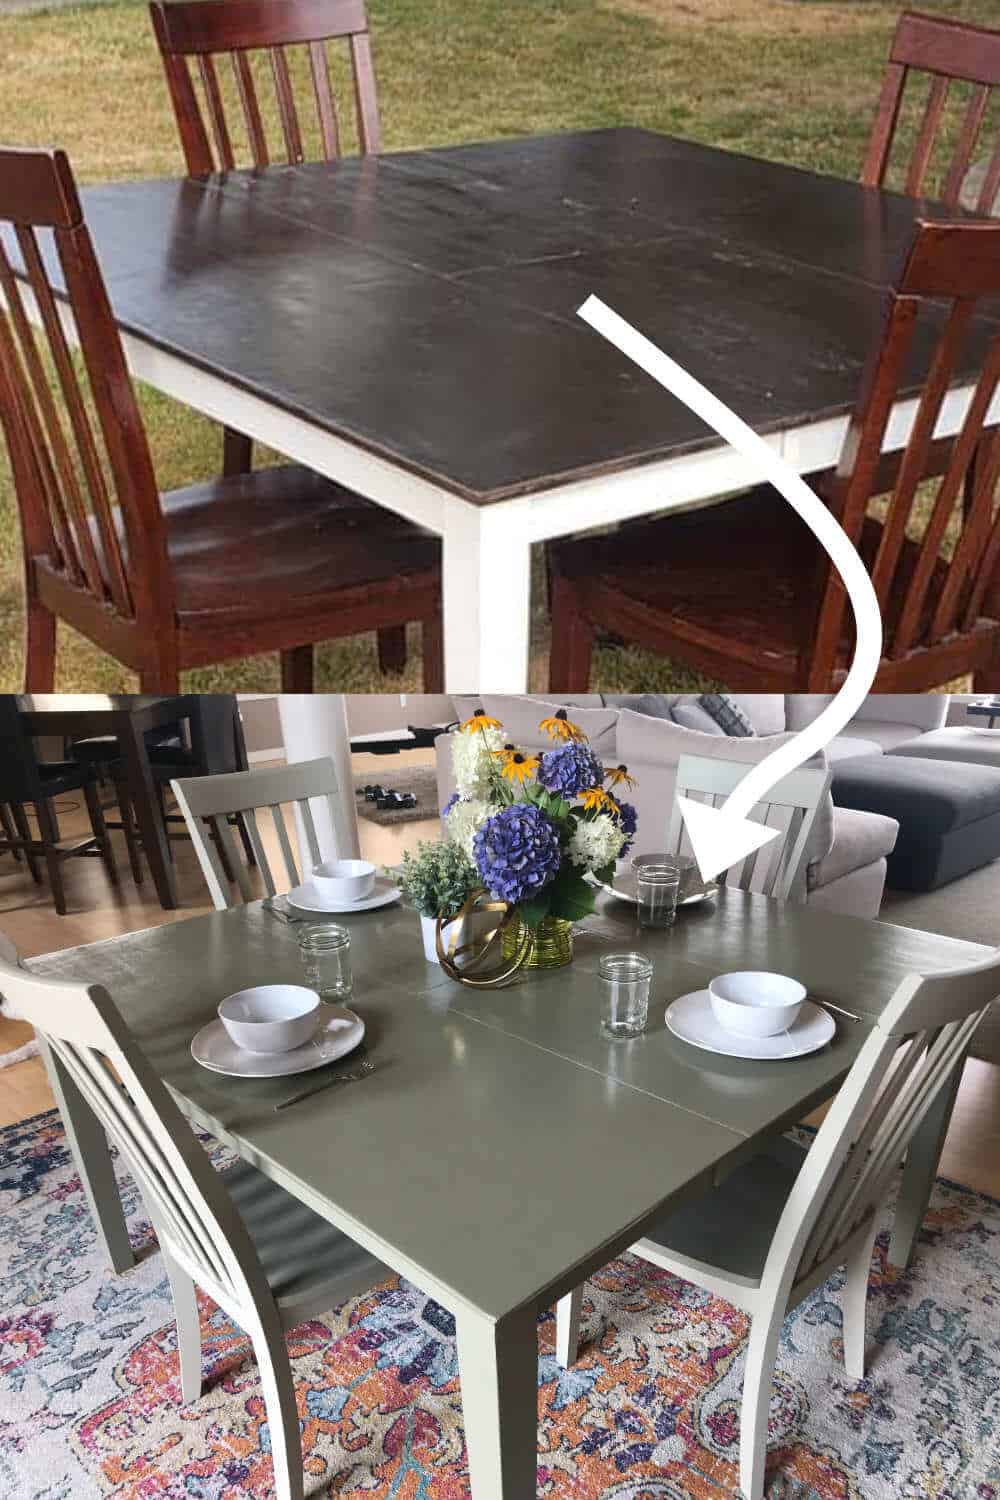
Image Source: sunshineandrainydays.com
Breathing New Life into Your Kitchen Table
Is your kitchen table looking a little tired? Scratched, faded, or just plain outdated? You don’t need to buy a new one! Repainting your kitchen table is a rewarding project that can save you money and give your kitchen a fresh new look. This kitchen table restoration guide will make the process simple, even for beginners. We’ll cover everything you need to know, from selecting the perfect color to applying the final protective coat. Get ready for a DIY table makeover that will make your old table look brand new!
Why Repaint Your Kitchen Table?
There are many reasons to embark on this project:
- Cost-Effective: Buying a new table can be expensive. Repainting is a fraction of the cost.
- Customization: You get to choose the exact color and finish to match your kitchen decor.
- Sustainability: It’s an eco-friendly way to reuse and update furniture instead of discarding it.
- Skill Building: It’s a great way to learn basic DIY skills.
- Satisfaction: There’s immense pride in transforming a piece of furniture yourself!
Choosing Your Paint: What’s the Best Option?
Selecting the right paint is crucial for a successful outcome. Here are some popular choices for updating kitchen table surfaces:
Latex Paint
- Pros: Water-based, easy to clean up, low VOCs (volatile organic compounds), available in a vast range of colors. Dries relatively quickly.
- Cons: Can chip if not properly prepped and sealed. Not as durable as some other options without a good topcoat.
- Best For: Those who want a wide color selection and easy cleanup. Requires a strong primer and a durable topcoat for kitchen table use.
Oil-Based Paint (Enamel)
- Pros: Extremely durable and hard-wearing, provides a smooth, hard finish. Great for high-traffic areas like a kitchen table.
- Cons: Strong odor, requires mineral spirits for cleanup, longer drying times, higher VOCs. Can yellow over time, especially in lighter colors.
- Best For: Durability is the top priority. The cleanup process is more involved.
Chalk Paint
- Pros: Requires minimal prep (often no sanding or priming needed), creates a matte, velvety finish, very forgiving for beginners. Excellent adhesion to most surfaces. Often used for a vintage or farmhouse look.
- Cons: Needs a protective topcoat (wax or polycrylic) to prevent scuffing and water damage. The matte finish might not be desired by everyone.
- Best For: A distressed or matte look, minimal prep time. The chalk paint kitchen table finish is very popular.
Milk Paint
- Pros: Creates a chippy, aged look, especially when used with a bonding agent or on raw wood. Natural, non-toxic ingredients.
- Cons: Can be unpredictable without a bonding agent, requiring more trial and error. Needs sealing.
- Best For: Achieving an antique, distressed aesthetic.
Spray Paint
- Pros: Quick application, can achieve a very smooth, even finish, especially on intricate details. Available in many finishes (matte, satin, gloss).
- Cons: Requires good ventilation and careful masking to avoid overspray. Can be challenging to get a perfectly even coat on large, flat surfaces without practice. Can be less durable than brushed-on paints unless specifically formulated for furniture.
- Best For: Creating a sleek, modern look or painting complex table legs. The spray paint kitchen table technique can be very effective if done correctly.
Cabinet and Furniture Paints (All-in-One)
- Pros: Formulated for durability and adhesion on furniture surfaces. Often self-priming and self-leveling, reducing brush strokes.
- Cons: Can be more expensive than standard latex paints. Color selection might be more limited.
- Best For: A balance of ease of use and durability. Many are specifically designed for kitchen cabinets, making them ideal for tables.
Planning Your Kitchen Table Repaint Project
Before you grab a brush, take some time to plan. This will save you headaches and ensure a beautiful end result.
Step 1: Assess Your Table
What is your table made of? Is it solid wood, veneer, or a laminate surface?
- Solid Wood: This is the easiest to work with. You can sand it down to bare wood if needed, and it accepts most types of paint well.
- Veneer: This is a thin layer of wood glued over a core material. Be careful when sanding, as you can sand through the veneer. Light scuff sanding is usually sufficient.
- Laminate/Melamine: These surfaces can be painted, but require specific primers and paints designed for adhesion to glossy or plastic-like surfaces.
Step 2: Decide on a Style and Color
Kitchen table paint ideas are abundant! Consider your current kitchen decor.
- Modern: Sleek whites, grays, blacks, or even bold accent colors.
- Farmhouse/Rustic: Whites, creams, muted blues, greens, or grays. Chalk paint is excellent here.
- Traditional: Deep woods (even if painted over), classic creams, or subtle hues.
- Color Combinations: Consider painting the tabletop a different color than the base or legs for visual interest.
Step 3: Gather Your Supplies
Having everything ready makes the process smooth.
- Paint: Your chosen type and color.
- Primer: Essential for good adhesion and color coverage, especially when painting dark to light or over slick surfaces.
- Topcoat/Sealer: (Polyurethane, Polycrylic, or Wax) for durability and protection.
- Sandpaper: Various grits (e.g., 80-120 for initial sanding/stripping, 150-220 for smoothing).
- Sanding Block or Electric Sander: For easier kitchen table sanding.
- Drop Cloths: To protect your work area.
- Painter’s Tape: For clean lines.
- Screwdriver or Wrench: To remove legs or hardware if needed.
- Cleaning Supplies: Mild soap, water, degreaser (like TSP substitute or Simple Green), clean rags.
- Paint Brushes: High-quality synthetic brushes for latex/acrylic, natural bristle brushes for oil-based paints. Foam rollers or good quality paint rollers for smooth surfaces.
- Paint Tray: For rollers.
- Safety Gear: Gloves, dust mask, eye protection.
- Optional: Wood filler for repairs, tack cloth for dust removal.
The Step-by-Step Repainting Process
Now, let’s get to work! Follow these steps for a professional-looking finish.
Step 1: Disassemble (If Necessary)
- If your table legs are removable, take them off. This makes painting much easier and allows you to get into all the nooks and crannies.
- Remove any hardware or decorative elements.
Step 2: Clean Thoroughly
This is a critical step for paint adhesion.
- Remove Debris: Wipe down the table with a damp cloth to remove dust and crumbs.
- Degrease: Use a mild detergent or a degreaser (like TSP substitute or Simple Green) mixed with water to remove any grease, grime, or food residue. Kitchen tables accumulate a lot of this!
- Rinse: Wipe down with a clean, damp cloth to remove any cleaning solution residue.
- Dry: Allow the table to dry completely.
Step 3: Repair Imperfections
- Fill Holes and Cracks: Use wood filler to fill any dents, scratches, or gouges.
- Sand Smooth: Once the wood filler is dry, sand it smooth with medium-grit sandpaper, then finish with fine-grit sandpaper until it’s flush with the surface.
Step 4: Sanding – The Key to a Lasting Finish
This is arguably the most important step for proper wood table refinishing. Even if you’re using chalk paint that claims “no prep,” a light scuff sand will always improve adhesion and durability.
Types of Sanding
- For Existing Paint/Varnish: If the old finish is in good condition, a light scuff sand with 150-220 grit sandpaper is usually enough to create a surface for the new paint to adhere to. If the old finish is peeling or damaged, you might need to sand down to bare wood using coarser grit paper (80-120), then progress to finer grits.
- For Bare Wood: If you’ve sanded down to bare wood, start with a coarser grit (like 80 or 100) to remove old finish and smooth rough spots. Then, move to medium grit (150) and finally fine grit (220) for a smooth surface.
- For Veneer: Use very light pressure and a fine-grit sandpaper (220) to avoid sanding through the veneer.
How to Sand
- By Hand: Use a sanding block for flat surfaces to ensure even pressure. Sand in the direction of the wood grain.
- With an Electric Sander: An orbital sander can speed up the process significantly, but be careful not to oversand, especially on veneers. Stick to the direction of the wood grain.
Kitchen Table Sanding Tips:
- Wear a Mask: Sanding creates fine dust. Protect your lungs!
- Clean As You Go: Wipe down the surface with a slightly damp cloth or use a shop vacuum with a brush attachment between grits to remove dust. This helps you see imperfections and prevents dust from clogging your sandpaper.
- Final Dust Removal: After your final sanding, use a vacuum and then a tack cloth. A tack cloth is sticky and picks up even the finest dust particles, ensuring a clean surface for priming.
Step 5: Priming
Primer is your best friend for a professional paint job. It helps the paint adhere better, covers stains, and ensures true color.
- Choose the Right Primer:
- All-Purpose Primer: Good for most situations.
- Stain-Blocking Primer: Essential if your table has dark stains or tannins that might bleed through paint (especially important for light colors).
- Adhesion Primer: Crucial for slick surfaces like laminate or previously lacquered furniture.
- Application:
- Stir the primer well.
- Apply a thin, even coat using a brush or roller. Avoid applying it too thickly, as it can lead to drips and an uneven finish.
- Allow the primer to dry completely according to the manufacturer’s instructions.
- Second Coat (Optional): For very dark wood or when painting a very light color over a dark base, a second coat of primer might be necessary for full coverage. Lightly sand with fine-grit sandpaper (220) between coats if needed, and always wipe with a tack cloth after sanding.
Step 6: Painting
Now for the fun part – applying the color!
- Stir, Don’t Shake: Stir your paint thoroughly. Shaking can create air bubbles.
- Thin Coats are Key: Apply thin, even coats. It’s better to do three thin coats than one thick one. Thin coats dry faster and are less prone to drips and brush marks.
- Brush Strokes: For tabletops, use a high-quality brush and apply paint in smooth, consistent strokes, following the direction of the wood grain. For legs and edges, use a brush to get into corners.
- Rolling: For large, flat surfaces like the tabletop, a foam roller or a good quality short-nap roller can provide a smoother finish than a brush.
- Drying Time: Allow each coat of paint to dry completely before applying the next. Check the paint can for recommended drying times between coats. This is crucial for durability.
- Sanding Between Coats (Optional but Recommended): For an ultra-smooth finish, lightly sand with very fine-grit sandpaper (220 or higher) between coats of paint. Always wipe away dust with a tack cloth. This step removes any minor imperfections or dried drips.
- Number of Coats: Most projects require 2-3 coats of paint for full coverage and an even finish.
Chalk Paint Kitchen Table Application:
If you’re using chalk paint, you can often skip the extensive sanding and priming. Apply thin coats, allowing each to dry. Once you have your desired coverage, you’ll need to apply a protective topcoat.
Spray Paint Kitchen Table Application:
- Ensure excellent ventilation and cover surrounding areas completely.
- Hold the can about 10-12 inches from the surface.
- Use smooth, even strokes, overlapping each pass by about 50%.
- Work in a well-lit area to avoid missing spots.
- Apply multiple thin coats rather than one heavy coat.
Step 7: Applying the Topcoat (Sealer)
This is vital for protecting your painted finish, especially on a kitchen table that sees a lot of use.
- Types of Topcoats:
- Polycrylic: Water-based, low odor, clear finish. Dries quickly and is very durable. Often preferred over polyurethane for lighter colors as it won’t yellow.
- Polyurethane (Water-Based or Oil-Based): Water-based is similar to polycrylic. Oil-based is more durable but can impart a slight amber tone, especially over white or light colors.
- Furniture Wax: Used primarily with chalk paint. Provides a soft, matte finish but is less durable than polycrylic or polyurethane and needs reapplication over time.
- Application:
- Ensure your paint is completely dry and cured (check paint can – often 24-72 hours after the last coat).
- Stir the topcoat gently; avoid shaking to prevent bubbles.
- Apply thin, even coats using a good quality synthetic brush or foam applicator.
- Allow each coat to dry completely according to the manufacturer’s instructions.
- Lightly sand with very fine-grit sandpaper (320 or higher) between coats and wipe with a tack cloth for a super smooth finish.
- Most projects require 2-3 coats of topcoat for adequate protection.
Step 8: Reassemble and Cure
- Once the final coat of topcoat is dry to the touch, reattach any legs or hardware you removed.
- Curing Time: Paint and topcoats continue to harden over days or even weeks. This is called “curing.” While you can use the table gently after 24-72 hours, avoid placing heavy items, sliding things across the surface, or harsh cleaning for at least 7 days (or as recommended by the paint manufacturer) to allow the finish to fully cure and reach maximum durability.
Kitchen Table Restoration vs. Repainting
While repainting is a form of restoration, kitchen table restoration can also refer to refinishing down to the bare wood and applying a new stain or clear coat.
- Repainting: Covers the original surface with a new color. Great for hiding imperfections or completely changing the look.
- Refinishing (Staining/Clear Coat): Enhances the natural beauty of the wood. Requires more intensive sanding to remove the old finish completely.
If your table has beautiful wood grain you want to showcase, wood table refinishing with stain and a protective clear coat might be a better option. However, for a dramatic change or to cover up significant damage, repainting is the way to go.
Furniture Painting Tips for a Professional Finish
- Work in a Well-Lit, Ventilated Area: Natural light is best. Open windows or use fans to ensure good airflow.
- Use Quality Tools: Cheap brushes and rollers can leave streaks and an uneven finish. Invest in good quality tools.
- Don’t Rush: Allow adequate drying time between coats. Patience is key to a durable and beautiful finish.
- Test Colors: If you’re unsure about a color, buy a small sample pot and paint a swatch on the underside of the table or on a piece of cardboard to see how it looks in your kitchen lighting.
- Consider a Sealer: Always use a protective topcoat for a kitchen table to prevent scratches and water damage.
- Clean Brushes Immediately: Wash your brushes and rollers thoroughly with water (for latex/acrylic) or mineral spirits (for oil-based) as soon as you finish. This makes them reusable.
Updating Kitchen Table – Common Challenges and Solutions
| Challenge | Solution |
|---|---|
| Brush Strokes Visible | Use a high-quality synthetic brush, thin coats, and paint in the direction of the wood grain. Consider a foam roller for tabletops. Lightly sand between coats. |
| Paint Not Adhering | Ensure proper cleaning and degreasing. Use a high-quality primer designed for the surface type. Lightly scuff sand the surface before priming if it’s glossy. |
| Drips and Runs | Apply thin coats. Avoid overloading your brush or roller. Wipe excess paint from your brush before applying. Remove drips immediately with your brush or a clean rag. |
| Scratches and Chips | Thorough sanding and priming are essential. Apply multiple thin coats of paint and a durable topcoat (polycrylic or polyurethane). Allow sufficient curing time. |
| Uneven Color Coverage | Apply thin, even coats. Ensure consistent application. A second coat of primer might be needed. Stir paint frequently during application. |
| Table Has a High-Gloss Finish | Use an adhesion primer specifically designed for glossy surfaces. Scuff sand thoroughly with 220-grit sandpaper to create a “tooth” for the primer to grip. |
Frequently Asked Questions (FAQ)
Q1: Can I paint over a stained kitchen table?
A1: Yes, you can paint over a stained table. The key is thorough cleaning, sanding to create a dull surface, and using a good quality primer. If the stain is very dark, you might need a stain-blocking primer to prevent it from showing through your new paint color.
Q2: What is the best paint finish for a kitchen table?
A2: For durability and ease of cleaning, a satin or semi-gloss finish is generally recommended for kitchen tables. Matte finishes can be beautiful but are more prone to showing wear and can be harder to wipe clean.
Q3: Do I really need to sand?
A3: Yes, sanding is crucial for most paint projects, even if you’re using chalk paint. Sanding creates a “tooth” on the surface, allowing the primer and paint to adhere properly, leading to a more durable finish. Even a light scuff sand with fine-grit sandpaper is highly recommended.
Q4: How long does it take to repaint a kitchen table?
A4: The actual painting time might only be a few hours, but the entire process, including drying and curing times between coats, can take several days to a week or more. Patience is key!
Q5: Can I use spray paint on my kitchen table?
A5: Yes, spray paint can be used on kitchen tables, especially for achieving a very smooth, factory-like finish. Ensure good ventilation, proper masking, and apply multiple thin coats for best results.
Q6: How do I protect my freshly painted kitchen table?
A6: Apply 2-3 coats of a durable topcoat like polycrylic or polyurethane. Allow the paint to cure fully before subjecting the table to heavy use.
By following these steps, you can achieve a beautiful, durable, and customized look for your kitchen table, breathing new life into your dining space with your very own DIY table makeover. Happy painting!